window OPEL ASTRA K 2020 Manual user
[x] Cancel search | Manufacturer: OPEL, Model Year: 2020, Model line: ASTRA K, Model: OPEL ASTRA K 2020Pages: 305, PDF Size: 27.84 MB
Page 151 of 305

Climate control149Automatic air recirculationAn air humidity sensor switches
automatically to external air if internal air humidity is too high.
Basic settings
Some settings can be changed in the Settings menu in the Info Display.
Vehicle personalisation 3 124.
Auxiliary heater
Air heater Quickheat is an electric auxiliary air
heater which automatically warms up
the passenger compartment more
quickly.Air vents
Adjustable air vents At least one air vent must be open
while cooling is on.
To open the vent, turn the adjuster
wheel towards the bigger W symbol.
Adjust the air amount at the vent
outlet by turning the adjuster wheel.
Direct the flow of air by tilting and
swivelling the slats.
To close the vent, turn the adjuster
wheel towards the smaller W symbol.
9 Warning
Do not attach any objects to the
slats of the air vents. Risk of
damage and injury in case of an
accident.
Fixed air vents
Additional air vents are located
beneath the windscreen and door windows and in the foot wells.
Page 157 of 305
Driving and operating155
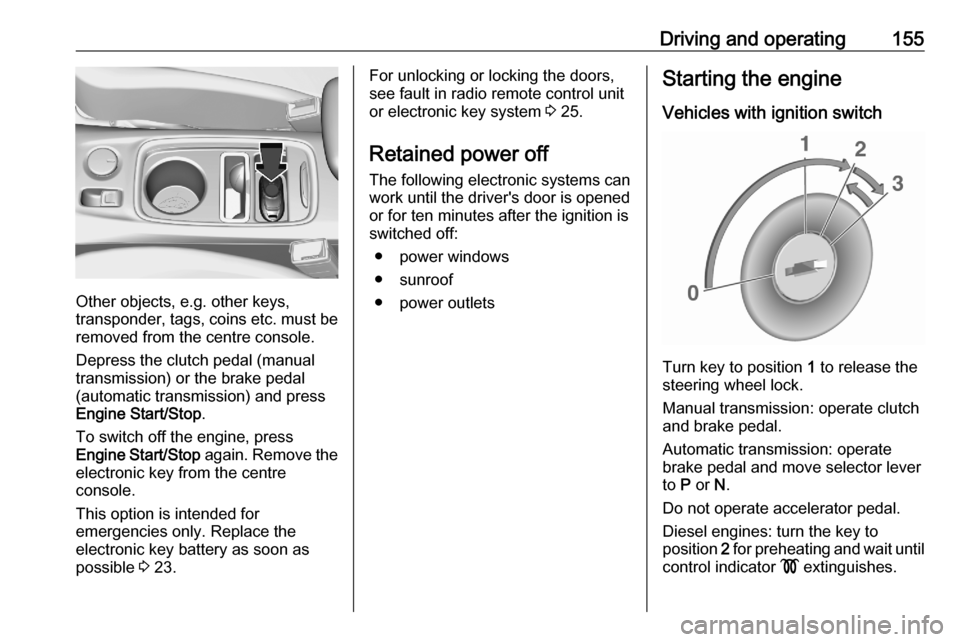
Other objects, e.g. other keys,
transponder, tags, coins etc. must be removed from the centre console.
Depress the clutch pedal (manual
transmission) or the brake pedal
(automatic transmission) and press
Engine Start/Stop .
To switch off the engine, press
Engine Start/Stop again. Remove the
electronic key from the centre
console.
This option is intended for
emergencies only. Replace the
electronic key battery as soon as
possible 3 23.
For unlocking or locking the doors,
see fault in radio remote control unit
or electronic key system 3 25.
Retained power off
The following electronic systems can
work until the driver's door is opened
or for ten minutes after the ignition is
switched off:
● power windows
● sunroof
● power outletsStarting the engine
Vehicles with ignition switch
Turn key to position 1 to release the
steering wheel lock.
Manual transmission: operate clutch
and brake pedal.
Automatic transmission: operate
brake pedal and move selector lever
to P or N.
Do not operate accelerator pedal.
Diesel engines: turn the key to
position 2 for preheating and wait until
control indicator ! extinguishes.
Page 161 of 305

Driving and operating159● The driver's door is closed or thedriver's seat belt is fastened.
● The vehicle battery is sufficiently charged and in good condition.
● The engine is warmed up.
● The engine coolant temperature is not too high.
● The engine exhaust temperature is not too high, e.g. after driving
with high engine load.
● The ambient temperature is above -5 °C.
● The brake vacuum is sufficient.
● Between the last restart and a new Autostop must be about10 seconds.
● The self-cleaning function of the exhaust filter is not active.
● The vehicle was driven at least at
walking speed since the last
Autostop.
Otherwise an Autostop will be
inhibited.
The stop-start system will be
deactivated on inclines of 12% or
more.Certain settings of the climate control
system may inhibit an Autostop. See
Climate control chapter for more
details 3 141.
Immediately after motorway driving
an Autostop may be inhibited.
New vehicle running-in 3 152.
Vehicle battery discharge protection
To ensure reliable engine restarts,
several vehicle battery discharge
protection features are implemented
as part of the stop-start system.
Power saving measures
During an Autostop, several electrical
features e.g. auxiliary electric heater
or heated rear window are disabled or switched to a power saving mode.
The fan speed of the climate control
system is reduced to save power.
Restart of the engine by the driverVehicles with manual transmission
Depending on the engine, two
versions of a restart are available.
See engine data to identify the engine
identifier code for your vehicle
3 280.Conventional restart
Depress the clutch pedal to restart the
engine. For engines with late restart,
this is only possible without
depressing the brake pedal.
Late restart ● Depress the brake pedal.
● Depress the clutch pedal.
● Select first gear.
● Release the brake pedal to restart the engine.Vehicles with automatic transmission:Release the brake pedal or move
selector lever out of D into N or P to
restart the engine.
Restart of the engine by the stop-
start system
On vehicles with manual transmission
which are in a conventional Autostop,
the selector lever must be in neutral
to enable an automatic restart.
On vehicles with manual transmission
which are in an early Autostop, an
automatic restart is possible, when
not in neutral if the brake pedal and
the clutch pedal are depressed.
Page 163 of 305
Driving and operating161vehicles with power button.
Turn the front wheels towards
the kerb.
● Close the windows and the sunroof.
● Remove the ignition key from the ignition switch or switch off
ignition on vehicles with power
button. Turn the steering wheel until the steering wheel lock is
felt to engage.
For vehicles with automatic
transmission, the key can only
be removed when the selector
lever is in position P.
● Lock the vehicle by pressing the
button on the door handle or the
button e on the remote control.
● Activate the anti-theft alarm system.
● The engine cooling fans may run
after the engine has been
switched off 3 224.
Caution
After running at high engine
speeds or with high engine loads,
operate the engine briefly at a low load or run in neutral for
approx. 30 seconds before
switching off, in order to protect
the turbocharger.
Note
In the event of an accident with
airbag deployment, the engine is
switched off automatically if the
vehicle comes to a standstill within a
certain time.
In countries with extreme cold
temperatures it may be necessary to
park the vehicle without applied
parking brake. Make sure to park the vehicle on a level surface.
Engine exhaust9 Danger
Engine exhaust gases contain
poisonous carbon monoxide,
which is colourless and odourless and could be fatal if inhaled.
If exhaust gases enter the interior
of the vehicle, open the windows.
Have the cause of the fault
rectified by a workshop.
Avoid driving with an open load
compartment, otherwise exhaust
gases could enter the vehicle.
Exhaust filter
The exhaust filter is a particle filter for diesel and petrol engines.
Page 164 of 305

162Driving and operatingAutomatic cleaning process
The exhaust filter system filters soot
particles out of the exhaust gases.
The system includes a self-cleaning
function that runs automatically
during driving without any notification.
The filter is cleaned by periodically
burning off the soot particles at high
temperature. This process takes
place automatically under set driving
conditions and may take up to
25 minutes. Typically it needs
between 7 and 12 minutes. Autostop
is not available and fuel consumption may be higher during this period. The
emission of smells and smoke during
this process is normal.
System requires cleaning
Under certain conditions, e.g. driving
short distances, the system cannot
clean itself automatically.
If cleaning of the filter is required and if previous driving conditions did not
enable automatic cleaning, it will be
indicated by a warning message in
the Driver Information Centre.A warning message appears when
exhaust filter is full. Start cleaning
process as soon as possible.
A warning message also appears
when exhaust filter has reached the
maximum filling level. Start cleaning
process immediately to avoid
damage to the engine.
Activate self-cleaning process
Cleaning process is completed more
quickly at high engine speeds and
loads. Therefore, drive in lower gears
than normal, and use manual gear
selection on vehicles with automatic
transmission. Usage of electrical consumers like air conditioning and
heated windows to increase engine
load supports cleaning process.Caution
If possible, do not interrupt
cleaning process. Drive until
cleaning is completed to avoid the
need for service or repair by a
workshop.
Vehicles with petrol engine
To activate cleaning process,
continue driving, keep engine speed
above 2500 rpm. Shift down if
necessary.
Drive dynamically at different engine
speeds. Use engine brake for
deceleration, if possible.
Keep on driving until self-cleaning
operation is complete and the display
message disappears.Vehicles with diesel engine
To activate cleaning process,
continue driving, keep engine speed
above 2000 rpm, ideally and
continuously around 2500 rpm. Shift
down if necessary.
Keep on driving until self-cleaning
operation is complete and the display message disappears.
Page 225 of 305
Vehicle care223Caution
When transporting the vehicle on
a train or on a recovery vehicle, the
mud flaps might be damaged.
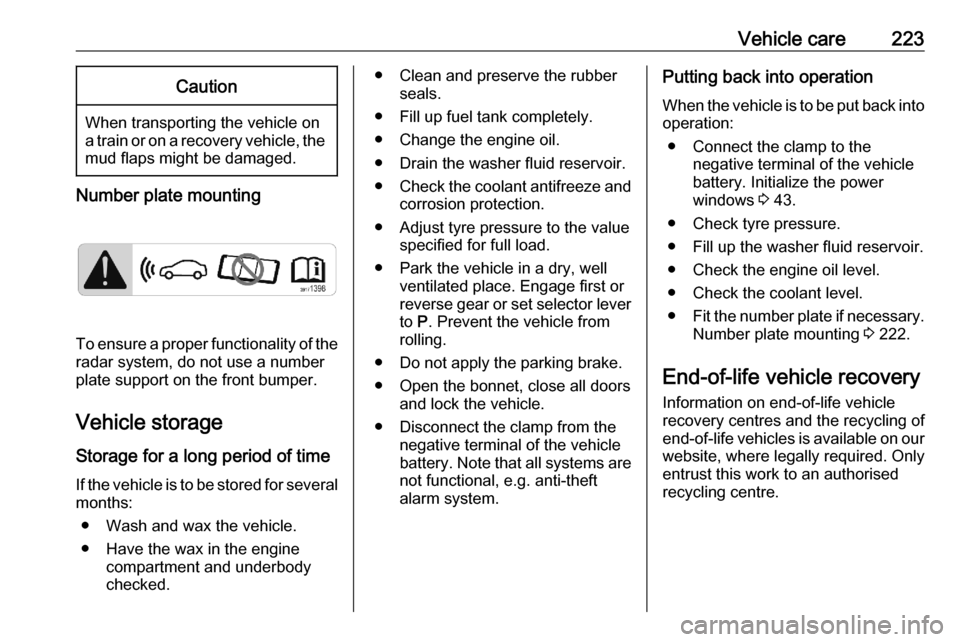
Number plate mounting
To ensure a proper functionality of the
radar system, do not use a number
plate support on the front bumper.
Vehicle storage Storage for a long period of timeIf the vehicle is to be stored for several
months:
● Wash and wax the vehicle.
● Have the wax in the engine compartment and underbody
checked.
● Clean and preserve the rubber seals.
● Fill up fuel tank completely.
● Change the engine oil.
● Drain the washer fluid reservoir.
● Check the coolant antifreeze and
corrosion protection.
● Adjust tyre pressure to the value specified for full load.
● Park the vehicle in a dry, well ventilated place. Engage first or
reverse gear or set selector lever
to P. Prevent the vehicle from
rolling.
● Do not apply the parking brake.
● Open the bonnet, close all doors and lock the vehicle.
● Disconnect the clamp from the negative terminal of the vehicle
battery. Note that all systems are
not functional, e.g. anti-theft
alarm system.Putting back into operation
When the vehicle is to be put back into
operation:
● Connect the clamp to the negative terminal of the vehicle
battery. Initialize the power
windows 3 43.
● Check tyre pressure.
● Fill up the washer fluid reservoir.
● Check the engine oil level.
● Check the coolant level.
● Fit the number plate if necessary.
Number plate mounting 3 222.
End-of-life vehicle recovery Information on end-of-life vehicle
recovery centres and the recycling of
end-of-life vehicles is available on our website, where legally required. Only
entrust this work to an authorised
recycling centre.
Page 231 of 305
Vehicle care229when using a battery charger.
Otherwise the vehicle battery may be damaged.
Jump starting 3 263.
Discharge protection
Battery voltage
When the vehicle battery voltage is running low, a warning message will
appear in the Driver Information
Centre.
When the vehicle is being driven, the
load reduction function temporarily
deactivates certain functions, e.g. the heated rear window.
The deactivated functions are
reactivated automatically as soon as
conditions permit.
Idle boost
If charging of the vehicle battery is
required due to battery condition, the
power output of the generator must
be increased. This will be achieved by
an idle boost which may be audible.
A message appears in the Driver
Information Centre.
Power outlet
The power outlets are deactivated in
the event of low vehicle battery
voltage.
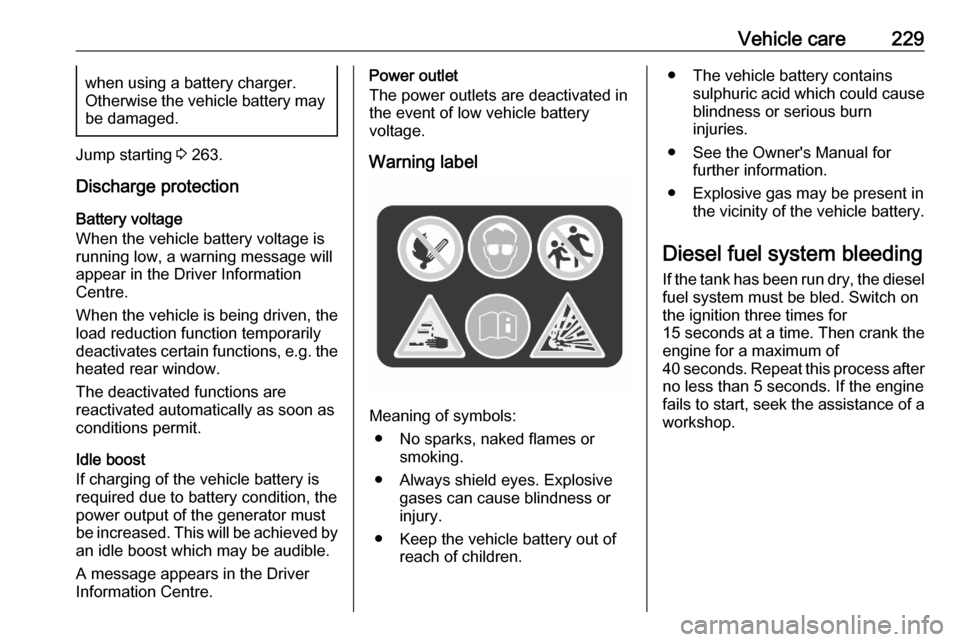
Warning label
Meaning of symbols: ● No sparks, naked flames or smoking.
● Always shield eyes. Explosive gases can cause blindness or
injury.
● Keep the vehicle battery out of reach of children.
● The vehicle battery containssulphuric acid which could cause
blindness or serious burn
injuries.
● See the Owner's Manual for further information.
● Explosive gas may be present in the vicinity of the vehicle battery.
Diesel fuel system bleeding If the tank has been run dry, the diesel
fuel system must be bled. Switch on
the ignition three times for
15 seconds at a time. Then crank the
engine for a maximum of 40 seconds. Repeat this process after
no less than 5 seconds. If the engine fails to start, seek the assistance of a
workshop.
Page 232 of 305
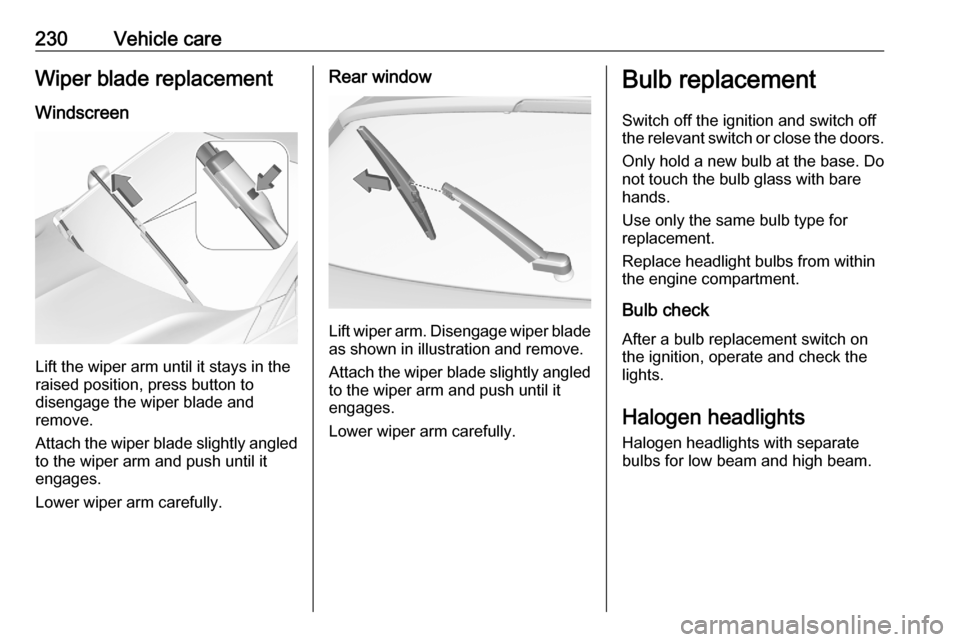
230Vehicle careWiper blade replacementWindscreen
Lift the wiper arm until it stays in the
raised position, press button to
disengage the wiper blade and
remove.
Attach the wiper blade slightly angled
to the wiper arm and push until it
engages.
Lower wiper arm carefully.
Rear window
Lift wiper arm. Disengage wiper blade as shown in illustration and remove.
Attach the wiper blade slightly angled
to the wiper arm and push until it
engages.
Lower wiper arm carefully.
Bulb replacement
Switch off the ignition and switch off
the relevant switch or close the doors.
Only hold a new bulb at the base. Do not touch the bulb glass with bare
hands.
Use only the same bulb type for
replacement.
Replace headlight bulbs from within
the engine compartment.
Bulb check
After a bulb replacement switch on
the ignition, operate and check the
lights.
Halogen headlights Halogen headlights with separate
bulbs for low beam and high beam.
Page 245 of 305

Vehicle care243No.Circuit16Fuel injection17Fuel injection18Diesel exhaust system19–20–21–22ABS23Washer system for windscreen
and rear window24–25Diesel fuel heating26Transmission control module27Power tailgate module28–29Heated rear window30Mirror defrost31–No.Circuit32DC transformer / LED display /
Electrical heater / Climate
control / Glow plug controller33–34Horn35Engine control module36Right high beam (Halogen, Eco
LED) / Right low beam (LED)37Left high beam (Halogen, Eco
LED)38LED headlight / Automatic
headlight range adjustment39Front fog light40Central Gateway Module41–42Manual headlight range adjust‐
ment43Fuel pump44Rear view camera / Inside rear
view mirror / Trailer moduleNo.Circuit45LED headlight left / Automatic
headlight range adjustment left46Instrument cluster47Steering column lock48Rear wiper49Outside rearview mirror50LED headlight right / Automatic
headlight range adjustment
right51Left low beam (LED)52Engine control module / Trans‐
mission control module53Windscreen wiper54Windscreen wiper55Diesel Exhaust system56–57–
After having changed defective fuses,
close the fuse box cover and press
until it engages.
Page 246 of 305
244Vehicle careIf the fuse box cover is not closed
correctly, malfunction may occur.
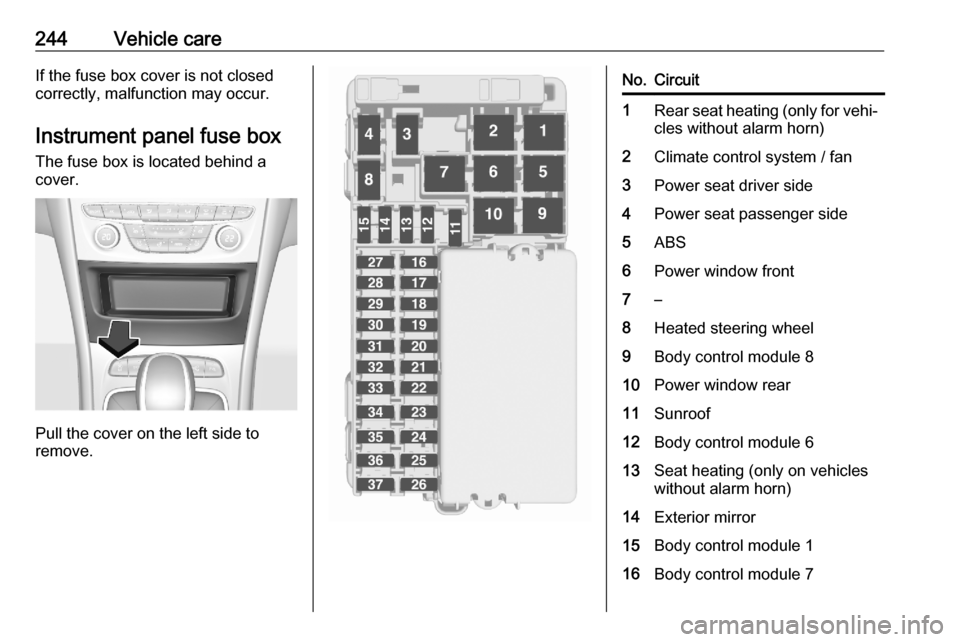
Instrument panel fuse box The fuse box is located behind a
cover.
Pull the cover on the left side to
remove.
No.Circuit1Rear seat heating (only for vehi‐ cles without alarm horn)2Climate control system / fan3Power seat driver side4Power seat passenger side5ABS6Power window front7–8Heated steering wheel9Body control module 810Power window rear11Sunroof12Body control module 613Seat heating (only on vehicles
without alarm horn)14Exterior mirror15Body control module 116Body control module 7