park assist OPEL ASTRA SALOON 2014 Owners Manual
[x] Cancel search | Manufacturer: OPEL, Model Year: 2014, Model line: ASTRA SALOON, Model: OPEL ASTRA SALOON 2014Pages: 245, PDF Size: 7.12 MB
Page 100 of 245
98Instruments and controls
Flashes with switched on
ignition
Fault in the immobiliser system. The
engine cannot be started 3 32.
Switch off the ignition and repeat the
start attempt.
If the control indicator continues
flashing, attempt to start the engine
using the spare key and seek the
assistance of a workshop.
Brake and clutch system R illuminates or flashes red.
Illuminated
Illuminates after the ignition is
switched on if the parking brake is
applied 3 147.
Illuminates when the parking brake is
released if the brake and clutch fluid
level is too low 3 164.9 Warning
Stop. Do not continue your
journey. Consult a workshop.
Flashes
On vehicle with automated manual
transmission, flashes for a few
seconds when the ignition is switched
off if the parking brake is not applied.
On vehicles with automated manual
transmission, flashes when the
driver's door is opened if no gear is
engaged and the parking brake is not
applied.
Antilock brake system
(ABS) u illuminates red.
Illuminates for a few seconds after the ignition is turned on. The system is
ready for operation when the control indicator goes out.
If the control indicator does not go out after a few seconds, or if it illuminates
while driving, there is a fault in the
ABS. The brake system remains
operational but without ABS
regulation.
Antilock Brake System 3 146.Sport mode
1 illuminates yellow.
The symbol is illuminated when Sport
mode is on 3 139, 3 143.
Winter mode
T illuminates yellow.
The symbol is illuminated when
Winter mode is on 3 139, 3 143.
Ultrasonic parking assist
r illuminates or flashes yellow.
Illuminates
Fault in system. Have the cause of the fault remedied by a workshop.
Flashes Fault due to sensors that are dirty or
covered by ice or snow.
or
Interference due to external sources of ultrasound. Once the source of
interference is removed, the system
will operate normally.
Page 147 of 245
Driving and operating145
A illuminates in the event of a fault.
Continued driving is possible. Manual
mode cannot be used for shifting.
If F appears in the transmission
display, continued driving is not
possible.
Have the cause of the fault remedied
by a workshop.
Interruption of power
supply
The clutch is not disengaged if there is an interruption of the power supply
when a gear is engaged. The vehicle
cannot move.
If the battery is discharged, start the
vehicle using jump leads 3 200.
If the cause of the fault is not a
discharged battery, seek the
assistance of a workshop.
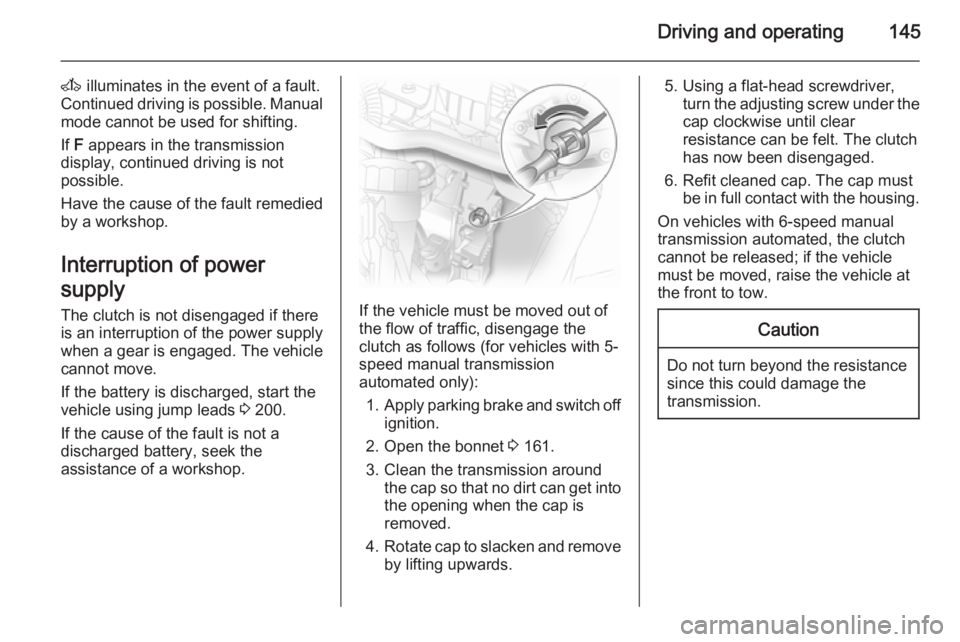
If the vehicle must be moved out of the flow of traffic, disengage the
clutch as follows (for vehicles with 5-
speed manual transmission
automated only):
1. Apply parking brake and switch off
ignition.
2. Open the bonnet 3 161.
3. Clean the transmission around the cap so that no dirt can get intothe opening when the cap is
removed.
4. Rotate cap to slacken and remove
by lifting upwards.
5. Using a flat-head screwdriver, turn the adjusting screw under the
cap clockwise until clear
resistance can be felt. The clutch
has now been disengaged.
6. Refit cleaned cap. The cap must be in full contact with the housing.
On vehicles with 6-speed manual
transmission automated, the clutch cannot be released; if the vehicle
must be moved, raise the vehicle at
the front to tow.Caution
Do not turn beyond the resistance since this could damage the
transmission.
Page 149 of 245
Driving and operating147
Fault9Warning
If there is a fault in the ABS, the
wheels may be liable to lock due
to braking that is heavier than
normal. The advantages of ABS are no longer available. During
hard braking, the vehicle can no longer be steered and may
swerve.
Have the cause of the fault remedied
by a workshop.
Parking brake Always apply parking brake firmly
without operating the release button,
and apply as firmly as possible on a
downhill or uphill slope.
To release the parking brake, pull the lever up slightly, press the release
button and fully lower the lever.
To reduce the operating forces of the
parking brake, depress the foot brake
at the same time.
Control indicator R 3 98.
Brake assist
If the brake pedal is depressed quickly and forcefully, maximum
brake force is automatically applied
(full braking).
Maintain steady pressure on the brake pedal for as long as full braking
is required. Maximum brake force is
automatically reduced when the
brake pedal is released.
Hill start assist The system helps prevent unintendedmovement when driving away on
inclines.
When releasing the foot brake after
stopping on an incline, the brakes
remain on for a further two seconds.
The brakes release automatically as
soon as the vehicle begins to
accelerate.Ride control systems
Electronic stability
program
Electronic stability program
(ESP® Plus
) improves driving stability
when necessary, regardless of the
type of road surface or tyre grip. It also prevents the drive wheels from
spinning.
As soon as the vehicle starts to
swerve (understeer/oversteer),
engine output is reduced and the
wheels are braked individually. This
considerably improves the driving
stability of the vehicle on slippery road
surfaces.
ESP® Plus
is operational as soon as
control indicator v extinguishes.
When ESP® Plus
comes into action v
flashes.
Page 152 of 245
150Driving and operating
With automatic transmission or
manual transmission automated, only
activate cruise control in automatic
mode.
Control indicator m 3 102.
Activation
Briefly press the m button: the current
speed is stored and maintained.
Vehicle speed can be increased by
depressing the accelerator pedal.
When the accelerator pedal is
released, the previously stored speed is resumed.
The speed is saved until the ignition
is switched off.
To resume the saved speed, briefly
press the g button at a speed above
30 km/h.
Increase speed
With cruise control active, hold down
button m or briefly press it repeatedly:
speed is increased continuously or in small increments.
When button m is released the
current speed is stored and
maintained.Reduce speed
With cruise control active, hold down button g or briefly press it repeatedly:
speed is reduced continuously or in
small increments.
When button g is released the current
speed is stored and maintained.
Deactivation
Briefly press the § button: cruise
control is deactivated.
Automatic deactivation: ■ Vehicle speed below approx. 30 km/h
■ The brake pedal is depressed
■ The clutch pedal is depressed
■ Selector lever in N.Object detection
systems
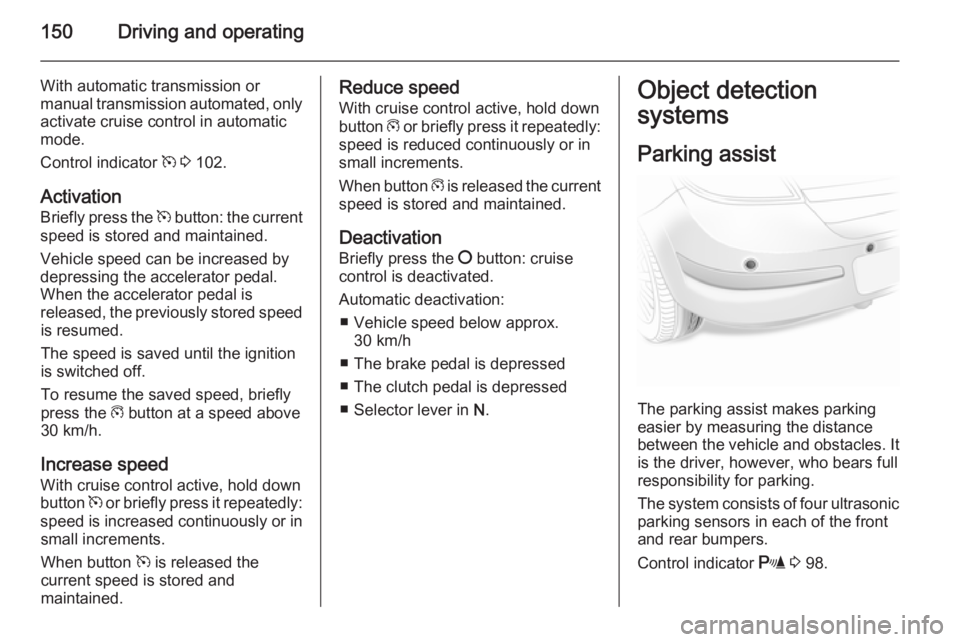
Parking assist
The parking assist makes parking
easier by measuring the distance between the vehicle and obstacles. It
is the driver, however, who bears full
responsibility for parking.
The system consists of four ultrasonic parking sensors in each of the front
and rear bumpers.
Control indicator r 3 98.
Page 153 of 245

Driving and operating151
Note
Attached parts in the detection area
cause system malfunction.
Activation
When reverse gear is engaged, the
system switches itself on
automatically.
The system can also be activated at
low speed by pressing the r button.
An obstacle is indicated by buzzers.
The interval between the buzzers
becomes shorter as the vehicle gets closer to the obstacle. When the
distance is less than 30 cm, the buzzer is continuous.
9 Warning
Under certain circumstances,
various reflective surfaces on
objects or clothing as well as
external noise sources may cause the system to fail to detect
obstacles.
Deactivation
Deactivate the system by pressing
the r button.
The system deactivates automatically
when reverse gear is disengaged.
Towing equipment The system automatically detects
factory-fitted towing equipment.
When towing, plugging the trailer
cable into the socket automatically
switches the parking assist off.
Fuel
Fuel for petrol engines
Only use unleaded fuel that complies
with European standard EN 228 or
E DIN 51626-1 or equivalent.
Your engine is capable to run with
E10 fuel that fulfills these standards.
E10 fuel contains up to 10 %
bioethanol.
Use fuel with the recommended
octane rating 3 216. Use of fuel with
too low an octane rating can reduce
engine power and torque and slightly increases fuel consumption.Caution
Do not use fuel or fuel additives
that contain metallic compounds
such as manganese-based
additives. This may cause engine
damage.
Page 188 of 245
186Vehicle care
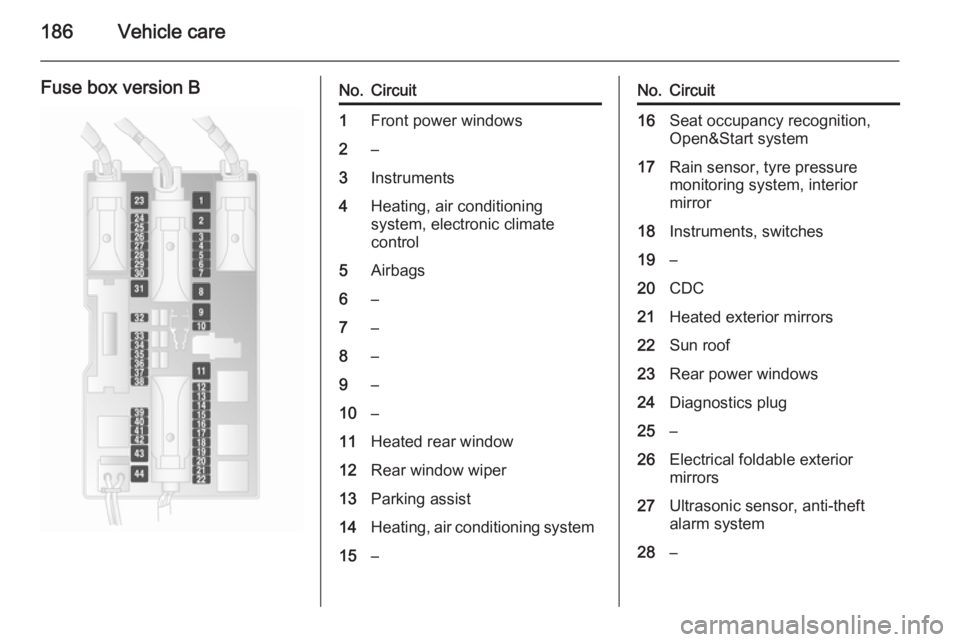
Fuse box version BNo.Circuit1Front power windows2–3Instruments4Heating, air conditioning
system, electronic climate
control5Airbags6–7–8–9–10–11Heated rear window12Rear window wiper13Parking assist14Heating, air conditioning system15–No.Circuit16Seat occupancy recognition,
Open&Start system17Rain sensor, tyre pressure
monitoring system, interior
mirror18Instruments, switches19–20CDC21Heated exterior mirrors22Sun roof23Rear power windows24Diagnostics plug25–26Electrical foldable exterior
mirrors27Ultrasonic sensor, anti-theft
alarm system28–
Page 190 of 245
188Vehicle care
TwinTop
The tools for emergency operation of
the convertible hardtop are stowed in
the glove compartment.Wheels and tyres
Tyre condition, wheel condition
Drive over edges slowly and at right
angles if possible. Driving over sharp
edges can cause tyre and wheel
damage. Do not trap tyres on the kerb when parking.
Regularly check the wheels for
damage. Seek the assistance of a
workshop in the event of damage or
unusual wear.
Tyres
Tyres of size 225/45 R 17 are only
permitted if the vehicle is equipped
with electronic stability program.Astra OPC "Nürburgring
Edition" with tyres 225/40 ZR 18
This model is factory-fitted with high-
performance sports tyres, size
225/40 ZR 18. These tyres are
approved for use on public roads but
have typical racing characteristics
and a correspondingly shallow tread.
The tyres provide sportily oriented
and experienced drivers with better
performance at faster speeds on dry
road surfaces but can cause the
vehicle to break away without
warning if this limit is exceeded. Avoid adopting a risky driving style because
of this improved performance. In wet conditions adapt your driving style
and speed to the shallow tread.
Winter tyres Winter tyres improve driving safety at
temperatures below 7 °C and should
therefore be fitted on all wheels.
Page 198 of 245
196Vehicle care
Drain excess tyre pressure with
the button over the pressure indicator.
Do not run the compressor longer than 10 minutes.
14. Detach the tyre repair kit. Screw the filler hose to the free
connection on the sealant bottle.
This prevents sealant leakage.
Stow the tyre repair kit in the load
compartment.
15. Remove any excess sealant using a cloth.
16. Take the label indicating maximum permitted speed from
the sealant bottle and affix in the
driver's field of view.
17. Continue driving immediately so that sealant is evenly distributed
in the tyre. After driving approx.
10 km (but no more than
10 minutes), stop and check tyre
pressure. Screw compressor air
hose directly onto tyre valve and
compressor when doing this.
If tyre pressure is more than
1.3 bar , set it to the correct value.Repeat the procedure until there
is no more loss of pressure.
If the tyre pressure has fallen
below 1.3 bar, the vehicle must
not be used. Seek the assistance
of a workshop.
18. Stow away tyre repair kit in load compartment.
Note
The driving characteristics of the
repaired tyre is severely affected,
therefore have this tyre replaced.
If unusual noise is heard or the
compressor becomes hot, turn
compressor off for at least 30
minutes.
The built-in safety valve opens at a
pressure of 7 bar.
Note the expiry date of the kit. After
this date its sealing capability is no
longer guaranteed. Pay attention to
storage information on sealant
bottle.
Replace the used sealant bottle. Dispose of the bottle as prescribed
by applicable laws.The compressor and sealant can be used from approx. -30 °C.
The adapters supplied can be used
to pump up other items e.g.
footballs, air mattresses, inflatable
dinghies etc. They are located on the underside of the compressor. To
remove, screw on compressor air
hose and withdraw adapter.
Wheel changing Some vehicles are equipped with a
tyre repair kit instead of a spare wheel 3 193.
Make the following preparations and
observe the following information:
■ Park the vehicle on a level, firm and
non-skid surface. The front wheels
must be in the straight-ahead
position.
■ Apply the parking brake and engage first gear, reverse gear or
P .
■ Remove the spare wheel 3 198.
■ On the Astra TwinTop, the roof must be closed before the vehicle
is raised.
Page 242 of 245
240
Headlight flash ........................... 118
Headlight range adjustment ......118
Headlights................................... 117 Headlights when driving abroad 118
Head restraint adjustment .............8
Head restraints ............................ 47
Heated mirrors ............................. 34
Heated rear window ..................... 38
Heating ........................................ 53
Heating and ventilation system . 124
High beam ......................... 101, 118
Hill start assist ........................... 147
Horn ....................................... 14, 87
I
Identification plate .....................212
Ignition switch positions .............133
Immobiliser .................................. 32
Indicators ...................................... 93
Information displays.................... 102
Instrument cluster ........................93
Instrument panel illumination .....180
Instrument panel illumination control .................................... 121
Instrument panel overview ........... 10
Interactive driving system ...........148
Interactive driving system, continuous damping control,
sport mode .............................. 100
Interior care ............................... 205Interior lighting............................ 121
Interior lights ...................... 121, 180
Interior mirrors .............................. 34
Interruption of power supply 140, 145
Introduction .................................... 3
Isofix child restraint systems ........ 65
J Jump starting ............................. 200
K Keys ............................................. 20
Keys, locks ................................... 20
Keys, memorised settings ............22
L
Lashing eyes ............................... 75
Lighting ...................................... 111
Lighting features .........................122
Light switch ................................ 117
Load compartment ................28, 68
Load compartment cover .............73
Load compartment fuse box ......185
Load compartment grille ...............80
Loading assist .............................. 77
Loading information .....................84
Load rails and hooks ...................75
Low engine oil level ...................100
Low fuel ..................................... 100M
Malfunction indicator light ............97
Manual adjustment ......................32
Manual anti-dazzle ......................34
Manual mode .....................138, 143
Manual transmission .................. 141
Manual transmission automated 142
Memorised settings ......................22
Mirror adjustment ........................... 9
Misted light covers .....................121
N
New vehicle running-in ..............132
Number plate light .....................179
O Object detection systems ...........150
Odometer ..................................... 93
Oil, engine .......................... 208, 213
Open&Start system .............22, 101
Outside temperature ....................89
Overrun cut-off ........................... 134
P Parking ................................ 18, 134
Parking assist ............................ 150
Parking brake ............................ 147
Parking lights ............................. 120
Particle filter ................................ 135
Performance .............................. 217
Page 244 of 245
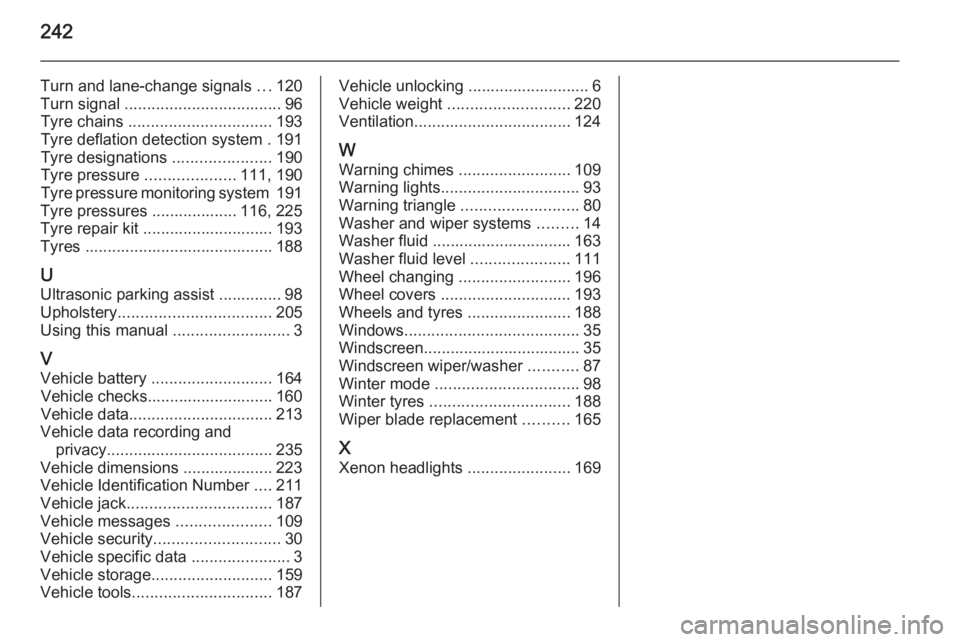
242
Turn and lane-change signals ...120
Turn signal ................................... 96
Tyre chains ................................ 193
Tyre deflation detection system . 191
Tyre designations ......................190
Tyre pressure ....................111, 190
Tyre pressure monitoring system 191
Tyre pressures ................... 116, 225
Tyre repair kit ............................. 193
Tyres .......................................... 188
U Ultrasonic parking assist .............. 98
Upholstery .................................. 205
Using this manual ..........................3
V Vehicle battery ........................... 164
Vehicle checks............................ 160
Vehicle data ................................ 213
Vehicle data recording and privacy ..................................... 235
Vehicle dimensions .................... 223
Vehicle Identification Number ....211
Vehicle jack ................................ 187
Vehicle messages .....................109
Vehicle security ............................ 30
Vehicle specific data ......................3
Vehicle storage ........................... 159
Vehicle tools ............................... 187Vehicle unlocking ........................... 6
Vehicle weight ........................... 220
Ventilation ................................... 124
W
Warning chimes .........................109
Warning lights ............................... 93
Warning triangle .......................... 80
Washer and wiper systems .........14
Washer fluid ............................... 163
Washer fluid level ......................111
Wheel changing .........................196
Wheel covers ............................. 193
Wheels and tyres .......................188
Windows ....................................... 35
Windscreen................................... 35
Windscreen wiper/washer ...........87
Winter mode ................................ 98
Winter tyres ............................... 188
Wiper blade replacement ..........165
X Xenon headlights .......................169