ABS OPEL CALIBRA 1988 Service User Guide
[x] Cancel search | Manufacturer: OPEL, Model Year: 1988, Model line: CALIBRA, Model: OPEL CALIBRA 1988Pages: 525, PDF Size: 58.26 MB
Page 70 of 525
12•56Wiring diagrams
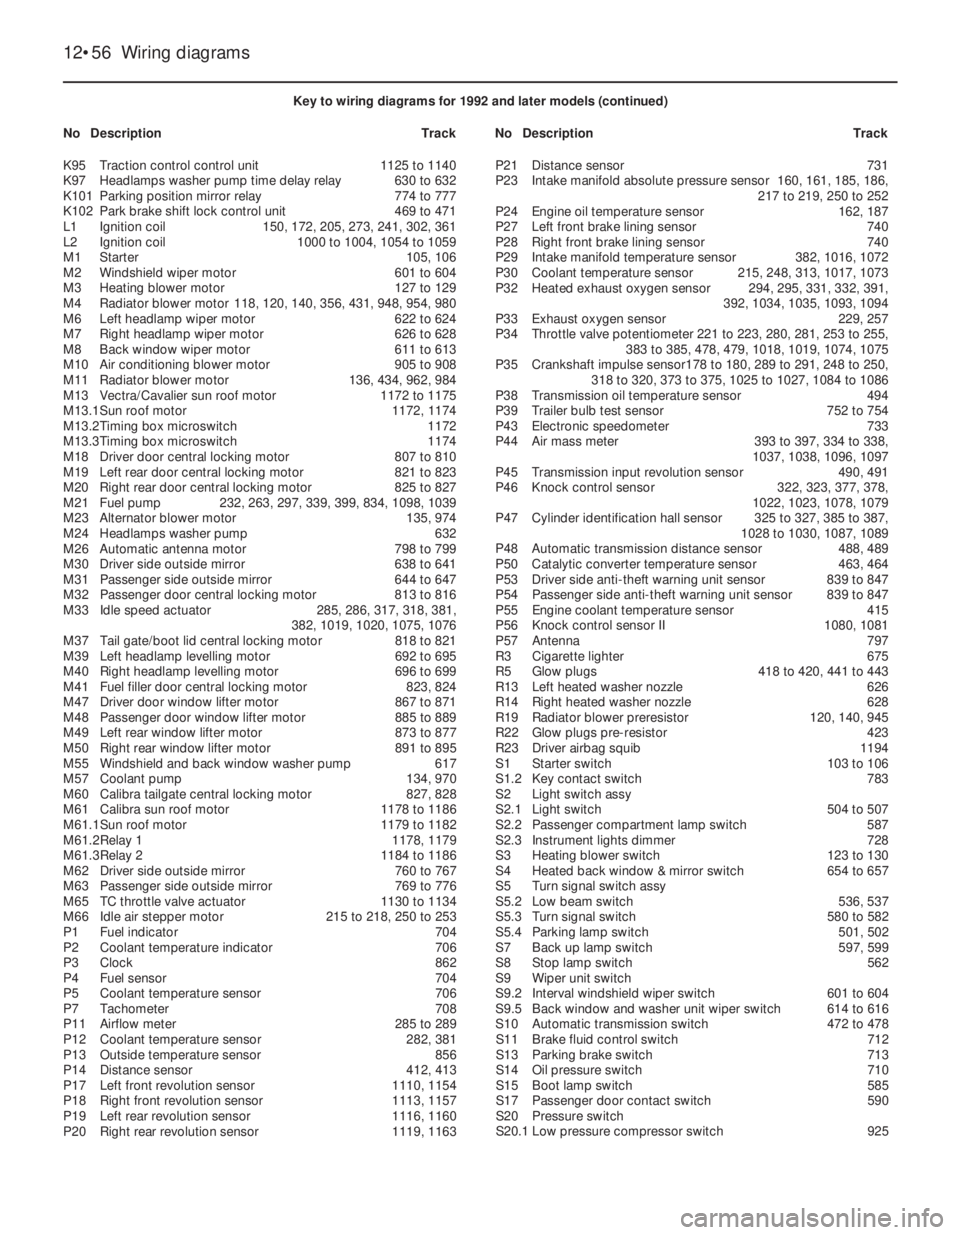
Key to wiring diagrams for 1992 and later models (continued)
NoDescriptionTrackNoDescriptionTrack
K95Traction control control unit1125 to 1140
K97Headlamps washer pump time delay relay630 to 632
K101Parking position mirror relay774 to 777
K102Park brake shift lock control unit 469 to 471
L1Ignition coil150, 172, 205, 273, 241, 302, 361
L2Ignition coil1000 to 1004, 1054 to 1059
M1Starter105, 106
M2Windshield wiper motor601 to 604
M3Heating blower motor127 to 129
M4Radiator blower motor118, 120, 140, 356, 431, 948, 954, 980
M6Left headlamp wiper motor622 to 624
M7Right headlamp wiper motor 626 to 628
M8Back window wiper motor611 to 613
M10Air conditioning blower motor905 to 908
M11Radiator blower motor136, 434, 962, 984
M13Vectra/Cavalier sun roof motor1172 to 1175
M13.1Sun roof motor1172, 1174
M13.2Timing box microswitch1172
M13.3Timing box microswitch1174
M18Driver door central locking motor807 to 810
M19Left rear door central locking motor821 to 823
M20Right rear door central locking motor825 to 827
M21Fuel pump232, 263, 297, 339, 399, 834, 1098, 1039
M23Alternator blower motor135, 974
M24Headlamps washer pump632
M26Automatic antenna motor798 to 799
M30Driver side outside mirror638 to 641
M31Passenger side outside mirror644 to 647
M32Passenger door central locking motor813 to 816
M33Idle speed actuator285, 286, 317, 318, 381,
382, 1019, 1020, 1075, 1076
M37Tail gate/boot lid central locking motor818 to 821
M39Left headlamp levelling motor 692 to 695
M40Right headlamp levelling motor696 to 699
M41Fuel filler door central locking motor823, 824
M47Driver door window lifter motor867 to 871
M48Passenger door window lifter motor885 to 889
M49Left rear window lifter motor873 to 877
M50Right rear window lifter motor891 to 895
M55Windshield and back window washer pump617
M57Coolant pump134, 970
M60Calibra tailgate central locking motor827, 828
M61Calibra sun roof motor1178 to 1186
M61.1Sun roof motor1179 to 1182
M61.2Relay 11178, 1179
M61.3Relay 21184 to 1186
M62Driver side outside mirror760 to 767
M63Passenger side outside mirror769 to 776
M65TC throttle valve actuator1130 to 1134
M66Idle air stepper motor215 to 218, 250 to 253
P1Fuel indicator704
P2Coolant temperature indicator706
P3Clock862
P4Fuel sensor704
P5Coolant temperature sensor706
P7Tachometer708
P11Airflow meter 285 to 289
P12Coolant temperature sensor282, 381
P13Outside temperature sensor856
P14Distance sensor412, 413
P17Left front revolution sensor1110, 1154
P18Right front revolution sensor1113, 1157
P19Left rear revolution sensor1116, 1160
P20Right rear revolution sensor1119, 1163P21Distance sensor731
P23Intake manifold absolute pressure sensor160, 161, 185, 186,
217 to 219, 250 to 252
P24Engine oil temperature sensor162, 187
P27Left front brake lining sensor740
P28Right front brake lining sensor740
P29Intake manifold temperature sensor382, 1016, 1072
P30Coolant temperature sensor215, 248, 313, 1017, 1073
P32Heated exhaust oxygen sensor294, 295, 331, 332, 391,
392, 1034, 1035, 1093, 1094
P33Exhaust oxygen sensor229, 257
P34Throttle valve potentiometer221 to 223, 280, 281, 253 to 255,
383 to 385, 478, 479, 1018, 1019, 1074, 1075
P35Crankshaft impulse sensor178 to 180, 289 to 291, 248 to 250,
318 to 320, 373 to 375, 1025 to 1027, 1084 to 1086
P38Transmission oil temperature sensor494
P39Trailer bulb test sensor752 to 754
P43Electronic speedometer733
P44Air mass meter393 to 397, 334 to 338,
1037, 1038, 1096, 1097
P45Transmission input revolution sensor490, 491
P46Knock control sensor322, 323, 377, 378,
1022, 1023, 1078, 1079
P47Cylinder identification hall sensor325 to 327, 385 to 387,
1028 to 1030, 1087, 1089
P48Automatic transmission distance sensor488, 489
P50Catalytic converter temperature sensor463, 464
P53Driver side anti-theft warning unit sensor839 to 847
P54Passenger side anti-theft warning unit sensor839 to 847
P55Engine coolant temperature sensor415
P56Knock control sensor II1080, 1081
P57Antenna797
R3Cigarette lighter675
R5Glow plugs418 to 420, 441 to 443
R13Left heated washer nozzle 626
R14Right heated washer nozzle628
R19Radiator blower preresistor120, 140, 945
R22Glow plugs pre-resistor423
R23Driver airbag squib1194
S1Starter switch103 to 106
S1.2Key contact switch783
S2Light switch assy
S2.1Light switch504 to 507
S2.2Passenger compartment lamp switch587
S2.3Instrument lights dimmer728
S3Heating blower switch123 to 130
S4Heated back window & mirror switch654 to 657
S5Turn signal switch assy
S5.2Low beam switch536, 537
S5.3Turn signal switch580 to 582
S5.4Parking lamp switch501, 502
S7Back up lamp switch597, 599
S8Stop lamp switch562
S9Wiper unit switch
S9.2Interval windshield wiper switch601 to 604
S9.5Back window and washer unit wiper switch614 to 616
S10Automatic transmission switch472 to 478
S11Brake fluid control switch712
S13Parking brake switch713
S14Oil pressure switch710
S15Boot lamp switch585
S17Passenger door contact switch590
S20Pressure switch
S20.1Low pressure compressor switch925
Page 71 of 525
Wiring diagrams 12•57
12
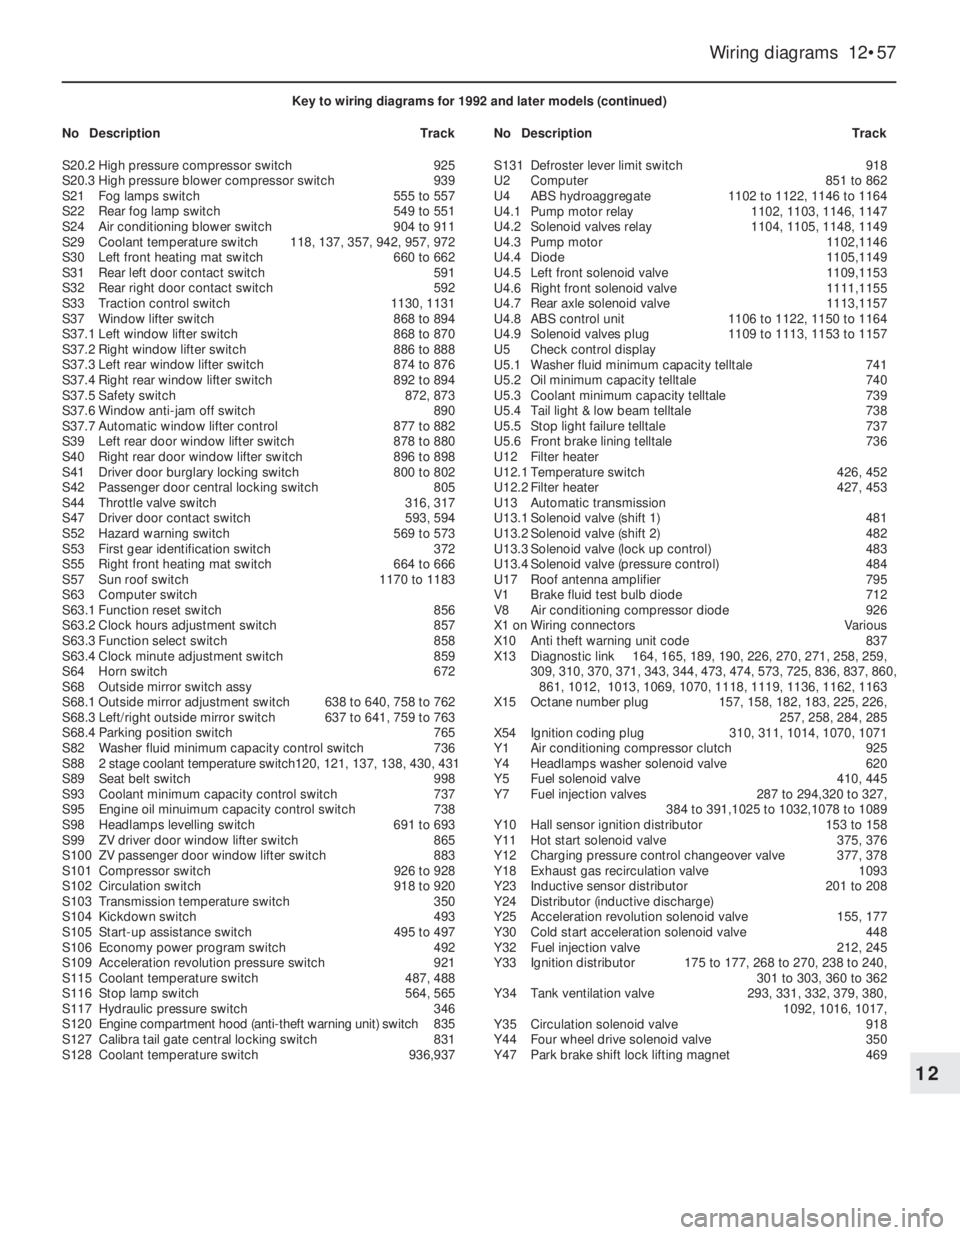
Key to wiring diagrams for 1992 and later models (continued)
NoDescriptionTrackNoDescriptionTrack
S20.2High pressure compressor switch925
S20.3High pressure blower compressor switch939
S21Fog lamps switch555 to 557
S22Rear fog lamp switch549 to 551
S24Air conditioning blower switch904 to 911
S29Coolant temperature switch118, 137, 357, 942, 957, 972
S30Left front heating mat switch660 to 662
S31Rear left door contact switch591
S32Rear right door contact switch592
S33Traction control switch1130, 1131
S37Window lifter switch868 to 894
S37.1Left window lifter switch868 to 870
S37.2Right window lifter switch886 to 888
S37.3Left rear window lifter switch874 to 876
S37.4Right rear window lifter switch892 to 894
S37.5Safety switch872, 873
S37.6Window anti-jam off switch890
S37.7Automatic window lifter control877 to 882
S39Left rear door window lifter switch878 to 880
S40Right rear door window lifter switch896 to 898
S41Driver door burglary locking switch800 to 802
S42Passenger door central locking switch805
S44Throttle valve switch316, 317
S47Driver door contact switch593, 594
S52Hazard warning switch569 to 573
S53First gear identification switch372
S55Right front heating mat switch664 to 666
S57Sun roof switch1170 to 1183
S63Computer switch
S63.1Function reset switch856
S63.2Clock hours adjustment switch857
S63.3Function select switch858
S63.4Clock minute adjustment switch859
S64Horn switch672
S68Outside mirror switch assy
S68.1Outside mirror adjustment switch638 to 640, 758 to 762
S68.3Left/right outside mirror switch637 to 641, 759 to 763
S68.4Parking position switch765
S82Washer fluid minimum capacity control switch736
S882 stage coolant temperature switch120, 121, 137, 138, 430, 431
S89Seat belt switch998
S93Coolant minimum capacity control switch737
S95Engine oil minuimum capacity control switch738
S98Headlamps levelling switch691 to 693
S99ZV driver door window lifter switch865
S100ZV passenger door window lifter switch883
S101Compressor switch926 to 928
S102Circulation switch918 to 920
S103Transmission temperature switch350
S104Kickdown switch493
S105Start-up assistance switch495 to 497
S106Economy power program switch492
S109Acceleration revolution pressure switch921
S115Coolant temperature switch487, 488
S116Stop lamp switch564, 565
S117Hydraulic pressure switch346
S120Engine compartment hood (anti-theft warning unit) switch835
S127Calibra tail gate central locking switch831
S128Coolant temperature switch936,937S131Defroster lever limit switch918
U2Computer851 to 862
U4ABS hydroaggregate1102 to 1122, 1146 to 1164
U4.1Pump motor relay1102, 1103, 1146, 1147
U4.2Solenoid valves relay1104, 1105, 1148, 1149
U4.3Pump motor1102,1146
U4.4Diode1105,1149
U4.5Left front solenoid valve1109,1153
U4.6Right front solenoid valve1111,1155
U4.7Rear axle solenoid valve1113,1157
U4.8ABS control unit1106 to 1122, 1150 to 1164
U4.9Solenoid valves plug1109 to 1113, 1153 to 1157
U5Check control display
U5.1Washer fluid minimum capacity telltale741
U5.2Oil minimum capacity telltale740
U5.3Coolant minimum capacity telltale739
U5.4Tail light & low beam telltale738
U5.5Stop light failure telltale737
U5.6Front brake lining telltale736
U12Filter heater
U12.1Temperature switch426, 452
U12.2Filter heater427, 453
U13Automatic transmission
U13.1Solenoid valve (shift 1)481
U13.2Solenoid valve (shift 2)482
U13.3Solenoid valve (lock up control)483
U13.4Solenoid valve (pressure control)484
U17Roof antenna amplifier795
V1Brake fluid test bulb diode712
V8Air conditioning compressor diode926
X1 onWiring connectorsVarious
X10Anti theft warning unit code837
X13Diagnostic link164, 165, 189, 190, 226, 270, 271, 258, 259,
309, 310, 370, 371, 343, 344, 473, 474, 573, 725, 836, 837, 860,
861, 1012, 1013, 1069, 1070, 1118, 1119, 1136, 1162, 1163
X15Octane number plug157, 158, 182, 183, 225, 226,
257, 258, 284, 285
X54Ignition coding plug310, 311, 1014, 1070, 1071
Y1Air conditioning compressor clutch925
Y4Headlamps washer solenoid valve620
Y5Fuel solenoid valve410, 445
Y7Fuel injection valves287 to 294,320 to 327,
384 to 391,1025 to 1032,1078 to 1089
Y10Hall sensor ignition distributor153 to 158
Y11Hot start solenoid valve375, 376
Y12Charging pressure control changeover valve377, 378
Y18Exhaust gas recirculation valve1093
Y23Inductive sensor distributor201 to 208
Y24Distributor (inductive discharge)
Y25Acceleration revolution solenoid valve155, 177
Y30Cold start acceleration solenoid valve 448
Y32Fuel injection valve212, 245
Y33Ignition distributor175 to 177, 268 to 270, 238 to 240,
301 to 303, 360 to 362
Y34Tank ventilation valve293, 331, 332, 379, 380,
1092, 1016, 1017,
Y35Circulation solenoid valve918
Y44Four wheel drive solenoid valve350
Y47Park brake shift lock lifting magnet469
Page 90 of 525
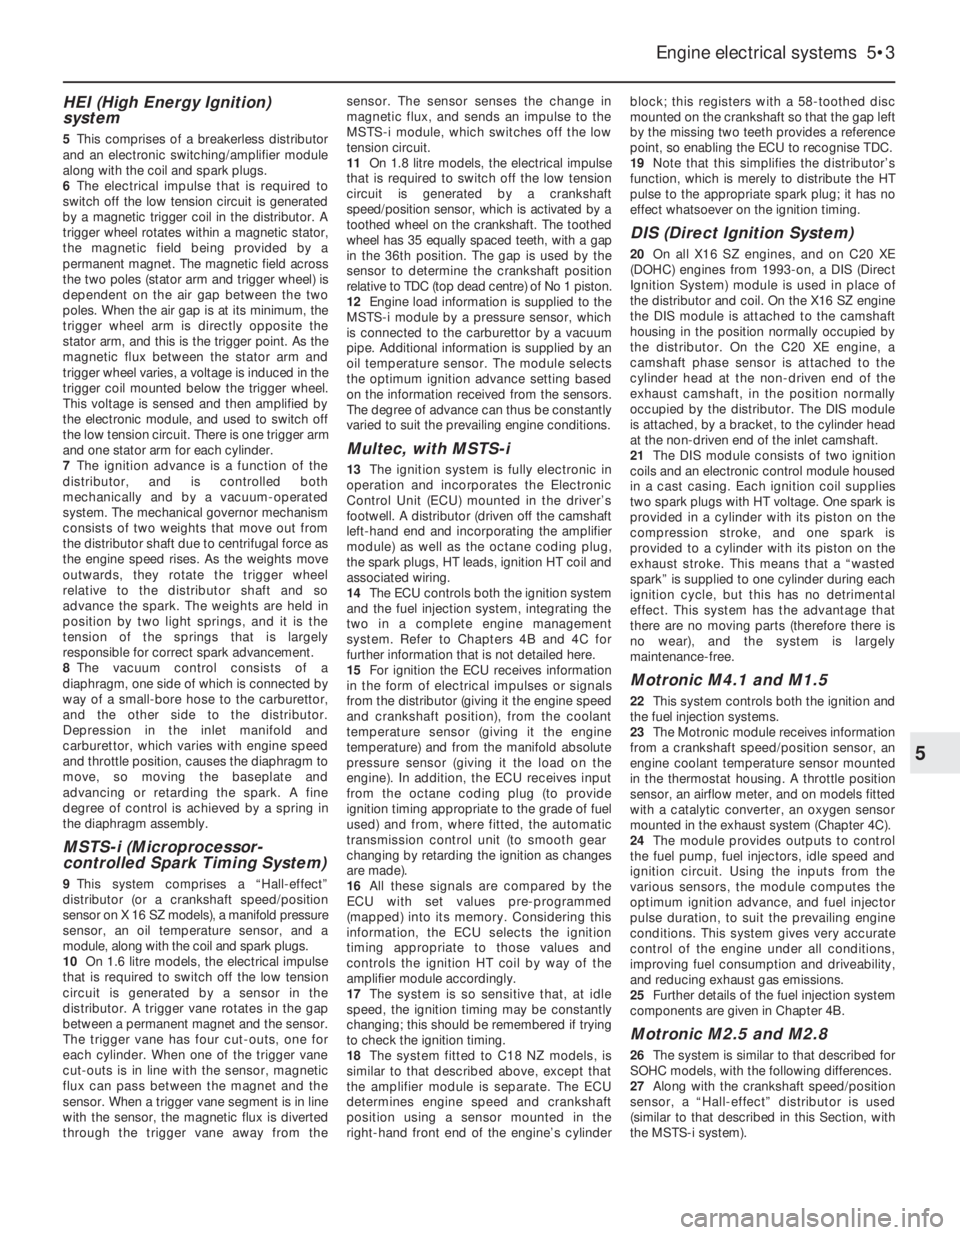
HEI (High Energy Ignition)
system
5This comprises of a breakerless distributor
and an electronic switching/amplifier module
along with the coil and spark plugs.
6The electrical impulse that is required to
switch off the low tension circuit is generated
by a magnetic trigger coil in the distributor. A
trigger wheel rotates within a magnetic stator,
the magnetic field being provided by a
permanent magnet. The magnetic field across
the two poles (stator arm and trigger wheel) is
dependent on the air gap between the two
poles. When the air gap is at its minimum, the
trigger wheel arm is directly opposite the
stator arm, and this is the trigger point. As the
magnetic flux between the stator arm and
trigger wheel varies, a voltage is induced in the
trigger coil mounted below the trigger wheel.
This voltage is sensed and then amplified by
the electronic module, and used to switch off
the low tension circuit. There is one trigger arm
and one stator arm for each cylinder.
7The ignition advance is a function of the
distributor, and is controlled both
mechanically and by a vacuum-operated
system. The mechanical governor mechanism
consists of two weights that move out from
the distributor shaft due to centrifugal force as
the engine speed rises. As the weights move
outwards, they rotate the trigger wheel
relative to the distributor shaft and so
advance the spark. The weights are held in
position by two light springs, and it is the
tension of the springs that is largely
responsible for correct spark advancement.
8The vacuum control consists of a
diaphragm, one side of which is connected by
way of a small-bore hose to the carburettor,
and the other side to the distributor.
Depression in the inlet manifold and
carburettor, which varies with engine speed
and throttle position, causes the diaphragm to
move, so moving the baseplate and
advancing or retarding the spark. A fine
degree of control is achieved by a spring in
the diaphragm assembly.
MSTS-i (Microprocessor-
controlled Spark Timing System)
9This system comprises a “Hall-effect”
distributor (or a crankshaft speed/position
sensor on X 16 SZ models), a manifold pressure
sensor, an oil temperature sensor, and a
module, along with the coil and spark plugs.
10On 1.6 litre models, the electrical impulse
that is required to switch off the low tension
circuit is generated by a sensor in the
distributor. A trigger vane rotates in the gap
between a permanent magnet and the sensor.
The trigger vane has four cut-outs, one for
each cylinder. When one of the trigger vane
cut-outs is in line with the sensor, magnetic
flux can pass between the magnet and the
sensor. When a trigger vane segment is in line
with the sensor, the magnetic flux is diverted
through the trigger vane away from thesensor. The sensor senses the change in
magnetic flux, and sends an impulse to the
MSTS-i module, which switches off the low
tension circuit.
11On 1.8 litre models, the electrical impulse
that is required to switch off the low tension
circuit is generated by a crankshaft
speed/position sensor, which is activated by a
toothed wheel on the crankshaft. The toothed
wheel has 35 equally spaced teeth, with a gap
in the 36th position. The gap is used by the
sensor to determine the crankshaft position
relative to TDC (top dead centre) of No 1 piston.
12Engine load information is supplied to the
MSTS-i module by a pressure sensor, which
is connected to the carburettor by a vacuum
pipe. Additional information is supplied by an
oil temperature sensor. The module selects
the optimum ignition advance setting based
on the information received from the sensors.
The degree of advance can thus be constantly
varied to suit the prevailing engine conditions.
Multec, with MSTS-i
13The ignition system is fully electronic in
operation and incorporates the Electronic
Control Unit (ECU) mounted in the driver’s
footwell. A distributor (driven off the camshaft
left-hand end and incorporating the amplifier
module) as well as the octane coding plug,
the spark plugs, HT leads, ignition HT coil and
associated wiring.
14The ECU controls both the ignition system
and the fuel injection system, integrating the
two in a complete engine management
system. Refer to Chapters 4B and 4C for
further information that is not detailed here.
15For ignition the ECU receives information
in the form of electrical impulses or signals
from the distributor (giving it the engine speed
and crankshaft position), from the coolant
temperature sensor (giving it the engine
temperature) and from the manifold absolute
pressure sensor (giving it the load on the
engine). In addition, the ECU receives input
from the octane coding plug (to provide
ignition timing appropriate to the grade of fuel
used) and from, where fitted, the automatic
transmission control unit (to smooth gear
changing by retarding the ignition as changes
are made).
16All these signals are compared by the
ECU with set values pre-programmed
(mapped) into its memory. Considering this
information, the ECU selects the ignition
timing appropriate to those values and
controls the ignition HT coil by way of the
amplifier module accordingly.
17The system is so sensitive that, at idle
speed, the ignition timing may be constantly
changing; this should be remembered if trying
to check the ignition timing.
18The system fitted to C18 NZ models, is
similar to that described above, except that
the amplifier module is separate. The ECU
determines engine speed and crankshaft
position using a sensor mounted in the
right-hand front end of the engine’s cylinderblock; this registers with a 58-toothed disc
mounted on the crankshaft so that the gap left
by the missing two teeth provides a reference
point, so enabling the ECU to recognise TDC.
19Note that this simplifies the distributor’s
function, which is merely to distribute the HT
pulse to the appropriate spark plug; it has no
effect whatsoever on the ignition timing.
DIS (Direct Ignition System)
20On all X16 SZ engines, and on C20 XE
(DOHC) engines from 1993-on, a DIS (Direct
Ignition System) module is used in place of
the distributor and coil. On the X16 SZ engine
the DIS module is attached to the camshaft
housing in the position normally occupied by
the distributor. On the C20 XE engine, a
camshaft phase sensor is attached to the
cylinder head at the non-driven end of the
exhaust camshaft, in the position normally
occupied by the distributor. The DIS module
is attached, by a bracket, to the cylinder head
at the non-driven end of the inlet camshaft.
21The DIS module consists of two ignition
coils and an electronic control module housed
in a cast casing. Each ignition coil supplies
two spark plugs with HT voltage. One spark is
provided in a cylinder with its piston on the
compression stroke, and one spark is
provided to a cylinder with its piston on the
exhaust stroke. This means that a “wasted
spark” is supplied to one cylinder during each
ignition cycle, but this has no detrimental
effect. This system has the advantage that
there are no moving parts (therefore there is
no wear), and the system is largely
maintenance-free.
Motronic M4.1 and M1.5
22This system controls both the ignition and
the fuel injection systems.
23The Motronic module receives information
from a crankshaft speed/position sensor, an
engine coolant temperature sensor mounted
in the thermostat housing. A throttle position
sensor, an airflow meter, and on models fitted
with a catalytic converter, an oxygen sensor
mounted in the exhaust system (Chapter 4C).
24The module provides outputs to control
the fuel pump, fuel injectors, idle speed and
ignition circuit. Using the inputs from the
various sensors, the module computes the
optimum ignition advance, and fuel injector
pulse duration, to suit the prevailing engine
conditions. This system gives very accurate
control of the engine under all conditions,
improving fuel consumption and driveability,
and reducing exhaust gas emissions.
25Further details of the fuel injection system
components are given in Chapter 4B.
Motronic M2.5 and M2.8
26The system is similar to that described for
SOHC models, with the following differences.
27Along with the crankshaft speed/position
sensor, a “Hall-effect” distributor is used
(similar to that described in this Section, with
the MSTS-i system).
Engine electrical systems 5•3
5
Page 105 of 525
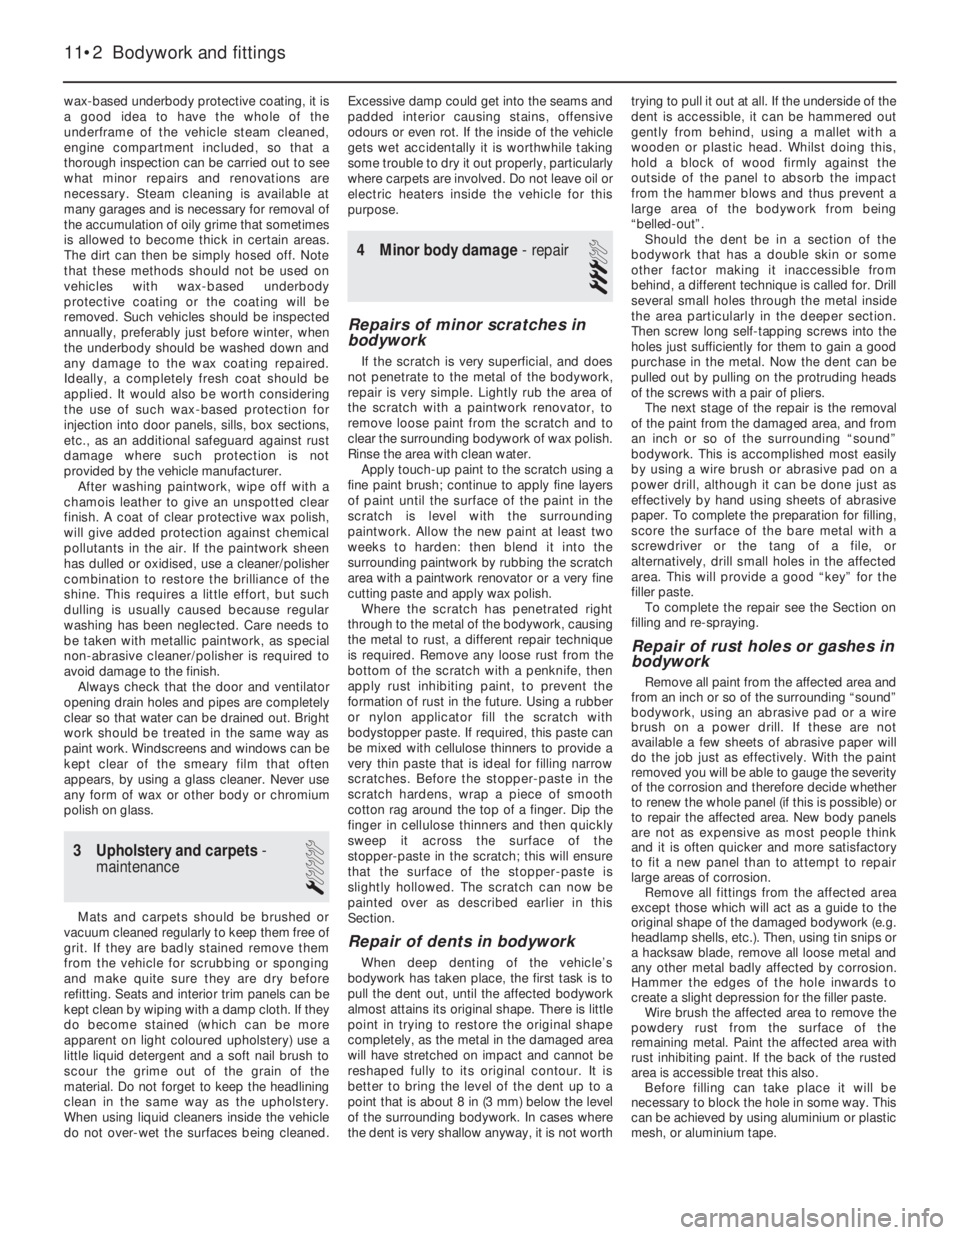
wax-based underbody protective coating, it is
a good idea to have the whole of the
underframe of the vehicle steam cleaned,
engine compartment included, so that a
thorough inspection can be carried out to see
what minor repairs and renovations are
necessary. Steam cleaning is available at
many garages and is necessary for removal of
the accumulation of oily grime that sometimes
is allowed to become thick in certain areas.
The dirt can then be simply hosed off. Note
that these methods should not be used on
vehicles with wax-based underbody
protective coating or the coating will be
removed. Such vehicles should be inspected
annually, preferably just before winter, when
the underbody should be washed down and
any damage to the wax coating repaired.
Ideally, a completely fresh coat should be
applied. It would also be worth considering
the use of such wax-based protection for
injection into door panels, sills, box sections,
etc., as an additional safeguard against rust
damage where such protection is not
provided by the vehicle manufacturer.
After washing paintwork, wipe off with a
chamois leather to give an unspotted clear
finish. A coat of clear protective wax polish,
will give added protection against chemical
pollutants in the air. If the paintwork sheen
has dulled or oxidised, use a cleaner/polisher
combination to restore the brilliance of the
shine. This requires a little effort, but such
dulling is usually caused because regular
washing has been neglected. Care needs to
be taken with metallic paintwork, as special
non-abrasive cleaner/polisher is required to
avoid damage to the finish.
Always check that the door and ventilator
opening drain holes and pipes are completely
clear so that water can be drained out. Bright
work should be treated in the same way as
paint work. Windscreens and windows can be
kept clear of the smeary film that often
appears, by using a glass cleaner. Never use
any form of wax or other body or chromium
polish on glass.
3Upholstery and carpets -
maintenance
1
Mats and carpets should be brushed or
vacuum cleaned regularly to keep them free of
grit. If they are badly stained remove them
from the vehicle for scrubbing or sponging
and make quite sure they are dry before
refitting. Seats and interior trim panels can be
kept clean by wiping with a damp cloth. If they
do become stained (which can be more
apparent on light coloured upholstery) use a
little liquid detergent and a soft nail brush to
scour the grime out of the grain of the
material. Do not forget to keep the headlining
clean in the same way as the upholstery.
When using liquid cleaners inside the vehicle
do not over-wet the surfaces being cleaned.Excessive damp could get into the seams and
padded interior causing stains, offensive
odours or even rot. If the inside of the vehicle
gets wet accidentally it is worthwhile taking
some trouble to dry it out properly, particularly
where carpets are involved. Do not leave oil or
electric heaters inside the vehicle for this
purpose.
4Minor body damage - repair
3
Repairs of minor scratches in
bodywork
If the scratch is very superficial, and does
not penetrate to the metal of the bodywork,
repair is very simple. Lightly rub the area of
the scratch with a paintwork renovator, to
remove loose paint from the scratch and to
clear the surrounding bodywork of wax polish.
Rinse the area with clean water.
Apply touch-up paint to the scratch using a
fine paint brush; continue to apply fine layers
of paint until the surface of the paint in the
scratch is level with the surrounding
paintwork. Allow the new paint at least two
weeks to harden: then blend it into the
surrounding paintwork by rubbing the scratch
area with a paintwork renovator or a very fine
cutting paste and apply wax polish.
Where the scratch has penetrated right
through to the metal of the bodywork, causing
the metal to rust, a different repair technique
is required. Remove any loose rust from the
bottom of the scratch with a penknife, then
apply rust inhibiting paint, to prevent the
formation of rust in the future. Using a rubber
or nylon applicator fill the scratch with
bodystopper paste. If required, this paste can
be mixed with cellulose thinners to provide a
very thin paste that is ideal for filling narrow
scratches. Before the stopper-paste in the
scratch hardens, wrap a piece of smooth
cotton rag around the top of a finger. Dip the
finger in cellulose thinners and then quickly
sweep it across the surface of the
stopper-paste in the scratch; this will ensure
that the surface of the stopper-paste is
slightly hollowed. The scratch can now be
painted over as described earlier in this
Section.
Repair of dents in bodywork
When deep denting of the vehicle’s
bodywork has taken place, the first task is to
pull the dent out, until the affected bodywork
almost attains its original shape. There is little
point in trying to restore the original shape
completely, as the metal in the damaged area
will have stretched on impact and cannot be
reshaped fully to its original contour. It is
better to bring the level of the dent up to a
point that is about 8 in (3 mm) below the level
of the surrounding bodywork. In cases where
the dent is very shallow anyway, it is not worthtrying to pull it out at all. If the underside of the
dent is accessible, it can be hammered out
gently from behind, using a mallet with a
wooden or plastic head. Whilst doing this,
hold a block of wood firmly against the
outside of the panel to absorb the impact
from the hammer blows and thus prevent a
large area of the bodywork from being
“belled-out”.
Should the dent be in a section of the
bodywork that has a double skin or some
other factor making it inaccessible from
behind, a different technique is called for. Drill
several small holes through the metal inside
the area particularly in the deeper section.
Then screw long self-tapping screws into the
holes just sufficiently for them to gain a good
purchase in the metal. Now the dent can be
pulled out by pulling on the protruding heads
of the screws with a pair of pliers.
The next stage of the repair is the removal
of the paint from the damaged area, and from
an inch or so of the surrounding “sound”
bodywork. This is accomplished most easily
by using a wire brush or abrasive pad on a
power drill, although it can be done just as
effectively by hand using sheets of abrasive
paper. To complete the preparation for filling,
score the surface of the bare metal with a
screwdriver or the tang of a file, or
alternatively, drill small holes in the affected
area. This will provide a good “key” for the
filler paste.
To complete the repair see the Section on
filling and re-spraying.
Repair of rust holes or gashes in
bodywork
Remove all paint from the affected area and
from an inch or so of the surrounding “sound”
bodywork, using an abrasive pad or a wire
brush on a power drill. If these are not
available a few sheets of abrasive paper will
do the job just as effectively. With the paint
removed you will be able to gauge the severity
of the corrosion and therefore decide whether
to renew the whole panel (if this is possible) or
to repair the affected area. New body panels
are not as expensive as most people think
and it is often quicker and more satisfactory
to fit a new panel than to attempt to repair
large areas of corrosion.
Remove all fittings from the affected area
except those which will act as a guide to the
original shape of the damaged bodywork (e.g.
headlamp shells, etc.). Then, using tin snips or
a hacksaw blade, remove all loose metal and
any other metal badly affected by corrosion.
Hammer the edges of the hole inwards to
create a slight depression for the filler paste.
Wire brush the affected area to remove the
powdery rust from the surface of the
remaining metal. Paint the affected area with
rust inhibiting paint. If the back of the rusted
area is accessible treat this also.
Before filling can take place it will be
necessary to block the hole in some way. This
can be achieved by using aluminium or plastic
mesh, or aluminium tape.
11•2Bodywork and fittings
Page 106 of 525
Aluminium or plastic mesh, or glass fibre
matting, is probably the best material to use
for a large hole. Cut a piece to the
approximate size and shape of the hole to be
filled, then position it in the hole so that its
edges are below the level of the surrounding
bodywork. It can be retained in position by
several blobs of filler paste around its
periphery.
Aluminium tape should be used for small or
very narrow holes. Pull a piece off the roll and
trim it to the approximate size and shape
required. Then pull off the backing paper (if
used) and stick the tape over the hole. It can
be overlapped if the thickness of one piece is
insufficient. Burnish down the edges of the
tape with the handle of a screwdriver or
similar, to ensure that the tape is securely
attached to the metal underneath.
Bodywork repairs filling and
re-spraying
Before using this Section, see the Sections
on dent, deep scratch, rust holes and gash
repairs.
Many types of bodyfiller are available, but
generally those proprietary kits that contain a
tin of filler paste and a tube of resin hardener
are best for this type of repair. These can be
used directly from the tube. A wide, flexible
plastic or nylon applicator will be found
invaluable for imparting a smooth and well-
contoured finish to the surface of the filler.
Mix up a little filler on a clean piece of card
or board - measure the hardener carefully
(follow the maker’s instructions on the pack)
otherwise the filler will set too rapidly or too
slowly. Using the applicator apply the filler
paste to the prepared area; draw the
applicator across the surface of the filler to
achieve the correct contour and to level the
filler surface. When a contour that
approximates to the correct one is achieved,
stop working the paste - if you carry on too
long the paste will become sticky and begin to
“pick up” on the applicator. Continue to add
thin layers of filler paste at twenty-minute
intervals until the level of the filler is just proud
of the surrounding bodywork.
Once the filler has hardened, excess can be
removed using a metal plane or file. From then
on, progressively finer grades of abrasive
paper should be used, starting with a 40
grade production paper and finishing with 400
grade wet-and-dry paper. Always wrap the
abrasive paper around a flat rubber, cork, or
wooden block otherwise the surface of the
filler will not be completely flat. During the
smoothing of the filler surface the wet-and-dry
paper should be periodically rinsed in water.
This will ensure that a very smooth finish is
imparted to the filler at the final stage.
At this stage the “dent” should be
surrounded by a ring of bare metal, which in
turn should be encircled by the finely
“feathered” edge of the good paintwork.
Rinse the repair area with clean water, until all
the dust produced by the rubbing-down
operation has gone.Spray the whole repair area with a light coat
of primer. This will show up any imperfections
in the surface of the filler. Repair these
imperfections with fresh filler paste or
bodystopper, and again smooth the surface
with abrasive paper. If bodystopper is used, it
can be mixed with cellulose thinners to form a
thin paste that is ideal for filling small holes.
Repeat this spray and repair procedure until
you are satisfied that the surface of the filler,
and the feathered edge of the paintwork are
perfect. Clean the repair area with clean water
and allow to dry fully.
The repair area is now ready for final
spraying. Paint spraying must be carried out
in a warm, dry, windless and dust free
atmosphere. This condition can be created
artificially if you have access to a large indoor
working area, but if you are forced to work in
the open, you will have to pick your day very
carefully. If you are working indoors, dousing
the floor in the work area with water will help
to settle the dust that would otherwise be in
the atmosphere. If the repair area is confined
to one body panel, mask off the surrounding
panels; this will help to minimise the effects of
a slight miss-match in paint colours.
Bodywork fittings (e.g. chrome strips, door
handles, etc.), will also need to be masked off.
Use genuine masking tape and several
thicknesses of newspaper for the masking
operations.
Before beginning to spray, agitate the
aerosol can thoroughly, then spray a test area
(an old tin, or similar) until the technique is
mastered. Cover the repair area with a thick
coat of primer; the thickness should be built
up using several thin layers of paint rather
than one thick one. Using 400 grade
wet-and-dry paper, rub down the surface of
the primer until it is smooth. While doing this,
the work area should be thoroughly doused
with water, and the wet-and-dry paper
periodically rinsed in water. Allow to dry
before spraying on more paint.
Spray on the top coat, again building up the
thickness by using several thin layers of paint.
Start spraying in the centre of the repair area
and then work outwards, with a side-to-side
motion, until the whole repair area and about
2 inches of the surrounding original paintwork
is covered. Remove all masking material 10 to
15 minutes after spraying on the final coat of
paint.
Allow the new paint at least two weeks to
harden, then using a paintwork renovator or a
very fine cutting paste, blend the edges of the
paint into the existing paintwork. Finally, apply
wax polish.
Plastic components
With the use of more and more plastic body
components (e.g. bumpers, spoilers, and in
some cases major body panels), repair of
more serious damage to such items has
become a matter of either entrusting repair
work to a specialist in this field, or renewing
complete components. Repair of suchdamage by the DIY owner is not feasible
owing to the cost of the equipment and
materials required for effecting such repairs.
The basic technique involves making a groove
along the line of the crack in the plastic using
a rotary burr in a power drill. The damaged
part is then welded back together by using a
hot air gun to heat up and fuse a plastic filler
rod into the groove. Any excess plastic is then
removed and the area rubbed down to a
smooth finish. It is important that a filler rod of
the correct plastic is used, as body
components can be made of a variety of
different types (e.g. polycarbonate, ABS,
polypropylene).
Damage of a less serious nature (abrasions,
minor cracks, etc.), can be repaired by the DIY
owner using a two-part epoxy filler repair
material. Once mixed in equal proportions this
is used in similar fashion to the bodywork filler
used on metal panels. The filler is usually
cured in twenty to thirty minutes, ready for
sanding and painting.
If the owner is renewing a complete
component himself, or if he has repaired it
with epoxy filler, he will have a problem of
finding a paint for finishing which is
compatible with the type of plastic used. At
one time the use of a universal paint was not
possible owing to the complex range of
plastics come across in body component
applications. Standard paints, generally, will
not bond to plastic or rubber satisfactorily, but
special paints are available to match any
plastic or rubber finish can be obtained from
dealers. However, it is now possible to obtain
a plastic body parts finishing kit that consists
of a pre-primer treatment, a primer and
coloured top coat. Full instructions are
normally supplied with a kit, but the method of
use is to first apply the pre-primer to the
component concerned and allow it to dry for
up to 30 minutes. Then the primer is applied
and left to dry for about an hour before finally
applying the special coloured top coat. The
result is a correctly coloured component
where the paint will flex with the plastic or
rubber, a property that standard paint does
not normally possess.
5Major body damage - repair
5
Major impact or rust damage should only
be repaired by a Vauxhall dealer or other
competent specialist. Alignment jigs are
needed for successful completion of such
work, superficially effective repairs may leave
dangerous weaknesses in the structure.
Distorted components can also impose
severe stresses on steering and suspension
components with consequent premature
failure.
Bodywork and fittings 11•3
11
Page 117 of 525
9Where applicable, ensure that the glass
panel securing screw lockwashers engage
with the locating pins on the guide rails.
10Before fully tightening the glass panel
securing screws, close the panel, and adjust
its position to give the dimensions shown (see
illustration).
11If a new glass panel has been fitted, peel
off the protective foil on completion of
adjustment.
12Take care when refitting the guide rail
plastic surround, as it is fragile. Adjust the
open position of the glass panel as required to
fit the surround without damaging it.
Gutter
Removal
13Remove the glass panel, as described
previously in this Section.
14Extract the two securing screws (Allen or
Torx type), then lift the gutter from the roof
aperture.
Refitting
15Refit the gutter to the roof aperture at an
angle, pushing it up to the stop on both sides
until the retaining lugs engage with the gutter
guides.
16Refit and tighten the securing screws,
then refit and adjust the glass panel as
described earlier in this Section.
Sunshade
Removal
17Remove the glass panel and the gutter, as
described previously in this Section. 18Carefully prise the four sunshade spring
clips out of the roof guides using a plastic or
wooden implement to avoid damage, then
withdraw the sunshade from the guides (see
illustration).
Refitting
19Refitting is a reversal of removal, but
ensure that the spring clips engage correctly
with the roof guides.
Crank drive
Removal
20Prise out the trim and unscrew the crank
handle securing screw. Prise the crank from
the drive spindle.
21Disconnect the battery negative lead, then
prise the courtesy lamp from the roof trim
panel, and disconnect the wiring.
22Remove the two trim panel securing
screws, and withdraw the trim panel from the
roof (see illustrations).
23Extract the two securing screws, and
remove the crank drive assembly (see
illustration).
Refitting
24Refitting is a reversal of removal,
remembering the following points.
25Before finally refitting the crank handle,
the crank drive must be adjusted as follows.
26Temporarily refit the crank handle, and
position it so that it faces forwards, then
depress the locking button.
27Remove the crank handle and turn the
crank drive pinion anti-clockwise by hand as
far as the stop.
28Refit the crank handle so that it faces
directly forwards, then tighten the securing
screw and refit the trim.
35Interior trim panels -general
2
1The various interior trim panels are secured
by a variety of screws and plastic clips.
2Where press-fit plastic fasteners are used,
it is advisable to use a forked tool similar to
that shown to remove them, to avoid damage
to the clips and the trim panel (see
illustration).
3Removal and refitting of most of the trim
panels is self-explanatory but in all cases,
care must be taken, as the panels are easily
damaged by careless handling and the use of
sharp instruments to release clips.
36Interior trim panels -removal
and refitting
2
Sill trim panel
Removal
1When working on the passenger side of
models fitted with ABS, extract the three
securing screws and remove the cover from
the ABS control module. Note that two of the
screws are covered by plastic caps, which
must be prised out to expose the screws.
11•14Bodywork and fittings
34.22A Extract the securing screws . . .
35.2 Forked tool being used to remove clip
from rear seat back trim34.23 . . . to expose the crank drive -
securing screws arrowed34.22B . . . then withdraw the trim panel
from the roof . . .
34.18 Sunshade spring clip locations
(arrowed)
34.10 Sunroof glass panel fitting position
Page 132 of 525

9
System type
Models without ABS:
1.4, 1.6 and 1.8 litre models . . . . . . . . . . . . . . . . . . . . . . . . . . . . . . . . Front discs and rear drums, with vacuum servo assistance, dual
hydraulic circuit split diagonally, pressure-proportioning valves in rear
hydraulic circuit. Cable-operated handbrake on rear wheels
2.0 litre models . . . . . . . . . . . . . . . . . . . . . . . . . . . . . . . . . . . . . . . . . . Front and rear discs, with vacuum servo assistance, dual hydraulic
circuit split diagonally, pressure-proportioning valves in rear hydraulic
circuit. Cable-operated handbrake on rear wheels
All models with Anti-lock Braking System (ABS) . . . . . . . . . . . . . . . . . . Front and rear discs, with vacuum servo assistance, operated via
hydraulic modulator, dual hydraulic circuit split front/rear, pressure-
proportioning valves in rear hydraulic circuit. Cable-operated
handbrake on rear wheels
Front discs
Type:
1.4, 1.6 and 1.8 litre models . . . . . . . . . . . . . . . . . . . . . . . . . . . . . . . . Solid or ventilated (as from 10/91)
2.0 litre models . . . . . . . . . . . . . . . . . . . . . . . . . . . . . . . . . . . . . . . . . . Ventilated
Diameter:
1.4, 1.6 and early 1.8 litre models . . . . . . . . . . . . . . . . . . . . . . . . . . . . 236 mm
Late (as from 10/91) 1.8 and 2.0 litre models . . . . . . . . . . . . . . . . . . . 256 mm
Maximum disc run-out (all models) . . . . . . . . . . . . . . . . . . . . . . . . . . . . 0.1 mm
Minimum pad friction material thickness (including backing plate):
All models . . . . . . . . . . . . . . . . . . . . . . . . . . . . . . . . . . . . . . . . . . . . . . 7.0 mm
Minimum disc thickness after machining: *
1.4, 1.6 and 1.8 litre models (with solid discs) . . . . . . . . . . . . . . . . . . 10.7 mm
1.4, 1.6 and 1.8 litre models (with vented discs) . . . . . . . . . . . . . . . . 18.0 mm
2.0 litre models . . . . . . . . . . . . . . . . . . . . . . . . . . . . . . . . . . . . . . . . . . 22.0 mm
* When this dimension is reached, only one further new set of brake pads is permissible, then renew the discs
Chapter 9
Braking system
ABS electronic control module - removal and refitting . . . . . . . . . . .22
ABS hydraulic modulator - removal and refitting . . . . . . . . . . . . . . . .20
ABS relays (ABS-2E systems only) - removal and refitting . . . . . . . .23
ABS wheel sensors - removal and refitting . . . . . . . . . . . . . . . . . . . .21
Anti-lock braking system (ABS) - general . . . . . . . . . . . . . . . . . . . . . . .2
Brake disc - inspection, removal and refitting . . . . . . . . . . . . . . . . . .10
Brake drum - removal, inspection and refitting . . . . . . . . . . . . . . . . .11
Brake fluid pipes and hoses - general, removal and refitting . . . . . . .25
Brake pedal - removal and refitting . . . . . . . . . . . . . . . . . . . . . . . . . .29
Front brake disc shield - removal and refitting . . . . . . . . . . . . . . . . . .14
Front disc caliper - removal, overhaul and refitting . . . . . . . . . . . . . . .8
Front disc pads - inspection, removal and refitting . . . . . . . . . . . . . . .4
General description . . . . . . . . . . . . . . . . . . . . . . . . . . . . . . . . . . . . . . .1
Handbrake - adjustment . . . . . . . . . . . . . . . . . . . . . . . . . . . . . . . . . . .26
Handbrake cable - removal and refitting . . . . . . . . . . . . . . . . . . . . . .27Handbrake lever - removal and refitting . . . . . . . . . . . . . . . . . . . . . . .28
Handbrake shoes (rear disc brakes) - inspection, removal and
refitting . . . . . . . . . . . . . . . . . . . . . . . . . . . . . . . . . . . . . . . . . . . . . . .7
Hydraulic system - bleeding . . . . . . . . . . . . . . . . . . . . . . . . . . . . . . . . .3
Master cylinder - removal and refitting . . . . . . . . . . . . . . . . . . . . . . . .15
Master cylinder (ABS) - general . . . . . . . . . . . . . . . . . . . . . . . . . . . . .17
Master cylinder (non-ABS) - overhaul . . . . . . . . . . . . . . . . . . . . . . . . .16
Rear brake backplate - removal and refitting . . . . . . . . . . . . . . . . . . .13
Rear brake pressure-proportioning valves - removal and refitting . . .24
Rear brake shoes (drum brakes) - inspection, removal and refitting . .6
Rear disc caliper - removal, overhaul and refitting . . . . . . . . . . . . . . . .9
Rear disc pads - inspection, removal and refitting . . . . . . . . . . . . . . . .5
Rear wheel cylinder (drum brakes) - removal, overhaul and refitting .12
Vacuum servo - description and testing . . . . . . . . . . . . . . . . . . . . . . .18
Vacuum servo - removal and refitting . . . . . . . . . . . . . . . . . . . . . . . . .19
9•1
Specifications Contents
Easy,suitable for
novice with little
experienceFairly easy,suitable
for beginner with
some experienceFairly difficult,
suitable for competent
DIY mechanic
Difficult,suitable for
experienced DIY
mechanicVery difficult,
suitable for expert DIY
or professional
Degrees of difficulty
54321
Page 133 of 525

Rear discs
Type (all models) . . . . . . . . . . . . . . . . . . . . . . . . . . . . . . . . . . . . . . . . . . .Solid
Diameter (all models) . . . . . . . . . . . . . . . . . . . . . . . . . . . . . . . . . . . . . . .260 mm
Maximum disc run-out (all models) . . . . . . . . . . . . . . . . . . . . . . . . . . . .0.1 mm
Minimum pad friction material thickness (including backing plate):
All models . . . . . . . . . . . . . . . . . . . . . . . . . . . . . . . . . . . . . . . . . . . . . .7.0 mm
Minimum disc thickness after machining (all models) * . . . . . . . . . . . . .8.0 mm
* When this dimension is reached, only one further new set of disc pads is permissible, then renew the discs
Minimum handbrake shoe friction material thickness (lining only)
All models . . . . . . . . . . . . . . . . . . . . . . . . . . . . . . . . . . . . . . . . . . . . . .1.0 mm
Rear drums
Internal diameter (all models) . . . . . . . . . . . . . . . . . . . . . . . . . . . . . . . . .200 mm
Minimum shoe friction material thickness (all models) . . . . . . . . . . . . . .0.5 mm above rivet heads
Brake fluid type/specification:
All models . . . . . . . . . . . . . . . . . . . . . . . . . . . . . . . . . . . . . . . . . . . . . .See Lubricants and fluidsin “Weekly checks”
Torque wrench settingsNmlbf ft
ABS hydraulic modulator mounting . . . . . . . . . . . . . . . . . . . . . . . . . . . .86
ABS wheel sensor mounting . . . . . . . . . . . . . . . . . . . . . . . . . . . . . . . . .86
ABS control unit . . . . . . . . . . . . . . . . . . . . . . . . . . . . . . . . . . . . . . . . . . .1.51
Brake fluid line unions . . . . . . . . . . . . . . . . . . . . . . . . . . . . . . . . . . . . . .1612
Caliper and wheel cylinder bleed screws . . . . . . . . . . . . . . . . . . . . . . . .97
Front brake disc securing screw . . . . . . . . . . . . . . . . . . . . . . . . . . . . . .43
Front brake fluid hose to caliper union . . . . . . . . . . . . . . . . . . . . . . . . . .4030
Front caliper bracket to hub carrier . . . . . . . . . . . . . . . . . . . . . . . . . . . .9570
Front caliper guide . . . . . . . . . . . . . . . . . . . . . . . . . . . . . . . . . . . . . . . . .3022
Front caliper mounting (solid disc models) . . . . . . . . . . . . . . . . . . . . . . .9570
Front caliper to mounting bracket (vented disc models) . . . . . . . . . . . .3022
Handbrake lever securing . . . . . . . . . . . . . . . . . . . . . . . . . . . . . . . . . . . .2015
Master cylinder mounting . . . . . . . . . . . . . . . . . . . . . . . . . . . . . . . . . . . .2216
Master cylinder stop screw (ATE type) . . . . . . . . . . . . . . . . . . . . . . . . . .64
Pressure proportioning valve to master cylinder:
ATE type . . . . . . . . . . . . . . . . . . . . . . . . . . . . . . . . . . . . . . . . . . . . . . .129
GMF type . . . . . . . . . . . . . . . . . . . . . . . . . . . . . . . . . . . . . . . . . . . . . .4030
Rear brake backplate/stub axle spring:
Stage 1 . . . . . . . . . . . . . . . . . . . . . . . . . . . . . . . . . . . . . . . . . . . . . . . .5037
Stage 2 . . . . . . . . . . . . . . . . . . . . . . . . . . . . . . . . . . . . . . . . . . . . . . . .Angle-tighten a further 30º
Stage 3 . . . . . . . . . . . . . . . . . . . . . . . . . . . . . . . . . . . . . . . . . . . . . . . .Angle-tighten a further 15º
Rear brake disc securing screw . . . . . . . . . . . . . . . . . . . . . . . . . . . . . . .86
Rear caliper mounting . . . . . . . . . . . . . . . . . . . . . . . . . . . . . . . . . . . . . .8059
Rear drum securing screw . . . . . . . . . . . . . . . . . . . . . . . . . . . . . . . . . . .43
Rear wheel cylinder mounting . . . . . . . . . . . . . . . . . . . . . . . . . . . . . . . .97
Vacuum servo support bracket to bulkhead . . . . . . . . . . . . . . . . . . . . .2216
Vacuum servo to support bracket . . . . . . . . . . . . . . . . . . . . . . . . . . . . .2015
1General description
The foot brake operates on all four wheels.
Solid or ventilated disc brakes are fitted at the
front, and self-adjusting drum or solid disc
brakes are fitted at the rear, depending on
model. Actuation is hydraulic, with vacuum
servo assistance. The handbrake is cable-
operated, and acts on the rear wheels only.
The hydraulic system is split into two
circuits. On non-ABS models, the system is
split diagonally, and on ABS models, the
system is split front and rear. If there is a
hydraulic fluid leak in one circuit, the
remaining circuit will still function, so that
some braking capability remains.
The hydraulic fluid supply to the rear brakes
is regulated so that the front brakes alwayslock first under heavy braking. The fluid
pressure to the rear brakes is controlled by
two valves, one for each brake, which are
either screwed into the master cylinder or
mounted on the rear underbody of the vehicle,
depending on model.
The brake servo is of the direct-acting type,
fitted between the pedal and the master
cylinder. The servo is powered by vacuum
developed in the inlet manifold. Should the
servo fail, the brakes will still operate, but
increased pedal pressure will be required.
2Anti-lock braking system
(ABS) - general
1ABS is available as an option for all models.
When the ignition is switched on, an ‘ABS’
symbol illuminates in the instrument panel for
a short time. 2The system comprises an electronic control
unit, roadwheel sensors, hydraulic modulator,
and the necessary valves and relays. Disc
brakes are fitted to all four wheels. The
purpose of the system is to stop wheel(s)
locking during heavy brake applications. This
is achieved by automatic release of the brake
on the locked wheel, followed by re-
application of the brake. This procedure is
carried out several times a second by the
hydraulic modulator.
3The modulator is controlled by the
electronic control unit, which itself receives
signals from the wheel sensors, which monitor
the locked or unlocked state of the wheels.
The two front brakes are modulated
separately, but the two rear brakes are
modulated together.
4The ABS unit is fitted between the brake
master cylinder and the brakes, the vacuum
servo and master cylinder being of similar
type for both non-ABS and ABS models.
9•2Braking system
Page 134 of 525

5If the ‘ABS’ symbol, in the instrument panel
stays lit after approximately 4 seconds, or if it
comes on sporadically or stays on whilst
driving, there is a fault in the system. Should
this occur, it is recommended that a complete
test is carried out by a Vauxhall dealer, who
will have the necessary specialist diagnostic
equipment. Due to the special equipment
required, it is not practical for the DIY
mechanic to carry out the test procedure.
6To prevent possible damage to the
electronic control unit, always disconnect the
control unit wiring plug before carrying out
electrical welding work.
7It is recommended that the control unit is
removed if the vehicle is being subjected to
high temperatures, like for instance, during
certain paint-drying processes.
8If using steam cleaning equipment, do not
aim the water/steam jet directly at the control
unit.
9Do not disconnect the control unit wiring
plug with the ignition switched on.
10Do not use a battery booster to start the
engine.
11After working on the ABS components,
ensure that all wiring plugs are correctly
reconnected, and have the complete system
tested by a Vauxhall dealer, at the earliest
opportunity.
12All models up to 1991 that were fitted with
ABS, used the ABS-2E system. From 1992
onwards an ABS-2EH system was fitted,
which can be identified by the location of the
electronic control module, which is bolted to
the hydraulic modulator.
13The main differences between the two
systems are in the electrical components and
circuits, the most obvious of these being
omission of the surge arrester relay on the
2EH system.
3Hydraulic system - bleeding
2
General
1If any of the hydraulic components in the
braking system have been removed or
disconnected, or if the fluid level in the
reservoir has been allowed to fall appreciably,
it is certain that air will have entered into the
system. The removal of all this air from the
hydraulic system is essential if the brakes are
to function correctly, and the process of
removing it is known as bleeding.
2Where an operation has only affected one
circuit of the hydraulic system (the system issplit diagonally on non-ABS models, and front
and rear on ABS models), then it will only be
necessary to bleed the relevant circuit. If the
master cylinder has been disconnected and
reconnected, or the fluid level has been
allowed to fall appreciably, then the complete
system must be bled.
3One of three methods can be used to bleed
the system, although Vauxhall recommend
the use of a pressure bleeding kit.
Bleeding - two-man method
4Obtain a clean jar, and a length of rubber or
plastic bleed tubing that will fit the bleed
screws tightly. The help of an assistant will be
required.
5Remove the dust cap and clean around the
bleed screw on the relevant caliper of wheel
cylinder (see illustration), then attach the
bleed tube to the screw. If the complete
system is being bled, start at the front of the
vehicle. When bleeding the complete system
on models with ABS, the front brakes must be
bled before the rears.
6Check that the fluid reservoir is topped up,
and then destroy the vacuum in the brake
servo by giving several applications of the
brake pedal.
7Immerse the open end of the bleed tube in
the jar, which should contain two or three
inches of hydraulic fluid. The jar should be
positioned about 300 mm (12.0 in) above the
bleed screw to prevent any possibility of air
entering the system down the threads of the
bleed screw when it is slackened.
8Open the bleed screw half a turn, and have
the assistant depress the brake pedal slowly
to the floor. With the brake pedal still
depressed, retighten the bleed screw, and
then have the assistant quickly release the
pedal. Repeat the procedure.
9Observe the submerged end of the tube in
the jar. When air bubbles cease to appear,
tighten the bleed screw when the pedal is
being held fully down by the assistant.
10Top-up the fluid reservoir. It must be kept
topped up throughout the bleeding
operations. If the connecting holes to the
master cylinder are exposed at any time due
to low fluid level, the air will be drawn into the
system, and the whole bleeding process will
have to start again.
11If the complete system is being bled, the
procedure should be repeated on the
diagonally opposite rear brake. Then on the
front and rear brakes of the other circuit on
non-ABS models, or on the remaining front
brake and then on the rear brakes on ABS
models.
12On completion, remove the bleed tube,
and discard the fluid that has been bled from
the system, unless it is required to make up
the level in the bleed jar. Never re-use old fluid.
13On completion of bleeding, top-up the
fluid level in the reservoir. Check the action ofthe brake pedal, which should be firm, and
free from any “sponginess” that would
indicate that air is still present in the system.
Bleeding - with one-way valve
14There are a number of one-man brake
bleeding kits currently available from motor
accessory shops. It is recommended that one
of these kits should be used whenever
possible, as they greatly simplify the bleeding
operations. They also reduce the risk of
expelled air or fluid being drawn back into the
system.
15Proceed as described in paragraphs 5
and 6.
16Open the bleed screw half a turn, then
depress the brake pedal to the floor, and
slowly release it. The one-way valve in the
bleeder device will prevent expelled air from
returning to the system at the completion of
each stroke. Repeat the operation until clear
hydraulic fluid, free from air bubbles, can be
seen coming through the tube. Tighten the
bleed screw.
17Proceed as described in paragraphs 11
to 13 inclusive.
Bleeding - with pressure
bleeding kit
18These are also available from motor
accessory shops, and are usually operated by
air pressure from the spare tyre.
19By connecting a pressurised container to
the master cylinder fluid reservoir, bleeding is
then carried out by simply opening each bleed
screw in turn and allowing the fluid to run out.
Like turning on a tap, until no air bubbles are
visible in the fluid being expelled.
20Using this method, the large reserve of
fluid provides a safeguard against air being
drawn into the master cylinder during the
bleeding operations.
21This method of bleeding is recommended
by Vauxhall.
22Begin bleeding with reference to
paragraphs 5 and 6, and continue as
described in paragraphs 11 to 13 inclusive.
Braking system 9•3
3.5 Removing the dust cap from a rear
caliper bleed screw - models with
ventilated discs
9
If brake fluid is spilt on the
paintwork, the affected area
must be washed down with
cold water immediately.
Brake fluid is an effective paint
stripper!
Page 140 of 525
11Remove the wood and carefully withdraw
the piston.
12Carefully prise the seal from the groove in
the caliper piston bore, using a plastic or
wooden instrument.
13Inspect the surfaces of the piston and its
bore in the caliper for scoring, or evidence of
metal-to-metal contact. If evident, renew the
complete caliper assembly.
14If the piston and bore are in good
condition, discard the seals and obtain a
repair kit, which will contain all the necessary
renewable items.
15Clean the piston and cylinder bore with
brake fluid or methylated spirit, nothing else!
16Begin reassembly by fitting the seal into
the caliper bore.
17Locate the dust seal in its groove in the
piston. Dip the piston in clean brake fluid and
insert it squarely into the cylinder. Check that
the cutaway recesses in the piston are
positioned horizontally. If necessary, carefully
turn the piston to its correct position.
18When the piston has been partially
depressed, engage the dust seal with the rim
of the caliper bore, and fit the retaining clip.
19Push the piston further into its bore, but
not as far as the stop, ensuring that it does
not jam.
20If desired, the caliper body locating pin
rubbers can be renewed. Extract the nylon
compression sleeve from within each rubber,
then carefully compress the rubber shoulder,
and push the rubber through the hole in the
caliper body to remove it from the inboard
end (see illustrations).
21Fit the new rubbers using a reversal of the
removal procedure.
22Secure the caliper bracket in a soft-jawed
vice, and refit the guide springs in the
positions noted before removal.
23Engage the caliper body with the locating
pins on the bracket, then press the caliper
body into position until the locating pin
rubbers in the caliper body rest against the
bracket.
Refitting
24Refit the caliper bracket to the hub carrier,
and tighten the securing bolts to the specified
torque. Refit the dust caps to the bolts.25Reconnect the brake fluid hose union,
using new sealing rings on the union bolt.
26Refit the disc pads, as described in
Section 4.
27Remove the polythene from the brake
fluid reservoir filler neck, and bleed the
relevant brake hydraulic circuit, as described
in Section 3.
28Refit the roadwheel and lower the vehicle
to the ground. Do not fully tighten the
roadwheel bolts until the vehicle is resting on
its wheels.
Models with ventilated discs
Removal
29Proceed as described in paragraphs 1 to 4
inclusive.
30Withdraw the caliper body from the
vehicle.
31If desired, the caliper bracket can be
removed from the hub carrier by unscrewing
the two securing bolts (see illustration).
Overhaul
32To overhaul the caliper, continue as
follows. Otherwise, go on to paragraph 42 for
details of refitting.
33Brush the dirt and dust from the caliper,
but take care not to inhale it.
34Using a screwdriver, carefully prise the
dust seal from the end of the piston and the
caliper body, and remove it.
35Proceed as described in paragraphs 10
to 15 inclusive.
36Begin reassembly by fitting the seal into
the caliper bore.
37Locate the dust seal in its groove in the
piston. Dip the piston in clean brake fluid and
insert it squarely into the cylinder. Check that
the cutaway recesses in the piston are
positioned vertically. If necessary, carefully
turn the piston to its correct position.
38When the piston has been partially
depressed, engage the dust seal with the rim
of the caliper bore.
39Push the piston further into its bore, but
not as far as the stop, ensuring that it does
not jam.
40If desired, the guide bolt sleeves can be
renewed. Extract the nylon compression
sleeve from within each rubber, then carefullycompress the rubber shoulder, and push the
rubber through the hole in the caliper body to
remove it from the inboard end.
41Fit the new sleeves using a reversal of the
removal procedure.
Refitting
42Where applicable, refit the caliper bracket
to the hub carrier, and tighten the securing
bolts to the specified torque.
43Proceed as described in paragraphs 25
to 28 inclusive.
9Rear disc caliper - removal,
overhaul and refitting
3
Note: Refer to the note at the beginning of
Section 3 before proceeding. Before
dismantling a caliper, check that replacement
parts can be obtained, and retain the old
components to compare them with the new
ones
Removal
1Where applicable, remove the wheel trim,
then loosen the relevant rear roadwheel bolts
and check the front wheels. Jack up the rear
of the vehicle, and support on axle stands
(see “Jacking and Vehicle Support”)
positioned under the body side members.
Remove the roadwheel.
2Remove the disc pads, as described in
Section 5.
3Working under the bonnet, remove the
brake fluid reservoir cap and secure a piece of
polythene over the filler neck with a rubber
band, or by refitting the cap. This will reduce
the loss of fluid during the following
procedure.
4Unscrew the brake fluid pipe union nut from
the rear of the caliper, and disconnect the
pipe. Take care not to strain the pipe. Be
prepared for fluid spillage, and plug the open
ends to prevent dirt ingress and further fluid
loss.
5Unscrew the two mounting bolts and
withdraw the caliper from the vehicle, noting
that on DOHC models, the caliper securing
bolts also secure the ABS sensor bracket (see
illustrations). Take care not to strain the ABS
sensor wiring, where applicable.
Braking system 9•9
8.31 Caliper bracket securing bolts
(arrowed) - model with ventilated discs8.20B . . . then withdraw the caliper
locating pin rubber - model with
solid discs8.20A Extract the nylon compression
sleeve (arrowed) . . .
9