cooling OPEL CALIBRA 1988 Service Repair Manual
[x] Cancel search | Manufacturer: OPEL, Model Year: 1988, Model line: CALIBRA, Model: OPEL CALIBRA 1988Pages: 525, PDF Size: 58.26 MB
Page 7 of 525
13Clean any foreign matter from the float
chamber. Renew the float, the float needle
valve and seat if wear is evident, or if the float
is punctured or otherwise damaged. Check
that the needle valve closes completely before
the float reaches the top of its movement. See
Section 15, for details of float level checking.
14Renew the diaphragms in the part-load
enrichment valve and in the accelerator pump.
If additional pump or valve parts are supplied
in the overhaul kit, renew these parts also.
15Further dismantling is not recommended.
Pay particular attention to the throttle opening
mechanism arrangement if it is decided to
dismantle it; the interlocking arrangement is
important.
16Reassemble in the reverse order to
dismantling. Use new gaskets and seals
throughout; lubricate linkages with a smear of
molybdenum based grease.
Refitting
17Carry out the following procedure before
refitting.
a)Position the fast idle adjustment screw on
the highest step of the fast idle cam.
b)Use a gauge rod or twist drill of the
specified diameter to measure the
opening of the primary throttle valve.
c)Adjust if necessary at the fast idle
adjustment screw.
d)Note that this is a preliminary adjustment;
final adjustment of the fast idle speed
should take place with the engine running.
18Refitting is a reversal of removal, but
renew the gasket(s).
19After refitting, carry out the following
checks and adjustments.
20Check the throttle cable free play and
adjust if necessary, as described in Section 11.
21Check and if necessary top-up the
coolant level, as described in Chapter 3.
22Check and if necessary adjust the idle
speed and mixture, as described in Section 14.
14Idle speed and mixture -
adjustment
3
Note: Refer to Section 2 before proceeding.
To carry out the adjustments, an accurate
tachometer and an exhaust gas analyser (CO
meter) will be required
1To check the idle speed and mixture
adjustment, the following conditions must be
met:
a)The engine must be at normal operating
temperature
b)All electrical consumers (cooling fan,
heater blower, headlamps, etc.) must be
switched off
c)The ignition timing and spark plug gaps
must be correctly adjusted - see Chapters
1 and 5
d)The throttle cable free play must be
correctly adjusted - see Section 11
e)The air inlet trunking must be free from
leaks, and the air filter must be cleanf)On automatic models, always select
position, “P”.
2Connect a tachometer and an exhaust gas
analyser to the vehicle, according to the
equipment manufacturer’s instructions.
3Start the engine, and run it at 2000 rpm for
approximately 30 seconds, then allow it to
idle. If the idle speed is outside the specified
limits, adjust by means of the throttle stop
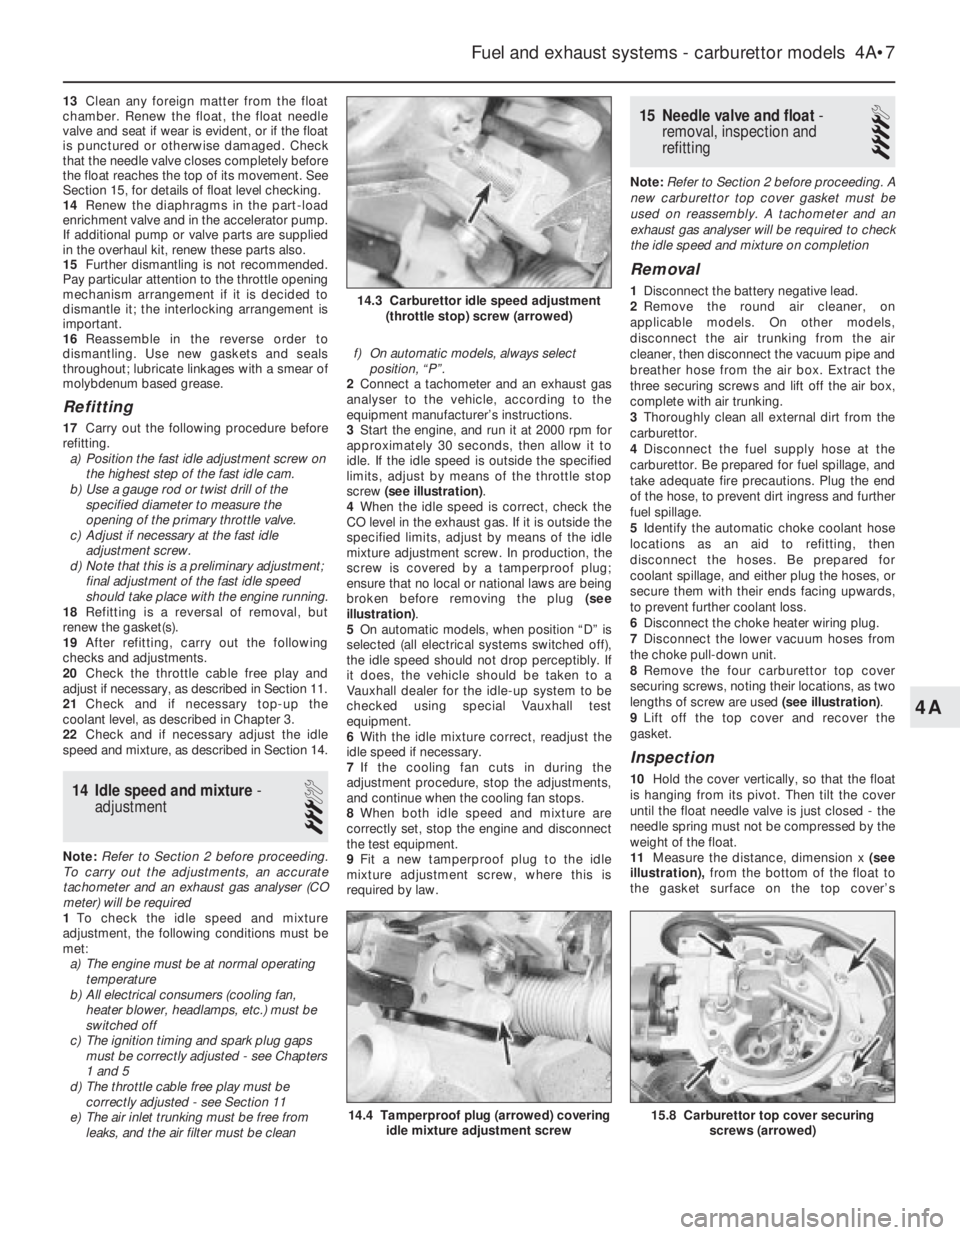
screw (see illustration).
4When the idle speed is correct, check the
CO level in the exhaust gas. If it is outside the
specified limits, adjust by means of the idle
mixture adjustment screw. In production, the
screw is covered by a tamperproof plug;
ensure that no local or national laws are being
broken before removing the plug (see
illustration).
5On automatic models, when position “D” is
selected (all electrical systems switched off),
the idle speed should not drop perceptibly. If
it does, the vehicle should be taken to a
Vauxhall dealer for the idle-up system to be
checked using special Vauxhall test
equipment.
6With the idle mixture correct, readjust the
idle speed if necessary.
7If the cooling fan cuts in during the
adjustment procedure, stop the adjustments,
and continue when the cooling fan stops.
8When both idle speed and mixture are
correctly set, stop the engine and disconnect
the test equipment.
9Fit a new tamperproof plug to the idle
mixture adjustment screw, where this is
required by law.
15Needle valve and float -
removal, inspection and
refitting
4
Note: Refer to Section 2 before proceeding. A
new carburettor top cover gasket must be
used on reassembly. A tachometer and an
exhaust gas analyser will be required to check
the idle speed and mixture on completion
Removal
1Disconnect the battery negative lead.
2Remove the round air cleaner, on
applicable models. On other models,
disconnect the air trunking from the air
cleaner, then disconnect the vacuum pipe and
breather hose from the air box. Extract the
three securing screws and lift off the air box,
complete with air trunking.
3Thoroughly clean all external dirt from the
carburettor.
4Disconnect the fuel supply hose at the
carburettor. Be prepared for fuel spillage, and
take adequate fire precautions. Plug the end
of the hose, to prevent dirt ingress and further
fuel spillage.
5Identify the automatic choke coolant hose
locations as an aid to refitting, then
disconnect the hoses. Be prepared for
coolant spillage, and either plug the hoses, or
secure them with their ends facing upwards,
to prevent further coolant loss.
6Disconnect the choke heater wiring plug.
7Disconnect the lower vacuum hoses from
the choke pull-down unit.
8Remove the four carburettor top cover
securing screws, noting their locations, as two
lengths of screw are used (see illustration).
9Lift off the top cover and recover the
gasket.
Inspection
10Hold the cover vertically, so that the float
is hanging from its pivot. Then tilt the cover
until the float needle valve is just closed - the
needle spring must not be compressed by the
weight of the float.
11Measure the distance, dimension x (see
illustration),from the bottom of the float to
the gasket surface on the top cover’s
Fuel and exhaust systems - carburettor models 4A•7
15.8 Carburettor top cover securing
screws (arrowed)14.4 Tamperproof plug (arrowed) covering
idle mixture adjustment screw
14.3 Carburettor idle speed adjustment
(throttle stop) screw (arrowed)
4A
Page 10 of 525
Fast idle cam position
20With the bi-metal housing removed, and
the choke valve gap “B”, correctly set,
continue as follows.
21Open the throttle valve, then close the
choke valve using light finger pressure on the
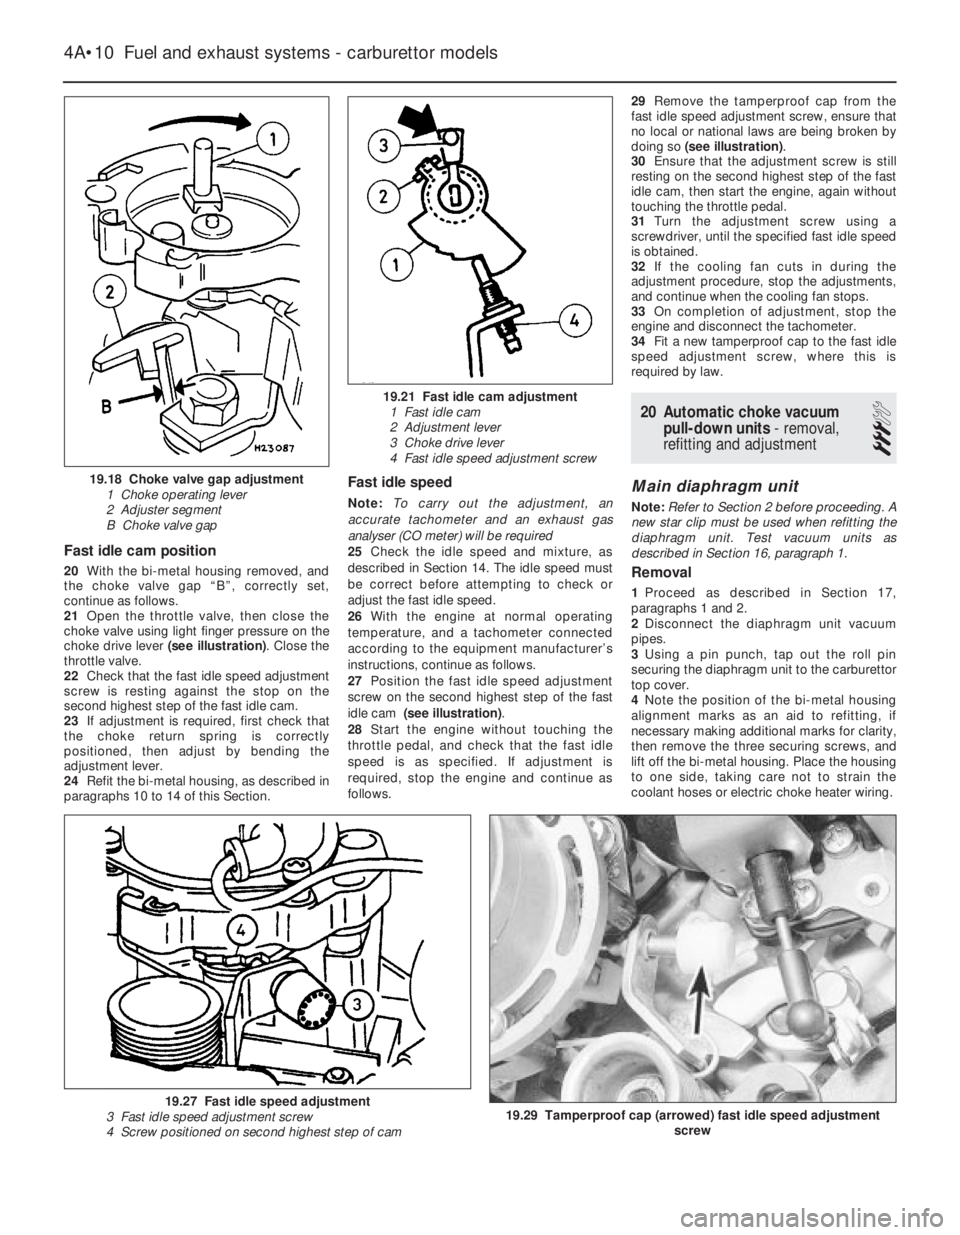
choke drive lever (see illustration). Close the
throttle valve.
22Check that the fast idle speed adjustment
screw is resting against the stop on the
second highest step of the fast idle cam.
23If adjustment is required, first check that
the choke return spring is correctly
positioned, then adjust by bending the
adjustment lever.
24Refit the bi-metal housing, as described in
paragraphs 10 to 14 of this Section.
Fast idle speed
Note: To carry out the adjustment, an
accurate tachometer and an exhaust gas
analyser (CO meter) will be required
25Check the idle speed and mixture, as
described in Section 14. The idle speed must
be correct before attempting to check or
adjust the fast idle speed.
26With the engine at normal operating
temperature, and a tachometer connected
according to the equipment manufacturer’s
instructions, continue as follows.
27Position the fast idle speed adjustment
screw on the second highest step of the fast
idle cam (see illustration).
28Start the engine without touching the
throttle pedal, and check that the fast idle
speed is as specified. If adjustment is
required, stop the engine and continue as
follows.29Remove the tamperproof cap from the
fast idle speed adjustment screw, ensure that
no local or national laws are being broken by
doing so (see illustration).
30Ensure that the adjustment screw is still
resting on the second highest step of the fast
idle cam, then start the engine, again without
touching the throttle pedal.
31Turn the adjustment screw using a
screwdriver, until the specified fast idle speed
is obtained.
32If the cooling fan cuts in during the
adjustment procedure, stop the adjustments,
and continue when the cooling fan stops.
33On completion of adjustment, stop the
engine and disconnect the tachometer.
34Fit a new tamperproof cap to the fast idle
speed adjustment screw, where this is
required by law.
20Automatic choke vacuum
pull-down units - removal,
refitting and adjustment
3
Main diaphragm unit
Note: Refer to Section 2 before proceeding. A
new star clip must be used when refitting the
diaphragm unit. Test vacuum units as
described in Section 16, paragraph 1.
Removal
1Proceed as described in Section 17,
paragraphs 1 and 2.
2Disconnect the diaphragm unit vacuum
pipes.
3Using a pin punch, tap out the roll pin
securing the diaphragm unit to the carburettor
top cover.
4Note the position of the bi-metal housing
alignment marks as an aid to refitting, if
necessary making additional marks for clarity,
then remove the three securing screws, and
lift off the bi-metal housing. Place the housing
to one side, taking care not to strain the
coolant hoses or electric choke heater wiring.
4A•10Fuel and exhaust systems - carburettor models
19.18 Choke valve gap adjustment
1 Choke operating lever
2 Adjuster segment
B Choke valve gap
19.21 Fast idle cam adjustment
1 Fast idle cam
2 Adjustment lever
3 Choke drive lever
4 Fast idle speed adjustment screw
19.29 Tamperproof cap (arrowed) fast idle speed adjustment
screw19.27 Fast idle speed adjustment
3 Fast idle speed adjustment screw
4 Screw positioned on second highest step of cam
Page 12 of 525
Refitting
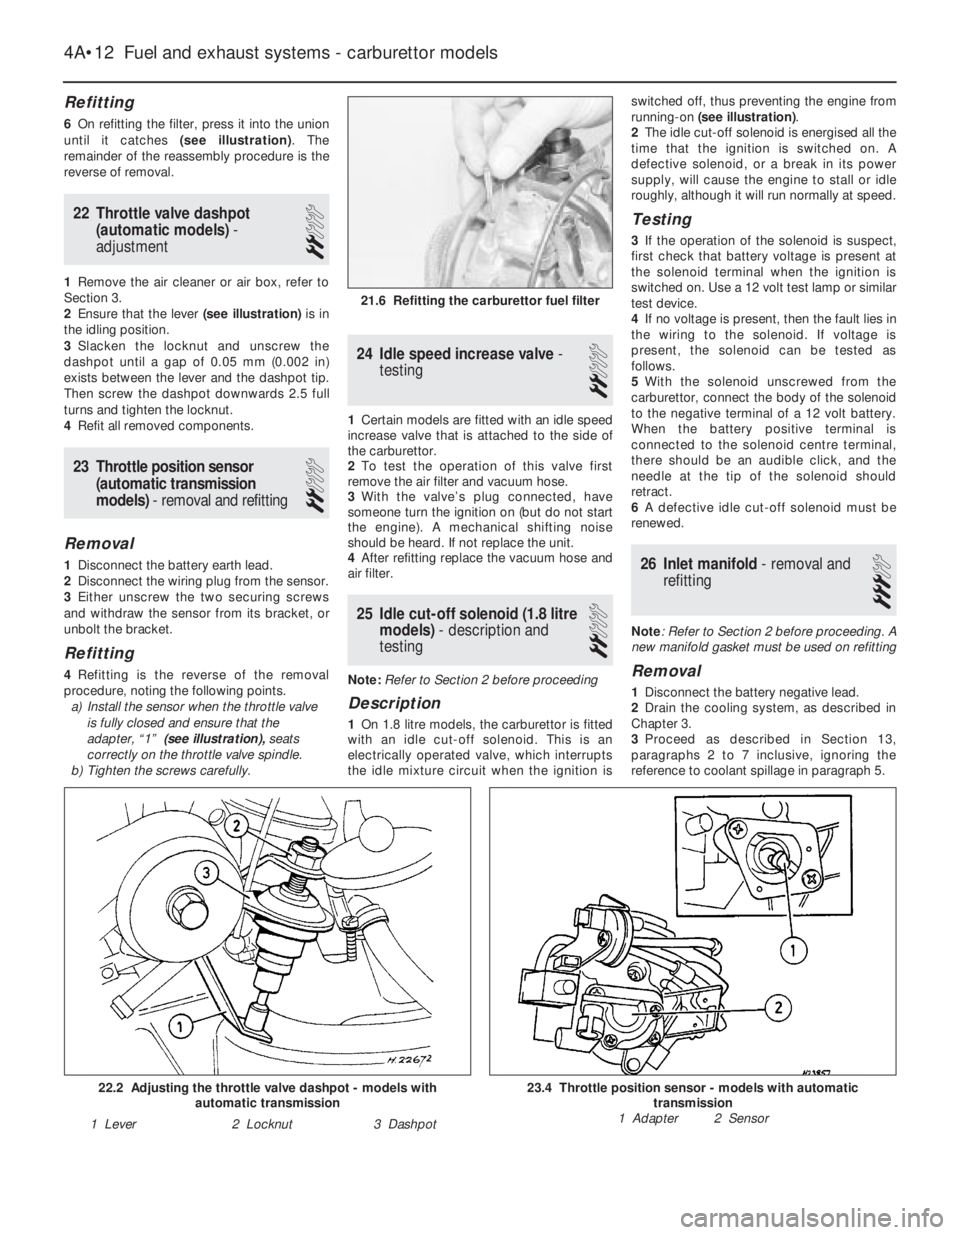
6On refitting the filter, press it into the union
until it catches (see illustration). The
remainder of the reassembly procedure is the
reverse of removal.
22Throttle valve dashpot
(automatic models) -
adjustment
2
1Remove the air cleaner or air box, refer to
Section 3.
2Ensure that the lever (see illustration)is in
the idling position.
3Slacken the locknut and unscrew the
dashpot until a gap of 0.05 mm (0.002 in)
exists between the lever and the dashpot tip.
Then screw the dashpot downwards 2.5 full
turns and tighten the locknut.
4Refit all removed components.
23Throttle position sensor
(automatic transmission
models) - removal and refitting
2
Removal
1Disconnect the battery earth lead.
2Disconnect the wiring plug from the sensor.
3Either unscrew the two securing screws
and withdraw the sensor from its bracket, or
unbolt the bracket.
Refitting
4Refitting is the reverse of the removal
procedure, noting the following points.
a)Install the sensor when the throttle valve
is fully closed and ensure that the
adapter, “1” (see illustration),seats
correctly on the throttle valve spindle.
b)Tighten the screws carefully.
24Idle speed increase valve -
testing
2
1Certain models are fitted with an idle speed
increase valve that is attached to the side of
the carburettor.
2To test the operation of this valve first
remove the air filter and vacuum hose.
3With the valve’s plug connected, have
someone turn the ignition on (but do not start
the engine). A mechanical shifting noise
should be heard. If not replace the unit.
4After refitting replace the vacuum hose and
air filter.
25Idle cut-off solenoid (1.8 litre
models) - description and
testing
2
Note: Refer to Section 2 before proceeding
Description
1On 1.8 litre models, the carburettor is fitted
with an idle cut-off solenoid. This is an
electrically operated valve, which interrupts
the idle mixture circuit when the ignition isswitched off, thus preventing the engine from
running-on (see illustration).
2The idle cut-off solenoid is energised all the
time that the ignition is switched on. A
defective solenoid, or a break in its power
supply, will cause the engine to stall or idle
roughly, although it will run normally at speed.
Testing
3If the operation of the solenoid is suspect,
first check that battery voltage is present at
the solenoid terminal when the ignition is
switched on. Use a 12 volt test lamp or similar
test device.
4If no voltage is present, then the fault lies in
the wiring to the solenoid. If voltage is
present, the solenoid can be tested as
follows.
5With the solenoid unscrewed from the
carburettor, connect the body of the solenoid
to the negative terminal of a 12 volt battery.
When the battery positive terminal is
connected to the solenoid centre terminal,
there should be an audible click, and the
needle at the tip of the solenoid should
retract.
6A defective idle cut-off solenoid must be
renewed.
26Inlet manifold - removal and
refitting
3
Note: Refer to Section 2 before proceeding. A
new manifold gasket must be used on refitting
Removal
1Disconnect the battery negative lead.
2Drain the cooling system, as described in
Chapter 3.
3Proceed as described in Section 13,
paragraphs 2 to 7 inclusive, ignoring the
reference to coolant spillage in paragraph 5.
4A•12Fuel and exhaust systems - carburettor models
21.6 Refitting the carburettor fuel filter
23.4 Throttle position sensor - models with automatic
transmission
1 Adapter 2 Sensor22.2 Adjusting the throttle valve dashpot - models with
automatic transmission
1 Lever2 Locknut3 Dashpot
Page 13 of 525
4Disconnect the coolant hose from the rear
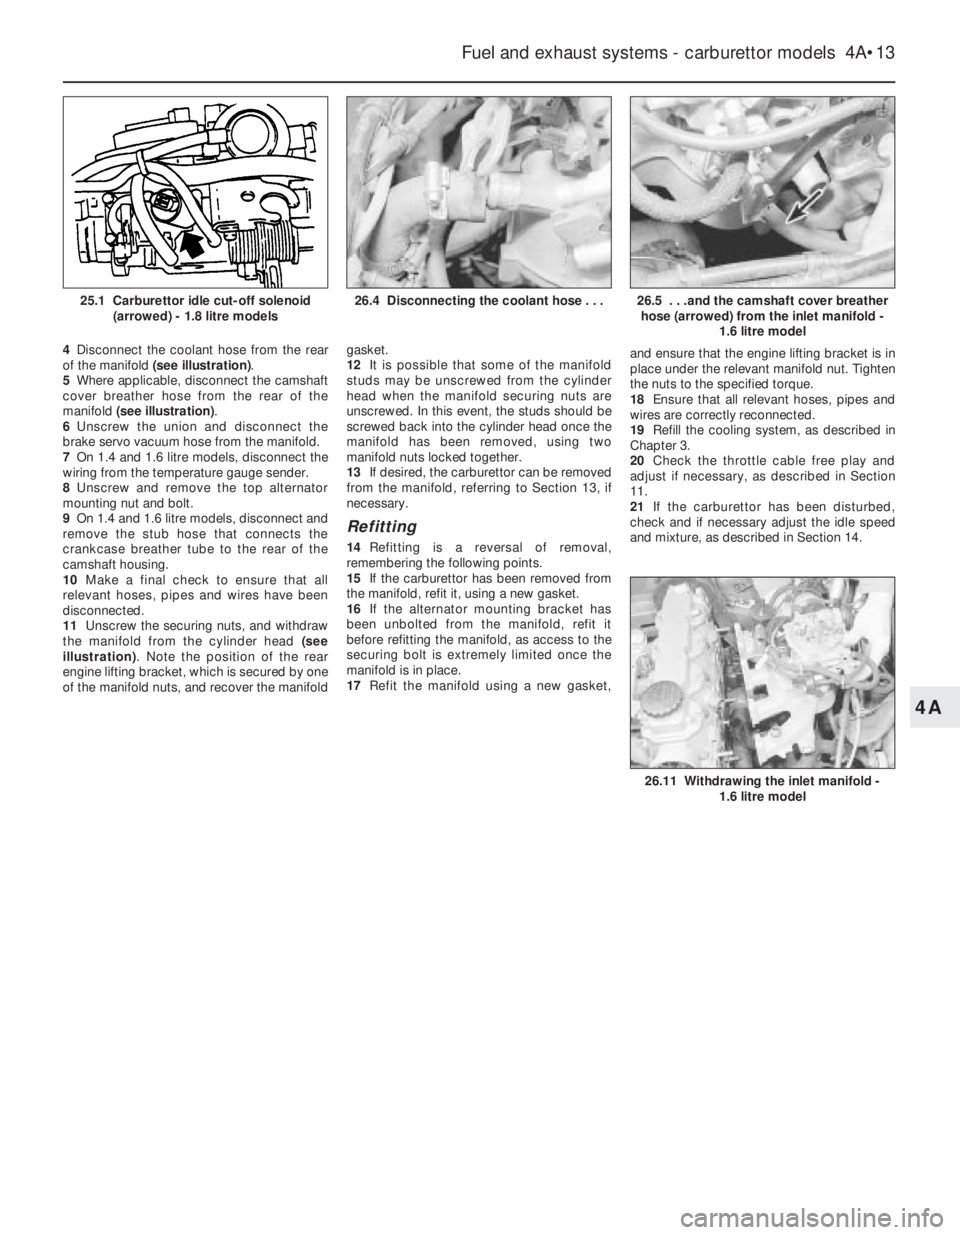
of the manifold (see illustration).
5Where applicable, disconnect the camshaft
cover breather hose from the rear of the
manifold (see illustration).
6Unscrew the union and disconnect the
brake servo vacuum hose from the manifold.
7On 1.4 and 1.6 litre models, disconnect the
wiring from the temperature gauge sender.
8Unscrew and remove the top alternator
mounting nut and bolt.
9On 1.4 and 1.6 litre models, disconnect and
remove the stub hose that connects the
crankcase breather tube to the rear of the
camshaft housing.
10Make a final check to ensure that all
relevant hoses, pipes and wires have been
disconnected.
11Unscrew the securing nuts, and withdraw
the manifold from the cylinder head (see
illustration). Note the position of the rear
engine lifting bracket, which is secured by one
of the manifold nuts, and recover the manifoldgasket.
12It is possible that some of the manifold
studs may be unscrewed from the cylinder
head when the manifold securing nuts are
unscrewed. In this event, the studs should be
screwed back into the cylinder head once the
manifold has been removed, using two
manifold nuts locked together.
13If desired, the carburettor can be removed
from the manifold, referring to Section 13, if
necessary.
Refitting
14Refitting is a reversal of removal,
remembering the following points.
15If the carburettor has been removed from
the manifold, refit it, using a new gasket.
16If the alternator mounting bracket has
been unbolted from the manifold, refit it
before refitting the manifold, as access to the
securing bolt is extremely limited once the
manifold is in place.
17Refit the manifold using a new gasket,and ensure that the engine lifting bracket is in
place under the relevant manifold nut. Tighten
the nuts to the specified torque.
18Ensure that all relevant hoses, pipes and
wires are correctly reconnected.
19Refill the cooling system, as described in
Chapter 3.
20Check the throttle cable free play and
adjust if necessary, as described in Section
11.
21If the carburettor has been disturbed,
check and if necessary adjust the idle speed
and mixture, as described in Section 14.
Fuel and exhaust systems - carburettor models 4A•13
26.5 . . .and the camshaft cover breather
hose (arrowed) from the inlet manifold -
1.6 litre model
26.11 Withdrawing the inlet manifold -
1.6 litre model
26.4 Disconnecting the coolant hose . . .
4A
25.1 Carburettor idle cut-off solenoid
(arrowed) - 1.8 litre models
Page 16 of 525
1General information and
precautions
The electrical system is of 12-volt negative
earth type. Power for the lights and all
electrical accessories is supplied by a
lead/acid type battery, which is charged by
the alternator.
This Chapter covers repair and service
procedures for the various electrical
components not associated with engine.
Information on the battery, alternator and
starter motor can be found in Chapter 5.
It should be noted that, before working on
any component in the electrical system, the
battery negative terminal should first be
disconnected, to prevent the possibility of
electrical short-circuits and/or fires.
Whenever the occasion arises, carefully
check the routing of the wiring harness,
ensuring that it is correctly secured by the
clips or ties provided so that it cannot chafe
against other components. Carefully check
points such as the clutch cable bracket,
clutch housing and harness support bracket,
the inlet manifold, the horn mounting bracket,
the starter motor terminals, and the rear
bumper and number plate lamp.
If evidence is found of the harness having
chafed against other components, repair the
damage and ensure that the harness is
secured or protected so that the problem
cannot occur again.
2Electrical fault-finding -
general information
Note:Refer to the precautions given in “Safety
first!” (at the beginning of this manual) and to
Section 1 of this Chapter before starting work.
The following tests relate to testing of the main
electrical circuits, and should not be used to
test delicate electronic circuits (such as anti-
lock braking systems), particularly where an
electronic control module is used.
A typical electrical circuit consists of an
electrical component, any switches, relays,
motors, fuses, fusible links or circuit breakers
related to that component, and the wiring and
connectors that link the component to boththe battery and the chassis. To help to
pinpoint a problem in an electrical circuit,
wiring diagrams are included at the end of this
Chapter.
Before attempting to diagnose an electrical
fault, first study the appropriate wiring
diagram, to obtain a complete understanding
of the components included in the particular
circuit concerned. The possible sources of a
fault can be narrowed down by noting
whether other components related to the
circuit are operating properly. If several
components or circuits fail at one time, the
problem is likely to be related to a shared fuse
or earth connection.
Electrical problems usually stem from
simple causes, such as loose or corroded
connections, a faulty earth connection, a
blown fuse, a melted fusible link, or a faulty
relay (refer to Section 3 for details of testing
relays). Visually inspect the condition of all
fuses, wires and connections in a problem
circuit before testing the components. Use
the wiring diagrams to determine which
terminal connections will need to be checked,
to pinpoint the trouble-spot.
The basic tools required for electrical fault-
finding include the following:
a)a circuit tester or voltmeter (a 12-volt bulb
with a set of test leads can also be used
for certain tests).
b)a self-powered test light (sometimes
known as a continuity tester).
c)an ohmmeter (to measure resistance).
d)a battery.
e)a set of test leads.
f)a jumper wire, preferably with a circuit
breaker or fuse incorporated, which can
be used to bypass suspect wires or
electrical components.
Before attempting to locate a problem with
test instruments, use the wiring diagram to
determine where to make the connections.
To find the source of an intermittent wiring
fault (usually due to a poor or dirty
connection, or damaged wiring insulation), a
“wiggle” test can be performed on the wiring.
This involves wiggling the wiring by hand, to
see if the fault occurs as the wiring is moved.
It should be possible to narrow down the
source of the fault to a particular section of
wiring. This method of testing can be used in
conjunction with any of the tests described in
the following sub-Sections.
Apart from problems due to poor
connections, two basic types of fault can
occur in an electrical circuit - open-circuit, or
short-circuit.
Open-circuit faults are caused by a break
somewhere in the circuit, which prevents
current from flowing. An open-circuit fault will
prevent a component from working, but will
not cause the relevant circuit fuse to blow.
Short-circuit faults are caused by a “short”
somewhere in the circuit, which allows the
current flowing in the circuit to “escape” along
an alternative route, usually to earth. Short-
circuit faults are normally caused by abreakdown in wiring insulation, which allows a
feed wire to touch either another wire, or an
earthed component such as the bodyshell. A
short-circuit fault will normally cause the
relevant circuit fuse to blow.
Finding an open-circuit
To check for an open-circuit, connect one
lead of a circuit tester or voltmeter to either
the negative battery terminal or a known good
earth.
Connect the other lead to a connector in
the circuit being tested, preferably nearest to
the battery or fuse.
Switch on the circuit, remembering that
some circuits are live only when the ignition
switch is moved to a particular position.
If voltage is present (indicated either by the
tester bulb lighting or a voltmeter reading, as
applicable), this means that the section of the
circuit between the relevant connector and
the battery is problem-free.
Continue to check the remainder of the
circuit in the same fashion.
When a point is reached at which no
voltage is present, the problem must lie
between that point and the previous test point
with voltage. Most problems can be traced to
a broken, corroded or loose connection.
Finding a short-circuit
To check for a short-circuit, first disconnect
the load(s) from the circuit (loads are the
components that draw current from a circuit,
such as bulbs, motors, heating elements, etc.).
Remove the relevant fuse from the circuit,
and connect a circuit tester or voltmeter to the
fuse connections.
Switch on the circuit, remembering that
some circuits are live only when the ignition
switch is moved to a particular position.
If voltage is present (indicated either by the
tester bulb lighting or a voltmeter reading, as
applicable), this means that there is a short-
circuit.
If no voltage is present, but the fuse still
blows with the load(s) connected, this indicates
an internal fault in the load(s).
Finding an earth fault
The battery negative terminal is connected
to “earth” (the metal of the
engine/transmission and the car body), and
most systems are wired so that they only
receive a positive feed. The current returning
through the metal of the car body. This means
that the component mounting and the body
form part of that circuit. Loose or corroded
mountings can therefore cause a range of
electrical faults, ranging from total failure of a
circuit, to a puzzling partial fault. In particular,
lights may shine dimly (especially when
another circuit sharing the same earth point is
in operation). Motors (e.g. wiper motors or the
radiator cooling fan motor) may run slowly,
and the operation of one circuit may have an
affect on another. Note that on many vehicles,
earth straps are used between certain
components, such as the engine/transmission
and the body, usually where there is no metal-
12•2Body electrical systems
Warning: Before carrying out
any work on the electrical
system, read through the
precautions given in “Safety
first!” at the beginning of this manual, and
in Chapter 5.
Caution:If the radio/cassette player fitted
to the vehicle is one with an anti-theft
security code, as the standard unit is, refer
to “Radio/cassette player anti-theft system
- precaution”in the Reference Section of
this manual before disconnecting the
battery.
Page 37 of 525
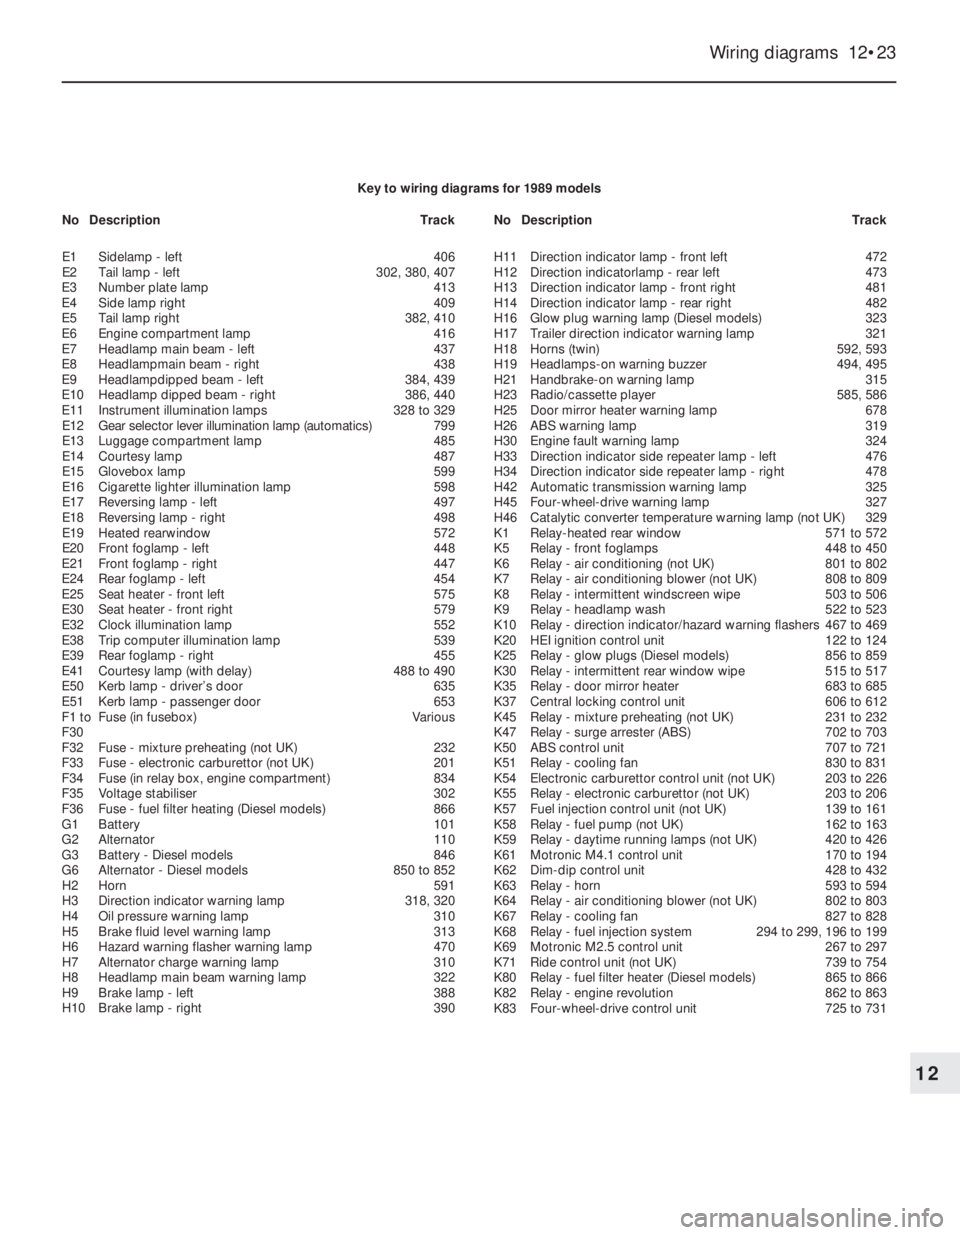
Wiring diagrams 12•23
12
Key to wiring diagrams for 1989 models
E1Sidelamp - left406
E2Tail lamp -left302, 380, 407
E3Number plate lamp413
E4Side lamp right409
E5Tail lamp right382, 410
E6Engine compartment lamp416
E7Headlamp main beam - left437
E8Headlampmain beam - right438
E9Headlampdipped beam - left384, 439
E10Headlamp dipped beam - right386, 440
E11Instrument illumination lamps328 to 329
E12Gear selector lever illumination lamp (automatics)799
E13Luggage compartment lamp485
E14Courtesy lamp487
E15Glovebox lamp599
E16Cigarette lighter illumination lamp598
E17Reversing lamp - left497
E18Reversing lamp - right498
E19Heated rearwindow572
E20Front foglamp -left448
E21Front foglamp - right447
E24Rear foglamp - left454
E25Seat heater -front left575
E30Seat heater - front right579
E32Clock illumination lamp552
E38Trip computer illumination lamp539
E39Rear foglamp - right455
E41Courtesy lamp (with delay)488 to 490
E50Kerb lamp - driver’s door635
E51Kerb lamp - passenger door653
F1 toFuse (in fusebox)Various
F30
F32Fuse - mixture preheating (not UK)232
F33Fuse - electronic carburettor (not UK)201
F34Fuse (in relay box, engine compartment)834
F35Voltage stabiliser302
F36Fuse - fuel filter heating (Diesel models)866
G1Battery101
G2Alternator110
G3Battery - Diesel models846
G6Alternator - Diesel models850 to 852
H2Horn591
H3Direction indicator warning lamp318, 320
H4Oil pressure warning lamp310
H5Brake fluid level warning lamp313
H6Hazard warning flasher warning lamp470
H7Alternator charge warning lamp310
H8Headlamp main beam warning lamp322
H9Brake lamp - left388
H10Brake lamp - right390H11Direction indicator lamp - front left472
H12Direction indicatorlamp - rear left473
H13Direction indicator lamp - front right481
H14Direction indicator lamp - rear right482
H16Glow plug warning lamp (Diesel models)323
H17Trailer direction indicator warning lamp321
H18Horns (twin)592, 593
H19Headlamps-on warning buzzer494, 495
H21Handbrake-on warning lamp315
H23Radio/cassette player585, 586
H25Door mirror heater warning lamp678
H26ABS warning lamp319
H30Engine fault warning lamp324
H33Direction indicator side repeater lamp - left476
H34Direction indicator side repeater lamp - right478
H42Automatic transmission warning lamp325
H45Four-wheel-drive warning lamp327
H46Catalytic converter temperature warning lamp (not UK)329
K1Relay-heated rear window571 to 572
K5Relay - front foglamps448 to 450
K6Relay - air conditioning (not UK)801 to 802
K7Relay - air conditioning blower (not UK)808 to 809
K8Relay - intermittent windscreen wipe503 to 506
K9Relay - headlamp wash522 to 523
K10Relay - direction indicator/hazard warning flashers467 to 469
K20HEI ignition control unit122 to 124
K25Relay - glow plugs (Diesel models)856 to 859
K30Relay - intermittent rear window wipe515 to 517
K35Relay - door mirror heater683 to 685
K37Central locking control unit606 to 612
K45Relay - mixture preheating (not UK)231 to 232
K47Relay - surge arrester (ABS)702 to 703
K50ABS control unit707 to 721
K51Relay - cooling fan830 to 831
K54Electronic carburettor control unit (not UK)203 to 226
K55Relay - electronic carburettor (not UK)203 to 206
K57Fuel injection control unit (not UK)139 to 161
K58Relay -fuel pump (not UK)162 to 163
K59Relay - daytime running lamps (not UK)420 to 426
K61Motronic M4.1 control unit170 to 194
K62Dim-dip control unit428 to 432
K63Relay - horn593 to 594
K64Relay - air conditioning blower (not UK)802 to 803
K67Relay -cooling fan827 to 828
K68Relay -fuel injection system294 to 299, 196 to 199
K69Motronic M2.5 control unit267 to 297
K71Ride control unit (not UK)739 to 754
K80Relay -fuel filter heater (Diesel models)865 to 866
K82Relay - engine revolution862 to 863
K83Four-wheel-drive control unit725 to 731 NoDescriptionTrackNoDescriptionTrack
Page 38 of 525
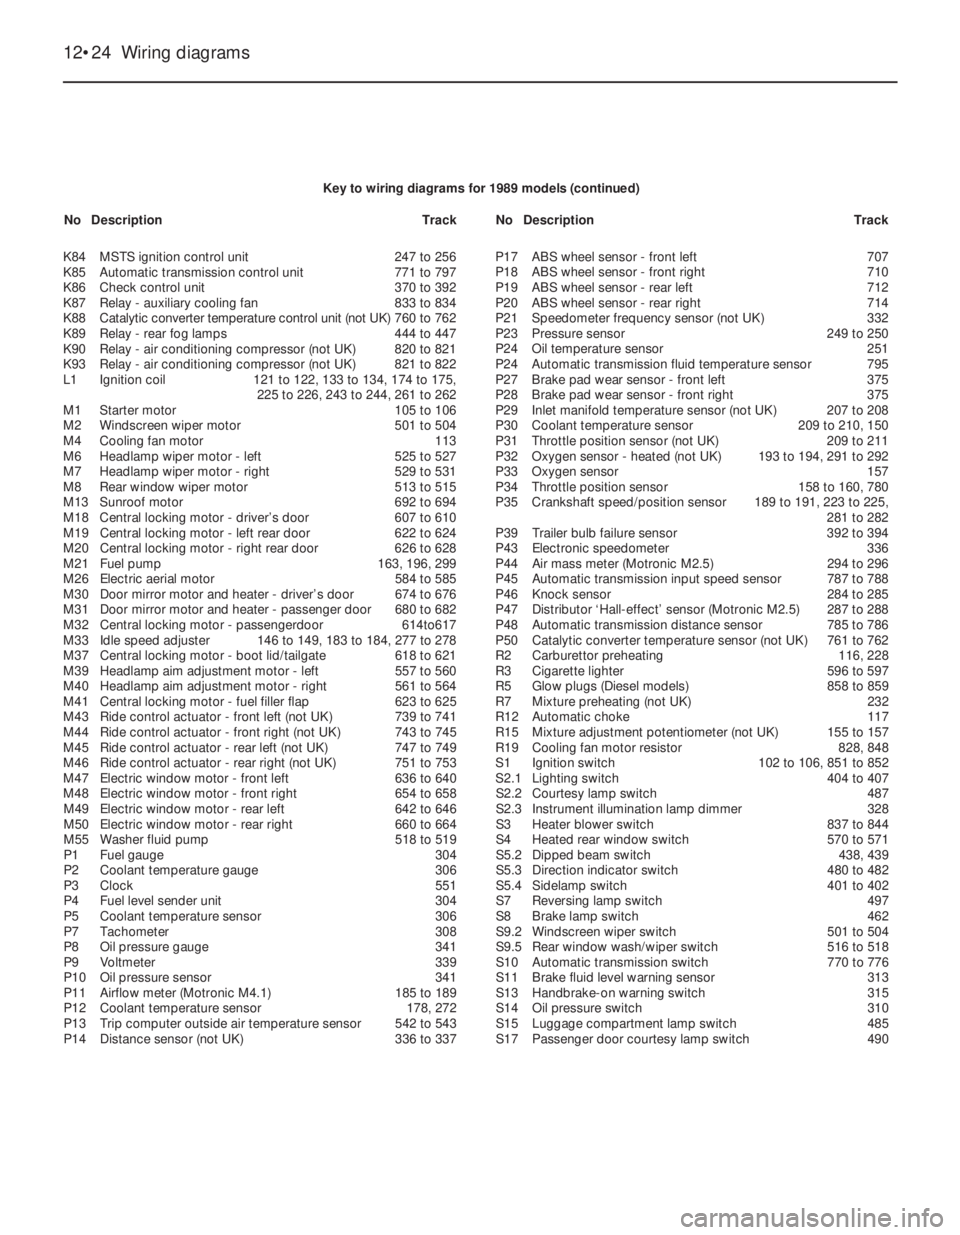
12•24Wiring diagrams
K84MSTS ignition control unit247 to 256
K85Automatic transmission control unit771 to 797
K86Check control unit370 to 392
K87Relay - auxiliary cooling fan833 to 834
K88Catalytic converter temperature control unit (not UK)760 to 762
K89Relay - rear fog lamps444 to 447
K90Relay - air conditioning compressor (not UK)820 to 821
K93Relay - air conditioning compressor (not UK)821 to 822
L1Ignition coil121 to 122, 133 to 134, 174 to 175,
225 to 226, 243 to 244, 261 to 262
M1Starter motor105 to 106
M2Windscreen wiper motor501 to 504
M4Cooling fan motor113
M6Headlamp wiper motor -left525 to 527
M7Headlamp wiper motor - right529 to 531
M8Rear window wiper motor513 to 515
M13Sunroof motor692 to 694
M18Central locking motor - driver’s door607 to 610
M19Central locking motor - left rear door622 to 624
M20Central locking motor - right rear door626 to 628
M21Fuel pump163, 196, 299
M26Electric aerial motor584 to 585
M30Door mirror motor and heater - driver’s door674 to 676
M31Door mirror motor and heater - passenger door680 to 682
M32Central locking motor - passengerdoor614to617
M33Idle speed adjuster146 to 149, 183 to 184, 277 to 278
M37Central locking motor - boot lid/tailgate618 to 621
M39Headlamp aim adjustment motor -left557 to 560
M40Headlamp aim adjustment motor - right561 to 564
M41Central locking motor - fuel filler flap623 to 625
M43Ride control actuator - front left (not UK)739 to 741
M44Ride control actuator - front right (not UK)743 to 745
M45Ride control actuator -rear left (not UK)747 to 749
M46Ride control actuator - rear right (not UK)751 to 753
M47Electric window motor - front left636 to 640
M48Electric window motor - front right654 to 658
M49Electric window motor - rear left642 to 646
M50Electric window motor - rear right660 to 664
M55Washer fluid pump518 to 519
P1Fuel gauge304
P2Coolant temperature gauge306
P3Clock551
P4Fuel level sender unit304
P5Coolant temperature sensor306
P7Tachometer308
P8Oil pressure gauge341
P9Voltmeter339
P10Oil pressure sensor341
P11Airflow meter (Motronic M4.1)185 to 189
P12Coolant temperature sensor178, 272
P13Trip computer outside air temperature sensor542 to 543
P14Distance sensor (not UK)336 to 337P17ABS wheel sensor - front left707
P18ABS wheel sensor -front right710
P19ABS wheel sensor -rear left712
P20ABS wheel sensor - rear right714
P21Speedometer frequency sensor (not UK)332
P23Pressure sensor 249 to 250
P24Oil temperature sensor251
P24Automatic transmission fluid temperature sensor795
P27Brake pad wear sensor - front left375
P28Brake pad wear sensor - front right375
P29Inlet manifold temperature sensor (not UK)207 to 208
P30Coolant temperature sensor209 to 210, 150
P31Throttle position sensor (not UK)209 to 211
P32Oxygen sensor - heated (not UK)193 to 194, 291 to 292
P33Oxygen sensor157
P34Throttle position sensor158 to 160, 780
P35Crankshaft speed/position sensor189 to 191, 223 to 225,
281 to 282
P39Trailer bulb failure sensor392 to 394
P43Electronic speedometer336
P44Air mass meter (Motronic M2.5)294 to 296
P45Automatic transmission input speed sensor787 to 788
P46Knock sensor284 to 285
P47Distributor ‘Hall-effect’ sensor (Motronic M2.5)287 to 288
P48Automatic transmission distance sensor785 to 786
P50Catalytic converter temperature sensor (not UK)761 to 762
R2Carburettor preheating116, 228
R3Cigarette lighter596 to 597
R5Glow plugs (Diesel models)858 to 859
R7Mixture preheating (not UK)232
R12Automatic choke117
R15Mixture adjustment potentiometer (not UK)155 to 157
R19Cooling fan motor resistor828, 848
S1Ignition switch102 to 106, 851 to 852
S2.1Lighting switch404 to 407
S2.2Courtesy lamp switch487
S2.3Instrument illumination lamp dimmer328
S3Heater blower switch837 to 844
S4Heated rear window switch570 to 571
S5.2Dipped beam switch438, 439
S5.3Direction indicator switch480 to 482
S5.4Sidelamp switch401 to 402
S7Reversing lamp switch497
S8Brake lamp switch462
S9.2Windscreen wiper switch501 to 504
S9.5Rear window wash/wiper switch516 to 518
S10Automatic transmission switch770 to 776
S11Brake fluid level warning sensor313
S13Handbrake-on warning switch315
S14Oil pressure switch310
S15Luggage compartment lamp switch485
S17Passenger door courtesy lamp switch490 Key to wiring diagrams for 1989 models (continued)
NoDescriptionTrackNoDescriptionTrack
Page 39 of 525
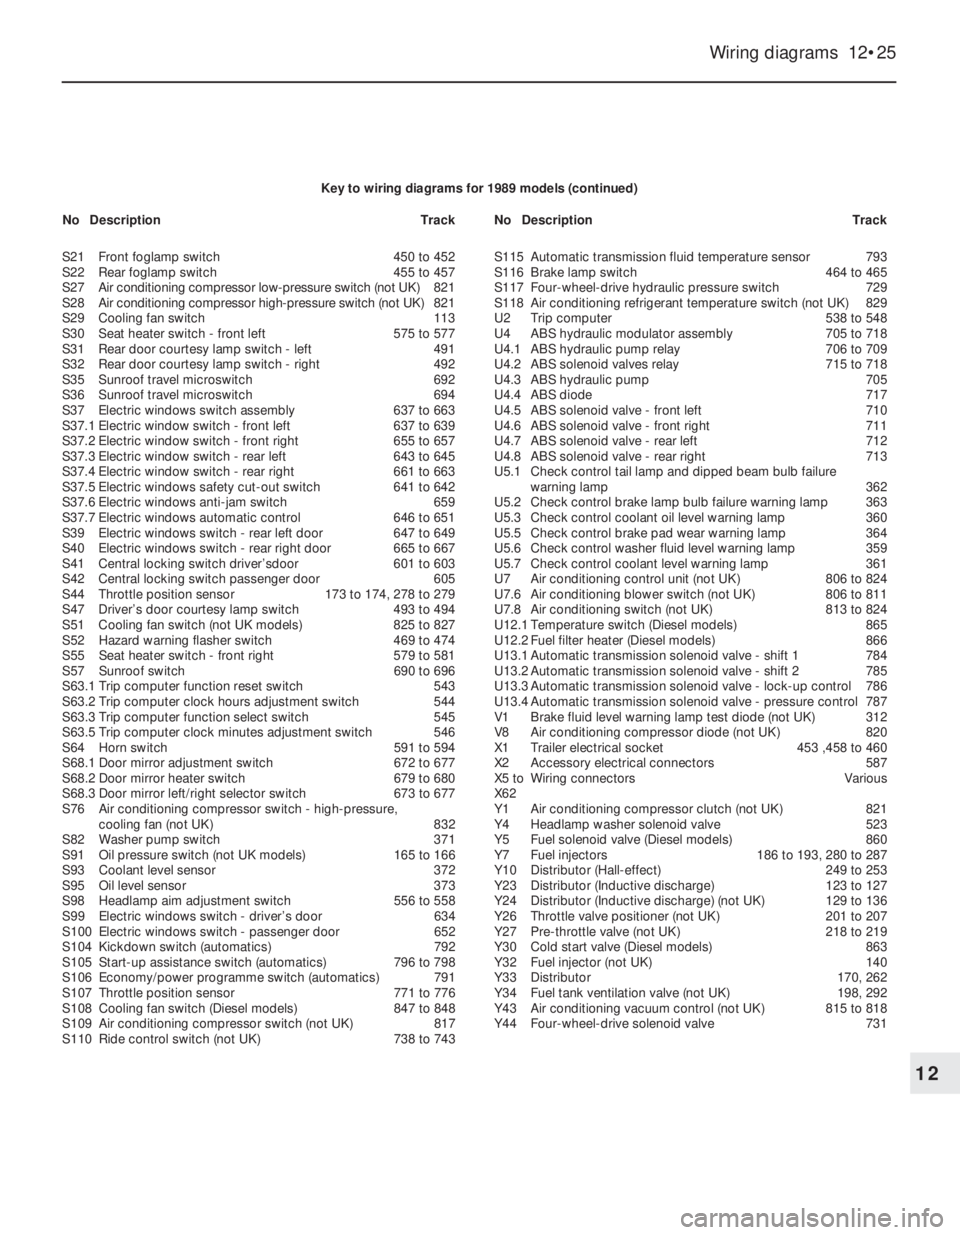
Wiring diagrams 12•25
12
Key to wiring diagrams for 1989 models (continued)
S21Front foglamp switch450 to 452
S22Rear foglamp switch455 to 457
S27Air conditioning compressor low-pressure switch (not UK)821
S28Air conditioning compressor high-pressure switch (not UK)821
S29Cooling fan switch113
S30Seat heater switch - front left575 to 577
S31Rear door courtesy lamp switch - left491
S32Rear door courtesy lamp switch - right492
S35Sunroof travel microswitch692
S36Sunroof travel microswitch694
S37Electric windows switch assembly637 to 663
S37.1Electric window switch - front left637 to 639
S37.2Electric window switch - front right655 to 657
S37.3Electric window switch - rear left643 to 645
S37.4Electric window switch - rear right661 to 663
S37.5Electric windows safety cut-out switch641 to 642
S37.6Electric windows anti-jam switch659
S37.7Electric windows automatic control646 to 651
S39Electric windows switch - rear left door647 to 649
S40Electric windows switch - rear right door665 to 667
S41Central locking switch driver’sdoor601 to 603
S42Central locking switch passenger door605
S44Throttle position sensor173 to 174, 278 to 279
S47Driver’s door courtesy lamp switch493 to 494
S51Cooling fan switch (not UK models)825 to 827
S52Hazard warning flasher switch469 to 474
S55Seat heater switch - front right579 to 581
S57Sunroof switch690 to 696
S63.1Trip computer function reset switch543
S63.2Trip computer clock hours adjustment switch544
S63.3Trip computer function select switch545
S63.5Trip computer clock minutes adjustment switch546
S64Horn switch591 to 594
S68.1Door mirror adjustment switch672 to 677
S68.2Door mirror heater switch679 to 680
S68.3Door mirror left/right selector switch673 to 677
S76Air conditioning compressor switch -high-pressure,
cooling fan (not UK)832
S82Washer pump switch371
S91Oil pressure switch (not UK models)165 to 166
S93Coolant level sensor372
S95Oil level sensor373
S98Headlamp aim adjustment switch556 to 558
S99Electric windows switch - driver’s door634
S100Electric windows switch -passenger door652
S104Kickdown switch (automatics)792
S105Start-up assistance switch (automatics)796 to 798
S106Economy/power programme switch (automatics)791
S107Throttle position sensor 771 to 776
S108Cooling fan switch (Diesel models)847 to 848
S109Air conditioning compressor switch (not UK)817
S110Ride control switch (not UK)738 to 743S115Automatic transmission fluid temperature sensor793
S116Brake lamp switch464 to 465
S117Four-wheel-drive hydraulic pressure switch729
S118Air conditioning refrigerant temperature switch (not UK)829
U2Trip computer538 to 548
U4ABS hydraulic modulator assembly705 to 718
U4.1ABS hydraulic pump relay706 to 709
U4.2ABS solenoid valves relay715 to 718
U4.3ABS hydraulic pump705
U4.4ABS diode717
U4.5ABS solenoid valve - front left710
U4.6ABS solenoid valve - front right711
U4.7ABS solenoid valve - rear left712
U4.8ABS solenoid valve - rear right713
U5.1Check control tail lamp and dipped beam bulb failure
warning lamp362
U5.2Check control brake lamp bulb failure warning lamp 363
U5.3Check control coolant oil level warning lamp360
U5.5Check control brake pad wear warning lamp364
U5.6Check control washer fluid level warning lamp359
U5.7Check control coolant level warning lamp361
U7Air conditioning control unit (not UK)806 to 824
U7.6Air conditioning blower switch (not UK)806 to 811
U7.8Air conditioning switch (not UK)813 to 824
U12.1Temperature switch (Diesel models)865
U12.2Fuel filter heater (Diesel models)866
U13.1Automatic transmission solenoid valve -shift 1784
U13.2Automatic transmission solenoid valve - shift 2785
U13.3Automatic transmission solenoid valve - lock-up control786
U13.4Automatic transmission solenoid valve - pressure control787
V1Brake fluid level warning lamp test diode (not UK)312
V8 Air conditioning compressor diode (not UK)820
X1Trailer electrical socket453 ,458 to 460
X2Accessory electrical connectors587
X5 toWiring connectorsVarious
X62
Y1Air conditioning compressor clutch (not UK)821
Y4Headlamp washer solenoid valve523
Y5Fuel solenoid valve (Diesel models)860
Y7Fuel injectors186 to 193, 280 to 287
Y10Distributor (Hall-effect)249 to 253
Y23Distributor (Inductive discharge)123 to 127
Y24Distributor (Inductive discharge) (not UK)129 to 136
Y26Throttle valve positioner (not UK)201 to 207
Y27Pre-throttle valve (not UK)218 to 219
Y30Cold start valve (Diesel models)863
Y32Fuel injector (not UK)140
Y33Distributor170, 262
Y34Fuel tank ventilation valve (not UK)198, 292
Y43Air conditioning vacuum control (not UK)815 to 818
Y44Four-wheel-drive solenoid valve731 NoDescriptionTrackNoDescriptionTrack
Page 52 of 525
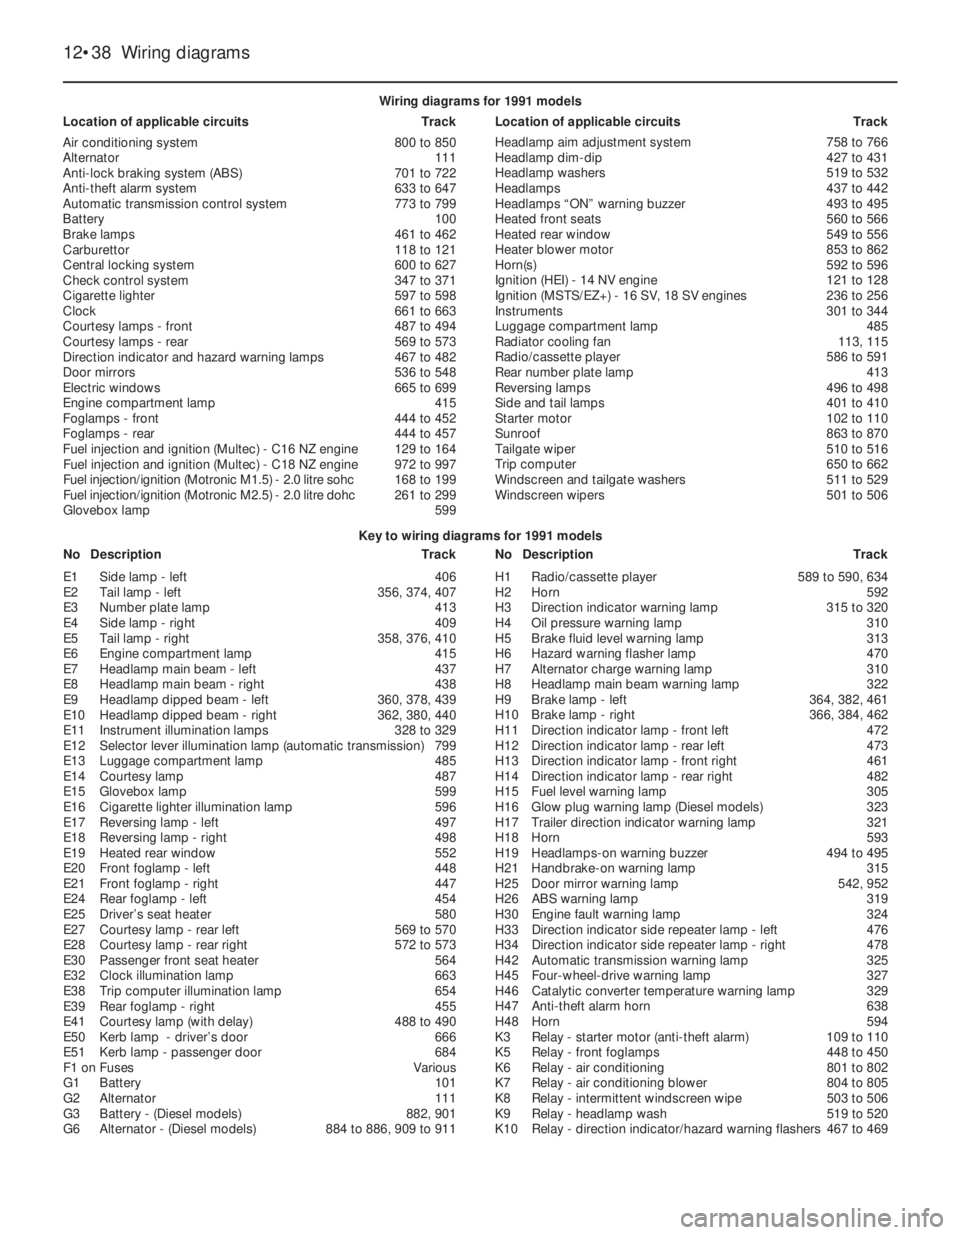
12•38Wiring diagrams
Key to wiring diagrams for 1991 models
NoDescriptionTrackNoDescriptionTrack Wiring diagrams for 1991 models
Location of applicable circuitsTrackLocation of applicable circuitsTrack
Air conditioning system800 to 850
Alternator111
Anti-lock braking system (ABS)701 to 722
Anti-theft alarm system633 to 647
Automatic transmission control system773 to 799
Battery100
Brake lamps461 to 462
Carburettor118 to 121
Central locking system600 to 627
Check control system347 to 371
Cigarette lighter597 to 598
Clock661 to 663
Courtesy lamps - front487 to 494
Courtesy lamps - rear569 to 573
Direction indicator and hazard warning lamps467 to 482
Door mirrors536 to 548
Electric windows665 to 699
Engine compartment lamp415
Foglamps - front444 to 452
Foglamps - rear444 to 457
Fuel injection and ignition (Multec) - C16NZ engine129 to 164
Fuel injection and ignition (Multec) - C18NZ engine972 to 997
Fuel injection/ignition (Motronic M1.5) - 2.0litre sohc 168 to 199
Fuel injection/ignition (Motronic M2.5) - 2.0litre dohc 261 to 299
Glovebox lamp599Headlamp aim adjustment system758 to 766
Headlamp dim-dip427 to 431
Headlamp washers519 to 532
Headlamps437 to 442
Headlamps “ON” warning buzzer493 to 495
Heated front seats560 to 566
Heated rear window549 to 556
Heater blower motor853 to 862
Horn(s)592 to 596
Ignition (HEI) - 14NV engine121 to 128
Ignition (MSTS/EZ+) - 16SV, 18 SV engines236 to 256
Instruments301 to 344
Luggage compartment lamp485
Radiator cooling fan113, 115
Radio/cassette player586 to 591
Rear number plate lamp413
Reversing lamps496 to 498
Side and tail lamps401 to 410
Starter motor102 to 110
Sunroof863 to 870
Tailgate wiper510 to 516
Trip computer650 to 662
Windscreen and tailgate washers511 to 529
Windscreen wipers501 to 506
E1Side lamp - left406
E2Tail lamp - left356, 374, 407
E3Number plate lamp413
E4Side lamp - right409
E5Tail lamp - right358, 376, 410
E6Engine compartment lamp415
E7Headlamp main beam - left437
E8Headlamp main beam - right438
E9Headlamp dipped beam - left360, 378, 439
E10Headlamp dipped beam - right362, 380, 440
E11Instrument illumination lamps328 to 329
E12Selector lever illumination lamp (automatic transmission)799
E13Luggage compartment lamp485
E14Courtesy lamp487
E15Glovebox lamp599
E16Cigarette lighter illumination lamp596
E17Reversing lamp - left497
E18Reversing lamp - right498
E19Heated rear window552
E20Front foglamp - left448
E21Front foglamp - right447
E24Rear foglamp - left454
E25Driver’s seat heater580
E27Courtesy lamp - rear left569 to 570
E28Courtesy lamp - rear right572 to 573
E30Passenger front seat heater564
E32Clock illumination lamp663
E38Trip computer illumination lamp654
E39Rear foglamp - right455
E41Courtesy lamp (with delay)488 to 490
E50Kerb lamp - driver’s door666
E51Kerb lamp - passenger door684
F1 onFusesVarious
G1Battery101
G2Alternator111
G3Battery - (Diesel models)882, 901
G6Alternator - (Diesel models)884 to 886, 909 to 911H1Radio/cassette player589 to 590, 634
H2Horn592
H3Direction indicator warning lamp315 to 320
H4Oil pressure warning lamp310
H5Brake fluid level warning lamp313
H6Hazard warning flasher lamp470
H7Alternator charge warning lamp310
H8Headlamp main beam warning lamp322
H9Brake lamp - left364, 382, 461
H10Brake lamp - right366, 384, 462
H11Direction indicator lamp - front left472
H12Direction indicator lamp - rear left473
H13Direction indicator lamp - front right461
H14Direction indicator lamp - rear right482
H15Fuel level warning lamp305
H16Glow plug warning lamp (Diesel models)323
H17Trailer direction indicator warning lamp321
H18Horn593
H19Headlamps-on warning buzzer494 to 495
H21Handbrake-on warning lamp315
H25Door mirror warning lamp542, 952
H26ABS warning lamp319
H30Engine fault warning lamp324
H33Direction indicator side repeater lamp - left476
H34Direction indicator side repeater lamp - right478
H42Automatic transmission warning lamp325
H45Four-wheel-drive warning lamp327
H46Catalytic converter temperature warning lamp329
H47Anti-theft alarm horn638
H48Horn594
K3Relay - starter motor (anti-theft alarm)109 to 110
K5Relay - front foglamps448 to 450
K6Relay - air conditioning801 to 802
K7Relay - air conditioning blower804 to 805
K8Relay - intermittent windscreen wipe503 to 506
K9Relay - headlamp wash519 to 520
K10Relay - direction indicator/hazard warning flashers467 to 469
Page 53 of 525
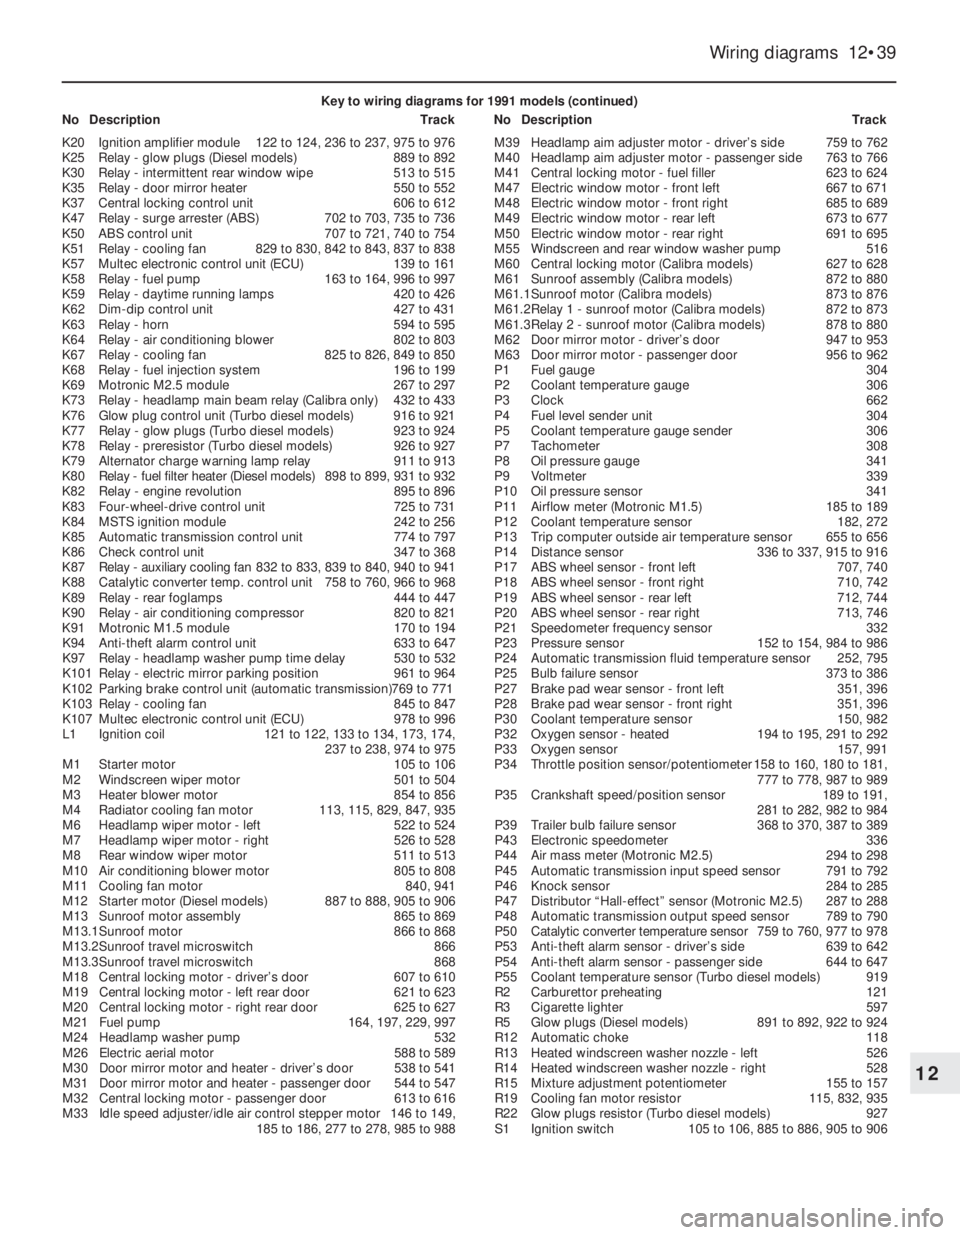
Wiring diagrams 12•39
12
Key to wiring diagrams for 1991 models (continued)
NoDescriptionTrackNoDescriptionTrack
K20Ignition amplifier module122 to 124, 236 to 237, 975 to 976
K25Relay - glow plugs (Diesel models)889 to 892
K30Relay - intermittent rear window wipe513 to 515
K35Relay - door mirror heater550 to 552
K37Central locking control unit606 to 612
K47Relay - surge arrester (ABS)702 to 703, 735 to 736
K50ABS control unit707 to 721, 740 to 754
K51Relay - cooling fan829 to 830, 842 to 843, 837 to 838
K57Multec electronic control unit (ECU)139 to 161
K58Relay - fuel pump163 to 164, 996 to 997
K59Relay - daytime running lamps420 to 426
K62Dim-dip control unit427 to 431
K63Relay - horn594 to 595
K64Relay - air conditioning blower802 to 803
K67Relay - cooling fan825 to 826, 849 to 850
K68Relay - fuel injection system196 to 199
K69Motronic M2.5 module267 to 297
K73Relay - headlamp main beam relay (Calibra only)432 to 433
K76Glow plug control unit (Turbo diesel models)916 to 921
K77Relay - glow plugs (Turbo diesel models)923 to 924
K78Relay - preresistor (Turbo diesel models)926 to 927
K79Alternator charge warning lamp relay911 to 913
K80Relay - fuel filter heater (Diesel models)898 to 899, 931 to 932
K82Relay - engine revolution895 to 896
K83Four-wheel-drive control unit725 to 731
K84MSTS ignition module242 to 256
K85Automatic transmission control unit774 to 797
K86Check control unit347 to 368
K87Relay - auxiliary cooling fan832 to 833, 839 to 840, 940 to 941
K88Catalytic converter temp. control unit758 to 760, 966 to 968
K89Relay - rear foglamps444 to 447
K90Relay - air conditioning compressor820 to 821
K91Motronic M1.5 module170 to 194
K94Anti-theft alarm control unit633 to 647
K97Relay - headlamp washer pump time delay530 to 532
K101Relay - electric mirror parking position961 to 964
K102Parking brake control unit (automatic transmission)769 to 771
K103Relay - cooling fan845 to 847
K107Multec electronic control unit (ECU)978 to 996
L1Ignition coil121 to 122, 133 to 134, 173, 174,
237 to 238, 974 to 975
M1Starter motor105 to 106
M2Windscreen wiper motor501 to 504
M3Heater blower motor854 to 856
M4Radiator cooling fan motor113, 115, 829, 847, 935
M6Headlamp wiper motor - left522 to 524
M7Headlamp wiper motor - right526 to 528
M8Rear window wiper motor511 to 513
M10Air conditioning blower motor805 to 808
M11Cooling fan motor840, 941
M12Starter motor (Diesel models)887 to 888, 905 to 906
M13Sunroof motor assembly865 to 869
M13.1Sunroof motor866 to 868
M13.2Sunroof travel microswitch866
M13.3Sunroof travel microswitch868
M18Central locking motor - driver’s door607 to 610
M19Central locking motor - left rear door621 to 623
M20Central locking motor - right rear door625 to 627
M21Fuel pump164, 197, 229, 997
M24Headlamp washer pump532
M26Electric aerial motor588 to 589
M30Door mirror motor and heater - driver’s door538 to 541
M31Door mirror motor and heater - passenger door544 to 547
M32Central locking motor - passenger door613 to 616
M33Idle speed adjuster/idle air control stepper motor146 to 149,
185 to 186, 277 to 278, 985 to 988M39Headlamp aim adjuster motor - driver’s side759 to 762
M40Headlamp aim adjuster motor - passenger side763 to 766
M41Central locking motor - fuel filler623 to 624
M47Electric window motor - front left667 to 671
M48Electric window motor - front right685 to 689
M49Electric window motor - rear left673 to 677
M50Electric window motor - rear right691 to 695
M55Windscreen and rear window washer pump516
M60Central locking motor (Calibra models)627 to 628
M61Sunroof assembly (Calibra models)872 to 880
M61.1Sunroof motor (Calibra models)873 to 876
M61.2Relay 1 - sunroof motor (Calibra models)872 to 873
M61.3Relay 2 - sunroof motor (Calibra models)878 to 880
M62Door mirror motor - driver’s door947 to 953
M63Door mirror motor - passenger door956 to 962
P1Fuel gauge304
P2Coolant temperature gauge306
P3Clock662
P4Fuel level sender unit304
P5Coolant temperature gauge sender306
P7Tachometer308
P8Oil pressure gauge341
P9Voltmeter339
P10Oil pressure sensor341
P11Airflow meter (Motronic M1.5)185 to 189
P12Coolant temperature sensor182, 272
P13Trip computer outside air temperature sensor655 to 656
P14Distance sensor336 to 337, 915 to 916
P17ABS wheel sensor - front left707, 740
P18ABS wheel sensor - front right710, 742
P19ABS wheel sensor - rear left712, 744
P20ABS wheel sensor - rear right713, 746
P21Speedometer frequency sensor332
P23Pressure sensor152 to 154, 984 to 986
P24Automatic transmission fluid temperature sensor252, 795
P25Bulb failure sensor373 to 386
P27Brake pad wear sensor - front left351, 396
P28Brake pad wear sensor - front right351, 396
P30Coolant temperature sensor150, 982
P32Oxygen sensor - heated194 to 195, 291 to 292
P33Oxygen sensor157, 991
P34Throttle position sensor/potentiometer158 to 160, 180 to 181,
777 to 778, 987 to 989
P35Crankshaft speed/position sensor189 to 191,
281 to 282, 982 to 984
P39Trailer bulb failure sensor368 to 370, 387 to 389
P43Electronic speedometer336
P44Air mass meter (Motronic M2.5)294 to 298
P45Automatic transmission input speed sensor791 to 792
P46Knock sensor284 to 285
P47Distributor “Hall-effect” sensor (Motronic M2.5)287 to 288
P48Automatic transmission output speed sensor789 to 790
P50Catalytic converter temperature sensor759 to 760, 977 to 978
P53Anti-theft alarm sensor - driver’s side639 to 642
P54Anti-theft alarm sensor - passenger side644 to 647
P55Coolant temperature sensor (Turbo diesel models)919
R2Carburettor preheating121
R3Cigarette lighter597
R5Glow plugs (Diesel models)891 to 892, 922 to 924
R12Automatic choke118
R13Heated windscreen washer nozzle - left526
R14Heated windscreen washer nozzle - right528
R15Mixture adjustment potentiometer155 to 157
R19Cooling fan motor resistor115, 832, 935
R22Glow plugs resistor (Turbo diesel models)927
S1Ignition switch105 to 106, 885 to 886, 905 to 906