fuel pump bracket and pump removal OPEL CALIBRA 1988 Service Repair Manual
[x] Cancel search | Manufacturer: OPEL, Model Year: 1988, Model line: CALIBRA, Model: OPEL CALIBRA 1988Pages: 525, PDF Size: 58.26 MB
Page 4 of 525
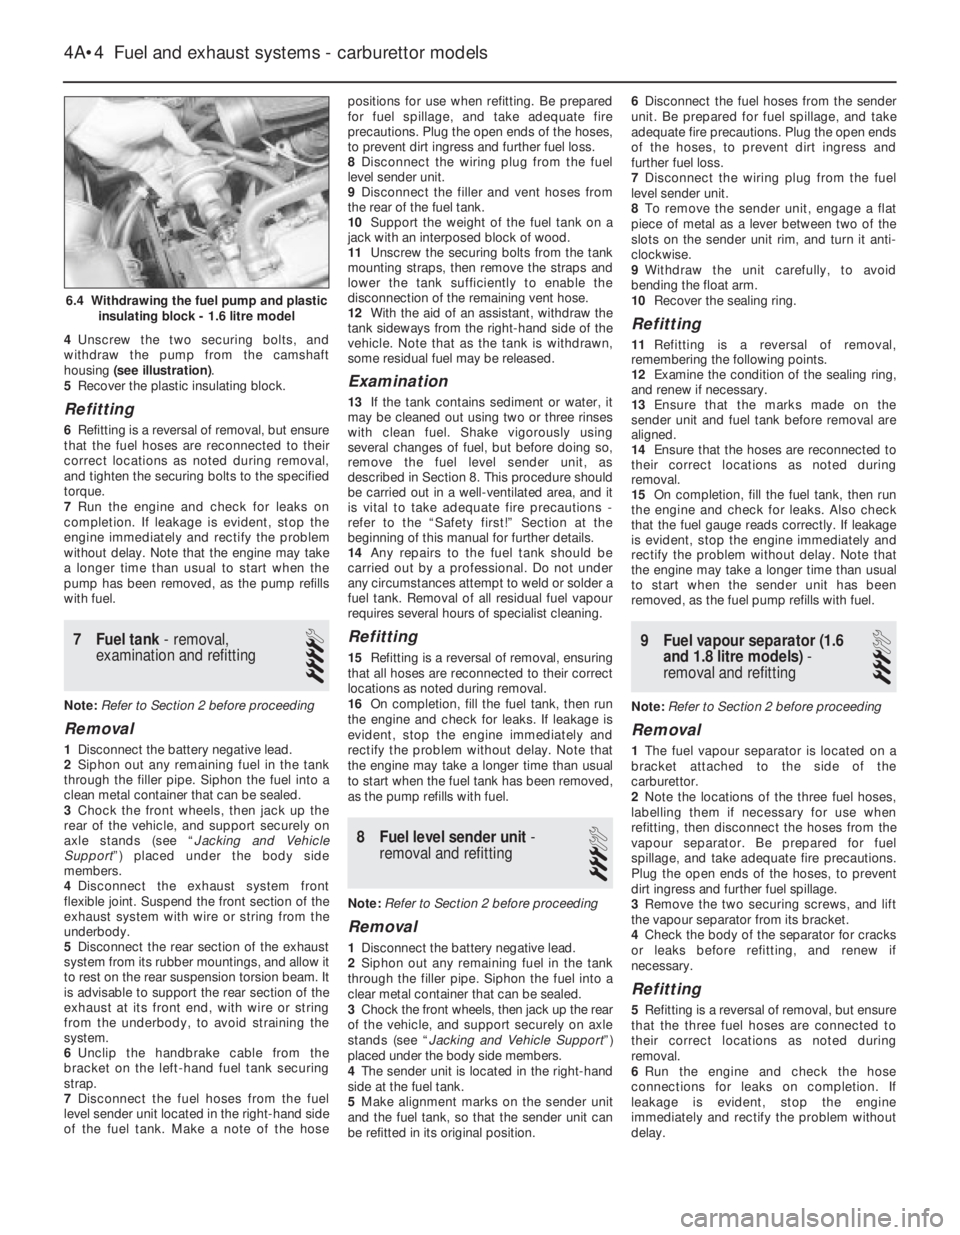
4Unscrew the two securing bolts, and
withdraw the pump from the camshaft
housing (see illustration).
5Recover the plastic insulating block.
Refitting
6Refitting is a reversal of removal, but ensure
that the fuel hoses are reconnected to their
correct locations as noted during removal,
and tighten the securing bolts to the specified
torque.
7Run the engine and check for leaks on
completion. If leakage is evident, stop the
engine immediately and rectify the problem
without delay. Note that the engine may take
a longer time than usual to start when the
pump has been removed, as the pump refills
with fuel.
7Fuel tank - removal,
examination and refitting
4
Note: Refer to Section 2 before proceeding
Removal
1Disconnect the battery negative lead.
2Siphon out any remaining fuel in the tank
through the filler pipe. Siphon the fuel into a
clean metal container that can be sealed.
3Chock the front wheels, then jack up the
rear of the vehicle, and support securely on
axle stands (see “Jacking and Vehicle
Support”) placed under the body side
members.
4Disconnect the exhaust system front
flexible joint. Suspend the front section of the
exhaust system with wire or string from the
underbody.
5Disconnect the rear section of the exhaust
system from its rubber mountings, and allow it
to rest on the rear suspension torsion beam. It
is advisable to support the rear section of the
exhaust at its front end, with wire or string
from the underbody, to avoid straining the
system.
6Unclip the handbrake cable from the
bracket on the left-hand fuel tank securing
strap.
7Disconnect the fuel hoses from the fuel
level sender unit located in the right-hand side
of the fuel tank. Make a note of the hosepositions for use when refitting. Be prepared
for fuel spillage, and take adequate fire
precautions. Plug the open ends of the hoses,
to prevent dirt ingress and further fuel loss.
8Disconnect the wiring plug from the fuel
level sender unit.
9Disconnect the filler and vent hoses from
the rear of the fuel tank.
10Support the weight of the fuel tank on a
jack with an interposed block of wood.
11Unscrew the securing bolts from the tank
mounting straps, then remove the straps and
lower the tank sufficiently to enable the
disconnection of the remaining vent hose.
12With the aid of an assistant, withdraw the
tank sideways from the right-hand side of the
vehicle. Note that as the tank is withdrawn,
some residual fuel may be released.
Examination
13If the tank contains sediment or water, it
may be cleaned out using two or three rinses
with clean fuel. Shake vigorously using
several changes of fuel, but before doing so,
remove the fuel level sender unit, as
described in Section 8. This procedure should
be carried out in a well-ventilated area, and it
is vital to take adequate fire precautions -
refer to the “Safety first!” Section at the
beginning of this manual for further details.
14Any repairs to the fuel tank should be
carried out by a professional. Do not under
any circumstances attempt to weld or solder a
fuel tank. Removal of all residual fuel vapour
requires several hours of specialist cleaning.
Refitting
15Refitting is a reversal of removal, ensuring
that all hoses are reconnected to their correct
locations as noted during removal.
16On completion, fill the fuel tank, then run
the engine and check for leaks. If leakage is
evident, stop the engine immediately and
rectify the problem without delay. Note that
the engine may take a longer time than usual
to start when the fuel tank has been removed,
as the pump refills with fuel.
8Fuel level sender unit -
removal and refitting
3
Note: Refer to Section 2 before proceeding
Removal
1Disconnect the battery negative lead.
2Siphon out any remaining fuel in the tank
through the filler pipe. Siphon the fuel into a
clear metal container that can be sealed.
3Chock the front wheels, then jack up the rear
of the vehicle, and support securely on axle
stands (see “Jacking and Vehicle Support”)
placed under the body side members.
4The sender unit is located in the right-hand
side at the fuel tank.
5Make alignment marks on the sender unit
and the fuel tank, so that the sender unit can
be refitted in its original position.6Disconnect the fuel hoses from the sender
unit. Be prepared for fuel spillage, and take
adequate fire precautions. Plug the open ends
of the hoses, to prevent dirt ingress and
further fuel loss.
7Disconnect the wiring plug from the fuel
level sender unit.
8To remove the sender unit, engage a flat
piece of metal as a lever between two of the
slots on the sender unit rim, and turn it anti-
clockwise.
9Withdraw the unit carefully, to avoid
bending the float arm.
10Recover the sealing ring.
Refitting
11Refitting is a reversal of removal,
remembering the following points.
12Examine the condition of the sealing ring,
and renew if necessary.
13Ensure that the marks made on the
sender unit and fuel tank before removal are
aligned.
14Ensure that the hoses are reconnected to
their correct locations as noted during
removal.
15On completion, fill the fuel tank, then run
the engine and check for leaks. Also check
that the fuel gauge reads correctly. If leakage
is evident, stop the engine immediately and
rectify the problem without delay. Note that
the engine may take a longer time than usual
to start when the sender unit has been
removed, as the fuel pump refills with fuel.
9Fuel vapour separator (1.6
and 1.8 litre models) -
removal and refitting
3
Note: Refer to Section 2 before proceeding
Removal
1The fuel vapour separator is located on a
bracket attached to the side of the
carburettor.
2Note the locations of the three fuel hoses,
labelling them if necessary for use when
refitting, then disconnect the hoses from the
vapour separator. Be prepared for fuel
spillage, and take adequate fire precautions.
Plug the open ends of the hoses, to prevent
dirt ingress and further fuel spillage.
3Remove the two securing screws, and lift
the vapour separator from its bracket.
4Check the body of the separator for cracks
or leaks before refitting, and renew if
necessary.
Refitting
5Refitting is a reversal of removal, but ensure
that the three fuel hoses are connected to
their correct locations as noted during
removal.
6Run the engine and check the hose
connections for leaks on completion. If
leakage is evident, stop the engine
immediately and rectify the problem without
delay.
4A•4Fuel and exhaust systems - carburettor models
6.4 Withdrawing the fuel pump and plastic
insulating block - 1.6 litre model
Page 5 of 525
10Throttle pedal - removal and
refitting
3
Removal
1Working inside the vehicle, remove the
lower trim panel from the driver’s footwell.
2Slide the cable retainer from the bracket on
the top of the pedal, and disconnect the cable
end from the pedal.
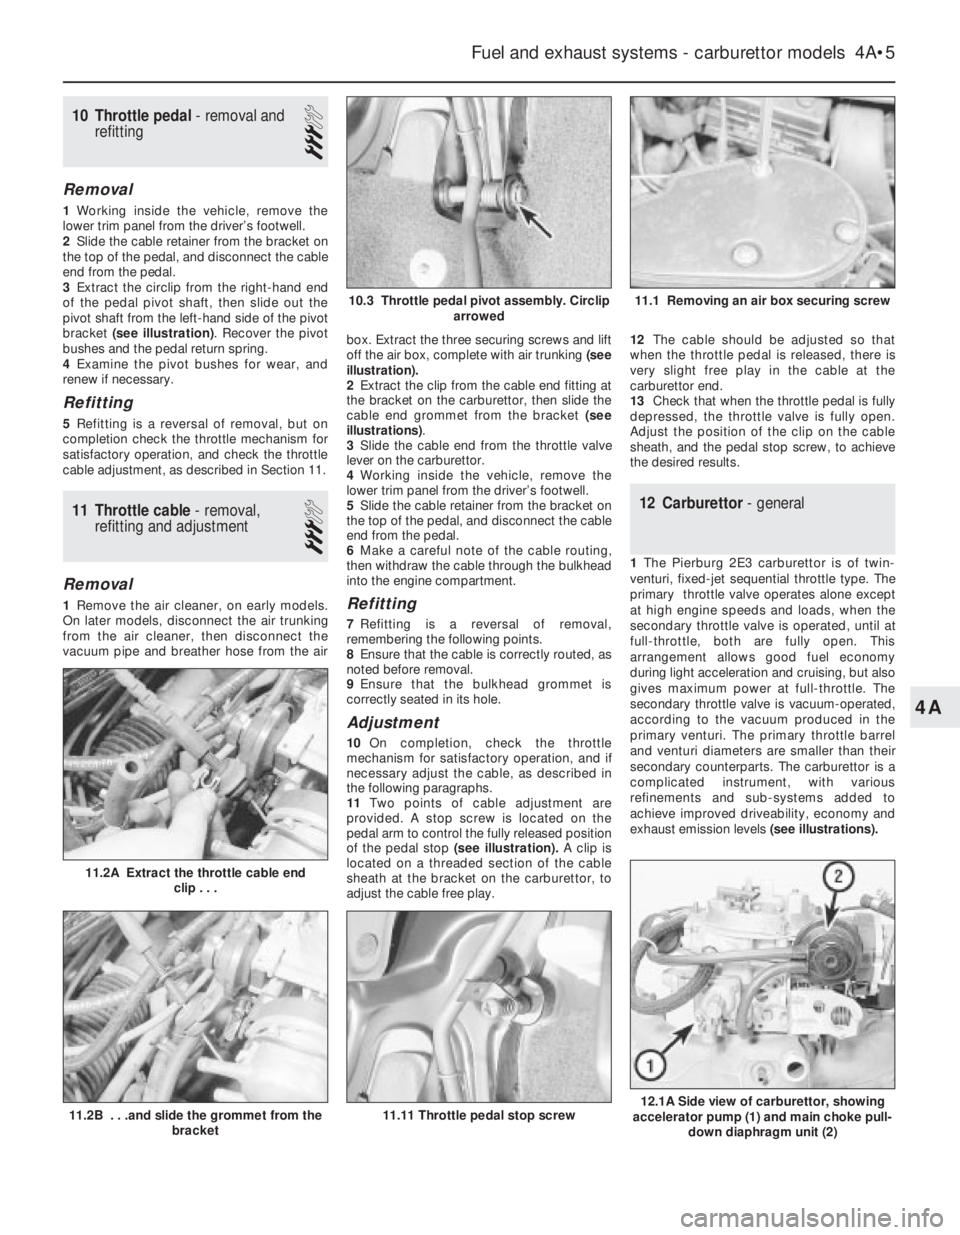
3Extract the circlip from the right-hand end
of the pedal pivot shaft, then slide out the
pivot shaft from the left-hand side of the pivot
bracket (see illustration). Recover the pivot
bushes and the pedal return spring.
4Examine the pivot bushes for wear, and
renew if necessary.
Refitting
5Refitting is a reversal of removal, but on
completion check the throttle mechanism for
satisfactory operation, and check the throttle
cable adjustment, as described in Section 11.
11Throttle cable - removal,
refitting and adjustment
3
Removal
1Remove the air cleaner, on early models.
On later models, disconnect the air trunking
from the air cleaner, then disconnect the
vacuum pipe and breather hose from the airbox. Extract the three securing screws and lift
off the air box, complete with air trunking(see
illustration).
2Extract the clip from the cable end fitting at
the bracket on the carburettor, then slide the
cable end grommet from the bracket (see
illustrations).
3Slide the cable end from the throttle valve
lever on the carburettor.
4Working inside the vehicle, remove the
lower trim panel from the driver’s footwell.
5Slide the cable retainer from the bracket on
the top of the pedal, and disconnect the cable
end from the pedal.
6Make a careful note of the cable routing,
then withdraw the cable through the bulkhead
into the engine compartment.Refitting
7Refitting is a reversal of removal,
remembering the following points.
8Ensure that the cable is correctly routed, as
noted before removal.
9Ensure that the bulkhead grommet is
correctly seated in its hole.
Adjustment
10On completion, check the throttle
mechanism for satisfactory operation, and if
necessary adjust the cable, as described in
the following paragraphs.
11Two points of cable adjustment are
provided. A stop screw is located on the
pedal arm to control the fully released position
of the pedal stop (see illustration).A clip is
located on a threaded section of the cable
sheath at the bracket on the carburettor, to
adjust the cable free play.12The cable should be adjusted so that
when the throttle pedal is released, there is
very slight free play in the cable at the
carburettor end.
13Check that when the throttle pedal is fully
depressed, the throttle valve is fully open.
Adjust the position of the clip on the cable
sheath, and the pedal stop screw, to achieve
the desired results.
12Carburettor - general
1The Pierburg 2E3 carburettor is of twin-
venturi, fixed-jet sequential throttle type. The
primary throttle valve operates alone except
at high engine speeds and loads, when the
secondary throttle valve is operated, until at
full-throttle, both are fully open. This
arrangement allows good fuel economy
during light acceleration and cruising, but also
gives maximum power at full-throttle. The
secondary throttle valve is vacuum-operated,
according to the vacuum produced in the
primary venturi. The primary throttle barrel
and venturi diameters are smaller than their
secondary counterparts. The carburettor is a
complicated instrument, with various
refinements and sub-systems added to
achieve improved driveability, economy and
exhaust emission levels(see illustrations).
Fuel and exhaust systems - carburettor models 4A•5
11.2A Extract the throttle cable end
clip . . .
12.1A Side view of carburettor, showing
accelerator pump (1) and main choke pull-
down diaphragm unit (2)11.11 Throttle pedal stop screw11.2B . . .and slide the grommet from the
bracket
11.1 Removing an air box securing screw10.3 Throttle pedal pivot assembly. Circlip
arrowed
4A
Page 6 of 525
2A separate idle system operates
independently from the main jet system,
supplying fuel by way of the mixture control
screw.
3The main jets are calibrated to suit engine
requirements at mid-range throttle openings.
To provide the necessary fuel enrichment at
full throttle, a vacuum-operated power valve is
used. The valve provides extra fuel under the
low vacuum conditions associated with wide
throttle openings.
4To provide an enriched mixture during
acceleration, an accelerator pump delivers
extra fuel to the primary main venturi. The
accelerator pump is operated mechanically by
a cam on the throttle linkage.
5A fully automatic choke is fitted, operated
by a coolant and electrically heated bi-metal
coil. When the engine is cold, the bi-metal coil
is fully wound up, holding the choke plate
(fitted to the primary barrel) closed. As the
engine warms up, the bi-metal coil is heated
and therefore unwinds, progressively opening
the choke plate. A vacuum operated pull-
down system is employed, whereby, if the
engine is under choke but is only cruising (i.e.
not under heavy load) the choke plate is
opened against the action of the bi-metal coil.
The pull-down system prevents an over-rich
mixture, which reduces fuel economy and
may cause unnecessary engine wear when
the engine is cold. A secondary pull-down
solenoid is fitted, which operates in
conjunction with the main diaphragm unit to
modify the pull-down characteristics,
improving fuel economy.
61.8 litre models are fitted with an idle cut-off
solenoid. This is an electrically operated valve,
which interrupts the idle mixture circuit when
the ignition is switched off, this preventing
engine “run-on”.13Carburettor - removal,
overhaul and refitting
3
Note: Refer to Section 2 before proceeding.
New gasket(s) must be used when refitting the
carburettor. A tachometer and an exhaust gas
analyser will be required to check the idle
speed and mixture on completion
Removal
1Disconnect the battery negative lead.
2Remove the air cleaner, on early models.
On later models, disconnect the air trunking
from the air cleaner, then disconnect the
vacuum pipe and breather hose from the air
box. Extract the three securing screws and lift
off the air box, complete with air trunking.
3On 1.4 litre models, disconnect the fuel
supply hose from the carburettor, and on 1.6
and 1.8 litre models, disconnect the fuel
supply and return hoses from the vapour
separator. Be prepared for fuel spillage, and
take adequate fire precautions. Plug the ends
of the hoses, to prevent dirt ingress and
further fuel spillage.
4Extract the clip from the throttle cable end
fitting at the bracket on the carburettor, then
slide the cable end grommet from the bracket,
and slide the cable end from the throttle valve
lever.
5Disconnect the coolant hoses from the
automatic choke housing noting their
locations, as an aid to refitting. Be prepared
for coolant spillage, and plug the hoses, or
secure them with their ends facing upwards,
to prevent further coolant loss.
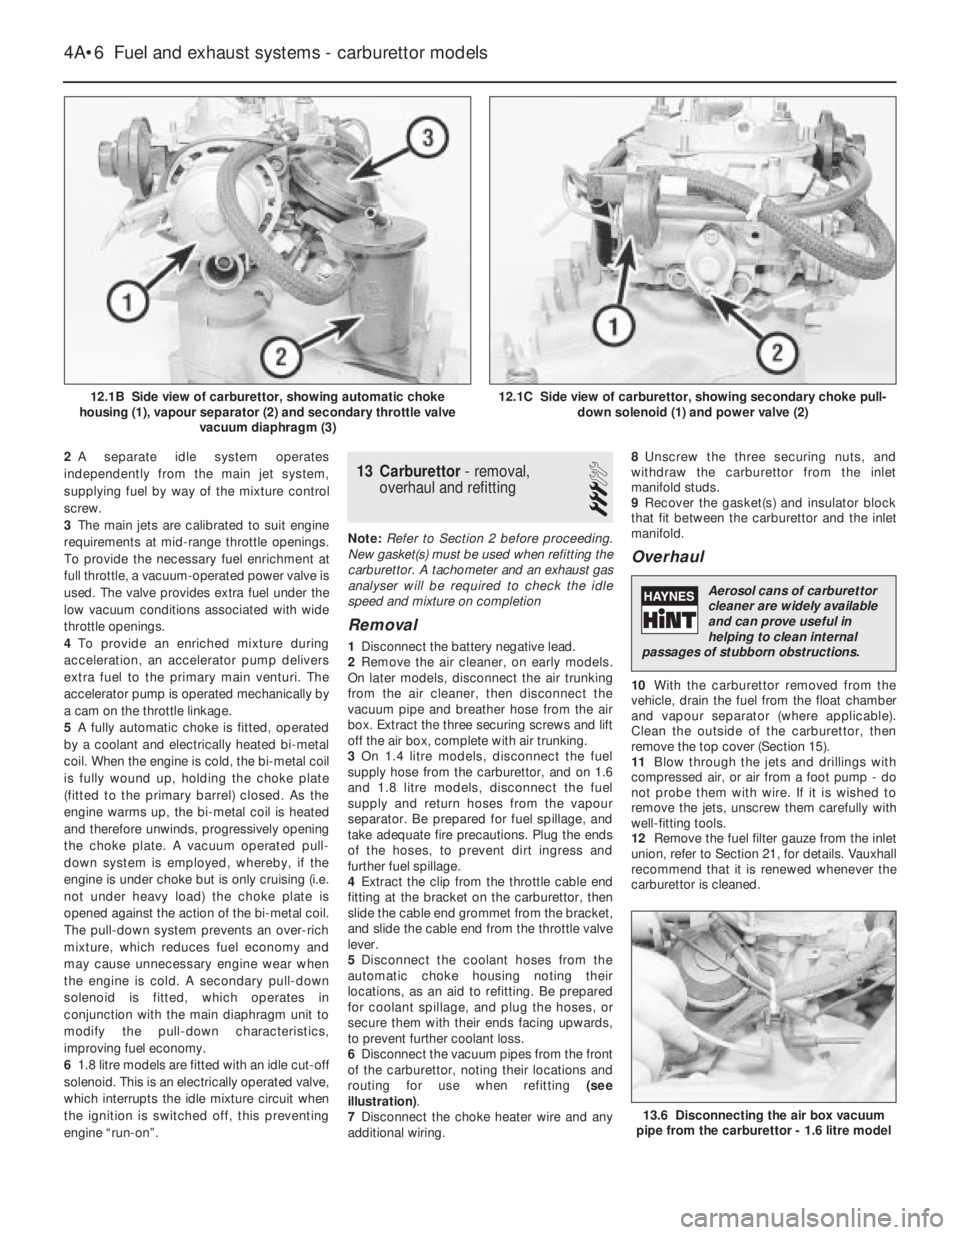
6Disconnect the vacuum pipes from the front
of the carburettor, noting their locations and
routing for use when refitting (see
illustration).
7Disconnect the choke heater wire and any
additional wiring.8Unscrew the three securing nuts, and
withdraw the carburettor from the inlet
manifold studs.
9Recover the gasket(s) and insulator block
that fit between the carburettor and the inlet
manifold.
Overhaul
10With the carburettor removed from the
vehicle, drain the fuel from the float chamber
and vapour separator (where applicable).
Clean the outside of the carburettor, then
remove the top cover (Section 15).
11Blow through the jets and drillings with
compressed air, or air from a foot pump - do
not probe them with wire. If it is wished to
remove the jets, unscrew them carefully with
well-fitting tools.
12Remove the fuel filter gauze from the inlet
union, refer to Section 21, for details. Vauxhall
recommend that it is renewed whenever the
carburettor is cleaned.
4A•6Fuel and exhaust systems - carburettor models
12.1B Side view of carburettor, showing automatic choke
housing (1), vapour separator (2) and secondary throttle valve
vacuum diaphragm (3)12.1C Side view of carburettor, showing secondary choke pull-
down solenoid (1) and power valve (2)
13.6 Disconnecting the air box vacuum
pipe from the carburettor - 1.6 litre model
Aerosol cans of carburettor
cleaner are widely available
and can prove useful in
helping to clean internal
passages of stubborn obstructions.
Page 8 of 525
underside. If the distance measured exceeds,
or is less than, that specified, the float weight
is incorrect and the float must be renewed.
12When the float level is known to be
correct, reassemble the carburettor, using a
new top cover gasket. Check the idle speed
and mixture settings as described in Section
14.
13Using a pin punch, tap the float retaining
pin from the base of the top cover, and lift out
the float and needle valve.
14Inspect the components for damage, and
renew as necessary. Check the needle valve
for wear, and check the float for leaks by
shaking it to see if it contains petrol.
15Clean the mating faces of the carburettor
body and top cover.
Refitting
16Refitting is a reversal of removal,
remembering the following points.
17After refitting, check the float and needle
valve for full and free movement.
18Use a new gasket between the top cover
and the carburettor body.
19Ensure that all hoses, pipes and wires are
correctly reconnected.
20On completion, check and if necessary
top-up the coolant level, as described in
Chapter 3, and check and if necessary adjust
the idle speed and mixture, as described in
Section 14.
16Secondary throttle valve
vacuum diaphragm - testing,
removal and refitting
3
Note: The diaphragm unit must be renewed in
its entirety, as no spares are available
Testing
1If a vacuum source incorporating a gauge is
available, apply approximately 300 mbars (9 in
Hg) to the diaphragm unit, at the hose nearest
the carburettor body. Close off the vacuum
source, and check that the vacuum is held. If
there is a leak, rectify or renew the leaking
component. Alternately, testing of a suspect
vacuum unit must be by the substitution of a
known good item.
Removal
2Remove the air cleaner, on early models.
On later models, disconnect the air trunking
from the air cleaner, then disconnect the
vacuum pipe air breather hose from the air
box. Extract the three securing screws and lift
off the air box, complete with air trunking.
3Disconnect the vacuum pipe from the
diaphragm unit.
4Prise the diaphragm operating rod balljoint
from the secondary throttle valve linkage.
5On 1.6 and 1.8 litre models, remove the two
securing screws and lift the vapour separator
from the bracket. Move the vapour separator
to one side, taking care not to strain the fuel
hoses.6Remove the three securing screws, and
withdraw the diaphragm unit complete with its
bracket from the carburettor body.
Refitting
7Refitting is a reversal of removal.
17Power valve diaphragm -
removal and refitting
3
Note: Refer to Section 2 before proceeding
Removal
1Disconnect the battery negative lead.
2Remove the air cleaner, on early models.
On later models, disconnect the air trunking
from the air cleaner, then disconnect the
vacuum pipe and breather hose from the airbox. Extract the three securing screws and lift
off the air box, complete with air trunking.
3Thoroughly clean all external dirt from the
area around the power valve housing.
4Remove the two securing screws, and lift
off the power valve cover, spring, and
diaphragm assembly.
Refitting
5Clean the mating faces of the cover and
housing.
6Locate the spring on the cover and
diaphragm assembly, ensuring that it is
correctly seated, then press the diaphragm
assembly and cover together. Note that the
vacuum hole in the diaphragm must align with
the corresponding holes in the housing flange
and cover.
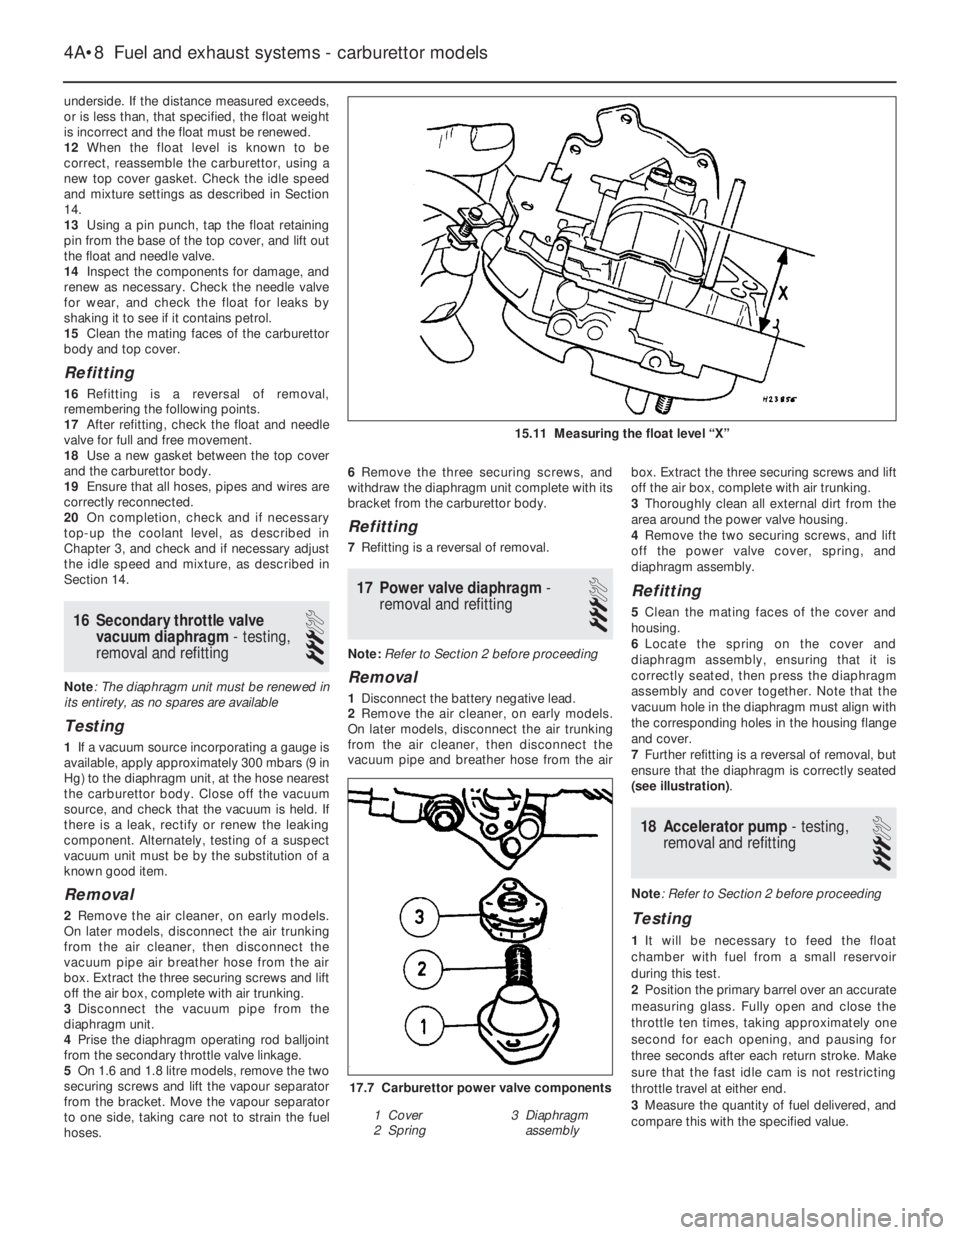
7Further refitting is a reversal of removal, but
ensure that the diaphragm is correctly seated
(see illustration).
18Accelerator pump - testing,
removal and refitting
3
Note: Refer to Section 2 before proceeding
Testing
1It will be necessary to feed the float
chamber with fuel from a small reservoir
during this test.
2Position the primary barrel over an accurate
measuring glass. Fully open and close the
throttle ten times, taking approximately one
second for each opening, and pausing for
three seconds after each return stroke. Make
sure that the fast idle cam is not restricting
throttle travel at either end.
3Measure the quantity of fuel delivered, and
compare this with the specified value.
4A•8Fuel and exhaust systems - carburettor models
15.11 Measuring the float level “X”
17.7 Carburettor power valve components
1 Cover
2 Spring3 Diaphragm
assembly
Page 11 of 525
5Remove the three screws securing the
choke assembly to the carburettor body.
Allow the choke assembly to drop down, but
do not disconnect the choke linkage.
6Remove the star clip that secures the
diaphragm unit to the carburettor top cover,
and withdraw the diaphragm unit.
Refitting
7Refitting is a reversal of removal, but use a
new star clip to secure the diaphragm unit to
the carburettor top cover. Before refitting the
air box to the top of the carburettor, check
and if necessary adjust the choke pull-down,
as follows.
Vacuum pull-down
Adjustment
8With the air cleaner or air box removed from
the top of the carburettor, as described in
Section 17, paragraph 2, continue as follows.
9Note the position of the bi-metal housing
alignment marks as an aid to refitting, if
necessary making additional marks for clarity,
then remove the three securing screws, and
lift off the bi-metal housing. Place the housing
to one side, taking care not to strain the
coolant hoses or electric choke heater wiring.
10Position the fast idle speed adjustment
screw on the highest step of the fast idle cam,
and check that the choke valve is closed.
11Move the pull-down arm towards the
diaphragm unit by pushing on the adjustment
screw until resistance is felt. Hold the arm in
this position.
12Using a drill shank of appropriate
diameter, or a similar item, measure the
clearance between the lower side of the
choke plate and the wall of the primary barrel
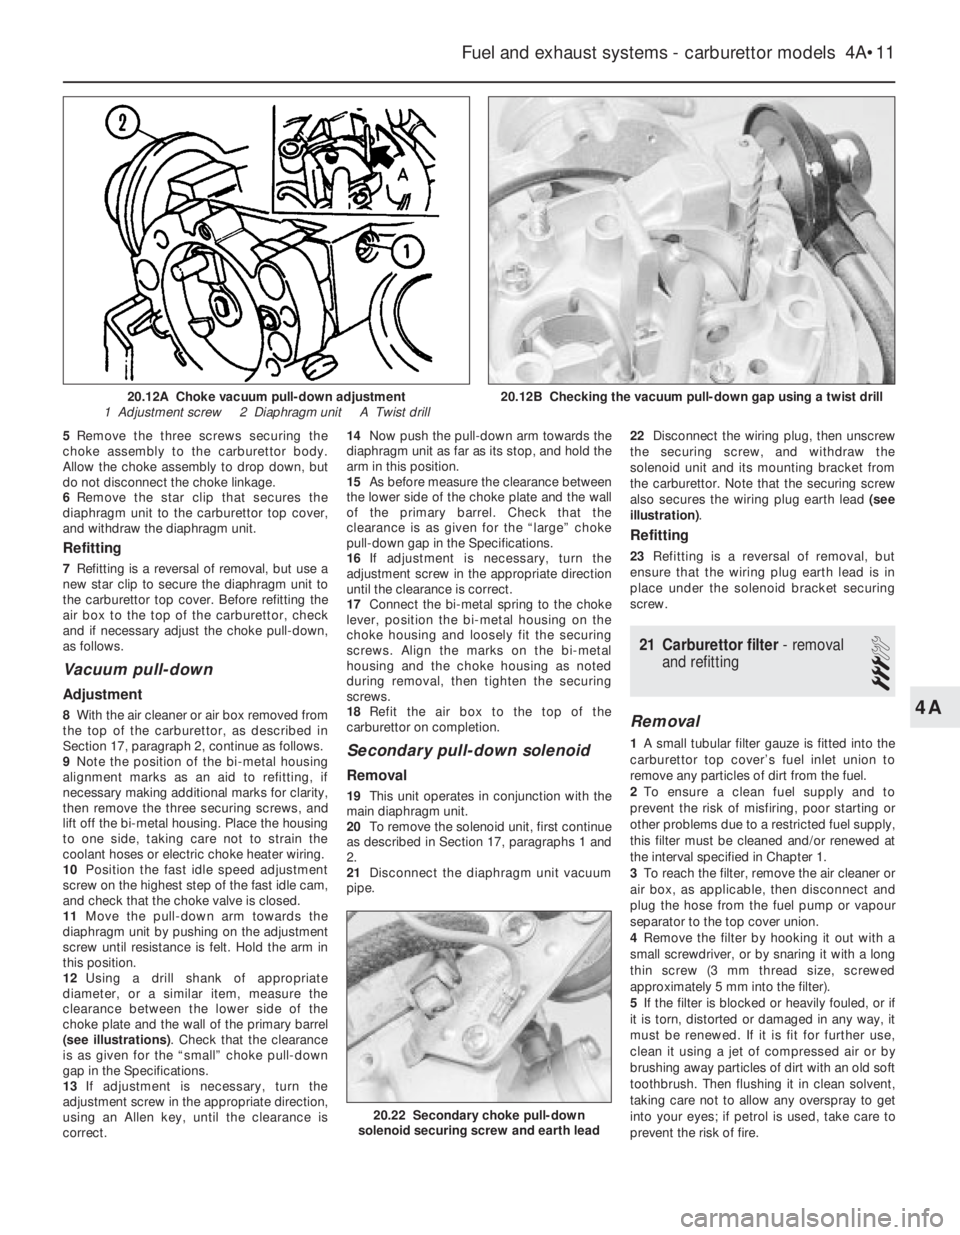
(see illustrations). Check that the clearance
is as given for the “small” choke pull-down
gap in the Specifications.
13If adjustment is necessary, turn the
adjustment screw in the appropriate direction,
using an Allen key, until the clearance is
correct.14Now push the pull-down arm towards the
diaphragm unit as far as its stop, and hold the
arm in this position.
15As before measure the clearance between
the lower side of the choke plate and the wall
of the primary barrel. Check that the
clearance is as given for the “large” choke
pull-down gap in the Specifications.
16If adjustment is necessary, turn the
adjustment screw in the appropriate direction
until the clearance is correct.
17Connect the bi-metal spring to the choke
lever, position the bi-metal housing on the
choke housing and loosely fit the securing
screws. Align the marks on the bi-metal
housing and the choke housing as noted
during removal, then tighten the securing
screws.
18Refit the air box to the top of the
carburettor on completion.
Secondary pull-down solenoid
Removal
19This unit operates in conjunction with the
main diaphragm unit.
20To remove the solenoid unit, first continue
as described in Section 17, paragraphs 1 and
2.
21Disconnect the diaphragm unit vacuum
pipe.22Disconnect the wiring plug, then unscrew
the securing screw, and withdraw the
solenoid unit and its mounting bracket from
the carburettor. Note that the securing screw
also secures the wiring plug earth lead (see
illustration).
Refitting
23Refitting is a reversal of removal, but
ensure that the wiring plug earth lead is in
place under the solenoid bracket securing
screw.
21Carburettor filter -removal
and refitting
3
Removal
1A small tubular filter gauze is fitted into the
carburettor top cover’s fuel inlet union to
remove any particles of dirt from the fuel.
2To ensure a clean fuel supply and to
prevent the risk of misfiring, poor starting or
other problems due to a restricted fuel supply,
this filter must be cleaned and/or renewed at
the interval specified in Chapter 1.
3To reach the filter, remove the air cleaner or
air box, as applicable, then disconnect and
plug the hose from the fuel pump or vapour
separator to the top cover union.
4Remove the filter by hooking it out with a
small screwdriver, or by snaring it with a long
thin screw (3 mm thread size, screwed
approximately 5 mm into the filter).
5If the filter is blocked or heavily fouled, or if
it is torn, distorted or damaged in any way, it
must be renewed. If it is fit for further use,
clean it using a jet of compressed air or by
brushing away particles of dirt with an old soft
toothbrush. Then flushing it in clean solvent,
taking care not to allow any overspray to get
into your eyes; if petrol is used, take care to
prevent the risk of fire.
Fuel and exhaust systems - carburettor models 4A•11
20.12B Checking the vacuum pull-down gap using a twist drill
20.22 Secondary choke pull-down
solenoid securing screw and earth lead
20.12A Choke vacuum pull-down adjustment
1 Adjustment screw 2 Diaphragm unit A Twist drill
4A
Page 102 of 525
3Lift up the edge of the windscreen cowl
panel for access to the sensor.
4Disconnect the sensor wiring plug, and the
vacuum pipe.
5Pull the pressure sensor upwards to release
it from its bracket, and withdraw it from the
vehicle.
Refitting
6Refitting is a reversal of removal. However,
on Multec models no fuel vapour trap is fitted.
It is therefore essential that the sensor
vacuum hose is routed so that it falls steadily
from the sensor to the throttle body. This
precaution prevents any fuel droplets being
trapped in the sensor or hose, and allows
them to drain into the inlet port.
Oil temperature sensor
Removal
7The sensor is screwed into the inlet
manifold side of the cylinder block, next to the
starter motor’s right-hand end.
8The sensor can be reached quite easily
from above, but if it is to be removed from
beneath, ensure that the handbrake is
applied, and that the vehicle is securely
supported on axle stands (see “Jacking and
Vehicle Support”).
9Disconnect the battery negative lead.
10Disconnect the sensor wiring plug.
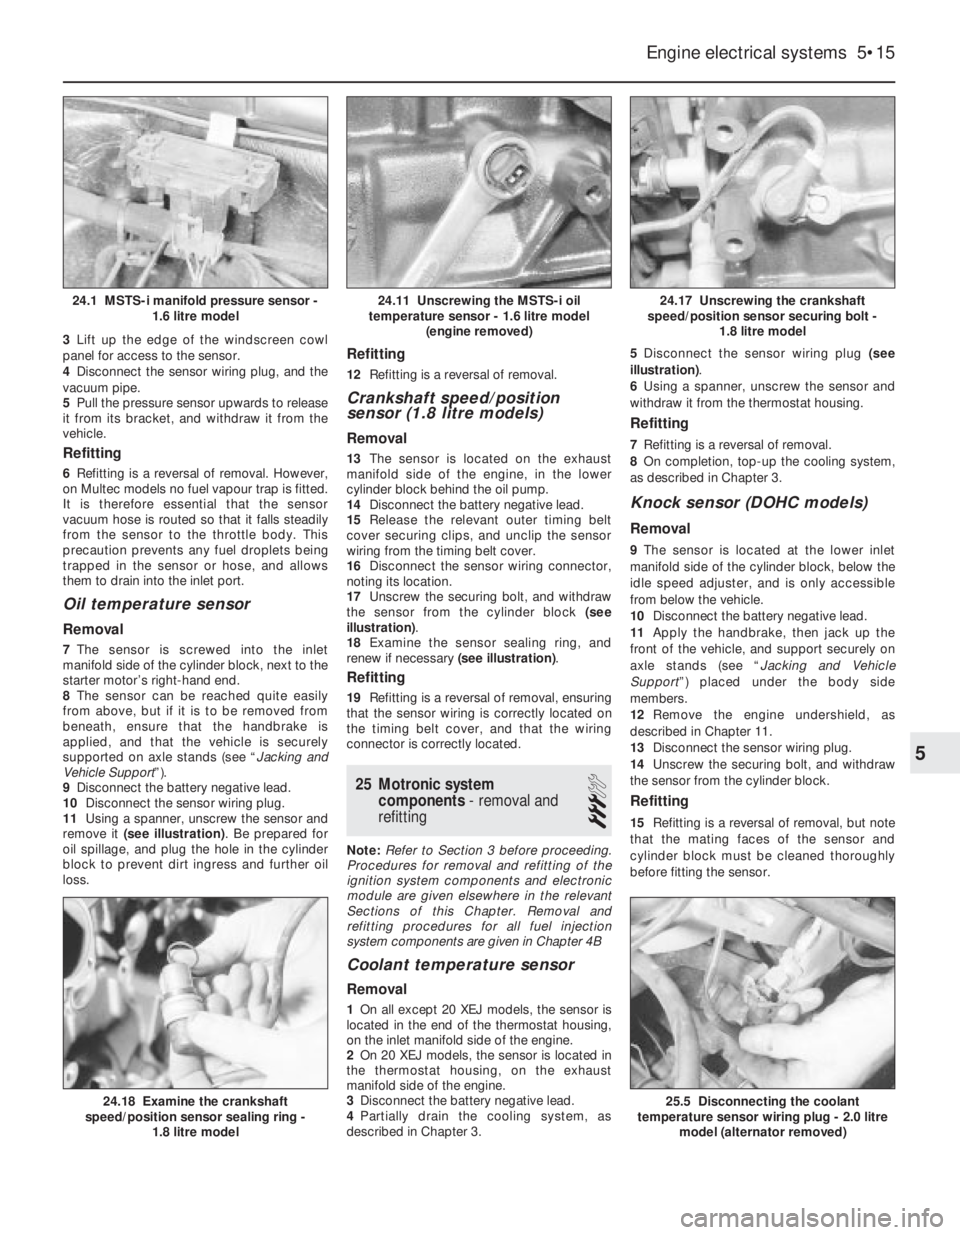
11Using a spanner, unscrew the sensor and
remove it (see illustration). Be prepared for
oil spillage, and plug the hole in the cylinder
block to prevent dirt ingress and further oil
loss.
Refitting
12Refitting is a reversal of removal.
Crankshaft speed/position
sensor (1.8 litre models)
Removal
13The sensor is located on the exhaust
manifold side of the engine, in the lower
cylinder block behind the oil pump.
14Disconnect the battery negative lead.
15Release the relevant outer timing belt
cover securing clips, and unclip the sensor
wiring from the timing belt cover.
16Disconnect the sensor wiring connector,
noting its location.
17Unscrew the securing bolt, and withdraw
the sensor from the cylinder block (see
illustration).
18Examine the sensor sealing ring, and
renew if necessary (see illustration).
Refitting
19Refitting is a reversal of removal, ensuring
that the sensor wiring is correctly located on
the timing belt cover, and that the wiring
connector is correctly located.
25Motronic system
components - removal and
refitting
3
Note: Refer to Section 3 before proceeding.
Procedures for removal and refitting of the
ignition system components and electronic
module are given elsewhere in the relevant
Sections of this Chapter. Removal and
refitting procedures for all fuel injection
system components are given in Chapter 4B
Coolant temperature sensor
Removal
1On all except 20 XEJ models, the sensor is
located in the end of the thermostat housing,
on the inlet manifold side of the engine.
2On 20 XEJ models, the sensor is located in
the thermostat housing, on the exhaust
manifold side of the engine.
3Disconnect the battery negative lead.
4Partially drain the cooling system, as
described in Chapter 3. 5Disconnect the sensor wiring plug (see
illustration).
6Using a spanner, unscrew the sensor and
withdraw it from the thermostat housing.
Refitting
7Refitting is a reversal of removal.
8On completion, top-up the cooling system,
as described in Chapter 3.
Knock sensor (DOHC models)
Removal
9The sensor is located at the lower inlet
manifold side of the cylinder block, below the
idle speed adjuster, and is only accessible
from below the vehicle.
10Disconnect the battery negative lead.
11Apply the handbrake, then jack up the
front of the vehicle, and support securely on
axle stands (see “Jacking and Vehicle
Support”) placed under the body side
members.
12Remove the engine undershield, as
described in Chapter 11.
13Disconnect the sensor wiring plug.
14Unscrew the securing bolt, and withdraw
the sensor from the cylinder block.
Refitting
15Refitting is a reversal of removal, but note
that the mating faces of the sensor and
cylinder block must be cleaned thoroughly
before fitting the sensor.
Engine electrical systems 5•15
24.17 Unscrewing the crankshaft
speed/position sensor securing bolt -
1.8 litre model
25.5 Disconnecting the coolant
temperature sensor wiring plug - 2.0 litre
model (alternator removed)24.18 Examine the crankshaft
speed/position sensor sealing ring -
1.8 litre model
24.11 Unscrewing the MSTS-i oil
temperature sensor - 1.6 litre model
(engine removed)24.1 MSTS-i manifold pressure sensor -
1.6 litre model
5
Page 126 of 525
4C
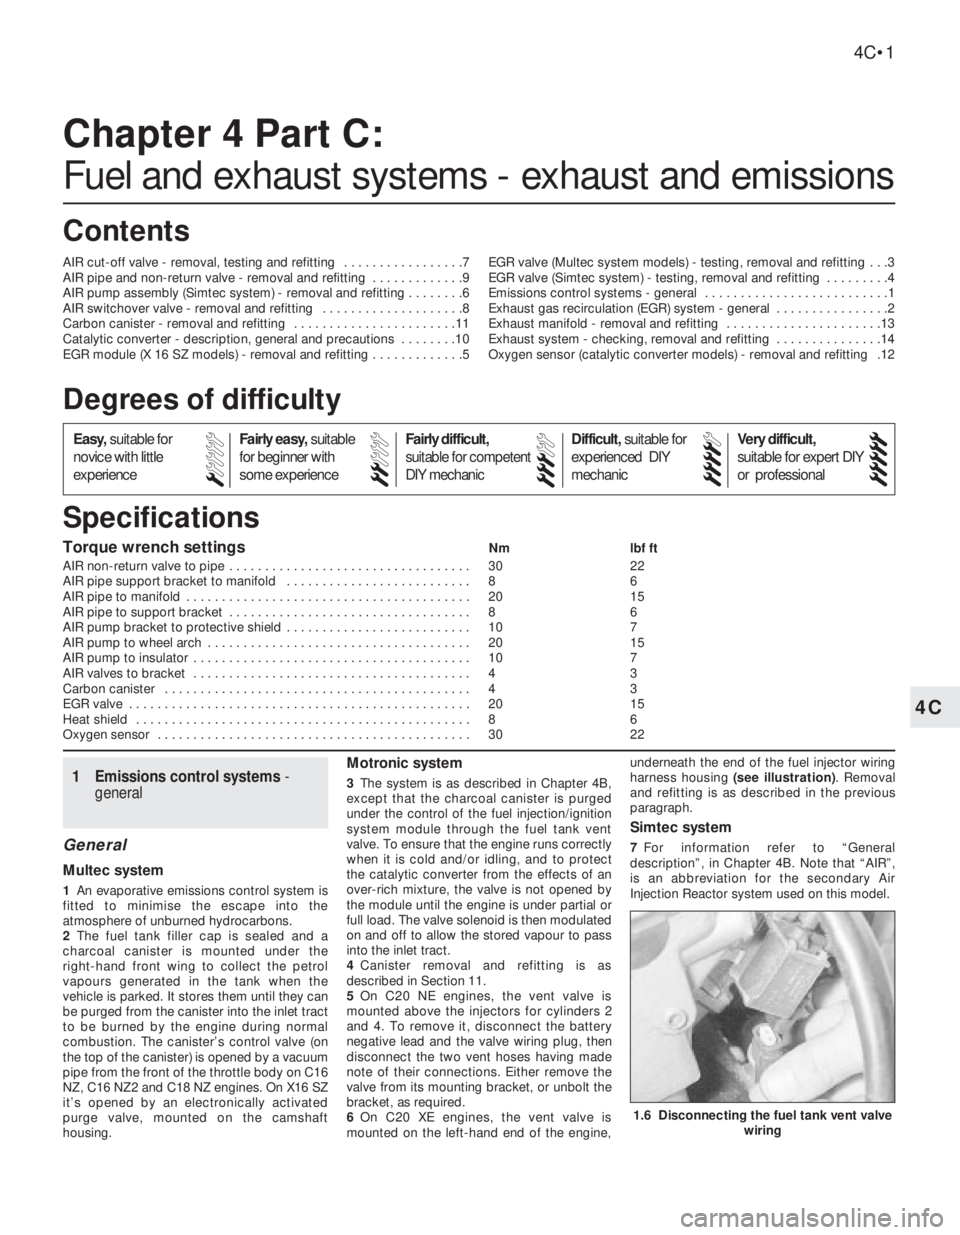
Torque wrench settingsNm lbf ft
AIR non-return valve to pipe . . . . . . . . . . . . . . . . . . . . . . . . . . . . . . . . . . 30 22
AIR pipe support bracket to manifold . . . . . . . . . . . . . . . . . . . . . . . . . . 8 6
AIR pipe to manifold . . . . . . . . . . . . . . . . . . . . . . . . . . . . . . . . . . . . . . . . 20 15
AIR pipe to support bracket . . . . . . . . . . . . . . . . . . . . . . . . . . . . . . . . . . 8 6
AIR pump bracket to protective shield . . . . . . . . . . . . . . . . . . . . . . . . . . 10 7
AIR pump to wheel arch . . . . . . . . . . . . . . . . . . . . . . . . . . . . . . . . . . . . . 20 15
AIR pump to insulator . . . . . . . . . . . . . . . . . . . . . . . . . . . . . . . . . . . . . . . 10 7
AIR valves to bracket . . . . . . . . . . . . . . . . . . . . . . . . . . . . . . . . . . . . . . . 4 3
Carbon canister . . . . . . . . . . . . . . . . . . . . . . . . . . . . . . . . . . . . . . . . . . . 4 3
EGR valve . . . . . . . . . . . . . . . . . . . . . . . . . . . . . . . . . . . . . . . . . . . . . . . . 20 15
Heat shield . . . . . . . . . . . . . . . . . . . . . . . . . . . . . . . . . . . . . . . . . . . . . . . 8 6
Oxygen sensor . . . . . . . . . . . . . . . . . . . . . . . . . . . . . . . . . . . . . . . . . . . . 30 22
Chapter 4 Part C:
Fuel and exhaust systems - exhaust and emissions
AIR cut-off valve - removal, testing and refitting . . . . . . . . . . . . . . . . .7
AIR pipe and non-return valve - removal and refitting . . . . . . . . . . . . .9
AIR pump assembly (Simtec system) - removal and refitting . . . . . . . .6
AIR switchover valve - removal and refitting . . . . . . . . . . . . . . . . . . . .8
Carbon canister - removal and refitting . . . . . . . . . . . . . . . . . . . . . . .11
Catalytic converter - description, general and precautions . . . . . . . .10
EGR module (X 16 SZ models) - removal and refitting . . . . . . . . . . . . .5EGR valve (Multec system models) - testing, removal and refitting . . .3
EGR valve (Simtec system) - testing, removal and refitting . . . . . . . . .4
Emissions control systems - general . . . . . . . . . . . . . . . . . . . . . . . . . .1
Exhaust gas recirculation (EGR) system - general . . . . . . . . . . . . . . . .2
Exhaust manifold - removal and refitting . . . . . . . . . . . . . . . . . . . . . .13
Exhaust system - checking, removal and refitting . . . . . . . . . . . . . . .14
Oxygen sensor (catalytic converter models) - removal and refitting .12
4C•1
Specifications Contents
1 Emissions control systems -
general
General
Multec system
1An evaporative emissions control system is
fitted to minimise the escape into the
atmosphere of unburned hydrocarbons.
2The fuel tank filler cap is sealed and a
charcoal canister is mounted under the
right-hand front wing to collect the petrol
vapours generated in the tank when the
vehicle is parked. It stores them until they can
be purged from the canister into the inlet tract
to be burned by the engine during normal
combustion. The canister’s control valve (on
the top of the canister) is opened by a vacuum
pipe from the front of the throttle body on C16
NZ, C16 NZ2 and C18 NZ engines. On X16 SZ
it’s opened by an electronically activated
purge valve, mounted on the camshaft
housing.
Motronic system
3The system is as described in Chapter 4B,
except that the charcoal canister is purged
under the control of the fuel injection/ignition
system module through the fuel tank vent
valve. To ensure that the engine runs correctly
when it is cold and/or idling, and to protect
the catalytic converter from the effects of an
over-rich mixture, the valve is not opened by
the module until the engine is under partial or
full load. The valve solenoid is then modulated
on and off to allow the stored vapour to pass
into the inlet tract.
4Canister removal and refitting is as
described in Section 11.
5On C20 NE engines, the vent valve is
mounted above the injectors for cylinders 2
and 4. To remove it, disconnect the battery
negative lead and the valve wiring plug, then
disconnect the two vent hoses having made
note of their connections. Either remove the
valve from its mounting bracket, or unbolt the
bracket, as required.
6On C20 XE engines, the vent valve is
mounted on the left-hand end of the engine,underneath the end of the fuel injector wiring
harness housing (see illustration). Removal
and refitting is as described in the previous
paragraph.
Simtec system
7For information refer to “General
description”, in Chapter 4B. Note that “AIR”,
is an abbreviation for the secondary Air
Injection Reactor system used on this model.
Easy,suitable for
novice with little
experienceFairly easy,suitable
for beginner with
some experienceFairly difficult,
suitable for competent
DIY mechanic
Difficult,suitable for
experienced DIY
mechanicVery difficult,
suitable for expert DIY
or professional
Degrees of difficulty
54321
1.6 Disconnecting the fuel tank vent valve
wiring
Page 127 of 525
2Exhaust gas recirculation
(EGR) system - general
The system reintroduces small amounts of
exhaust gas into the combustion cycle to
reduce the generation of oxides of nitrogen
(NOx).
On C16 NZ, C16 NZ2 and C18 NZ engines,
the volume of exhaust gas reintroduced is
governed by manifold vacuum, through the
EGR valve mounted on the inlet manifold.
When the valve is opened small amounts of
exhaust gas are allowed to enter the inlet
tract, passing through ports in the cylinder
head.
On X16 SZ engines the EGR valve is
operated by an EGR module, mounted on the
left-hand side of the engine compartment
behind the battery. This module amplifies
signals received from the fuel system ECU
and operates the EGR valve electronically
providing precise control of exhaust gas
recirculation under all engine conditions.
3EGR valve (Multec system
models) - testing, removal and
refitting
2
Testing
1On C16 NZ, C16 NZ2 and C18 NZ engines,
it is recommended that the system is checked
annually, by checking the movement of the
valve’s diaphragm carrier plate as follows.
Note that the carrier plate is visible only
through the apertures in the underside of the
valve, so a battery-operated torch and small
mirror may be useful. On X16 SZ engines,
Vauxhall test equipment is necessary to check
the EGR system.
2With the engine fully warmed up to normal
operating temperature and idling, briefly open
and close the throttle. The carrier plate should
move upwards as the manifold vacuum
changes. When the engine is idling smoothly
again, press the carrier plate upwards (do this
very carefully, so that the plate is not distorted or
the diaphragm damaged). The idle speed should
drop significantly (approximately 100 rpm).
3If the valve does not respond as described,
it must be cleaned.
Removal
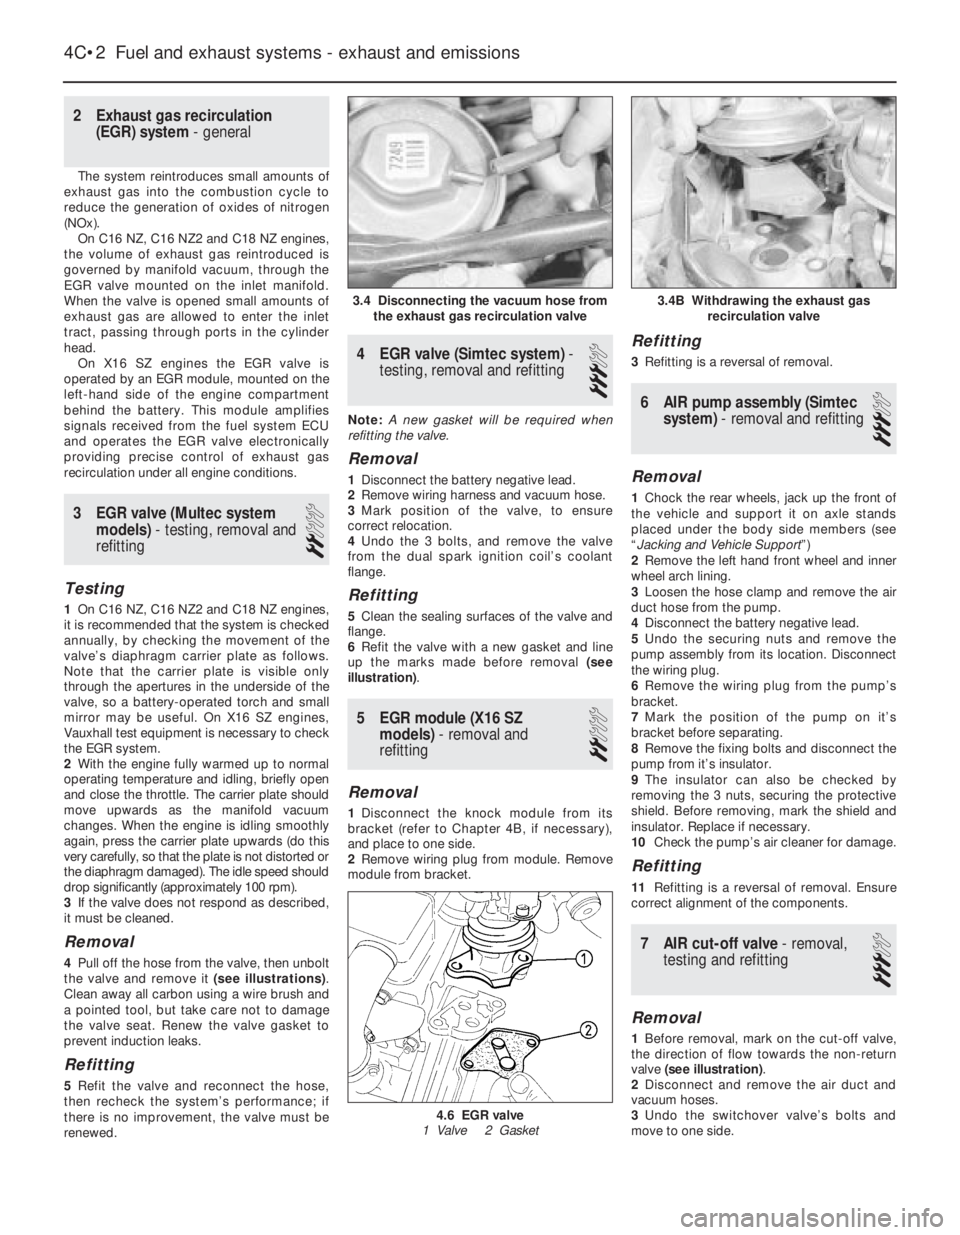
4Pull off the hose from the valve, then unbolt
the valve and remove it (see illustrations).
Clean away all carbon using a wire brush and
a pointed tool, but take care not to damage
the valve seat. Renew the valve gasket to
prevent induction leaks.
Refitting
5Refit the valve and reconnect the hose,
then recheck the system’s performance; if
there is no improvement, the valve must be
renewed.
4EGR valve (Simtec system) -
testing, removal and refitting
3
Note: A new gasket will be required when
refitting the valve.
Removal
1Disconnect the battery negative lead.
2Remove wiring harness and vacuum hose.
3Mark position of the valve, to ensure
correct relocation.
4Undo the 3 bolts, and remove the valve
from the dual spark ignition coil’s coolant
flange.
Refitting
5Clean the sealing surfaces of the valve and
flange.
6Refit the valve with a new gasket and line
up the marks made before removal (see
illustration).
5EGR module (X16 SZ
models) - removal and
refitting
2
Removal
1Disconnect the knock module from its
bracket (refer to Chapter 4B, if necessary),
and place to one side.
2Remove wiring plug from module. Remove
module from bracket.
Refitting
3Refitting is a reversal of removal.
6AIR pump assembly (Simtec
system) - removal and refitting
3
Removal
1Chock the rear wheels, jack up the front of
the vehicle and support it on axle stands
placed under the body side members (see
“Jacking and Vehicle Support”)
2Remove the left hand front wheel and inner
wheel arch lining.
3Loosen the hose clamp and remove the air
duct hose from the pump.
4Disconnect the battery negative lead.
5Undo the securing nuts and remove the
pump assembly from its location. Disconnect
the wiring plug.
6Remove the wiring plug from the pump’s
bracket.
7Mark the position of the pump on it’s
bracket before separating.
8Remove the fixing bolts and disconnect the
pump from it’s insulator.
9The insulator can also be checked by
removing the 3 nuts, securing the protective
shield. Before removing, mark the shield and
insulator. Replace if necessary.
10Check the pump’s air cleaner for damage.
Refitting
11Refitting is a reversal of removal. Ensure
correct alignment of the components.
7AIR cut-off valve - removal,
testing and refitting
3
Removal
1Before removal, mark on the cut-off valve,
the direction of flow towards the non-return
valve (see illustration).
2Disconnect and remove the air duct and
vacuum hoses.
3Undo the switchover valve’s bolts and
move to one side.
4C•2Fuel and exhaust systems - exhaust and emissions
3.4 Disconnecting the vacuum hose from
the exhaust gas recirculation valve
4.6 EGR valve
1 Valve 2 Gasket
3.4B Withdrawing the exhaust gas
recirculation valve
Page 128 of 525
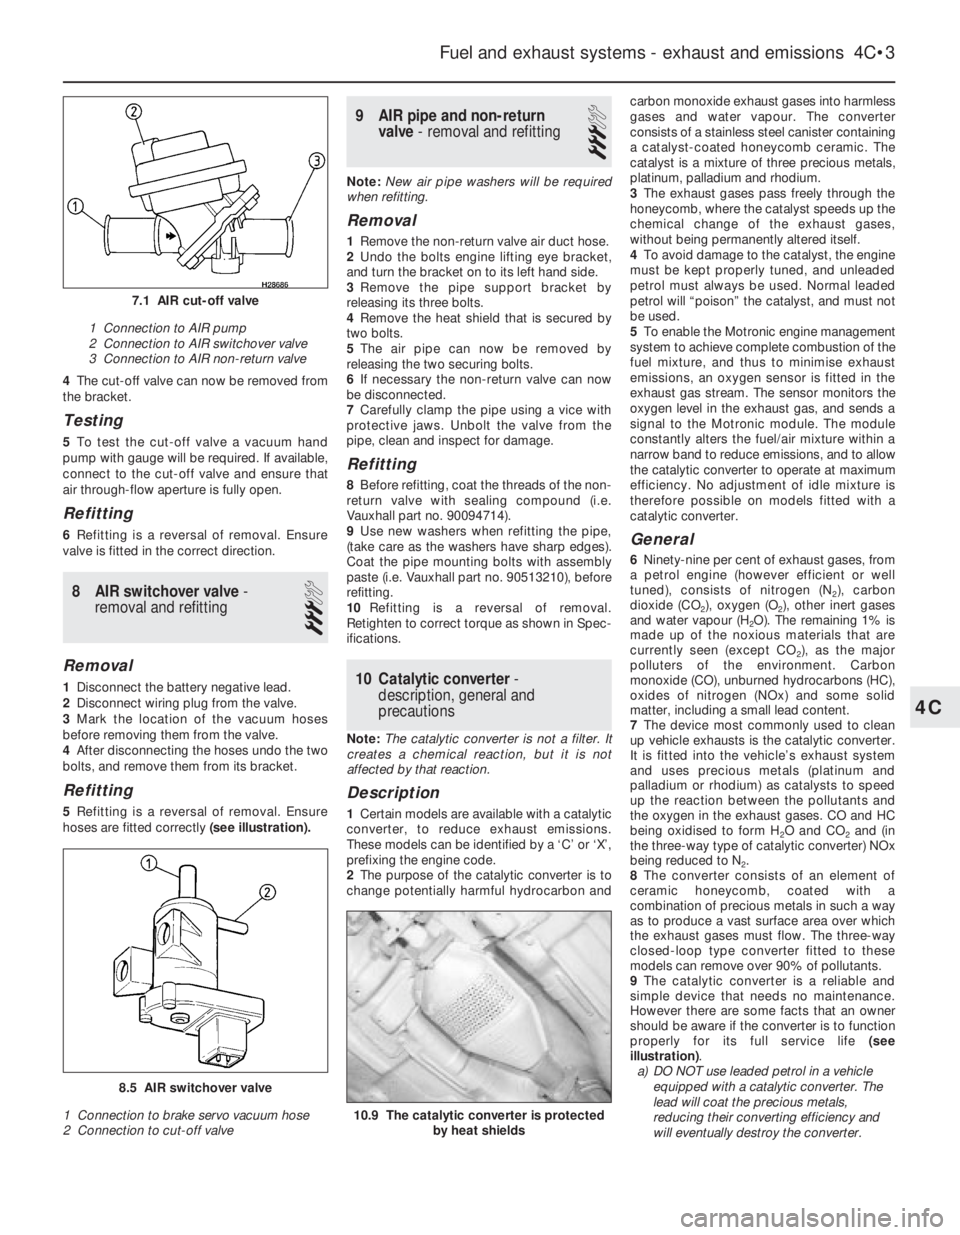
4The cut-off valve can now be removed from
the bracket.
Testing
5To test the cut-off valve a vacuum hand
pump with gauge will be required. If available,
connect to the cut-off valve and ensure that
air through-flow aperture is fully open.
Refitting
6Refitting is a reversal of removal. Ensure
valve is fitted in the correct direction.
8AIR switchover valve -
removal and refitting
3
Removal
1Disconnect the battery negative lead.
2Disconnect wiring plug from the valve.
3Mark the location of the vacuum hoses
before removing them from the valve.
4After disconnecting the hoses undo the two
bolts, and remove them from its bracket.
Refitting
5Refitting is a reversal of removal. Ensure
hoses are fitted correctly (see illustration).
9AIR pipe and non-return
valve - removal and refitting
3
Note:New air pipe washers will be required
when refitting.
Removal
1Remove the non-return valve air duct hose.
2Undo the bolts engine lifting eye bracket,
and turn the bracket on to its left hand side.
3Remove the pipe support bracket by
releasing its three bolts.
4Remove the heat shield that is secured by
two bolts.
5The air pipe can now be removed by
releasing the two securing bolts.
6If necessary the non-return valve can now
be disconnected.
7Carefully clamp the pipe using a vice with
protective jaws. Unbolt the valve from the
pipe, clean and inspect for damage.
Refitting
8Before refitting, coat the threads of the non-
return valve with sealing compound (i.e.
Vauxhall part no. 90094714).
9Use new washers when refitting the pipe,
(take care as the washers have sharp edges).
Coat the pipe mounting bolts with assembly
paste (i.e. Vauxhall part no. 90513210), before
refitting.
10Refitting is a reversal of removal.
Retighten to correct torque as shown in Spec-
ifications.
10Catalytic converter -
description, general and
precautions
Note: The catalytic converter is not a filter. It
creates a chemical reaction, but it is not
affected by that reaction.
Description
1Certain models are available with a catalytic
converter, to reduce exhaust emissions.
These models can be identified by a ‘C’ or ‘X’,
prefixing the engine code.
2The purpose of the catalytic converter is to
change potentially harmful hydrocarbon andcarbon monoxide exhaust gases into harmless
gases and water vapour. The converter
consists of a stainless steel canister containing
a catalyst-coated honeycomb ceramic. The
catalyst is a mixture of three precious metals,
platinum, palladium and rhodium.
3The exhaust gases pass freely through the
honeycomb, where the catalyst speeds up the
chemical change of the exhaust gases,
without being permanently altered itself.
4To avoid damage to the catalyst, the engine
must be kept properly tuned, and unleaded
petrol must always be used. Normal leaded
petrol will “poison” the catalyst, and must not
be used.
5To enable the Motronic engine management
system to achieve complete combustion of the
fuel mixture, and thus to minimise exhaust
emissions, an oxygen sensor is fitted in the
exhaust gas stream. The sensor monitors the
oxygen level in the exhaust gas, and sends a
signal to the Motronic module. The module
constantly alters the fuel/air mixture within a
narrow band to reduce emissions, and to allow
the catalytic converter to operate at maximum
efficiency. No adjustment of idle mixture is
therefore possible on models fitted with a
catalytic converter.
General
6Ninety-nine per cent of exhaust gases, from
a petrol engine (however efficient or well
tuned), consists of nitrogen (N
2), carbon
dioxide (CO
2), oxygen (O2), other inert gases
and water vapour (H
2O). The remaining 1% is
made up of the noxious materials that are
currently seen (except CO
2), as the major
polluters of the environment. Carbon
monoxide (CO), unburned hydrocarbons (HC),
oxides of nitrogen (NOx) and some solid
matter, including a small lead content.
7The device most commonly used to clean
up vehicle exhausts is the catalytic converter.
It is fitted into the vehicle’s exhaust system
and uses precious metals (platinum and
palladium or rhodium) as catalysts to speed
up the reaction between the pollutants and
the oxygen in the exhaust gases. CO and HC
being oxidised to form H
2O and CO2and (in
the three-way type of catalytic converter) NOx
being reduced to N
2.
8The converter consists of an element of
ceramic honeycomb, coated with a
combination of precious metals in such a way
as to produce a vast surface area over which
the exhaust gases must flow. The three-way
closed-loop type converter fitted to these
models can remove over 90% of pollutants.
9The catalytic converter is a reliable and
simple device that needs no maintenance.
However there are some facts that an owner
should be aware if the converter is to function
properly for its full service life (see
illustration).
a)DO NOT use leaded petrol in a vehicle
equipped with a catalytic converter. The
lead will coat the precious metals,
reducing their converting efficiency and
will eventually destroy the converter.
Fuel and exhaust systems - exhaust and emissions 4C•3
10.9 The catalytic converter is protected
by heat shields
8.5 AIR switchover valve
1 Connection to brake servo vacuum hose
2 Connection to cut-off valve
7.1 AIR cut-off valve
1 Connection to AIR pump
2 Connection to AIR switchover valve
3 Connection to AIR non-return valve
4C
Page 159 of 525
9Fuel filter (‘Out-of-tank’ fuel
pump models) - removal and
refitting
3
Note: Refer to Section 2 before proceeding
Removal
1The fuel filter is located on the fuel pump
bracket under the rear of the vehicle. Either on
the right-hand side of the spare wheel well or
in front of the fuel tank, depending on model
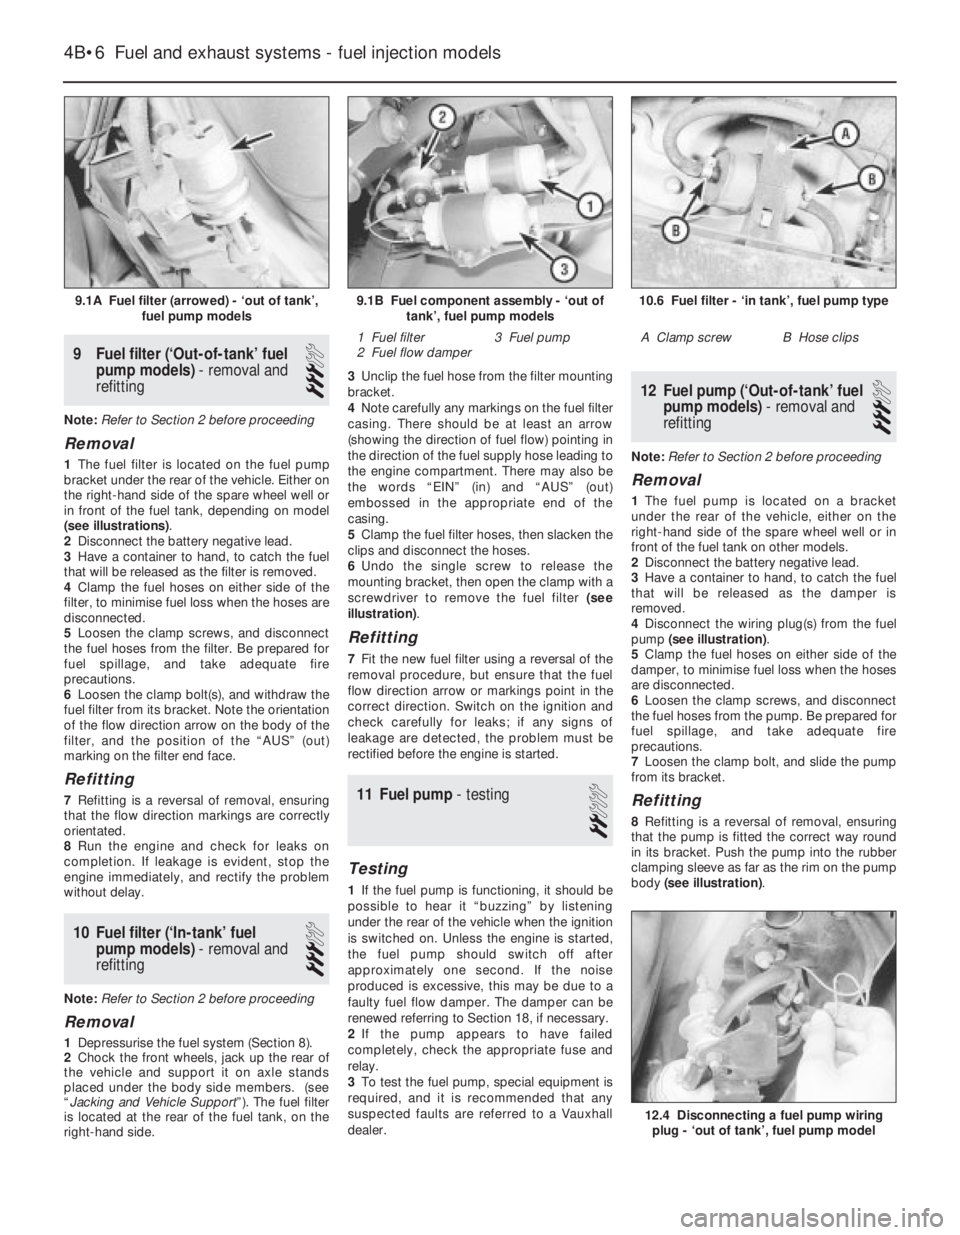
(see illustrations).
2Disconnect the battery negative lead.
3Have a container to hand, to catch the fuel
that will be released as the filter is removed.
4Clamp the fuel hoses on either side of the
filter, to minimise fuel loss when the hoses are
disconnected.
5Loosen the clamp screws, and disconnect
the fuel hoses from the filter. Be prepared for
fuel spillage, and take adequate fire
precautions.
6Loosen the clamp bolt(s), and withdraw the
fuel filter from its bracket. Note the orientation
of the flow direction arrow on the body of the
filter, and the position of the “AUS” (out)
marking on the filter end face.
Refitting
7Refitting is a reversal of removal, ensuring
that the flow direction markings are correctly
orientated.
8Run the engine and check for leaks on
completion. If leakage is evident, stop the
engine immediately, and rectify the problem
without delay.
10Fuel filter (‘In-tank’ fuel
pump models) - removal and
refitting
3
Note: Refer to Section 2 before proceeding
Removal
1Depressurise the fuel system (Section 8).
2Chock the front wheels, jack up the rear of
the vehicle and support it on axle stands
placed under the body side members. (see
“Jacking and Vehicle Support”). The fuel filter
is located at the rear of the fuel tank, on the
right-hand side.3Unclip the fuel hose from the filter mounting
bracket.
4Note carefully any markings on the fuel filter
casing. There should be at least an arrow
(showing the direction of fuel flow) pointing in
the direction of the fuel supply hose leading to
the engine compartment. There may also be
the words “EIN” (in) and “AUS” (out)
embossed in the appropriate end of the
casing.
5Clamp the fuel filter hoses, then slacken the
clips and disconnect the hoses.
6Undo the single screw to release the
mounting bracket, then open the clamp with a
screwdriver to remove the fuel filter (see
illustration).
Refitting
7Fit the new fuel filter using a reversal of the
removal procedure, but ensure that the fuel
flow direction arrow or markings point in the
correct direction. Switch on the ignition and
check carefully for leaks; if any signs of
leakage are detected, the problem must be
rectified before the engine is started.
11Fuel pump - testing
2
Testing
1If the fuel pump is functioning, it should be
possible to hear it “buzzing” by listening
under the rear of the vehicle when the ignition
is switched on. Unless the engine is started,
the fuel pump should switch off after
approximately one second. If the noise
produced is excessive, this may be due to a
faulty fuel flow damper. The damper can be
renewed referring to Section 18, if necessary.
2If the pump appears to have failed
completely, check the appropriate fuse and
relay.
3To test the fuel pump, special equipment is
required, and it is recommended that any
suspected faults are referred to a Vauxhall
dealer.
12Fuel pump (‘Out-of-tank’ fuel
pump models) - removal and
refitting
3
Note: Refer to Section 2 before proceeding
Removal
1The fuel pump is located on a bracket
under the rear of the vehicle, either on the
right-hand side of the spare wheel well or in
front of the fuel tank on other models.
2Disconnect the battery negative lead.
3Have a container to hand, to catch the fuel
that will be released as the damper is
removed.
4Disconnect the wiring plug(s) from the fuel
pump (see illustration).
5Clamp the fuel hoses on either side of the
damper, to minimise fuel loss when the hoses
are disconnected.
6Loosen the clamp screws, and disconnect
the fuel hoses from the pump. Be prepared for
fuel spillage, and take adequate fire
precautions.
7Loosen the clamp bolt, and slide the pump
from its bracket.
Refitting
8Refitting is a reversal of removal, ensuring
that the pump is fitted the correct way round
in its bracket. Push the pump into the rubber
clamping sleeve as far as the rim on the pump
body (see illustration).
4B•6Fuel and exhaust systems - fuel injection models
9.1A Fuel filter (arrowed) - ‘out of tank’,
fuel pump models10.6 Fuel filter - ‘in tank’, fuel pump type
A Clamp screwB Hose clips
12.4 Disconnecting a fuel pump wiring
plug - ‘out of tank’, fuel pump model
9.1B Fuel component assembly - ‘out of
tank’, fuel pump models
1 Fuel filter
2 Fuel flow damper3 Fuel pump