steering OPEL CASCADA 2014 Manual user
[x] Cancel search | Manufacturer: OPEL, Model Year: 2014, Model line: CASCADA, Model: OPEL CASCADA 2014Pages: 247, PDF Size: 7.45 MB
Page 168 of 247

166Driving and operatinge.g. below the bumper or
underneath the vehicle, are not
displayed.
Do not reverse the vehicle by only looking at the Info-Display and
check the surroundings behind
and around the vehicle before
reversing.
Activation
Rear view camera is automatically
activated when reverse gear is
engaged.
Functionality
The camera is mounted between the
number plate lights and has a viewing angle of 130°.
The area displayed by the camera is
limited. The distance of the image that
appears on the display differs from
the actual distance.
Guiding lines
Dynamic guiding lines are horizontal
lines in 1 metre intervals projected on
the picture to define the distance to shown objects.
Trajectory lane of the vehicle is
shown in accordance with the
steering angle.
The function can be deactivated in the menu Settings in the Info-Display.
Vehicle personalisation 3 102.
Warning symbols
Warning symbols are indicated as
triangles 9 on the picture which show
obstacles detected by the rear
sensors of the advanced parking
assist.
Additionally 9 appears on the top line
of the Info-Display with the warning to
check the vehicle surrounding.
Page 173 of 247

Driving and operating171
Criteria for the detection of an
unintended lane change are:
■ no operation of turn signals
■ no brake pedal operation
■ no active accelerator operation or speeding-up
■ no active steering
If the driver is performing these
actions, no warning will be issued.
Activation
The lane departure warning system isactivated by pressing the ) button.
The illuminated LED in the button
indicates that the system is switched
on. When the control indicator ) in
the instrument cluster illuminates
green, the system is ready to operate.
The system is only operable at
vehicle speeds above 56 km/h and if
lane markings are available.
When the system recognises an
unintended lane change, the control
indicator ) changes to yellow and
flashes. Simultaneously a chime
sound is activated.
Deactivation
The system is deactivated by
pressing ) button, the LED in the
button extinguishes.
At speeds below 56 km/h the system is inoperable.
Fault
The lane departure warning system
may not operate properly when:
■ the windscreen is not clean
■ there are adverse environmental conditions like heavy rain, snow,
direct sunlight or shadows
The system can not operate when no
lane marking is detected.
Page 177 of 247

Driving and operating175Driving characteristics and
towing tips Before attaching a trailer, lubricate
the coupling ball. However, do not do
so if a stabiliser, which acts on the coupling ball, is being used to reduce snaking movements.
For trailers with low driving stability
and caravan trailers with a permitted
gross vehicle weight of more than
1400 kg the use of a stabiliser is
strongly recommended when driving
above 80 km/h.
If the trailer starts snaking, drive more
slowly, do not attempt to correct the
steering and brake sharply if
necessary.
When driving downhill, drive in the
same gear as if driving uphill and
drive at a similar speed.
Adjust tyre pressure to the value
specified for full load 3 236.Trailer towing
Trailer loads
The permissible trailer loads are
vehicle and engine-dependent
maximum values which must not be
exceeded. The actual trailer load is
the difference between the actual
gross weight of the trailer and the
actual coupling socket load with the
trailer coupled.
The permissible trailer loads are
specified in the vehicle documents. In general, they are valid for gradients
up to max. 12 %.
The permitted trailer load applies up to the specified incline and up to an
altitude of 1000 metres above sea
level. Since engine power decreases
as altitude increases due to the air
becoming thinner, therefore reducing
climbing ability, the permissible gross
train weight also decreases by 10 %
for every 1000 metres of additional
altitude. The gross train weight does
not have to be reduced when driving
on roads with slight inclines (less than
8 %, e.g. motorways).The permissible gross train weight
must not be exceeded. This weight is
specified on the identification plate
3 226.
Vertical coupling load
The vertical coupling load is the load
exerted by the trailer on the coupling
ball. It can be varied by changing the
weight distribution when loading the
trailer.
The maximum permissible vertical
coupling load (75 kg) is specified on
the towing equipment identification
plate and in the vehicle documents.
Always aim for the maximum load,
especially in the case of heavy
trailers. The vertical coupling load
should never fall below 25 kg.
Page 203 of 247

Vehicle care201
No.Circuit16Seat ventilation, rear view
camera, soft top control module17–18–19Steering wheel heating20–21Seat heating22–23Soft top control module, power
rail left24–25–26Jumper fuse for non logistic
mode27Passive entry28–29Hydraulic unit30–No.Circuit31–32Flex RideVehicle tools
Tools
Vehicles with spare wheel
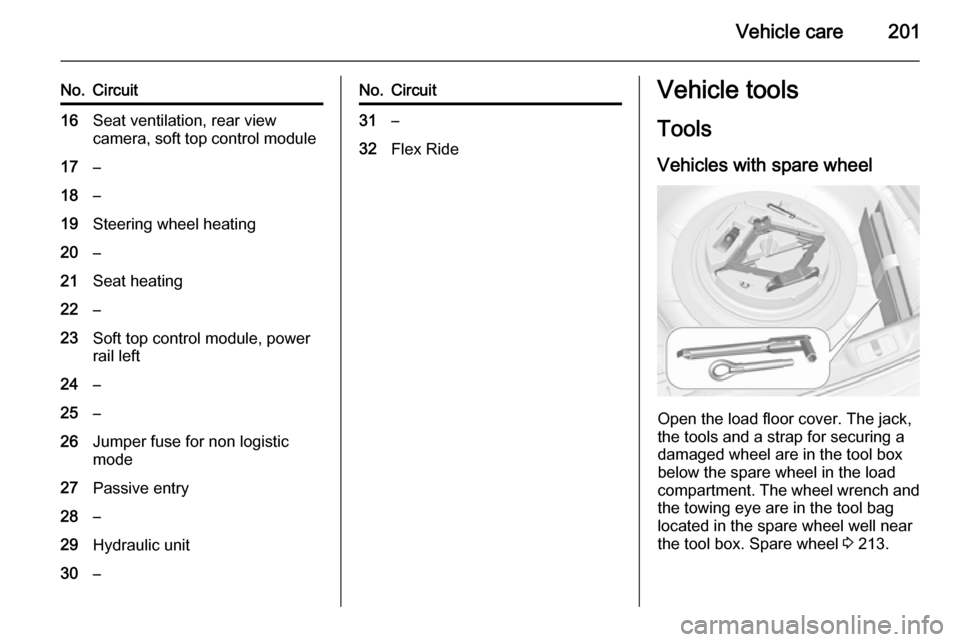
Open the load floor cover. The jack,
the tools and a strap for securing a
damaged wheel are in the tool box
below the spare wheel in the load
compartment. The wheel wrench and the towing eye are in the tool bag
located in the spare wheel well near
the tool box. Spare wheel 3 213.
Page 210 of 247

208Vehicle care9Warning
Damage may lead to tyre blowout.
The use of tyre chains is not permitted
on the temporary spare wheel.
Tyre repair kit
Minor damage to the tyre tread can be
repaired with the tyre repair kit.
Do not remove foreign bodies from
the tyres.
Tyre damage exceeding 4 mm or that
is at tyre's sidewall cannot be repaired with the tyre repair kit.
9 Warning
Do not drive faster than 80 km/h.
Do not use for a lengthy period.
Steering and handling may be
affected.
If you have a flat tyre:
Apply the parking brake and engage
first gear, reverse gear or P.
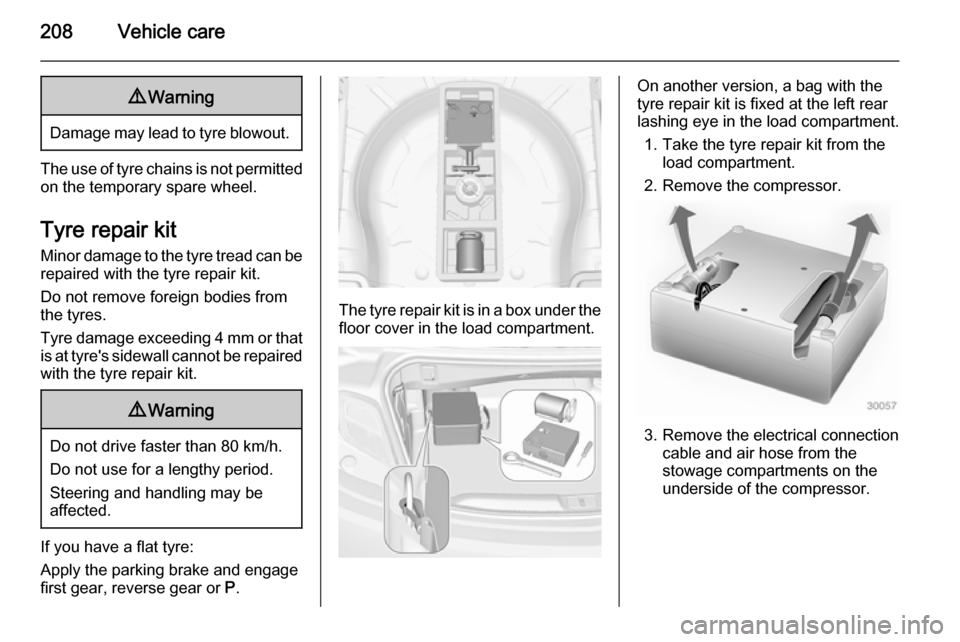
The tyre repair kit is in a box under the
floor cover in the load compartment.
On another version, a bag with the
tyre repair kit is fixed at the left rear
lashing eye in the load compartment.
1. Take the tyre repair kit from the load compartment.
2. Remove the compressor.
3. Remove the electrical connection cable and air hose from the
stowage compartments on the
underside of the compressor.
Page 220 of 247

218Vehicle care
4. Switch on electrical consumers(e.g. headlights, heated rear
window) of the vehicle receiving
the jump start.
5. Reverse above sequence exactly when removing leads.Towing
Towing the vehicle
Insert a screwdriver in the slot at the
lower part of the cap. Release the cap
by carefully moving the screwdriver
downwards.
The towing eye is stowed with the
vehicle tools 3 201.
Screw in the towing eye anticlockwise
as far as it will go until it stops in a
horizontal position.
Attach a tow rope – or better still a tow rod – to the towing eye.
The towing eye must only be used for
towing and not for recovering the
vehicle.
Switch on ignition to release steering
wheel lock and to permit operation of
brake lights, horn and windscreen
wiper.
Transmission in neutral.
Page 244 of 247

242
Headlights when driving abroad 113
Head restraint adjustment .............8
Head restraints ............................ 44
Heated mirrors ............................. 29
Heated rear window ..................... 33
Heated steering wheel .................77
Heating ........................................ 53
Heating and ventilation system . 123
High beam ........................... 93, 111
High beam assist ..................93, 112
Hill start assist ........................... 147
Horn ....................................... 14, 77
I
Identification plate .....................226
Ignition switch positions .............134
Immobiliser ............................ 28, 93
Indicators ...................................... 83
Information displays...................... 94
Instrument cluster ........................83
Instrument panel fuse box .........199
Instrument panel illumination .....195
Instrument panel illumination control .................................... 119
Instrument panel overview ........... 10
Interactive driving system ...........149
Interior care ............................... 222
Interior lighting ............................ 119
Interior lights ...................... 119, 195
Interior mirrors .............................. 30Interruption of power supply ......143
Introduction .................................... 3
ISOFIX child restraint systems ....67
J Jump starting ............................. 216
K Key, memorised settings ..............21
Keys ............................................. 19
Keys, locks ................................... 19
L Lane departure warning .......91, 170
Lashing eyes ............................... 74
Light switch ................................ 110
Load compartment ................24, 71
Load compartment fuse box ......200
Loading information .....................75
Low fuel ....................................... 92
M Malfunction indicator light ............89
Manual anti-dazzle ......................30
Manual mode ............................. 142
Manual transmission .................. 144
Memorised settings ......................21
Mirror adjustment ........................... 9
Misted light covers .....................119N
New vehicle running-in ..............134
Number plate light .....................195
O Object detection systems ...........157
Odometer ..................................... 84
Oil, engine .......................... 224, 228
Outside temperature ....................80
Overrun cut-off ........................... 136
P Parking ................................ 18, 138
Parking assist ............................ 157
Parking brake ............................ 145
Parking lights ............................. 118
Particulate filter ........................... 139
Performance .............................. 232
Performing work ........................181
Pollen filter ................................. 131
Power outlets ............................... 82
Power seat adjustment ................50
Power steering.............................. 91
Power windows ............................ 31
Preheating ................................... 91
Puncture ..................................... 211
Q
Quickheat ................................... 130
Page 245 of 247

243
RRadio Frequency Identification (RFID) ..................................... 239
Radio remote control ...................19
Reading lights ............................ 120
Rear floor storage cover ..............73
Rear fog light ............................... 93
Rear fog lights ........................... 118
Rear storage ................................. 73
Rear view camera ...................... 165
Recommended fluids and lubricants ........................ 224, 228
Refuelling ................................... 172 Retained power off .....................134
Reversing lights .........................119
Ride control systems ..................147
Rollover protection system ...........43
S Seat adjustment ....................... 7, 47
Seat belt ........................................ 8
Seat belt reminder .......................88
Seat belts ..................................... 53
Seat folding .................................. 49
Seat position ................................ 46
Selector lever ............................. 141
Service ............................... 132, 223
Service display ............................ 85
Service information ....................223Side airbag system ......................60
Side blind spot alert ....................164
Sidelights .................................... 110
Side turn signal lights ................194
Soft top ........................................ 34
Spare wheel ............................... 213
Speed limiter............................... 153
Speedometer ............................... 83
Starting and operating ................134
Starting off ................................... 17
Starting the engine ....................135
Steering ...................................... 133
Steering wheel adjustment ......9, 76
Steering wheel controls ...............76
Stop-start system........................ 136
Storage ......................................... 68
Storage compartments .................68
Sunvisor lights ........................... 120
Sun visors .................................... 33
Symbols ......................................... 4
T
Tachometer ................................. 84
Tail lights ................................... 192
Three-point seat belt .................... 55 Tools .......................................... 201
Top-tether fastening eyes ............67
Tow bar....................................... 174 Towing ................................ 174, 218
Towing another vehicle .............219Towing equipment .....................176
Towing the vehicle .....................218
Traction Control system ............. 147
Traction Control system off........... 91
Traffic sign assistant ...................167
Trailer coupling ........................... 174
Trailer towing ............................. 175
Transmission ............................... 16
Transmission display .................141
Tread depth ............................... 206
Trip odometer .............................. 84
Turn and lane-change signals ...117
Turn signal ................................... 88
Tyre chains ................................ 207
Tyre designations ......................203
Tyre pressure ............................ 203
Tyre pressure monitoring system ............................... 92, 204
Tyre pressures ........................... 236
Tyre repair kit ............................. 208
U Ultrasonic parking assist............. 157
Upholstery .................................. 222
Upshift .......................................... 91
Using this manual ..........................3
V Vehicle battery ........................... 185
Vehicle checks............................ 181