lights OPEL CASCADA 2017.5 Manual user
[x] Cancel search | Manufacturer: OPEL, Model Year: 2017.5, Model line: CASCADA, Model: OPEL CASCADA 2017.5Pages: 263, PDF Size: 7.74 MB
Page 190 of 263

188Vehicle careVehicle careGeneral Information...................189
Accessories and vehicle modifications .......................... 189
Vehicle storage ........................189
End-of-life vehicle recovery .....190
Vehicle checks ........................... 190
Performing work ......................190
Bonnet ..................................... 190
Engine oil ................................. 191
Engine coolant ......................... 192
Washer fluid ............................ 193
Brakes ..................................... 193
Brake fluid ............................... 194
Vehicle battery ......................... 194
Diesel fuel system bleeding .....195
Wiper blade replacement ........196
Bulb replacement .......................196
Halogen headlights ..................196
Adaptive forward lighting .........198
Fog lights ................................. 199
Front turn signal lights .............200
Tail lights ................................. 201
Side turn signal lights ..............202
Number plate light ...................203Interior lights ............................ 204
Instrument panel illumination ...204
Electrical system ........................204
Fuses ....................................... 204
Engine compartment fuse box . 205
Instrument panel fuse box .......207
Load compartment fuse box ....208
Vehicle tools .............................. 210
Tools ........................................ 210
Wheels and tyres .......................211
Winter tyres ............................. 211
Tyre designations ....................211
Tyre pressure monitoring
system .................................... 211
Tyre pressure .......................... 215
Tread depth ............................. 216
Changing tyre and wheel size . 216
Wheel covers ........................... 217
Tyre chains .............................. 217
Tyre repair kit .......................... 217
Wheel changing .......................220
Spare wheel ............................ 223
Jump starting ............................. 226
Towing ....................................... 228
Towing the vehicle ...................228
Towing another vehicle ...........229Appearance care .......................230
Exterior care ............................ 230
Interior care ............................. 232
Page 192 of 263

190Vehicle care● Check the coolant level.
● Since the durability of AdBlue is limited to two years, fluid should
be exchanged if it is too old. Seek the assistance of a workshop.
● Fit the number plate if necessary.
End-of-life vehicle recovery
Information on end-of-life vehicle
recovery centres and the recycling of
end-of-life vehicles is available on our website, where legally required. Only
entrust this work to an authorised
recycling centre.Vehicle checks
Performing work9 Warning
Only perform engine compartment
checks when the ignition is off.
The cooling fan may start
operating even if the ignition is off.
9 Danger
The ignition system and Xenon
headlights use extremely high
voltage. Do not touch.
Bonnet
Opening
Pull the release lever and return it to
its original position.
Page 198 of 263
196Vehicle careWiper blade replacement
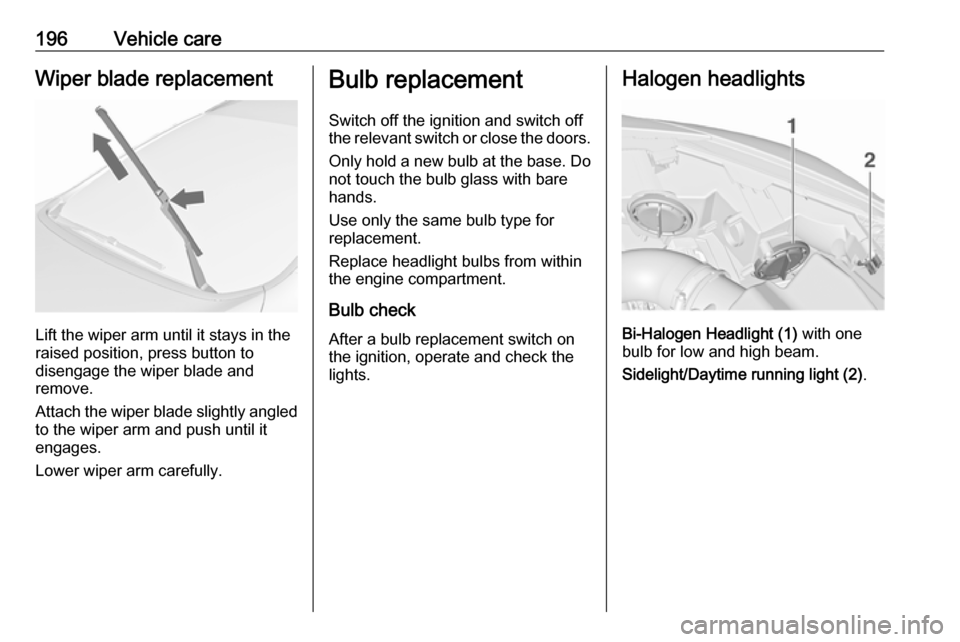
Lift the wiper arm until it stays in the
raised position, press button to
disengage the wiper blade and
remove.
Attach the wiper blade slightly angled
to the wiper arm and push until it
engages.
Lower wiper arm carefully.
Bulb replacement
Switch off the ignition and switch off
the relevant switch or close the doors.
Only hold a new bulb at the base. Do
not touch the bulb glass with bare
hands.
Use only the same bulb type for
replacement.
Replace headlight bulbs from within
the engine compartment.
Bulb check
After a bulb replacement switch on
the ignition, operate and check the
lights.Halogen headlights
Bi-Halogen Headlight (1) with one
bulb for low and high beam.
Sidelight/Daytime running light (2) .
Page 200 of 263
198Vehicle care
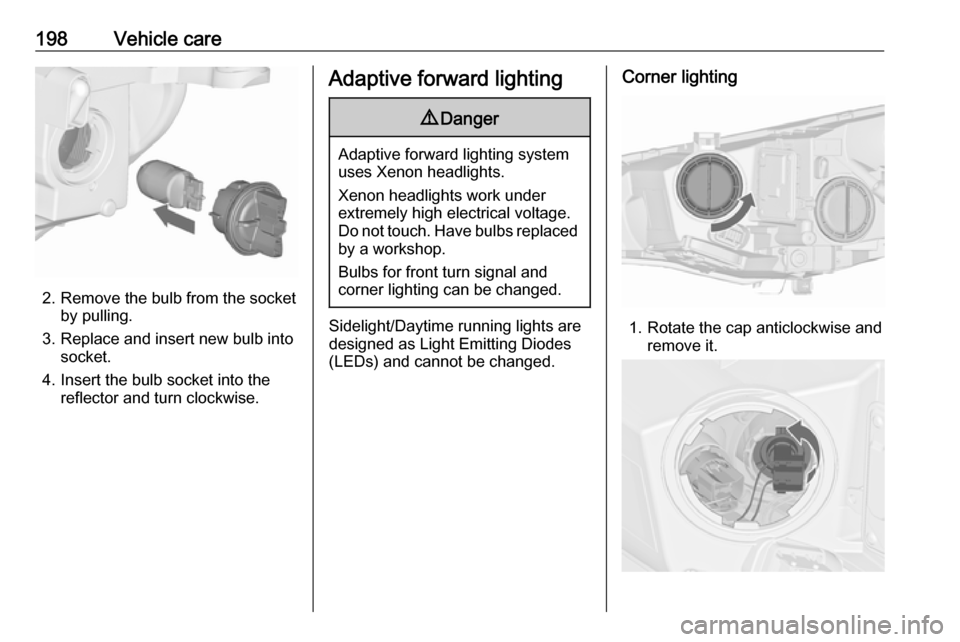
2. Remove the bulb from the socketby pulling.
3. Replace and insert new bulb into socket.
4. Insert the bulb socket into the reflector and turn clockwise.
Adaptive forward lighting9 Danger
Adaptive forward lighting system
uses Xenon headlights.
Xenon headlights work under
extremely high electrical voltage.
Do not touch. Have bulbs replaced by a workshop.
Bulbs for front turn signal and
corner lighting can be changed.
Sidelight/Daytime running lights are
designed as Light Emitting Diodes
(LEDs) and cannot be changed.
Corner lighting
1. Rotate the cap anticlockwise and remove it.
Page 201 of 263
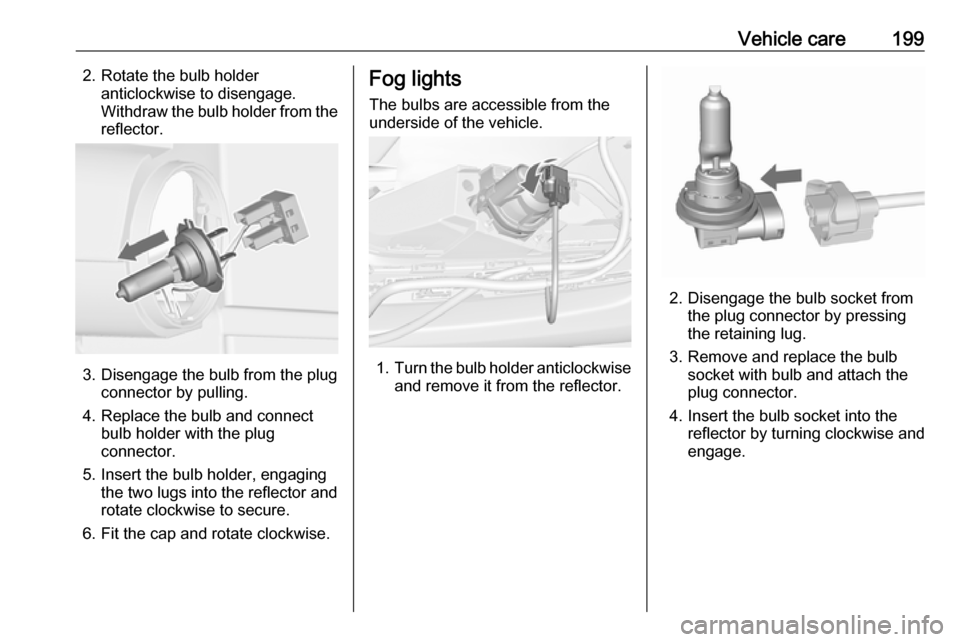
Vehicle care1992. Rotate the bulb holderanticlockwise to disengage.
Withdraw the bulb holder from the reflector.
3. Disengage the bulb from the plug connector by pulling.
4. Replace the bulb and connect bulb holder with the plug
connector.
5. Insert the bulb holder, engaging the two lugs into the reflector and
rotate clockwise to secure.
6. Fit the cap and rotate clockwise.
Fog lights
The bulbs are accessible from the
underside of the vehicle.
1. Turn the bulb holder anticlockwise
and remove it from the reflector.
2. Disengage the bulb socket from the plug connector by pressing
the retaining lug.
3. Remove and replace the bulb socket with bulb and attach the
plug connector.
4. Insert the bulb socket into the reflector by turning clockwise and
engage.
Page 202 of 263
200Vehicle careFront turn signal lights
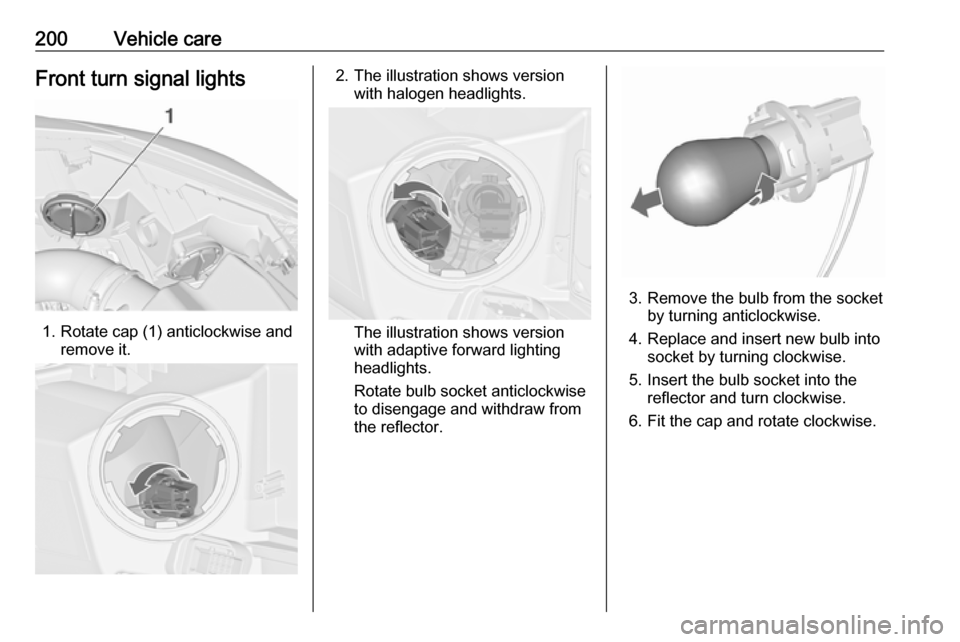
1. Rotate cap (1) anticlockwise andremove it.
2. The illustration shows versionwith halogen headlights.
The illustration shows version
with adaptive forward lighting
headlights.
Rotate bulb socket anticlockwise
to disengage and withdraw from
the reflector.
3. Remove the bulb from the socket by turning anticlockwise.
4. Replace and insert new bulb into socket by turning clockwise.
5. Insert the bulb socket into the reflector and turn clockwise.
6. Fit the cap and rotate clockwise.
Page 203 of 263
Vehicle care201Tail lights
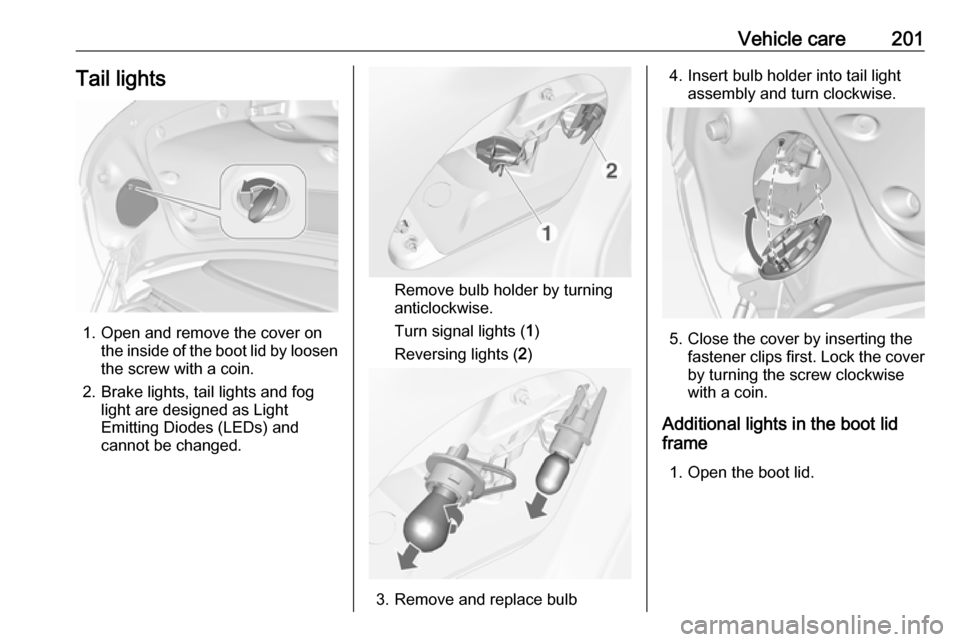
1. Open and remove the cover onthe inside of the boot lid by loosen
the screw with a coin.
2. Brake lights, tail lights and fog light are designed as Light
Emitting Diodes (LEDs) and
cannot be changed.
Remove bulb holder by turning
anticlockwise.
Turn signal lights ( 1)
Reversing lights ( 2)
3. Remove and replace bulb
4. Insert bulb holder into tail light
assembly and turn clockwise.
5. Close the cover by inserting thefastener clips first. Lock the cover
by turning the screw clockwise
with a coin.
Additional lights in the boot lid
frame
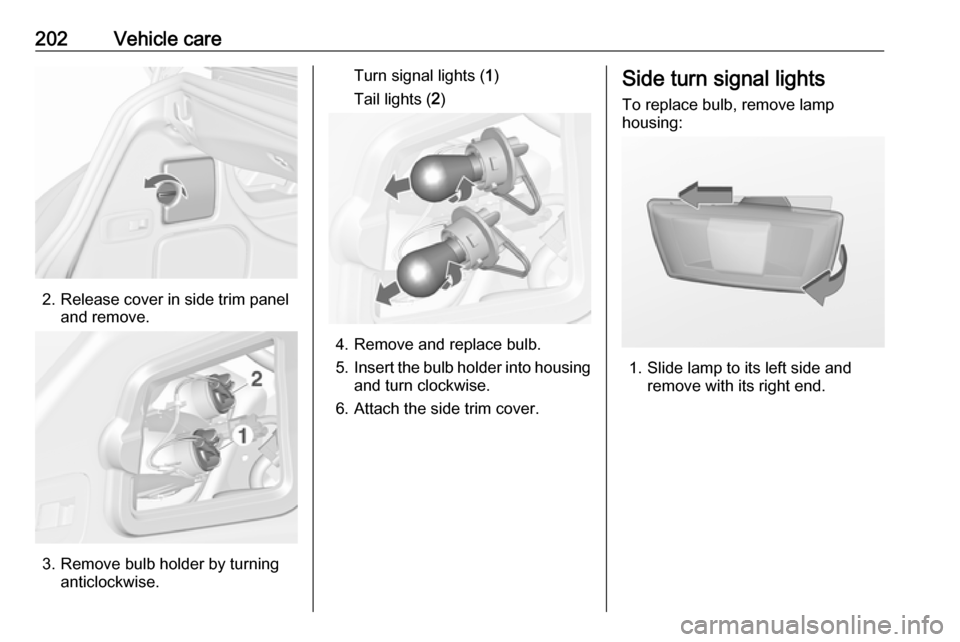
1. Open the boot lid.
Page 204 of 263
202Vehicle care
2. Release cover in side trim paneland remove.
3. Remove bulb holder by turninganticlockwise.
Turn signal lights ( 1)
Tail lights ( 2)
4. Remove and replace bulb.
5. Insert the bulb holder into housing
and turn clockwise.
6. Attach the side trim cover.
Side turn signal lights
To replace bulb, remove lamp
housing:
1. Slide lamp to its left side and remove with its right end.
Page 206 of 263

204Vehicle care5. Insert bulb holder into lamphousing and turn clockwise.
6. Insert lamp into bumper and let engage.
Interior lights Courtesy light, reading lights
Have bulbs replaced by a workshop.
Load compartment light
Have bulbs replaced by a workshop.
Instrument panel illumination
Have bulbs replaced by a workshop.Electrical system
Fuses Data on the replacement fuse mustmatch the data on the defective fuse.
There are three fuse boxes in the vehicle:
● In the front left of the engine compartment,
● In left-hand drive vehicles, in the interior behind the storage
compartment, or, in right-hand
drive vehicles, behind the
glovebox,
● Behind a cover on the left side of
the load compartment.
Before replacing a fuse, turn off the
respective switch and the ignition.
A blown fuse can be recognized by its melted wire. Do not replace the fuse
until the cause of the fault has been
remedied.
Some functions are protected by
several fuses.
Fuses may also be inserted without existence of a function.
Fuse extractor
A fuse extractor may be located in the
fuse box in the engine compartment.
Page 208 of 263

206Vehicle careNo.Circuit1Engine control module2Lambda sensor3Fuel injection, ignition system4Fuel injection, ignition system5–6Mirror heating7Fan control8Lambda sensor, engine cooling9Rear window sensor10Vehicle battery sensor11Trunk release12Adaptive forward lighting, auto‐
matic light control13ABS Valves14–15Engine control module16Starter17Transmission control moduleNo.Circuit18Heated rear window19Front power windows20Rear power windows21Rear electrical centre22Left high beam (Halogen)23Headlamp washer system24Right low beam (Xenon)25Left low beam (Xenon)26Front fog lights27Diesel fuel heating28Start stop system29Electric parking brake30ABS pump31–32Airbag33Adaptive forward lighting, auto‐
matic light control34Exhaust gas recirculationNo.Circuit35Power windows, rain sensor,
exterior mirror36Climate control37–38Vacuum pump39Fuel system control module40Windscreen washer system41Right high beam (Halogen)42Radiator fan43Windscreen wiper44–45Radiator fan46–47Horn48Radiator fan49Fuel pump50Headlamp levelling, adaptive
forward lighting