check engine light OPEL CASCADA 2019 Manual user
[x] Cancel search | Manufacturer: OPEL, Model Year: 2019, Model line: CASCADA, Model: OPEL CASCADA 2019Pages: 261, PDF Size: 7.94 MB
Page 20 of 261
![OPEL CASCADA 2019 Manual user 18In briefAutomatic transmissionP:parkR:reverseN:neutralD:automatic modeM:manual mode: move selector
lever from D to the left.<:manual mode upshifting]:manual mode downshifting
The selector lever can OPEL CASCADA 2019 Manual user 18In briefAutomatic transmissionP:parkR:reverseN:neutralD:automatic modeM:manual mode: move selector
lever from D to the left.<:manual mode upshifting]:manual mode downshifting
The selector lever can](/img/37/18802/w960_18802-19.png)
18In briefAutomatic transmissionP:parkR:reverseN:neutralD:automatic modeM:manual mode: move selector
lever from D to the left.<:manual mode upshifting]:manual mode downshifting
The selector lever can only be moved
out of P when the ignition is on and
the brake pedal is applied. To engage
P or R, press the release button.
Automatic transmission 3 145.
Starting off
Check before starting off ● Tyre pressure and condition 3 211, 3 242.
● Engine oil level and fluid levels 3 188.
● All windows, mirrors, exterior lighting and number plates are
free from dirt, snow and ice and
are operational.
● Proper position of mirrors, seats and seat belts 3 30, 3 49,
3 57.
● Soft top must be completely opened or closed 3 36.
● Brake function at low speed, particularly if the brakes are wet.Starting the engine
● Turn key to position 1.
● Move the steering wheel slightly to release the steering wheel
lock.
● Manual transmission: operate clutch and brake pedal.
Automatic transmission: operate
brake pedal and move selector to
P or N.
● Do not operate accelerator pedal.
● Turn key to position 3 and
release.
Starting the engine 3 139.
Page 113 of 261

Instruments and controls111background, even if they are not in
use. This includes automatic
updates, downloads, as well as
programme or app synchronisation
traffic. The data volume purchased
via OnStar might be consumed
rapidly. Turn off automatic
synchronisations in the settings of
your device.
Up to seven devices may be
connected.
To connect a mobile device with the
Wi-Fi hotspot:
1. Press j and then select Wi-Fi
settings on the Info-Display. The
settings displayed include the Wi- Fi hotspot name (SSID),
password and connection type.
2. Start a Wi-Fi network search on your mobile device.
3. Select your vehicle hotspot (SSID) when listed.
4. When prompted, enter the password on your mobile device.
Note
To change the SSID or password,
press Z and talk to an advisor or log
in to your account.To switch off the Wi-Fi hotspot
functionality, press Z to call an
advisor.
Smartphone app
With the myOpel smartphone app,
some vehicle functions can be
operated remotely.
The following functions are available: ● Lock or unlock vehicle.
● Honk horn or flash lights.
● Check fuel level, engine oil life and tyre pressure (only with tyre
pressure monitoring system).
● Send navigation destination to the vehicle, if equipped with a
built-in navigation system.
● Locate vehicle on a map.
● Manage Wi-Fi settings.
To operate these functions, download the app from App Store ®
or
Google Play™ Store.Remote control
If desired, use any phone to call an
advisor, who can remotely operate
specific vehicle functions. Find the
respective OnStar phone number on
our country-specific website.
The following functions are available: ● Lock or unlock vehicle.
● Provide information on the vehicle location.
● Honk horn or flash lights.
Stolen vehicle assistance
If the vehicle is stolen, report the theft to the authorities and request OnStar
stolen vehicle assistance. Use any
phone to call an advisor. Find the
respective OnStar phone number on
our country-specific website.
OnStar can provide support in
locating and recovering the vehicle.Theft alert
When the anti-theft alarm system is
triggered, a notification is sent to
OnStar. You are then informed about
this event by text message or email.
Page 153 of 261

Driving and operating151adequate force. For maximum
force, e.g. parking with trailer or on
inclines, pull switch m twice.
The electric parking brake is
applied when control indicator m
illuminates 3 92.
The electric parking brake can always
be activated, even if the ignition is off.
Do not operate electric parking brake
system too often without engine
running as this will discharge the
vehicle battery.
Before leaving the vehicle, check the electric parking brake status. Control
indicator m 3 92.
Releasing
Switch on ignition. Keep brake pedal
depressed then push switch m.
Drive away function
Vehicles with manual transmission:
Depressing the clutch pedal and then slightly releasing the clutch pedal and
slightly depressing the accelerator
pedal releases the electric parking
brake automatically. This is not
possible when the switch m is pulled
at the same time.
Vehicles with automatic transmission: Engaging D and then depressing the
accelerator pedal releases the
electric parking brake automatically.
This is not possible when the switch
m is pulled at the same time.
Dynamic braking when vehicle is
moving
When the vehicle is moving and the
switch m is kept pulled, the electric
parking brake system will decelerate the vehicle, but will not apply
statically.
As soon as the switch m is released,
dynamic braking will be stopped.
Fault
Failure mode of electric parking brake
is indicated by control indicator j and
by a vehicle message which is
displayed in the Driver Information
Centre.Apply electric parking brake: pull and
hold the switch m for more than
5 seconds. If control indicator m
illuminates, electric parking brake is
applied.
Release electric parking brake: push and hold the switch m for more than
2 seconds. If control indicator m
extinguishes, electric parking brake is
released.
Control indicator m flashes: electric
parking brake is not fully applied or
released. When continuously
flashing, release electric parking
brake and retry applying.
Brake assist If the brake pedal is depressed
quickly and forcefully, maximum
brake force is automatically applied
(full braking).
Maintain steady pressure on the
brake pedal for as long as full braking is required. Maximum brake force is
automatically reduced when the
brake pedal is released.
Page 187 of 261

Vehicle care185Vehicle careGeneral Information...................185
Accessories and vehicle modifications .......................... 185
Vehicle storage ........................186
End-of-life vehicle recovery .....186
Vehicle checks ........................... 187
Performing work ......................187
Bonnet ..................................... 187
Engine oil ................................. 188
Engine coolant ......................... 189
Washer fluid ............................ 190
Brakes ..................................... 190
Brake fluid ............................... 190
Vehicle battery ......................... 191
Wiper blade replacement ........192
Bulb replacement .......................192
Halogen headlights ..................193
Adaptive forward lighting .........194
Front fog lights ......................... 195
Front turn lights .......................196
Tail lights ................................. 197
Side turn lights ......................... 199
Number plate light ...................199
Interior lights ............................ 200
Instrument panel illumination ...200Electrical system ........................200
Fuses ....................................... 200
Engine compartment fuse box . 201
Instrument panel fuse box .......203
Load compartment fuse box ....204
Vehicle tools .............................. 206
Tools ........................................ 206
Wheels and tyres .......................207
Winter tyres ............................. 207
Tyre designations ....................207
Tyre pressure monitoring system .................................... 207
Tyre pressure .......................... 211
Tread depth ............................. 212
Changing tyre and wheel size . 212 Wheel covers ........................... 212
Tyre chains .............................. 213
Tyre repair kit .......................... 213
Wheel changing .......................217
Spare wheel ............................ 217
Jump starting ............................. 223
Towing ....................................... 224
Towing the vehicle ...................224
Towing another vehicle ...........225
Appearance care .......................226
Exterior care ............................ 226
Interior care ............................. 228General Information
Accessories and vehiclemodifications
We recommend the use of genuine
parts and accessories and factory
approved parts specific for your
vehicle type. We cannot assess or guarantee reliability of other products
- even if they have a regulatory or
otherwise granted approval.
Any modification, conversion or other
changes made to standard vehicle
specifications (including, without
limitation, software modifications,
modifications of the electronic control units) may invalidate the warranty
offered by Opel. Furthermore, such
changes may affect driver assistance
systems, may impact fuel
consumption, CO 2 emissions and
other emissions of the vehicle and
cause the vehicle to no longer
conform to the operating permit,
impacting the validity of your vehicle
registration.
Page 189 of 261

Vehicle care187Vehicle checks
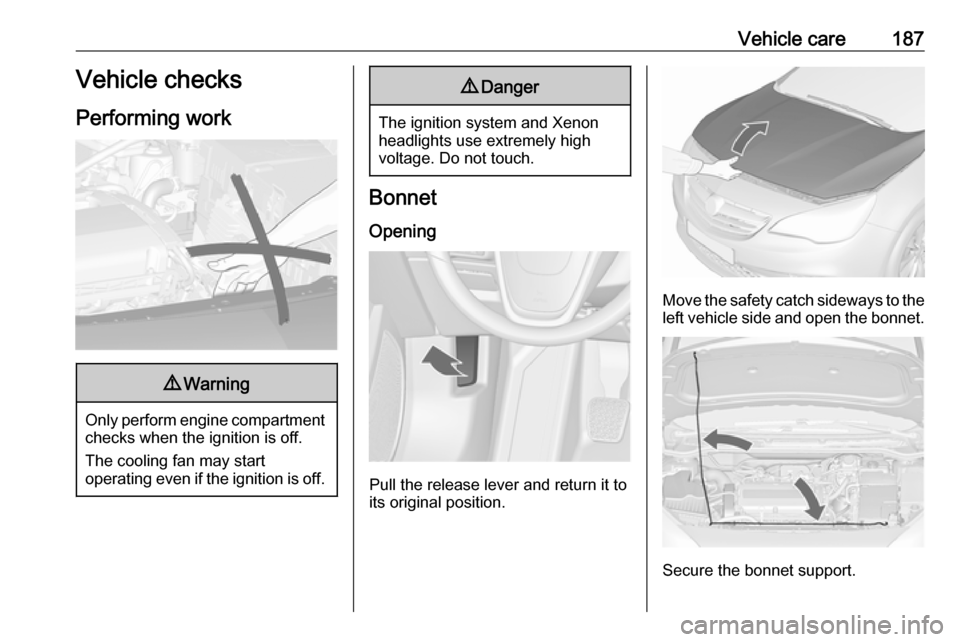
Performing work9 Warning
Only perform engine compartment
checks when the ignition is off.
The cooling fan may start
operating even if the ignition is off.
9 Danger
The ignition system and Xenon
headlights use extremely high
voltage. Do not touch.
Bonnet
Opening
Pull the release lever and return it to
its original position.
Move the safety catch sideways to the left vehicle side and open the bonnet.
Secure the bonnet support.
Page 194 of 261

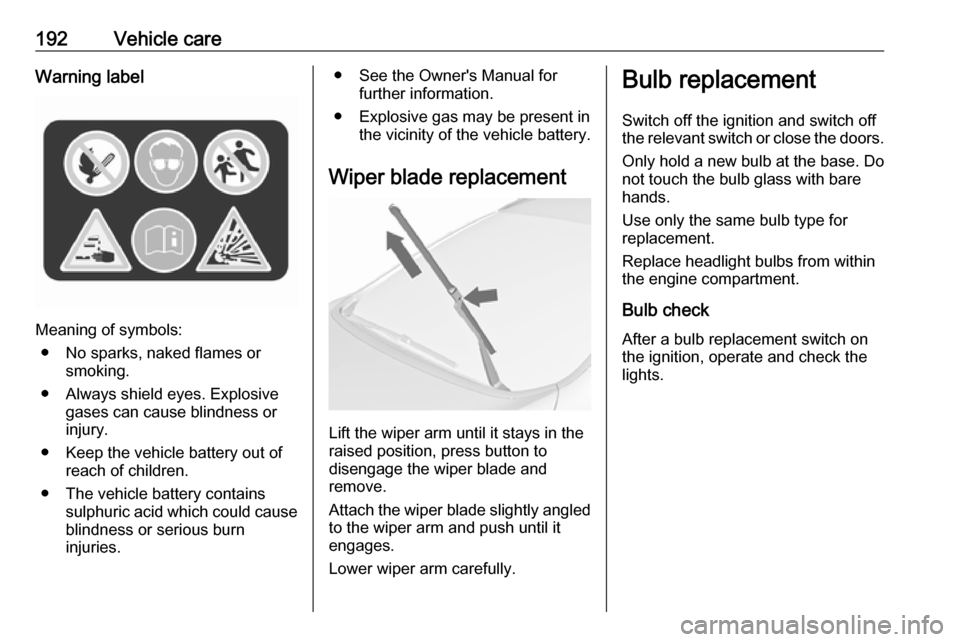
192Vehicle careWarning label
Meaning of symbols:● No sparks, naked flames or smoking.
● Always shield eyes. Explosive gases can cause blindness or
injury.
● Keep the vehicle battery out of reach of children.
● The vehicle battery contains sulphuric acid which could cause
blindness or serious burn
injuries.
● See the Owner's Manual for further information.
● Explosive gas may be present in the vicinity of the vehicle battery.
Wiper blade replacement
Lift the wiper arm until it stays in the
raised position, press button to
disengage the wiper blade and
remove.
Attach the wiper blade slightly angled
to the wiper arm and push until it
engages.
Lower wiper arm carefully.
Bulb replacement
Switch off the ignition and switch off
the relevant switch or close the doors.
Only hold a new bulb at the base. Do
not touch the bulb glass with bare
hands.
Use only the same bulb type for
replacement.
Replace headlight bulbs from within
the engine compartment.
Bulb check
After a bulb replacement switch on
the ignition, operate and check the
lights.
Page 259 of 261

257Rear storage................................. 75
Rear view camera ...................... 170
Recommended fluids and lubricants ........................ 231, 235
Refuelling ................................... 178 Registered trademarks ...............249
Retained power off .....................139
Reversing lights .........................123
Ride control systems ..................152
Rollover protection system ...........45
S Seat adjustment ............................. 7
Seat belt ........................................ 8
Seat belt reminder .......................91
Seat belts ..................................... 56
Seat folding .................................. 52
Seat heating ................................. 55
Seat position ................................ 49
Seat ventilation ............................. 55
Selector lever ............................. 146
Service ............................... 136, 230
Service display ............................ 87
Service information ....................230
Side airbag system ......................63
Side blind spot alert ....................169
Sidelights .................................... 114
Side turn lights ........................... 199
Soft top ........................................ 36
Software acknowledgement .......247Spare wheel ............................... 217
Speed limiter............................... 157
Speedometer ............................... 85
Starting and operating ................138
Starting off ................................... 18
Starting the engine ....................139
Steering ...................................... 138
Steering wheel adjustment ......9, 79
Steering wheel controls ...............79
Stop-start system........................ 140
Storage ......................................... 70
Storage compartments .................70
Sunvisor lights ........................... 124
Sun visors .................................... 35
Symbols ......................................... 4
T
Tachometer ................................. 86
Tail lights ................................... 197
Three-point seat belt .................... 57
Tools .......................................... 206
Tow bar....................................... 180
Towing ................................ 180, 224
Towing another vehicle .............225
Towing equipment .....................181
Towing the vehicle .....................224
Traction Control system ............. 152
Traction Control system off........... 94
Traffic sign assistant ...................172
Trailer coupling ........................... 180Trailer towing ............................. 180
Transmission ............................... 17
Transmission display .................145
Tread depth ............................... 212
Trip odometer .............................. 85
Turn lights ............................ 90, 122
Tyre chains ................................ 213
Tyre designations ......................207
Tyre pressure ............................ 211
Tyre pressure monitoring system ............................... 94, 207
Tyre pressures ........................... 242
Tyre repair kit ............................. 213
U Ultrasonic parking assist............. 162
Upholstery .................................. 228
Upshift .......................................... 93
Using this manual ..........................3
V
Vehicle battery ........................... 191
Vehicle checks............................ 187
Vehicle data ................................ 235
Vehicle data recording and privacy ..................................... 249
Vehicle detected ahead ................96
Vehicle dimensions .................... 240
Vehicle Identification Number ....233
Vehicle jack ................................ 206
Vehicle messages .....................103