wheel OPEL COMBO 2017 Manual user
[x] Cancel search | Manufacturer: OPEL, Model Year: 2017, Model line: COMBO, Model: OPEL COMBO 2017Pages: 195, PDF Size: 4.71 MB
Page 159 of 195

Vehicle care157Tyre pressure monitoringsystem
The Tyre Pressure Monitoring
System (TPMS) uses radio and
sensor technology to check tyre
pressure levels.Caution
Tyre pressure monitoring system
warns only about low tyre pressure condition and does not replace
regular tyre maintenance by the
driver.
The TPMS sensors monitor the air pressure in the tyres and transmit tyre
pressure readings to a receiver
located in the vehicle.
All wheels must be equipped with
pressure sensors and the tyres must
have the prescribed pressure.
Tyre pressure chart 3 185.
Note
In countries where the tyre pressure monitoring system is legally
required, the use of wheels without
pressure sensors will invalidate the
vehicle type approval.
Low tyre pressure condition
A detected low tyre pressure
condition is indicated by illumination
of control indicator w 3 86 together
with a warning chime. In vehicles with Multifunction version of the Driver
Information Centre, a corresponding message is also displayed.
If w illuminates, stop as soon as
possible and inflate the tyres as
recommended 3 185.
After inflating, driving may be
required to update the tyre pressure
values in the system. During this time
w may illuminate.
If w illuminates at lower temperatures
and extinguishes after some driving,
this could be an indicator for
approaching a low tyre pressure
condition. Check tyre pressure of all
four tyres.
If the tyre pressure must be reduced
or increased, switch off ignition.
Only mount wheels with pressure
sensors, otherwise the tyre pressure
value cannot be recognised by the
system and w flashes for several
seconds then illuminates
continuously. In vehicles with
Multifunction version of the Driver Information Centre, a corresponding
message is also displayed.
Page 160 of 195
158Vehicle careA spare wheel or temporary spare
wheel is not equipped with pressure
sensors. TPMS is not operational for
these wheels. For the further three
wheels, TPMS remains operational.
Spare wheel 3 163, Wheel changing
3 162.
Control indicator w and (depending
on version) a corresponding message appears at each ignition cycle untilthe tyres are inflated to the correct
tyre pressure.
Driver Information Centre 3 89.
Relearn function
After changing wheels, TPMS needs
to recalculate. The relearn process
takes up to 20 minutes of driving with
a minimum speed of 20 km/h.
If problems occur during the relearn
process, control indicator w flashes
for several seconds then illuminates
continuously and (depending on
version) a warning message is
displayed in the Driver Information
Centre.
Driver Information Centre 3 89.General information
The use of tyre chains or
commercially available liquid tyre
repair kits can impair the function of
the system. Factory-approved tyre
repair kits can be used.
Tyre repair kit 3 159, Tyre chains
3 159.
Operating electronic devices or being
close to facilities using similar wave
frequencies could disrupt the tyre
pressure monitoring system.
Each time the tyres are replaced, TPMS sensors must be dismounted
and serviced by a workshop.
Tread depth Check tread depth at regular
intervals.
Tyres should be replaced for safety
reasons at a tread depth of 2-3 mm
(4 mm for winter tyres).
For safety reasons, it is
recommended that the tread depth of
the tyres on one axle should not vary
by more than 2 mm.
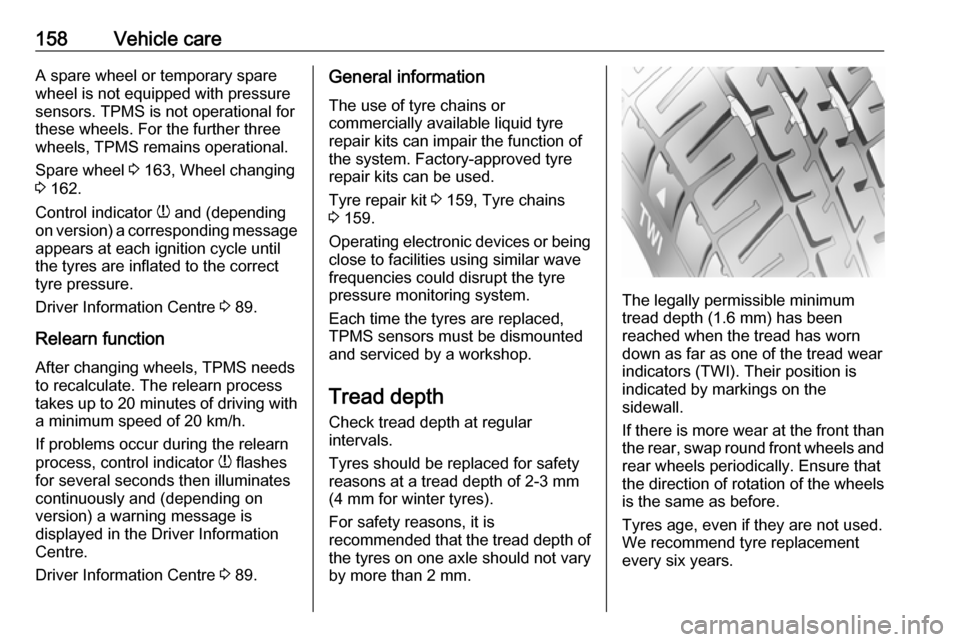
The legally permissible minimum
tread depth (1.6 mm) has been
reached when the tread has worn
down as far as one of the tread wear
indicators (TWI). Their position is
indicated by markings on the
sidewall.
If there is more wear at the front than
the rear, swap round front wheels and
rear wheels periodically. Ensure that
the direction of rotation of the wheels
is the same as before.
Tyres age, even if they are not used.
We recommend tyre replacement
every six years.
Page 161 of 195
Vehicle care159Changing tyre and wheelsize
If tyres of a different size than those
fitted at the factory are used, it may be necessary to reprogramme the
speedometer as well as the nominal
tyre pressure and make other vehicle modifications.
After converting to a different tyre
size, have the label with tyre
pressures replaced.9 Warning
Use of unsuitable tyres or wheels
may lead to accidents and will
invalidate the vehicle type
approval.
Wheel covers
Wheel covers and tyres that are
factory approved for the respective
vehicle and comply with all of the
relevant wheel and tyre combination requirements must be used.
If the wheel covers and tyres used are
not factory approved, the tyres must
not have a rim protection ridge.
Wheel covers must not impair brake
cooling.9 Warning
Use of unsuitable tyres or wheel
covers could lead to sudden
pressure loss and thereby
accidents.
Tyre chains
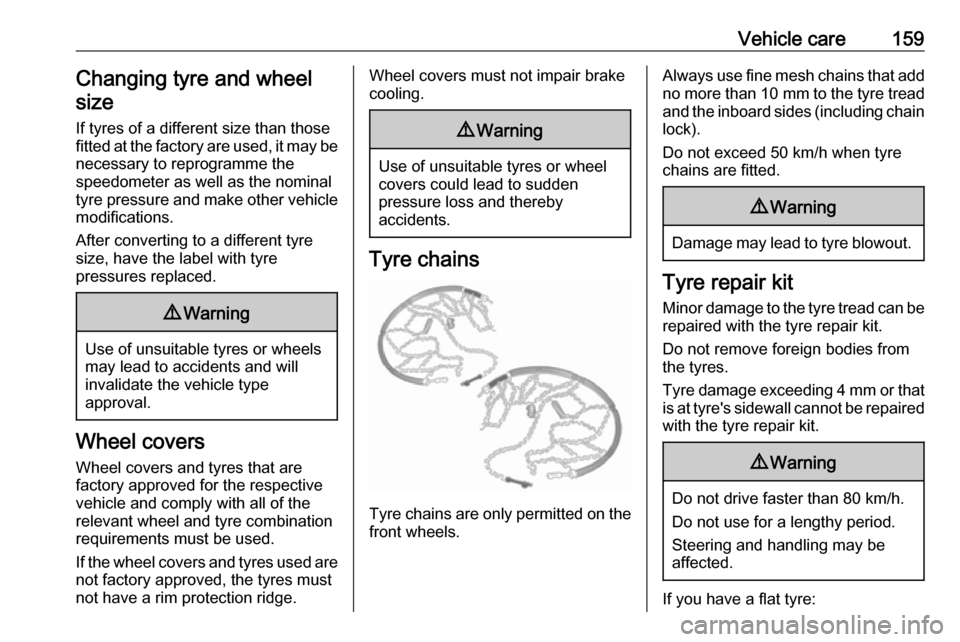
Tyre chains are only permitted on the
front wheels.
Always use fine mesh chains that add no more than 10 mm to the tyre tread
and the inboard sides (including chain lock).
Do not exceed 50 km/h when tyre
chains are fitted.9 Warning
Damage may lead to tyre blowout.
Tyre repair kit
Minor damage to the tyre tread can be
repaired with the tyre repair kit.
Do not remove foreign bodies from
the tyres.
Tyre damage exceeding 4 mm or that is at tyre's sidewall cannot be repairedwith the tyre repair kit.
9 Warning
Do not drive faster than 80 km/h.
Do not use for a lengthy period.
Steering and handling may be
affected.
If you have a flat tyre:
Page 164 of 195

162Vehicle care2. Turn the canister anticlockwise tolift it out.
3. Insert the new canister and turn it clockwise.
4. Connect the compressor air hose to the canister and fit the flexible
filler tube into its allocated space.
Wheel changing
Some vehicles are equipped with a
tyre repair kit instead of a spare wheel 3 159.
Make the following preparations and
observe the following information:
● Park the vehicle on a level, firm and non-skid surface. The front
wheels must be in the straight-
ahead position.
● Apply the parking brake and engage first or reverse gear.
● Remove the spare wheel 3 163.
● Never change more than one wheel at once.
● Use the jack only to change wheels in case of puncture, not
for seasonal winter or summer
tyre change.● The jack is maintenance-free.
● If the ground on which the vehicle
is standing is soft, a solid board
(max. 1 cm thick) should be
placed under the jack.
● No people or animals may be in the vehicle when it is jacked-up.
● Never crawl under a jacked-up vehicle.
● Do not start the vehicle when it is
raised on the jack.
● Clean wheel nuts and thread with
a clean cloth before mounting the
wheel.9 Warning
Do not grease wheel bolt, wheel
nut and wheel nut cone.
1. Disengage wheel nut caps with a screwdriver and remove. Pull off
the wheel cover using a suitable
tool.
2. Attach wheel wrench securely and loosen each wheel nut by halfa turn.
Page 165 of 195
Vehicle care163
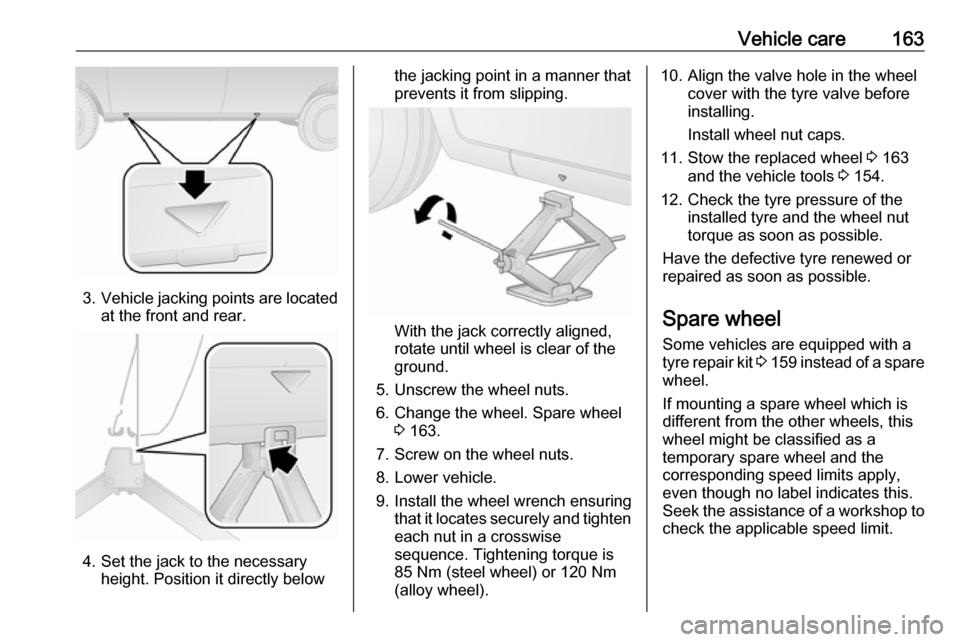
3.Vehicle jacking points are located
at the front and rear.
4. Set the jack to the necessary height. Position it directly below
the jacking point in a manner that
prevents it from slipping.
With the jack correctly aligned,
rotate until wheel is clear of the
ground.
5. Unscrew the wheel nuts. 6. Change the wheel. Spare wheel 3 163.
7. Screw on the wheel nuts.
8. Lower vehicle.
9. Install the wheel wrench ensuring that it locates securely and tighten
each nut in a crosswise
sequence. Tightening torque is
85 Nm (steel wheel) or 120 Nm
(alloy wheel).
10. Align the valve hole in the wheel cover with the tyre valve before
installing.
Install wheel nut caps.
11. Stow the replaced wheel 3 163
and the vehicle tools 3 154.
12. Check the tyre pressure of the installed tyre and the wheel nut
torque as soon as possible.
Have the defective tyre renewed or
repaired as soon as possible.
Spare wheel Some vehicles are equipped with atyre repair kit 3 159 instead of a spare
wheel.
If mounting a spare wheel which is
different from the other wheels, this
wheel might be classified as a
temporary spare wheel and the
corresponding speed limits apply,
even though no label indicates this.
Seek the assistance of a workshop to
check the applicable speed limit.
Page 166 of 195

164Vehicle careCaution
The use of a spare wheel that issmaller than the other wheels or in combination with winter tyres
could affect driveability. Have the defective tyre replaced as soon as
possible.
Depending on model variant, the
spare wheel is stored beneath the
floor or in the load compartment.
1. Attach the extension bar 2 to the
wheel wrench 1. Vehicle tools
3 154.
2. Insert the wheel wrench into the
aperture in the load compartment
floor.
3. Rotate the wheel wrench to lower the spare wheel to the floor.
4. Withdraw spare wheel frombeneath the vehicle.
5. Unscrew knob 2 and release
cable attachment 1 from spare
wheel.
6. Change the wheel.
7. Position the replaced wheel at the
rear of the vehicle with the outside of the wheel facing downwards.
Page 167 of 195
Vehicle care165
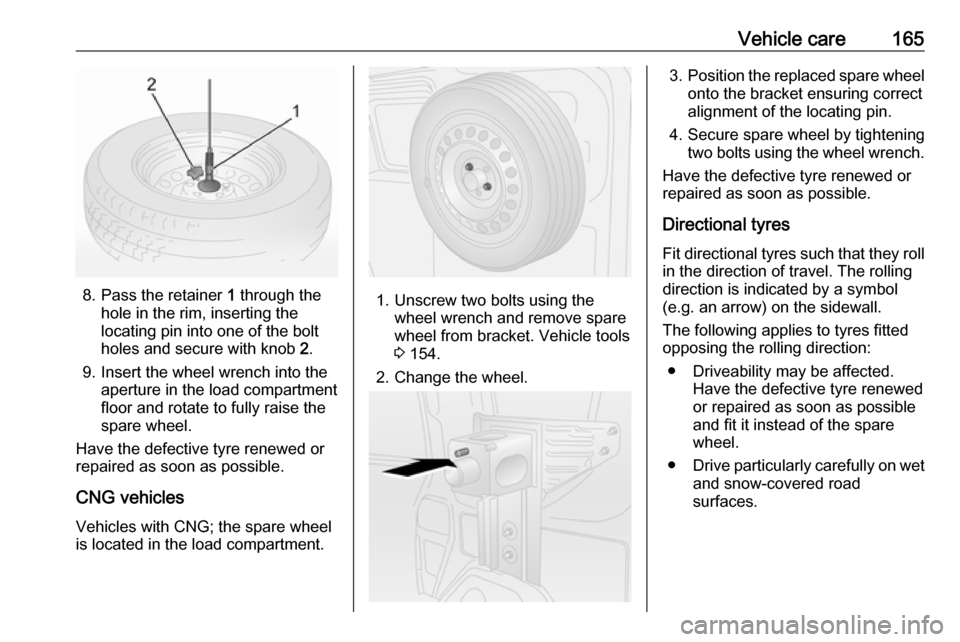
8. Pass the retainer 1 through the
hole in the rim, inserting the
locating pin into one of the bolt
holes and secure with knob 2.
9. Insert the wheel wrench into the aperture in the load compartment
floor and rotate to fully raise the
spare wheel.
Have the defective tyre renewed or repaired as soon as possible.
CNG vehicles
Vehicles with CNG; the spare wheel
is located in the load compartment.1. Unscrew two bolts using the wheel wrench and remove spare
wheel from bracket. Vehicle tools
3 154.
2. Change the wheel.
3. Position the replaced spare wheel
onto the bracket ensuring correct
alignment of the locating pin.
4. Secure spare wheel by tightening two bolts using the wheel wrench.
Have the defective tyre renewed or
repaired as soon as possible.
Directional tyres Fit directional tyres such that they rollin the direction of travel. The rolling
direction is indicated by a symbol
(e.g. an arrow) on the sidewall.
The following applies to tyres fitted
opposing the rolling direction:
● Driveability may be affected. Have the defective tyre renewed
or repaired as soon as possible
and fit it instead of the spare
wheel.
● Drive particularly carefully on wet
and snow-covered road
surfaces.
Page 170 of 195

168Vehicle careCaution
The towing eye must only be usedfor towing and not for recovering
the vehicle.
Switch on ignition to release steering
wheel lock and to permit operation of
brake lights, horn and windscreen
wiper.
Transmission in neutral.
Note
If neutral cannot be selected on
vehicles with manual transmission
automated (MTA), the vehicle must
only be towed with the drive wheels
raised off the ground.
Caution
Drive slowly. Do not drive jerkily.
Excessive tractive force can
damage the vehicle.
When the engine is not running,
considerably more force is needed to
brake and steer.
To prevent the entry of exhaust gases from the towing vehicle, switch on the
air recirculation 3 106 and close the
windows.
Seek the assistance of a workshop. After towing, unscrew the towing eye
and replace the cap.
Towing another vehicle
Insert a screwdriver in the slot at the
side of the cap. Release the cap by
carefully levering the screwdriver. To
prevent damage it is recommended to place a cloth between the screwdriver
and the frame.
The towing eye is stowed with the vehicle tools 3 154.
Screw in the towing eye as far as it will
go until it stops in a horizontal
position.
Attach a tow rope – or even better a tow bar – to the towing eye.
The towing eye must only be used for
towing and not for recovering a
vehicle.Caution
Drive slowly. Do not drive jerkily.
Excessive tractive force can
damage the vehicle.
After towing, unscrew the towing eye.
Insert cap.
Page 171 of 195
Vehicle care169Appearance care
Exterior care LocksThe locks are lubricated at the factoryusing a high quality lock cylinder
grease. Use de-icing agent only when
absolutely necessary, as this has a
degreasing effect and impairs lock
function. After using a de-icing agent,
have the locks regreased by a
workshop.
WashingThe paintwork of your vehicle is
exposed to environmental influences.
Wash and wax your vehicle regularly.
When using automatic vehicle
washes, select a programme that
includes waxing.
Bird droppings, dead insects, resin,
pollen and the like should be cleaned
off immediately, as they contain
aggressive constituents which can
cause paint damage.If using a vehicle wash, comply with
the vehicle wash manufacturer's
instructions. The windscreen wiper and rear window wiper must be
switched off. Remove antenna and
external accessories such as roof
racks etc.
If you wash your vehicle by hand,
make sure that the insides of the
wheel housings are also thoroughly
rinsed out.
Clean edges and folds on opened
doors and the bonnet as well as the
areas they cover.Caution
Always use a cleaning agent with
a pH value of four to nine.
Do not use cleaning agents on hot surfaces.
Do not clean the engine compartmentwith a steam-jet or high-pressure jet
cleaner.
Thoroughly rinse and leather-off the vehicle. Rinse leather frequently. Use
separate leathers for painted and
glass surfaces: remnants of wax on
the windows will impair vision.
Have the door hinges of all doors
greased by a workshop.
Do not use hard objects to remove
spots of tar. Use tar removal spray on
painted surfaces.
Exterior lights
Headlight and other light covers are
made of plastic. Do not use any
abrasive or caustic agents, do not use an ice scraper, and do not clean them
dry.
Polishing and waxing
Wax the vehicle regularly (at the
latest when water no longer beads).
Otherwise, the paintwork will dry out.
Polishing is necessary only if the paint
has become dull or if solid deposits
have become attached to it.
Paintwork polish with silicone forms a
protective film, making waxing
unnecessary.
Page 172 of 195

170Vehicle carePlastic body parts must not be treatedwith wax or polishing agents.
Windows and windscreen wiper
blades
Use a soft lint-free cloth or chamois
leather together with window cleaner and insect remover.
When cleaning the rear window from
inside, always wipe in parallel to the
heating element to prevent damage.
For mechanical removal of ice, use a
sharp-edged ice scraper. Press the
scraper firmly against the glass so
that no dirt can get under it and
scratch the glass.
Clean smearing wiper blades with a
soft cloth and window cleaner.
Remove dirt residues from smearing
wiper blades by using a soft cloth and window cleaner. Also make sure to
remove any residues such as wax,
insect residues and similar from the
window.
Ice residues, pollution and continuous
wiping on dry windows will damage or
even destroy the wiper blades.Glass panel
Never clean with solvents or abrasive
agents, fuels, aggressive media (e.g.
paint cleaner, acetone-containing
solutions etc.), acidic or highly
alkaline media or abrasive pads. Do
not apply wax or polishing agents to
the glass panel.
Wheels and tyres Do not use high-pressure jet
cleaners.
Clean rims with a pH-neutral wheel
cleaner.
Rims are painted and can be treated
with the same agents as the body.
Paintwork damage
Rectify minor paintwork damage with
a touch-up pen before rust forms.
Have more extensive damage or rust areas repaired by a workshop.
Underbody
Some areas of the vehicle underbody
have a PVC undercoating while other critical areas have a durable
protective wax coating.After the underbody is washed, check
the underbody and have it waxed if
necessary.
Bitumen/rubber materials could
damage the PVC coating. Have
underbody work carried out by a
workshop.
Before and after winter, wash the
underbody and have the protective
wax coating checked.
Natural gas system
Do not direct the steam jet or high-
pressure jet towards natural gas
system components. It is particularly important to protect the natural gastank and the pressure valves on the
vehicle underbody and the bulkhead in the engine compartment.
These components must not be
treated using chemical cleaners or
preservatives.
Have components of the natural gas
system cleaned by a workshop
authorised to carry out maintenance
of natural gas vehicles.