wheel OPEL COMBO D 2017.5 Manual user
[x] Cancel search | Manufacturer: OPEL, Model Year: 2017.5, Model line: COMBO D, Model: OPEL COMBO D 2017.5Pages: 201, PDF Size: 4.76 MB
Page 116 of 201

114Driving and operatingSteeringIf power steering assist is lost
because the engine stops or due to a
system malfunction, the vehicle can
be steered but may require increased
effort.Caution
Never leave the steering wheel on
full lock when the vehicle is
stationary, as this may damage
the power steering pump.
Starting and operating
New vehicle running-in Do not brake unnecessarily hard for
the first few journeys.
During the first drive, smoke may
occur because of wax and oil
evaporating off the exhaust system.
Park the vehicle in the open for a
while after the first drive and avoid
inhaling the fumes.
During the running-in period, fuel and engine oil consumption may be
higher.
Additionally, the cleaning process of
the diesel particle filter may take
place more often. Diesel particle filter
3 120.
Autostop may be inhibited to allow for charging of the vehicle battery. Stop-start system 3 116.
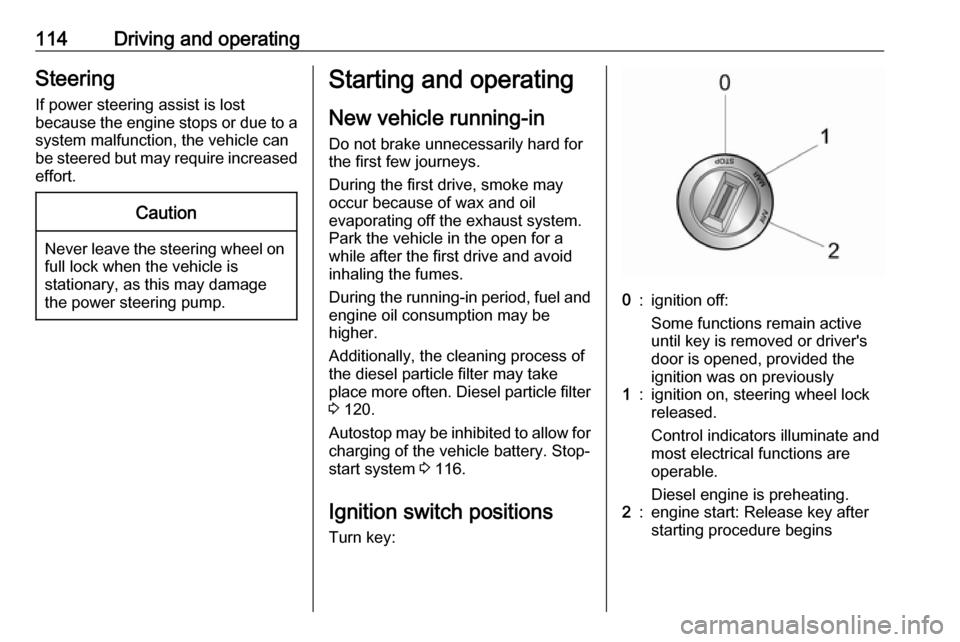
Ignition switch positions Turn key:0:ignition off:
Some functions remain active
until key is removed or driver's
door is opened, provided the
ignition was on previously1:ignition on, steering wheel lock
released.
Control indicators illuminate and
most electrical functions are
operable.
Diesel engine is preheating.2:engine start: Release key after
starting procedure begins
Page 117 of 201

Driving and operating115Steering wheel lockRemove key from ignition switch and
turn steering wheel until it engages.
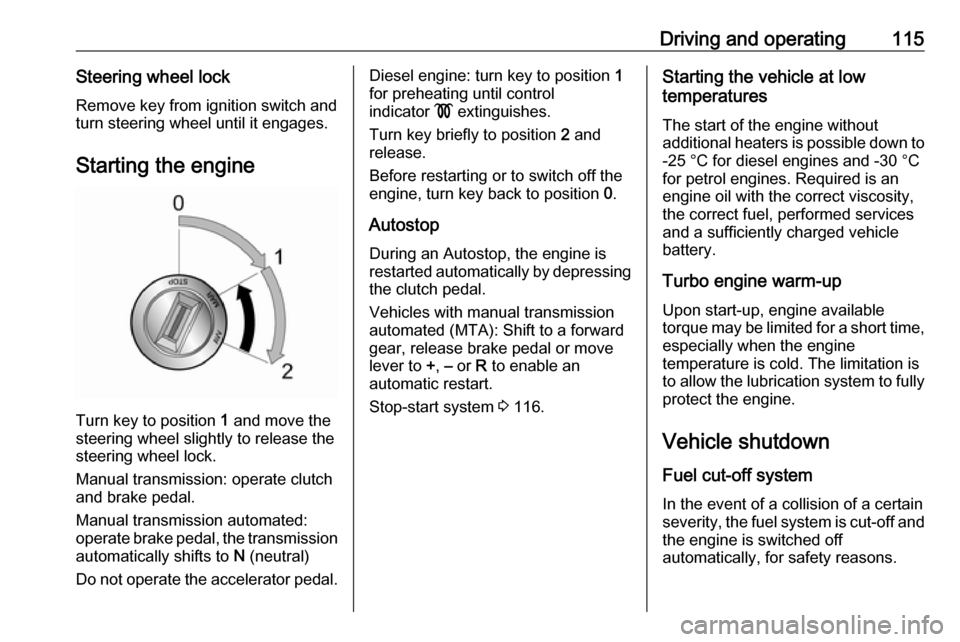
Starting the engine
Turn key to position 1 and move the
steering wheel slightly to release the
steering wheel lock.
Manual transmission: operate clutch
and brake pedal.
Manual transmission automated:
operate brake pedal, the transmission
automatically shifts to N (neutral)
Do not operate the accelerator pedal.
Diesel engine: turn key to position 1
for preheating until control
indicator ! extinguishes.
Turn key briefly to position 2 and
release.
Before restarting or to switch off the
engine, turn key back to position 0.
Autostop During an Autostop, the engine is
restarted automatically by depressing
the clutch pedal.
Vehicles with manual transmission
automated (MTA): Shift to a forward
gear, release brake pedal or move
lever to +, – or R to enable an
automatic restart.
Stop-start system 3 116.Starting the vehicle at low
temperatures
The start of the engine without
additional heaters is possible down to -25 °С for diesel engines and -30 °C
for petrol engines. Required is an engine oil with the correct viscosity,
the correct fuel, performed services
and a sufficiently charged vehicle
battery.
Turbo engine warm-up Upon start-up, engine available
torque may be limited for a short time, especially when the engine
temperature is cold. The limitation is
to allow the lubrication system to fully
protect the engine.
Vehicle shutdown
Fuel cut-off system In the event of a collision of a certain
severity, the fuel system is cut-off and
the engine is switched off
automatically, for safety reasons.
Page 121 of 201

Driving and operating119Parking9Warning
● Do not park the vehicle on an
easily ignitable surface. The
high temperature of the
exhaust system could ignite the
surface.
● Always apply parking brake without pressing release
button. Apply as firmly as
possible on a downhill slope or
uphill slope. Depress brake
pedal at the same time to
reduce operating force.
● Switch off the engine.
● If the vehicle is on a level surface or uphill slope, engage
first gear before switching off
the ignition. On an uphill slope,
turn the front wheels away from
the kerb.
If the vehicle is on a downhill
slope, engage reverse gear
before switching off the ignition. Turn the front wheels towardsthe kerb.
● Close the windows.
● Turn the ignition key to position
0 and remove it from the
ignition switch. Turn the
steering wheel until the
steering wheel lock is felt to
engage.
● Lock the vehicle 3 24.
● Activate the anti-theft locking system 3 29.
● The engine cooling fans may run
after the engine has been
switched off 3 142.
Caution
After running at high engine
speeds or with high engine loads,
operate the engine briefly at a low load or run in neutral for
approx. 30 seconds before
switching off, in order to protect
the turbocharger.
Note
In the event of an accident with
airbag deployment, the engine is
switched off automatically if the
vehicle comes to a standstill within a
certain time.
Page 128 of 201

126Driving and operatingBrakes
The brake system comprises two
independent brake circuits.
If a brake circuit fails, the vehicle can
still be braked using the other brake
circuit. However, braking effect is
achieved only when the brake pedal
is depressed firmly. Considerably
more force is needed for this. The
braking distance is extended. Seek the assistance of a workshop before
continuing your journey.
When the engine is not running, the
support of the brake servo unit
disappears once the brake pedal has been depressed once or twice.
Braking effect is not reduced, but
braking requires significantly greater
force. It is especially important to bear this in mind when being towed.
Control indicator R 3 84.
Antilock brake system
Antilock brake system (ABS)
prevents the wheels from locking.ABS starts to regulate brake pressure as soon as a wheel shows a tendency to lock. The vehicle remains
steerable, even during hard braking.
ABS control is made apparent
through a pulse in the brake pedal
and the noise of the regulation
process.
For optimum braking, keep the brake
pedal fully depressed throughout the
braking process, despite the fact that the pedal is pulsating. Do not reduce
the pressure on the pedal.
After starting off the system performs
a self-test which may be audible.
Fault
In the event of a fault, control indicator
u illuminates in the instrument
cluster. Depending on version, a
corresponding warning message,
e.g. ABS unavailable , may also be
displayed in the Driver Information Centre 3 90.9 Warning
If there is a fault in the ABS, the
wheels may be liable to lock due
to braking that is heavier than
normal. The advantages of ABS are no longer available. During
hard braking, the vehicle can no longer be steered and may
swerve.
Have the cause of the fault remedied
by a workshop.
Control indicator u 3 84.
Page 130 of 201

128Driving and operatingbe displayed in the Driver Information
Centre 3 90. Seek the assistance of
a workshop to have the fault remedied.
The Hill start assist is not active
during an Autostop.
Stop-start system 3 116.Ride control systems
Traction Control system The Anti-Slip Regulator (ASR) is a
component of the Electronic Stability
Control (ESC).
ASR improves driving stability when
necessary, regardless of the type of
road surface or tyre grip, by
preventing the drive wheels from
spinning.
As soon as the drive wheels starts to spin, engine output is reduced and
the wheel spinning the most is braked
individually. This considerably
improves the driving stability of the
vehicle on slippery road surfaces.
ASR is operational after each engine
start as soon as the control indicator
R extinguishes.
When ASR operates, R flashes.
9 Warning
Do not let this special safety
feature tempt you into taking risks
when driving.
Adapt speed to the road
conditions.
Page 131 of 201

Driving and operating129Deactivation
ASR can be switched off when
spinning of drive wheels is required:
press ASR OFF briefly.
LED in button illuminates and,
depending on version, a
corresponding message, e.g. ASR
disconnect , may also be displayed in
the Driver Information Centre 3 90.
ASR is reactivated by pressing
ASR OFF again.
ASR is also reactivated the next time
the ignition is switched on.
Fault
ASR will switch off automatically in the event of a fault. Control indicator
R will illuminate in the instrument
cluster. Depending on version, a
corresponding message, e.g. ESP
unavailable , may also appear in the
Driver Information Centre 3 90.
Have the cause of the fault remedied by a workshop.
Control indicator R 3 85.
Electronic Stability Control
Electronic Stability Control (ESC)
improves driving stability when
necessary, regardless of the type of
road surface or tyre grip. It also
prevents the drive wheels from
spinning.
As soon as the vehicle starts to
swerve (understeer/oversteer),
engine output is reduced and the wheels are braked individually. This
considerably improves the driving
stability of the vehicle on slippery road
surfaces.
ESC is operational after each engine
start as soon as control indicator R
extinguishes.
When ESC operates, R flashes.
The ESC system is automatically
activated when the vehicle is started
and cannot be deactivated.
9 Warning
Do not let this special safety
feature tempt you into taking risks
when driving.
Adapt speed to the road
conditions.
Page 142 of 201

140Vehicle careVehicle careGeneral Information...................140
Accessories and vehicle modifications .......................... 140
Vehicle storage ........................141
End-of-life vehicle recovery .....141
Vehicle checks ........................... 142
Performing work ......................142
Bonnet ..................................... 142
Engine oil ................................. 143
Engine coolant ......................... 144
Power steering fluid .................144
Washer fluid ............................ 145
Brakes ..................................... 145
Brake fluid ............................... 145
Vehicle battery ......................... 146
Wiper blade replacement ........147
Bulb replacement .......................148
Halogen headlights ..................148
Fog lights ................................. 150
Tail lights ................................. 150
Side turn signal lights ..............151
Centre high-mounted brake light ......................................... 151
Number plate light ...................152Interior lights ............................ 153
Instrument panel illumination ...154
Electrical system ........................154
Fuses ....................................... 154
Engine compartment fuse box . 155
Instrument panel fuse box .......156
Vehicle tools .............................. 158
Tools ........................................ 158
Wheels and tyres .......................159
Winter tyres ............................. 159
Tyre designations ....................159
Tyre pressure .......................... 159
Tyre pressure monitoring
system .................................... 160
Tread depth ............................. 162
Changing tyre and wheel size . 162 Wheel covers ........................... 162
Tyre chains .............................. 163
Tyre repair kit .......................... 163
Wheel changing .......................165
Spare wheel ............................ 167
Jump starting ............................. 169
Towing ....................................... 171
Towing the vehicle ...................171
Towing another vehicle ...........172
Appearance care .......................172
Exterior care ............................ 172
Interior care ............................. 175General Information
Accessories and vehiclemodifications
We recommend the use of genuine
parts and accessories and factory
approved parts specific for your
vehicle type. We cannot assess or guarantee reliability of other products
- even if they have a regulatory or
otherwise granted approval.
Any modification, conversion or other
changes made to standard vehicle
specifications (including, without
limitation, software modifications,
modifications of the electronic control units) may invalidate the warrantyoffered by Opel. Furthermore, such
changes may impact fuel
consumption, CO 2 emissions and
other emissions of the vehicle and
cause the vehicle to no longer
conform to the type approval,
impacting the validity of your vehicle
registration.
Page 160 of 201

158Vehicle careThe single panel of fuses may be
located on the right-hand side of the
fuse compartment in right-hand drive
vehicles.
After having changed defective fuses, refit the cover.
If the fuse box cover is not closed
correctly, malfunction may occur.Vehicle tools
Tools
Van
The tools and the vehicle jacking
equipment are in the storage area behind the front seat. Pull front handle
and slide seat forwards to access
3 37.
Combi, Combo Tour
The tools and the vehicle jacking
equipment are stored in the load
compartment behind a panel on the
right-hand side.
Wheel changing 3 165.
Spare wheel 3 167.
Page 161 of 201

Vehicle care159Wheels and tyres
Tyre condition, wheel condition
Drive over edges slowly and at right
angles if possible. Driving over sharp
edges can cause tyre and wheel
damage. Do not trap tyres on the kerb when parking.
Regularly check the wheels for
damage. Seek the assistance of a
workshop in the event of damage or
unusual wear.
Winter tyres
Winter tyres improve driving safety at temperatures below 7 °C and should
therefore be fitted on all wheels.
Tyres of size 185/65 R15,
195/65 R15 and 195/60 R16 C are
permitted as winter tyres.
In accordance with country-specific
regulations, affix the speed sticker in
the driver's field of view.Tyre designations
E.g. 215/60 R 16 95 H215:tyre width, mm60:cross-section ratio (tyre height
to tyre width), %R:belt type: RadialRF:type: RunFlatC:cargo or commercial use16:wheel diameter, inches95:load index e.g. 95 is equivalent
to 690 kgH:speed code letter
Speed code letter:
Q:up to 160 km/hS:up to 180 km/hT:up to 190 km/hH:up to 210 km/hV:up to 240 km/hW:up to 270 km/h
Choose a tyre appropriate for the
maximum speed of your vehicle.
The maximum speed is achievable at kerb weight with driver (75 kg) plus
125 kg payload. Optional equipment
could reduce the maximum speed of
the vehicle.
Performance 3 185.
Directional tyres
Directional tyres must be mounted so that they rotate in the correct
direction. The proper rotation
direction is indicated by a symbol
(e.g. an arrow) on the sidewall.
Tyre pressure
Check the pressure of cold tyres at
least every 14 days and before any
long journey. Do not forget the spare
wheel. This also applies to vehicles
with tyre pressure monitoring system.
Unscrew the valve cap.
Tyre pressure 3 190.
The tyre pressure information label
on the door frame (if fitted) indicates
the original equipment tyres and the
correspondent tyre pressures.
Always inflate tyres to the pressures
shown on the label.
The tyre pressure data refers to cold
tyres. It applies to summer and winter
tyres.
Page 162 of 201

160Vehicle careIncorrect tyre pressures will impair
safety, vehicle handling, comfort and
fuel economy and will increase tyre
wear.
Tyre pressures differ depending on
various options. For the correct tyre
pressure value, follow the procedure
below:
1. Identify the engine identifier code.
Engine data 3 182.
2. Identify the respective tyre.
The tyre pressure tables show all possible tyre combinations 3 190.
For the tyres approved for your
vehicle, refer to the EEC Certificate of
Conformity provided with your vehicle or other national registration
documents.
The driver is responsible for correct
adjustment of tyre pressures.9 Warning
If the pressure is too low, this can
result in considerable tyre warm-
up and internal damage, leading to tread separation and even to tyre
blow-out at high speeds.
9 Warning
For specific tyres the
recommended tyre pressure as
shown in the tyre pressure table may exceed the maximum tyre
pressure as indicated on the tyre.
Never exceed the maximum tyre
pressure as indicated on the tyre.
If the tyre pressure must be reduced
or increased on a vehicle with tyre
pressure monitoring system, switch
off ignition.
Temperature dependency
The tyre pressure depends on the
temperature of the tyre. During
driving, tyre temperature and
pressure increase. Tyre pressure
values provided on the tyre
information label and tyre pressure
chart are valid for cold tyres, which means at 20 °C.
The pressure increases by nearly
10 kPa (0.1 bar) for a 10 °C
temperature increase. This must be
considered when warm tyres are
checked.
Tyre pressure monitoring
system
The tyre pressure monitoring system
uses radio and sensor technology to
check tyre pressure levels.Caution
Tyre pressure monitoring system
warns only about low tyre pressure condition and does not replace
regular tyre maintenance by the
driver.
The tyre pressure monitoring system sensors monitor the air pressure in
the tyres and transmit tyre pressure
readings to a receiver located in the
vehicle.
All wheels must be equipped with
pressure sensors and the tyres must
have the prescribed pressure.
Tyre pressure chart 3 190.