lights OPEL COMBO D 2018 Manual user
[x] Cancel search | Manufacturer: OPEL, Model Year: 2018, Model line: COMBO D, Model: OPEL COMBO D 2018Pages: 203, PDF Size: 4.97 MB
Page 98 of 203

96Instruments and controlsPassenger bag or Passenger airbag
(Passenger front and side airbags
activation/deactivation)
Activate the front passenger airbags
if an adult is occupying the front
passenger seat. Deactivate airbags
when a child restraint system is
installed on this seat.9 Danger
Risk of fatal injury for a child using
a child restraint system on a seat
with activated front passenger
airbag.
Risk of fatal injury for an adult
person on a seat with deactivated
front passenger airbag.
After accessing this menu option,
activate or deactivate the airbags
( Bag Pass On or Bag Pass Off ) and
confirm; a confirmation message
appears in the display. Select YES (to
confirm changes) or No (to cancel
changes).
Airbag deactivation 3 53.
Day lights or Daytime running lights
Activate the daytime running lights to
increase visibility of the vehicle during
daylight (set to On). Deactivate when
not required (set to Off).
Daytime running lights 3 101.
Exit Menu
Select this menu option to exit the
settings menu.Vehicle messages
Warning chimesOnly one warning chime will sound at
a time.
The warning chime regarding
unfastened seat belts has priority
over any other warning chime.
When starting the engine or whilst driving
● If seat belt is not fastened.
● If a certain speed is exceeded with the parking brake applied.
● If the parking assist detects an object.
● If a fault is detected in the parking
assist.
● If a door, the bonnet or the tailgate is not fully closed when
starting-off.
● If the vehicle speed briefly exceeds a set limit.
● If the stop-start system cannot restart the engine automatically.
Page 102 of 203
100LightingLightingExterior lighting.......................... 100
Light switch .............................. 100
High beam ............................... 100
Headlight flash ......................... 100
Headlight range adjustment ....101
Headlights when driving abroad .................................... 101
Daytime running lights .............101
Hazard warning flashers ..........101
Turn and lane-change signals . 102
Front fog lights ......................... 102
Rear fog lights ......................... 102
Reversing lights .......................103
Misted light covers ...................103
Interior lighting ........................... 103
Instrument panel illumination control ..................................... 103
Interior lights ............................ 104
Load compartment lighting ......105
Lighting features ........................106
Exit lighting .............................. 106
Battery discharge protection ....106Exterior lighting
Light switch
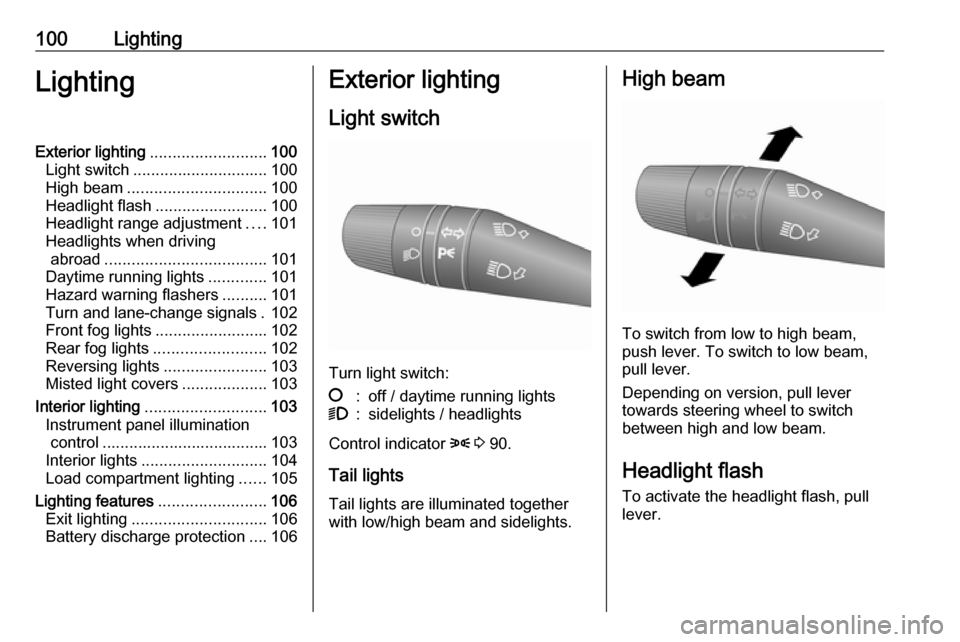
Turn light switch:
§:off / daytime running lights9:sidelights / headlights
Control indicator 8 3 90.
Tail lights Tail lights are illuminated together
with low/high beam and sidelights.
High beam
To switch from low to high beam,
push lever. To switch to low beam,
pull lever.
Depending on version, pull lever
towards steering wheel to switch
between high and low beam.
Headlight flash To activate the headlight flash, pull
lever.
Page 103 of 203
Lighting101Headlight range adjustment
Manual headlight range
adjustment
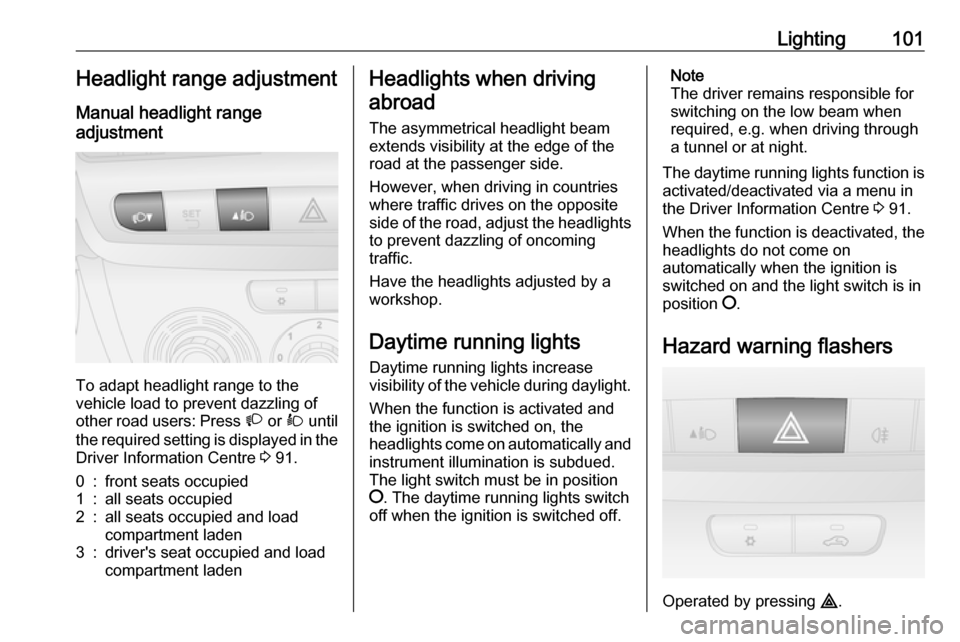
To adapt headlight range to the
vehicle load to prevent dazzling of
other road users: Press À or Á until
the required setting is displayed in the
Driver Information Centre 3 91.
0:front seats occupied1:all seats occupied2:all seats occupied and load
compartment laden3:driver's seat occupied and load
compartment ladenHeadlights when driving
abroad
The asymmetrical headlight beam
extends visibility at the edge of the
road at the passenger side.
However, when driving in countries
where traffic drives on the opposite
side of the road, adjust the headlights to prevent dazzling of oncoming
traffic.
Have the headlights adjusted by a
workshop.
Daytime running lights Daytime running lights increase
visibility of the vehicle during daylight.
When the function is activated and the ignition is switched on, the
headlights come on automatically and instrument illumination is subdued.
The light switch must be in position
§ . The daytime running lights switch
off when the ignition is switched off.Note
The driver remains responsible for
switching on the low beam when
required, e.g. when driving through
a tunnel or at night.
The daytime running lights function is activated/deactivated via a menu in
the Driver Information Centre 3 91.
When the function is deactivated, the
headlights do not come on
automatically when the ignition is
switched on and the light switch is in
position §.
Hazard warning flashers
Operated by pressing ¨.
Page 104 of 203
102LightingDepending on version, hazard
warning flashers may come on
automatically during hard braking.
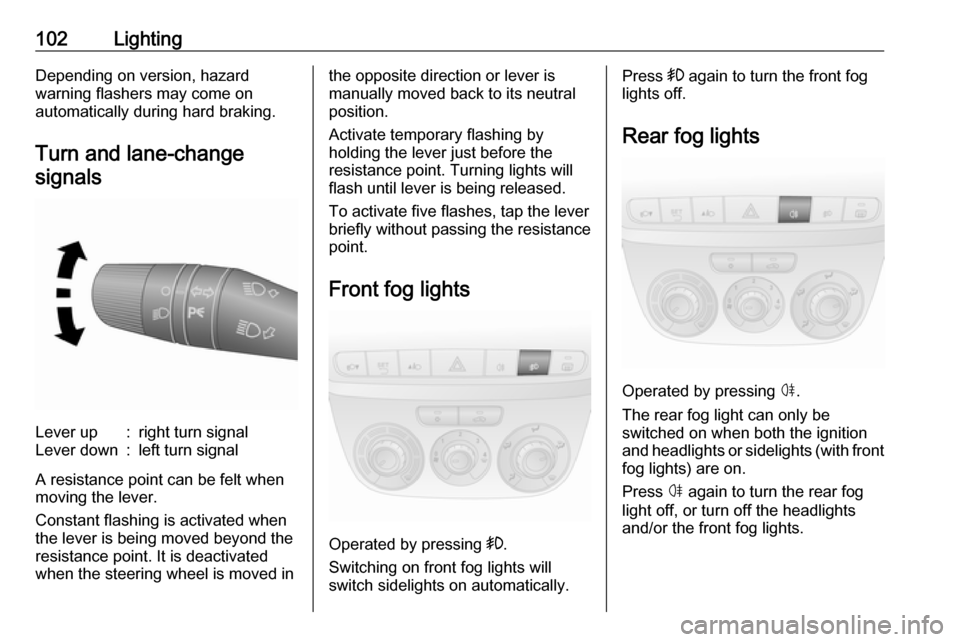
Turn and lane-change signalsLever up:right turn signalLever down:left turn signal
A resistance point can be felt when
moving the lever.
Constant flashing is activated when
the lever is being moved beyond the
resistance point. It is deactivated
when the steering wheel is moved in
the opposite direction or lever is
manually moved back to its neutral
position.
Activate temporary flashing by
holding the lever just before the
resistance point. Turning lights will
flash until lever is being released.
To activate five flashes, tap the lever
briefly without passing the resistance
point.
Front fog lights
Operated by pressing >.
Switching on front fog lights will
switch sidelights on automatically.
Press > again to turn the front fog
lights off.
Rear fog lights
Operated by pressing ø.
The rear fog light can only be
switched on when both the ignition
and headlights or sidelights (with front
fog lights) are on.
Press ø again to turn the rear fog
light off, or turn off the headlights
and/or the front fog lights.
Page 105 of 203

Lighting103Reversing lights
The reversing lights come on when
the ignition is on and reverse gear is
selected.
Misted light covers The inside of the light housing may
mist up briefly in poor, wet and cold weather conditions, in heavy rain or
after washing. The mist disappears
quickly by itself; to help, switch on the
headlights.Interior lighting
Instrument panel illumination control
When driving at night with the
headlights on, adjust the brightness
of the vehicle's interior lighting
(including instrument panel, climate
control display etc.) via the settings
menu of the Driver Information Centre
3 91.
To adjust brightness:
Standard version of Driver
Information Centre1. Press SETq once to access the
settings menu.
2. Scroll through the menu options by pressing R or S until menu
option ILLU appears in the
display.
3. Press SETq to access this menu
option.
4. Press R or S to increase or
decrease the displayed value.
5. Press SETq briefly to confirm
changes and automatically return
to the previous display screen.
Multifunction version of Driver
Information Centre
1. Press SETq to access the
settings menu.
2. Scroll through the menu options by pressing R or S until menu
option Dimmer appears in the
display.
3. Press SETq to access this menu
option.
Page 106 of 203

104Lighting4. Press R or S to increase or
decrease the displayed value.
5. Press SETq briefly to confirm
changes and automatically return to the previous display screen.
Depending on version, it may also be
possible to adjust the brightness by
pressing R or S without accessing
the settings menu.
Driver Information Centre 3 91.
Interior lights
Depending on model variant, during
entry and exit of the vehicle the front
and rear courtesy lights come on
automatically and then switch off after
a delay.
Note
In the event of an accident of a
certain severity, the interior lights
come on automatically. Fuel cut-off
system 3 97.Front courtesy light
Centre switch position: automatic
interior light.
To operate manually when the doors are closed, press the lens on either
side.
Front courtesy light with reading
lights
Centre switch position: automatic
interior light.
Can be operated individually or
together with switch 7 when the
doors are closed.
Press 7 left or right to operate
respective reading light.
Page 107 of 203

Lighting105Rear courtesy lights
Centre switch position: automatic
interior light.
To operate manually when the doors are closed, press the lens on either
side.
Load compartment lighting
Depending on model variant, load
compartment lighting switches on
when the rear doors / tailgate or
sliding side door is opened.
Removable rear courtesy light
Depending on model variant, the
removable rear courtesy light may
illuminate when the rear doors /
tailgate or sliding side doors are
opened and the central switch is in the middle position.
Switch the light on permanently by pressing the top part of the central
switch c.
Switch the light off permanently by pressing the bottom part of the central
switch ( AUTO OFF ).
To use as a handheld torch, press
button on top of the lamp assembly
(see illustration) to release it, swing
torch down carefully and remove.
Press switch on the end of torch to
turn the light on/off.
Replace the torch in its original
position to recharge the battery after
use.
Page 108 of 203
106LightingLighting featuresExit lighting
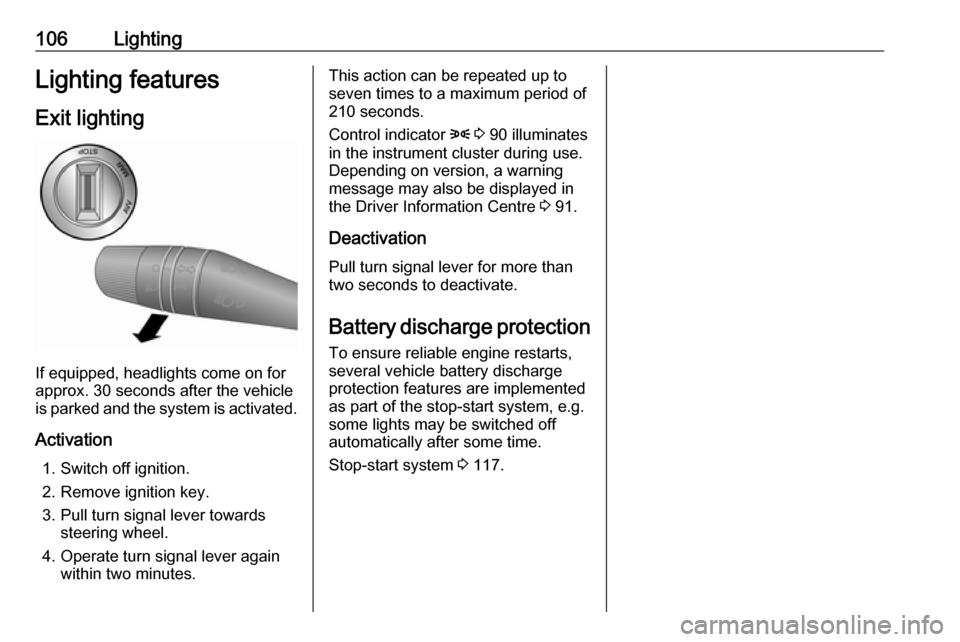
If equipped, headlights come on for
approx. 30 seconds after the vehicle
is parked and the system is activated.
Activation 1. Switch off ignition.
2. Remove ignition key.
3. Pull turn signal lever towards steering wheel.
4. Operate turn signal lever again within two minutes.
This action can be repeated up to
seven times to a maximum period of
210 seconds.
Control indicator 8 3 90 illuminates
in the instrument cluster during use.
Depending on version, a warning
message may also be displayed in
the Driver Information Centre 3 91.
Deactivation Pull turn signal lever for more thantwo seconds to deactivate.
Battery discharge protection
To ensure reliable engine restarts,
several vehicle battery discharge
protection features are implemented
as part of the stop-start system, e.g.
some lights may be switched off
automatically after some time.
Stop-start system 3 117.
Page 119 of 203
Driving and operating117Control indicator 9 illuminates if the
fuel cut-off switch is triggered and,
depending on version, a
corresponding warning message may
also appear in the Driver Information
Centre 3 91.
Generic warning control indicator 9
3 82.
Note
In addition, the vehicle is
automatically unlocked and the
hazard warning flashers and interior lights are illuminated.
Turn the ignition key to position 0 to
prevent vehicle battery discharge and
seek the assistance of a workshop
immediately. Have the vehicle
checked for fuel leaks in the engine
compartment, beneath the vehicle
and near the fuel tank.
To reset the fuel cut-off system and
enable the vehicle to be driven:
1. Turn the ignition key to position 1
3 115.
2. Fully actuate the right turn signal light 3 102.
3. Deactivate the right turn signal light.4. Fully actuate the left turn signallight.
5. Deactivate the left turn signal light.
6. Repeat steps 2, 3, 4 and 5.
7. Turn the ignition key to position 0.9 Danger
If you can smell fuel in the vehicle,
or a fuel leak is present, have the
cause of this remedied
immediately by a workshop. Do
not reset the fuel cut-off system, to avoid the risk of fire.
Fuel system messages 3 97.
Overrun cut-off The fuel supply is automatically cut-
off during overrun, i.e. when the
vehicle is driven with a gear engaged
but accelerator is released.
Depending on driving conditions, the
overrun cut-off may be deactivated.
Stop-start system
The stop-start system helps to save
fuel and to reduce exhaust emissions. When conditions allow, it switches off
the engine as soon as the vehicle is
at a low speed or at a standstill, e.g.
at a traffic light or in a traffic jam. It
starts the engine automatically as
soon as the clutch is depressed.
A vehicle battery sensor ensures that an Autostop is only performed if thevehicle battery is sufficiently charged
for a restart.
Activation
The stop-start system is available as
soon as the engine is started, the
vehicle starts-off and the conditions
as stated below in this section are
fulfilled.
Page 143 of 203

Vehicle care141Vehicle careGeneral Information...................141
Accessories and vehicle modifications .......................... 141
Vehicle storage ........................142
End-of-life vehicle recovery .....142
Vehicle checks ........................... 143
Performing work ......................143
Bonnet ..................................... 143
Engine oil ................................. 144
Engine coolant ......................... 145
Power steering fluid .................145
Washer fluid ............................ 146
Brakes ..................................... 146
Brake fluid ............................... 146
Vehicle battery ......................... 147
Wiper blade replacement ........148
Bulb replacement .......................149
Halogen headlights ..................149
Fog lights ................................. 151
Tail lights ................................. 151
Side turn signal lights ..............152
Centre high-mounted brake light ......................................... 152
Number plate light ...................153Interior lights ............................ 154
Instrument panel illumination ...155
Electrical system ........................155
Fuses ....................................... 155
Engine compartment fuse box . 156
Instrument panel fuse box .......157
Vehicle tools .............................. 159
Tools ........................................ 159
Wheels and tyres .......................160
Winter tyres ............................. 160
Tyre designations ....................160
Tyre pressure .......................... 160
Tyre pressure monitoring
system .................................... 161
Tread depth ............................. 163
Changing tyre and wheel size . 163 Wheel covers ........................... 163
Tyre chains .............................. 164
Tyre repair kit .......................... 164
Wheel changing .......................166
Spare wheel ............................ 168
Jump starting ............................. 170
Towing ....................................... 172
Towing the vehicle ...................172
Towing another vehicle ...........173
Appearance care .......................173
Exterior care ............................ 173
Interior care ............................. 176General Information
Accessories and vehiclemodifications
We recommend the use of genuine
parts and accessories and factory
approved parts specific for your
vehicle type. We cannot assess or guarantee reliability of other products
- even if they have a regulatory or
otherwise granted approval.
Any modification, conversion or other
changes made to standard vehicle
specifications (including, without
limitation, software modifications,
modifications of the electronic control units) may invalidate the warrantyoffered by Opel. Furthermore, such
changes may affect driver assistance
systems, may impact fuel
consumption, CO 2 emissions and
other emissions of the vehicle and
cause the vehicle to no longer
conform to the operating permit,
impacting the validity of your vehicle
registration.