ESP OPEL COMBO E 2019.1 Manual user
[x] Cancel search | Manufacturer: OPEL, Model Year: 2019.1, Model line: COMBO E, Model: OPEL COMBO E 2019.1Pages: 283, PDF Size: 10.57 MB
Page 70 of 283

68Seats, restraintsChild restraint installation locations
Permissible options for fastening a child restraint system with a three-point seat belt
Weight class
On front passenger seatOn outboard
seats in the
second rowOn centre seat
in the second
rowOn seats in
the third rowactivated airbagdeactivated airbagGroup 0, Group 0+: up to 13 kgXU 1,2U 3UU3Group I: 9 to 18 kgUFU1,2U3,4UU 3,4Group II: 15 to 25 kgUFU1,2U 3,4UU3,4Group III: 22 to 36 kgUFU1,2U3,4UU3,4U:universal suitability for forward-facing or rearward-facing child restraint systems in conjunction with three-point seat
beltUF:universal suitability for forward-facing child restraint systems in conjunction with three-point seat beltX:no child restraint system permitted in this weight class1:move seat forwards as far as necessary and adjust seat backrest inclination as far as necessary to a vertical position
to ensure that the belt runs forwards from the upper anchorage point2:adjust seat backrest inclination as far as necessary to a vertical position to ensure that the belt is tight on the buckle
side3:move the respective front seat ahead of the child restraint system forwards as far as necessary4:adjust the respective headrest as necessary or remove if required
Page 71 of 283

Seats, restraints69Permissible options for fitting an ISOFIX child restraint system with ISOFIX bracketsWeight classSize classFixtureOn front passenger seatOn the seats in the second
rowOn the seats in the
third rowGroup 0: up to 10 kgG
FISO/L2
ISO/L1
ISO/R1X
X
XX
X
IL 3X
X
XGroup 0+: up to 13 kgEISO/R1XIL 3XDISO/R2XIL3XCISO/R3XIL3XGroup I: 9 to 18 kgDISO/R2XIL3,4XCISO/R3XIL3,4XBISO/F2XIL, IUF 3,4XB1ISO/F2XXIL, IUF3,4XAISO/F3XIL, IUF 3,4XIL:suitable for particular ISOFIX restraint systems of the 'specific-vehicle', 'restricted' or 'semi-universal' categories.
The ISOFIX restraint system must be approved for the specific vehicle type (refer to the vehicle type list of the child restraint system)IUF:suitable for ISOFIX forward-facing child restraint systems of universal category approved for use in this weight classX:no ISOFIX child restraint system approved in this weight class3:move the respective front seat ahead of the child restraint system forwards as far as necessary4:adjust the respective headrest as necessary or remove if required
Page 83 of 283

Storage81
Turn the locking device upwards.
Put the hinges of the flap in their
housing, lift the flap and close the
locking device.
Fitting the protective cover
The protective cover must be
installed whenever the outer
passenger seat backrest is folded
down and the partition flap is open.
1. Fold the outer passenger seat backrest 3 49.2. Attach the four snap hooks of the
cover on the corresponding
lashing eye.
3. Pull the head restraint from the folded backrest, leaving two
notches visible on the head
restraint rod 3 46.
4. Load the objects.5. Pass the strap of the cover around
the head restraint. Tension the
strap by pulling at the loose end.
With fitted protective cover the
maximum load on the folded backrest is 100 kg.
Safety net
Depending on version, the safety net
can be installed behind the rear seats
or, if the rear seat backrests are
folded, behind the front seats.
Passengers must not be transported
behind the safety net.
Page 85 of 283

Storage83
● Wind one strap around the barlocated under the front driver
seat cushion. The other one wind
around the bar of the passenger
seat. Then secure each hook to
the corresponding strap.
Tension both straps by pulling at
the loose end.
● Push down head restraints and fold down rear seat backrests
3 76.
Load compartment grille
Depending on version a partition
protects the driver and passengers
against the risk of load movement.
The partition can be placed behind
the front or rear seats.
There is a flap in the partition which
can be opened to accommodate long
objects. A protective cover is
provided in the vehicle to assure safe transportation.
If the side seat backrest is folded
down and the partition flap is open the centre seat has to stay free.
If the backrest of the rear seat is
lowered and the flap open to transport long objects, the front passenger seat
has to stay free.
Page 87 of 283

Storage85Closing the flap1. Fix the rod in the bracket.
2. Close the flap and lock the locking
device.
3. Restore the seats to the upright position 3 49, 52
Fitting the protective cover
The protective cover must be
installed whenever the side seat
backrest is folded down and the
partition flap is open.
1. Attach the four snap hooks of the
cover on the corresponding
lashing eye.
2. Pull the head restraint from the folded backrest, leaving two
notches visible on the head
restraint rod 3 46.
3. Load the objects.4. Pass the strap of the cover around
the head restraint. Tension the
strap by pulling at the loose end.
If the loading is stored on the front
and rear seat at the passenger
Page 103 of 283

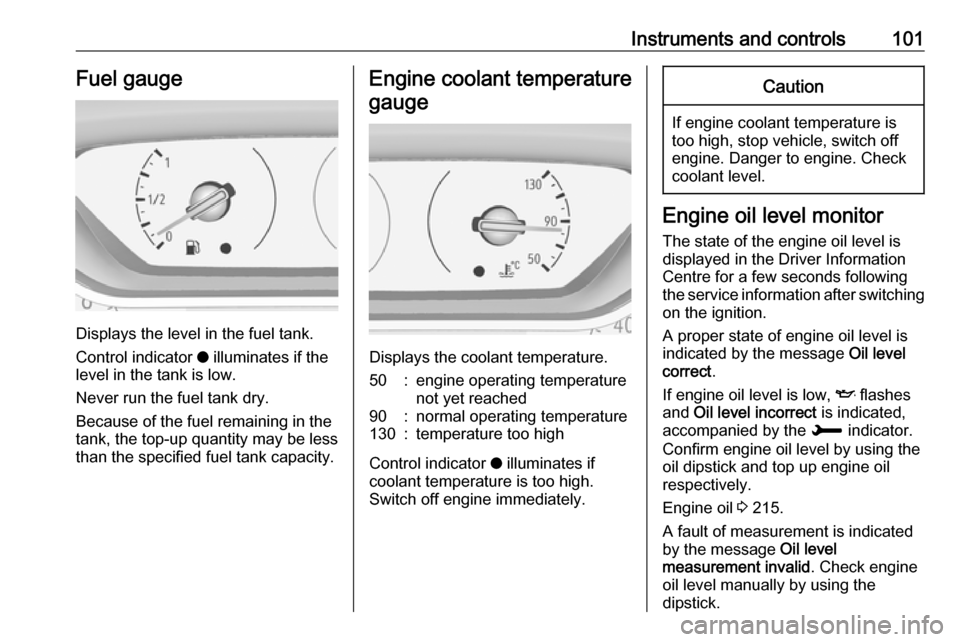
Instruments and controls101Fuel gauge
Displays the level in the fuel tank.
Control indicator o illuminates if the
level in the tank is low.
Never run the fuel tank dry.
Because of the fuel remaining in the
tank, the top-up quantity may be less
than the specified fuel tank capacity.
Engine coolant temperature
gauge
Displays the coolant temperature.
50:engine operating temperature
not yet reached90:normal operating temperature130:temperature too high
Control indicator o illuminates if
coolant temperature is too high. Switch off engine immediately.
Caution
If engine coolant temperature is
too high, stop vehicle, switch off
engine. Danger to engine. Check
coolant level.
Engine oil level monitor
The state of the engine oil level is
displayed in the Driver Information
Centre for a few seconds following
the service information after switching
on the ignition.
A proper state of engine oil level is
indicated by the message Oil level
correct .
If engine oil level is low, I flashes
and Oil level incorrect is indicated,
accompanied by the H indicator.
Confirm engine oil level by using the oil dipstick and top up engine oil
respectively.
Engine oil 3 215.
A fault of measurement is indicated
by the message Oil level
measurement invalid . Check engine
oil level manually by using the
dipstick.
Page 105 of 283

Instruments and controls103ignition is switched on, most control
indicators will illuminate briefly as a functionality test.
The control indicator colours mean:red:danger, important reminderyellow:warning, information, faultgreen:confirmation of activationblue:confirmation of activationwhite:confirmation of activation
See all control indicators on different
instrument clusters 3 97.
Turn lights
O illuminates or flashes green.
Illuminates briefly The parking lights are switched on.
Flashes
Turn lights or the hazard warning
flashers are activated.
Rapid flashing: failure of a turn light or associated fuse, failure of turn light on
trailer.
Bulb replacement 3 220.
Turn lights 3 127.
Seat belt reminder
X illuminates or flashes in the
instrument cluster. Additionally, there is an indication in the roof console.
The big symbols refer to the seat belts
of the front seats, the small symbols
refer to the second row rear seats.
● When the ignition is switched on,
X in the instrument cluster and
the symbols in the roof console
come on for a short time. For the
front seats, X in the instrument
cluster and the symbols in the
roof console illuminate until seat
belt is fastened.
● When driving faster than 20 km/h
and a seat belt is unfastened, the symbol in the roof console for therespective seat flashes and a
chime is audible. For the second
row rear seats, this only applies if
at least one rear seat belt was
previously fastened.
Aditionally, X illuminates in the
instrument cluster.
After two minutes the chime goes off and X in the roof console
illuminates constantly until the
seat belt of the respective seat is
fastened.
Airbag and belt tensioners v illuminates red.
When the ignition is switched on, the control indicator illuminates for
approx. four seconds. If it does not
illuminate, does not extinguish after
four seconds or illuminates whilst
driving, there is a fault in the airbag
system. Seek the assistance of a
Page 107 of 283

Instruments and controls105Flashes when the engine is
running
Fault that could lead to catalytic
converter damage. Ease up on the accelerator until the flashing stops.
Seek the assistance of a workshop
immediately.
Service vehicle soon
H illuminates yellow.
Illuminates briefly when the ignition is
switched on.
May illuminate together with other
control indicators and a
corresponding message in the Driver
Information Centre.
Seek the assistance of a workshop
immediately.
Stop engine
Y illuminates red.
Illuminates briefly when the ignition is switched on.Illuminates together with other controlindicators, accompanied by a warning
chime and a corresponding message in the Driver Information Centre.
Stop engine immediately and seek
the assistance of a workshop.
System check
J illuminates yellow or red.
Illuminates yellow
A minor engine fault has been
detected.
Illuminates red
A major engine fault has been
detected.
Stop engine as soon as possible and seek the assistance of a workshop.
Brake and clutch system
R illuminates red.
The brake and clutch fluid level is too
low.9 Warning
Stop. Do not continue your
journey. Consult a workshop.
Parking brake
m illuminates red.
Illuminates when the manual parking
brake is applied and ignition is
switched on 3 162.
Electric parking brake
m illuminates or flashes red.
Illuminates
Electric parking brake is applied
3 162.
Flashes
Electric parking brake is not applied
automatically. The application or the
release is faulty.
Page 113 of 283

Instruments and controls111
Turn the adjuster wheel to select a
page in the trip / fuel information
menu.
Press SET / CLR to confirm or reset
a function.
Vehicle and service messages are
popped up in the Driver Information
Centre if required. Scroll messages
by turning the adjuster wheel.
Confirm messages by pressing
SET / CLR .
Additionally, some menus can be selected via the CHECK button.Press CHECK to switch between the
respective menus.
Vehicle messages 3 117.
Trip / fuel information menu,
Midlevel display
Select the required page:
Trip odometer
The recorded distance since the
reset.
Press L for 2 seconds to reset trip
odometer.
Average fuel consumption
Display of average consumption. The measurement can be reset at any
time and starts with a default value.
To reset, press SET/CLR for a few
seconds.
Page 120 of 283

118Instruments and controlsWhen the vehicle is being driven, the
load reduction function temporarily
deactivates certain functions, such as
the air conditioning, the heated rear
window, heated steering wheel, etc.
The deactivated functions are
reactivated automatically as soon as
conditions permit.Vehicle personalisation
The vehicle's behaviour can be
personalised by changing the settings in the Info Display.
Depending on vehicle equipment and
country-specific regulations some of
the functions described below may
not be available.
Some functions are only displayed or
active when the engine is running.
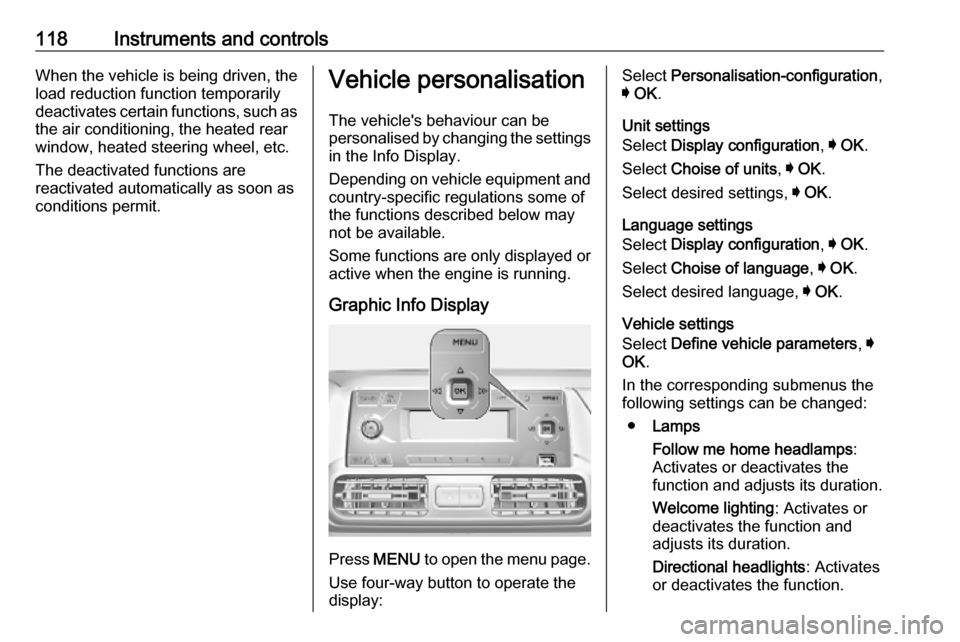
Graphic Info Display
Press MENU to open the menu page.
Use four-way button to operate the
display:
Select Personalisation-configuration ,
I OK .
Unit settings
Select Display configuration , I OK .
Select Choise of units , I OK .
Select desired settings, I OK .
Language settings
Select Display configuration , I OK .
Select Choise of language , I OK .
Select desired language, I OK .
Vehicle settings
Select Define vehicle parameters , I
OK .
In the corresponding submenus the
following settings can be changed:
● Lamps
Follow me home headlamps :
Activates or deactivates the
function and adjusts its duration.
Welcome lighting : Activates or
deactivates the function and
adjusts its duration.
Directional headlights : Activates
or deactivates the function.