instrument panel OPEL COMBO E 2019.75 Manual user
[x] Cancel search | Manufacturer: OPEL, Model Year: 2019.75, Model line: COMBO E, Model: OPEL COMBO E 2019.75Pages: 285, PDF Size: 10.68 MB
Page 117 of 285

Instruments and controls115Touch required menu display icon or
a function with the finger.
Confirm a required function or
selection by touching.
Touch r on the display to exit a
menu without changing a setting.
For further information, see
Infotainment manual.Speech recognition
Description see Infotainment manual.
Vehicle personalisation 3 118.
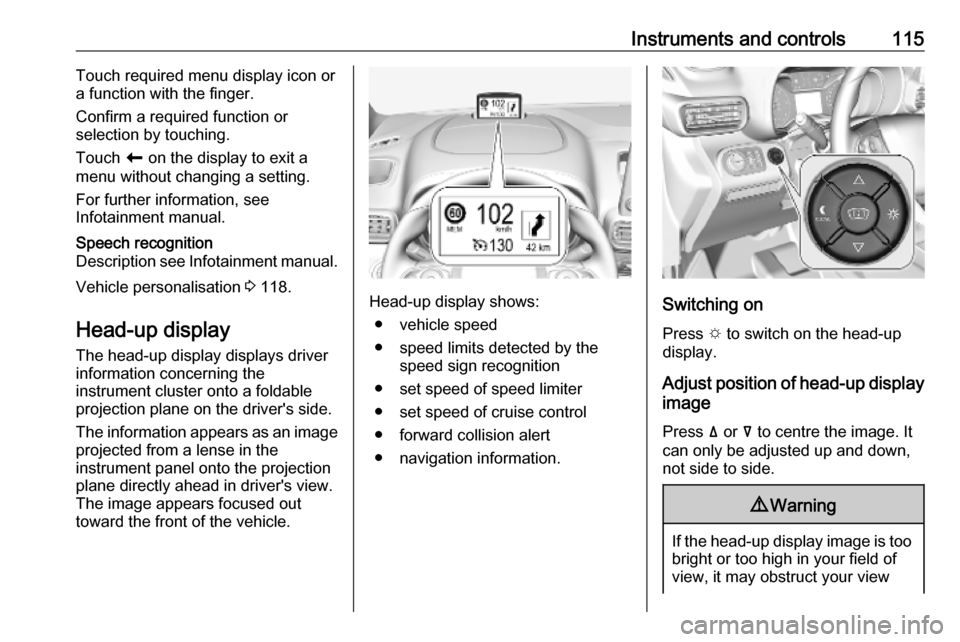
Head-up display The head-up display displays driver
information concerning the
instrument cluster onto a foldable
projection plane on the driver's side.
The information appears as an image
projected from a lense in the
instrument panel onto the projection
plane directly ahead in driver's view.
The image appears focused out
toward the front of the vehicle.Head-up display shows:
● vehicle speed
● speed limits detected by the speed sign recognition
● set speed of speed limiter
● set speed of cruise control
● forward collision alert
● navigation information.Switching on
Press e to switch on the head-up
display.
Adjust position of head-up display
image
Press ä or å to centre the image. It
can only be adjusted up and down,
not side to side.
9 Warning
If the head-up display image is too
bright or too high in your field of
view, it may obstruct your view
Page 118 of 285

116Instruments and controlswhen it is dark outside. Be sure tokeep the head-up display imagedim and placed low in your field of view.
Adjust brightness
The head-up display image will
automatically dim and brighten to
compensate for outside lighting.
Brightness can also be adjusted
manually as needed:
Press e to brighten the display. Press
æ to dim the display.
The image can temporarily light up
depending on angel and position of
sunlight.
Switching off
Press æ and hold to turn the head-up
display off.
Language Preferred language can be set invehicle personalisation menu 3 118.
Units
Units can be changed in vehicle
personalisation menu 3 118.
Care of head-up display
Clean the screen of the head-up
display with a soft cloth sprayed with glass cleaner. Wipe the lens gently,
then dry it.
System limitations Head-up display may not operate
properly when:
● The lens in the instrument panel is covered by objects or not
clean.
● Display brightness is too dim or bright.
● Image is not adjusted to the proper height.
● The driver wears polarized sunglasses.
If the head-up image is not correct for
other reasons, contact a workshop.Rear view display
The rear view display is located at the position of the interior mirror.
It provides the following views: ● standard rear view 3 41
● close rear view 3 199
● passenger side view 3 196
Switching on
Press m and confirm the message
with p.
Page 126 of 285

124LightingLightingExterior lighting.......................... 124
Light switch .............................. 124
Automatic light control .............125
High beam ............................... 125
High beam assist .....................125
Headlight flash ......................... 126
Headlight range adjustment ....127
Headlights when driving abroad .................................... 127
Daytime running lights .............127
Cornering lights .......................127
Hazard warning flashers ..........127
Turn lights ................................ 128
Front fog lights ......................... 128
Rear fog light ........................... 129
Parking lights ........................... 129
Reversing lights .......................129
Misted light covers ...................129
Interior lighting ........................... 130
Instrument panel illumination control ..................................... 130
Interior lights ............................ 130
Reading lights .......................... 130
Sunvisor lights ......................... 131Lighting features ........................131
Centre console lighting ............131
Entry lighting ............................ 131
Exit lighting .............................. 131
Vehicle locator lighting ............132
Peripheral lighting ....................132
Battery discharge protection ....132Exterior lighting
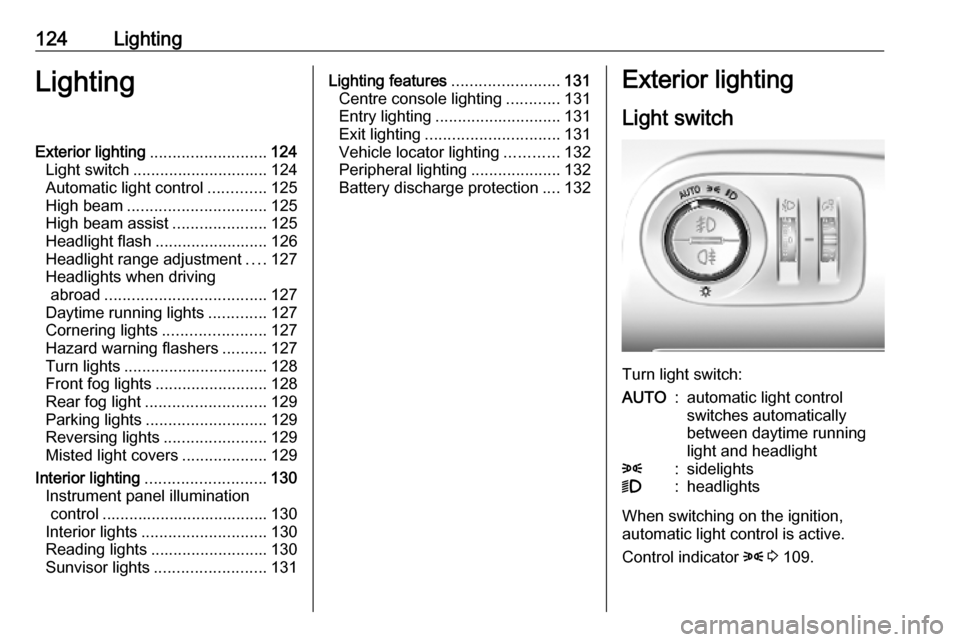
Light switch
Turn light switch:
AUTO:automatic light control
switches automatically
between daytime running
light and headlight8:sidelights9:headlights
When switching on the ignition,
automatic light control is active.
Control indicator 8 3 109.
Page 132 of 285

130LightingInterior lightingInstrument panelillumination control
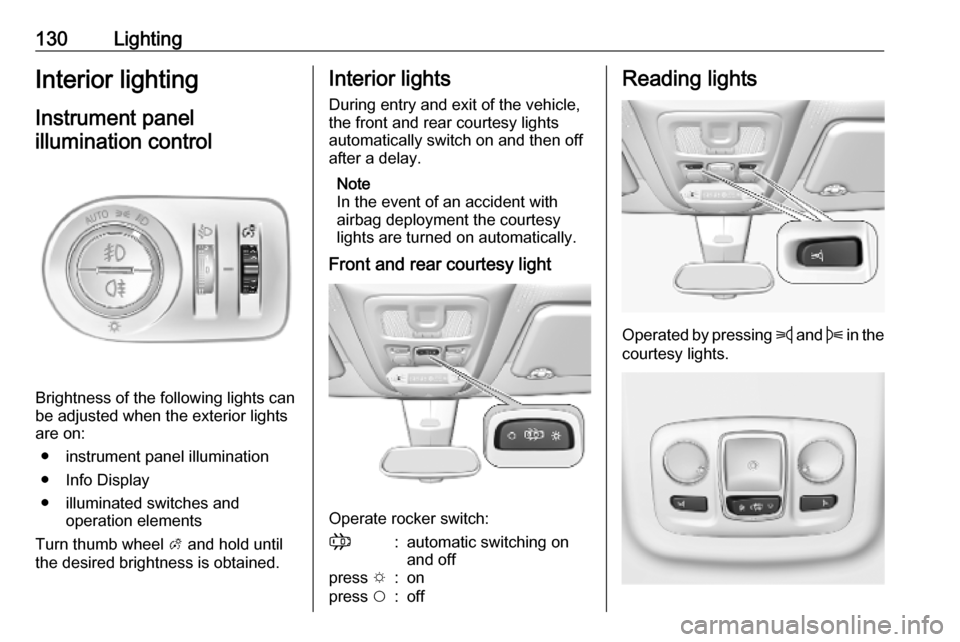
Brightness of the following lights can
be adjusted when the exterior lights
are on:
● instrument panel illumination
● Info Display
● illuminated switches and operation elements
Turn thumb wheel A and hold until
the desired brightness is obtained.
Interior lights
During entry and exit of the vehicle,
the front and rear courtesy lights
automatically switch on and then off
after a delay.
Note
In the event of an accident with
airbag deployment the courtesy
lights are turned on automatically.
Front and rear courtesy light
Operate rocker switch:
;:automatic switching on
and offpress e:onpress $:offReading lights
Operated by pressing z and B in the
courtesy lights.
Page 133 of 285

Lighting131Illustration shows rear courtesy lights.
Sunvisor lights Illuminates when the cover is opened.Lighting features
Centre console lighting A spotlight integrated in the overheadconsole illuminates the centre
console when headlights are
switched off.
The intensity can be adjusted in the
vehicle personalisation 3 118.
Entry lighting
Welcome lighting
Some or all of the following lights are
switched on for a short time by
unlocking the vehicle with the radio remote control:
● headlights
● tail lights
● interior lights
The number of activated lights
depends on the surrounding light
conditions.
The lighting switches off immediately
when the ignition is switched on.
Starting off 3 19.This function can be activated or
deactivated in the vehicle
personalisation 3 118.
The following lights will additionally
switch on when the driver's door is
opened:
● illumination of some switches
● Driver Information Centre
Exit lighting The following lights are switched on if
the key is removed from the ignition
switch:
● interior lights
● instrument panel light
They will switch off automatically after
a delay. This function works only in
the dark.
Path lighting Headlights, tail lights and number
plate lights illuminate the surrounding
area for an adjustable time after
leaving the vehicle.
Page 145 of 285

Climate control143Air vents
Adjustable air vents Air vents in the instrument panel
Direct the flow of air by tilting and
swivelling the slats.
To close the vent, swivel the slats
inwards.
Outer air vents in the instrument
panel
Direct the flow of air by tilting and
swivelling the slats.
To close the vent, swivel the slats
outwards.
At least two air vents must be open
while cooling is on.
9 Warning
Do not attach any objects to the
slats of the air vents. Risk of
damage and injury in case of an
accident.
Rear air vents in the centre
console
To activate the distribution of
climatised / heated air via the rear air
vents, press E.
Direct the flow of air by tilting and
swivelling the slats.
Adjust the air flow to select the
desired speed.
x:increase air flowx:decrease air flow
Page 183 of 285

Driving and operating181Hill considerations9Warning
Do not use the adaptive cruise
control on steep hill roads.
System performance on hills depends
on vehicle speed, vehicle load, traffic
conditions and the road gradient. It
may not detect a vehicle in your path
while driving on hills. On steep hills,
you may have to use the accelerator
pedal to maintain your vehicle speed.
When going downhill you may have to brake to maintain or reduce your
speed.
Note that applying the brake
deactivates the system.
Fault
In the event of a fault with the adaptive
cruise control, you are alerted by the
illumination of a warning light and the display of a message in the
instrument panel, accompanied by an
audible signal.
The adaptive cruise control may not
operate correctly if traffic signs do not comply with the Vienna Convention
on Road Signs and Signals.
Have the system checked by a dealer
or a qualified workshop.
As a safety measure, do not use the
system if the brake lights are faulty.
Forward collision alert The forward collision alert may help toavoid or reduce the harm caused by
front-end crashes.
The forward collision alert uses the
front camera in the windscreen to
detect a preceding vehicle directly
ahead, in your path.If a vehicle directly ahead is
approached too quickly, a warning
chime and alert in the Driver
Information Centre is provided.9 Warning
Forward collision alert is just a
warning system and does not
apply the brakes. When
approaching a vehicle ahead too
rapidly, it may not provide you
enough time to avoid a collision.
The driver accepts full
responsibility for the appropriate
following distance based on traffic, weather and visibility conditions.
The complete attention of the
driver is always required while
driving. The driver must always be
ready to take action and apply the
brakes.
Page 198 of 285

196Driving and operatingThe state of the system is stored
when switching off the ignition.
The system is automatically
deactivated when towing an
electrically connected trailer.
Due to adverse weather conditions
such as heavy rain, false detections
may occur.
Fault
In the event of a fault, B flashes for a
few moments in the instrument panel,
accompanied by C and a display
message. Have the cause of the fault remedied by a workshop.
Passenger side camera
The passenger side camera monitors the side of the vehicle.
The camera is mounted at the bottom of the exterior mirror on the
passenger side.
The passenger side view is displayed
in the rear view display 3 116.
The area displayed by the camera is
limited. The distance of the image that
appears on the display differs from
the actual distance.
Switching on
The camera is switched on when the vehicle is running in forward gear and
the passenger side view is selectedfrom the rear view display.
Guidelines
The line represents a distance of
about 4 m beyond the edge of
vehicle's rear bumper.
Switching off The camera is deactivated when
another view type is selected.
Panoramic view system
This system allows views of the
vehicle's surroundings to be
displayed as a nearly 180° picture in
the Info display, like a bird's eye view.
Page 205 of 285

Driving and operating203If the driver wishes to maintain thetrajectory of the vehicle, he can
prevent the correction by keeping a
firm grip on the steering wheel, e.g.
during an avoiding manoeuvre. The
correction is interrupted if the turn
lights are operated.
There is no correction triggered when
the turn lights are operated and
during a few seconds after turn lights
have been switched off.
If the system detects that the driver is
not holding the steering wheel firmly enough during an automatic
correction of trajectory, it interrupts the correction. A warning message in the Driver Information Centre
accompanied by a warning chime
alerts the driver when immediate
driver´s action is required.
If the side blind spot alert is activated
and the driver is about to change the
lane, the system corrects the
trajectory of the vehicle despite the
activation of the turn lights if another
vehicle is detected in the side blind
spot zone.Deactivation
To deactivate the system, press andhold Ó. Deactivation of the system is
confirmed by the illuminated LED in
the button. In the Driver Information
Centre solid grey lines are displayed.
Recommended deactivation It is recommended to deactivate the
system in the following situations:
● Road surface in poor condition
● Unfavourable climatic conditions
● Slippery surfaces, e.g., ice
The system is not designed for driving in the following situations:
● Driving on a speed circuit
● Driving with a trailer
● Driving on a rolling stand
● Driving on unstable surfacesFault
In the event of a fault, a and C
appear in the instrument panel,
accompanied by a display message
and a warning chime. Contact a
dealer or a qualified workshop to have the system checked.
System limitations The system performance may be
affected by:
● windscreen not clean or affected by foreign objects, e.g. stickers
● close vehicles ahead
● banked roads
● narrow, winding or hilly roads
● road edges
● sudden lighting changes
● adverse environmental conditions, e.g. heavy rain or
snow
● vehicle modifications, e.g. tyres
Page 215 of 285

Vehicle care213Vehicle careGeneral Information...................213
Accessories and vehicle modifications .......................... 213
Vehicle storage ........................214
End-of-life vehicle recovery .....215
Vehicle checks ........................... 215
Performing work ......................215
Bonnet ..................................... 215
Engine oil ................................. 216
Engine coolant ......................... 217
Washer fluid ............................ 218
Brakes ..................................... 218
Brake fluid ............................... 218
Vehicle battery ......................... 218
Diesel fuel system bleeding .....220
Wiper blade replacement ........221
Bulb replacement .......................221
Halogen headlights ..................221
LED headlights ........................ 224
Front fog lights ......................... 224
Front turn lights .......................225
Tail lights ................................. 225
Side turn lights ......................... 228
Number plate light ...................228
Interior lights ............................ 229Electrical system........................229
Fuses ....................................... 229
Engine compartment fuse box . 230
Instrument panel fuse box .......230
Vehicle tools .............................. 232
Tools ........................................ 232
Wheels and tyres .......................233
Winter tyres ............................. 233
Tyre designations ....................233
Tyre pressure .......................... 233
Tyre deflation detection system .................................... 234
Tread depth ............................. 235
Changing tyre and wheel size . 236
Wheel covers ........................... 236
Tyre chains .............................. 237
Tyre repair kit .......................... 237
Wheel changing .......................240
Spare wheel ............................ 241
Jump starting ............................. 245
Towing ....................................... 246
Towing the vehicle ...................246
Towing another vehicle ...........248
Appearance care .......................249
Exterior care ............................ 249
Interior care ............................. 251
Floor mats ............................... 251General Information
Accessories and vehicle modifications
We recommend the use of genuine parts and accessories and factory
approved parts specific for your
vehicle type. We cannot assess or
guarantee reliability of other products - even if they have a regulatory or
otherwise granted approval.
Any modification, conversion or other
changes made to standard vehicle
specifications (including, without
limitation, software modifications,
modifications of the electronic control units) may invalidate the warranty
offered by Opel. Furthermore, such
changes may affect driver assistance
systems, may impact fuel
consumption, CO 2 emissions and
other emissions of the vehicle and
cause the vehicle to no longer
conform to the operating permit,
impacting the validity of your vehicle
registration.