headlights OPEL COMBO E 2019 User Guide
[x] Cancel search | Manufacturer: OPEL, Model Year: 2019, Model line: COMBO E, Model: OPEL COMBO E 2019Pages: 279, PDF Size: 10.43 MB
Page 131 of 279

Lighting129Lighting features
Centre console lighting A spotlight integrated in the overheadconsole illuminates the centre
console when headlights are
switched off.
The intensity can be adjusted in the
vehicle personalisation 3 119.
Entry lighting
Welcome lighting Some or all of the following lights are
switched on for a short time by
unlocking the vehicle with the radio remote control:
● headlights
● tail lights
● interior lights
The number of activated lights
depends on the surrounding light
conditions.
The lighting switches off immediately
when the ignition is switched on.
Starting off 3 18.This function can be activated or
deactivated in the vehicle
personalisation 3 119.
The following lights will additionally
switch on when the driver's door is
opened:
● illumination of some switches
● Driver Information Centre
Exit lighting The following lights are switched on if
the key is removed from the ignition
switch:
● interior lights
● instrument panel light
They will switch off automatically after
a delay. This function works only in
the dark.
Path lighting Headlights, tail lights and number
plate lights illuminate the surrounding
area for an adjustable time after
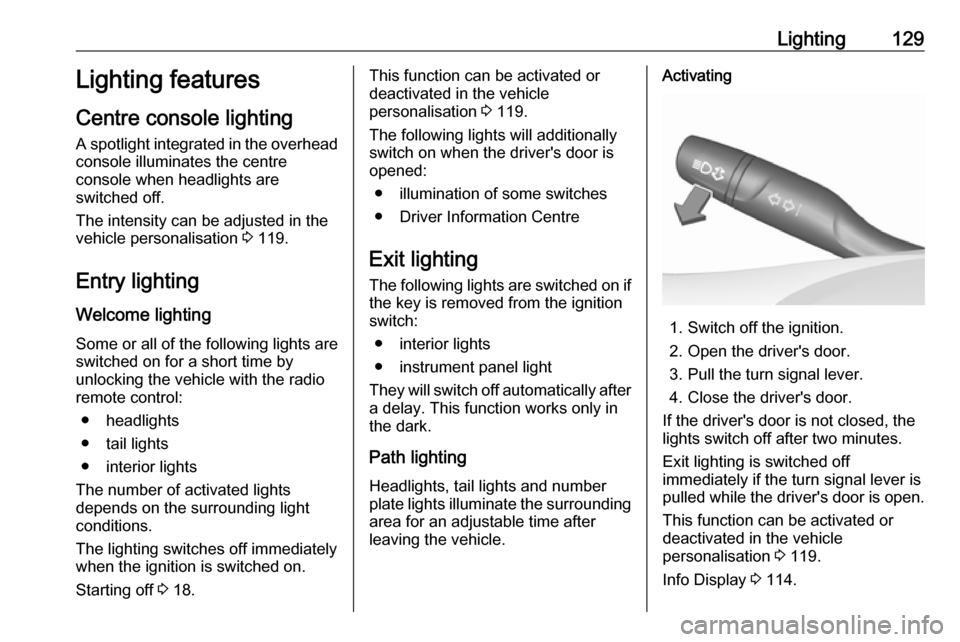
leaving the vehicle.Activating
1. Switch off the ignition.
2. Open the driver's door.
3. Pull the turn signal lever.
4. Close the driver's door.
If the driver's door is not closed, the
lights switch off after two minutes.
Exit lighting is switched off
immediately if the turn signal lever is pulled while the driver's door is open.
This function can be activated or
deactivated in the vehicle
personalisation 3 119.
Info Display 3 114.
Page 132 of 279

130LightingVehicle locator lighting
This function allows you to locate your vehicle, e.g., in weak lighting
conditions using the remote control.
The headlights come on and the turn
lights flash for 10 seconds.
Press N on the remote control.
The vehicle must be locked more than
5 seconds.
Peripheral lighting Peripheral lighting allows you to
switch on the position lights, low
beam and number plate lighting using
the remote control.
Press G on the remote control to
switch on peripheral lighting.
Press G a second time to switch off
peripheral lighting.
Battery discharge protection
To prevent discharge of the vehicle
battery when the ignition is switched off, some interior lights are switched
off automatically after some time.
Page 148 of 279

146Driving and operating9Warning
If the vehicle battery is discharged,
the vehicle must not be towed,
tow-started or jump-started as the
steering wheel lock cannot be
disengaged.
Operation on vehicles with
electronic key system in case of
failure
If either the electronic key fails or the
battery of the electronic key is weak,
a message may be displayed in the
Driver Information Centre.
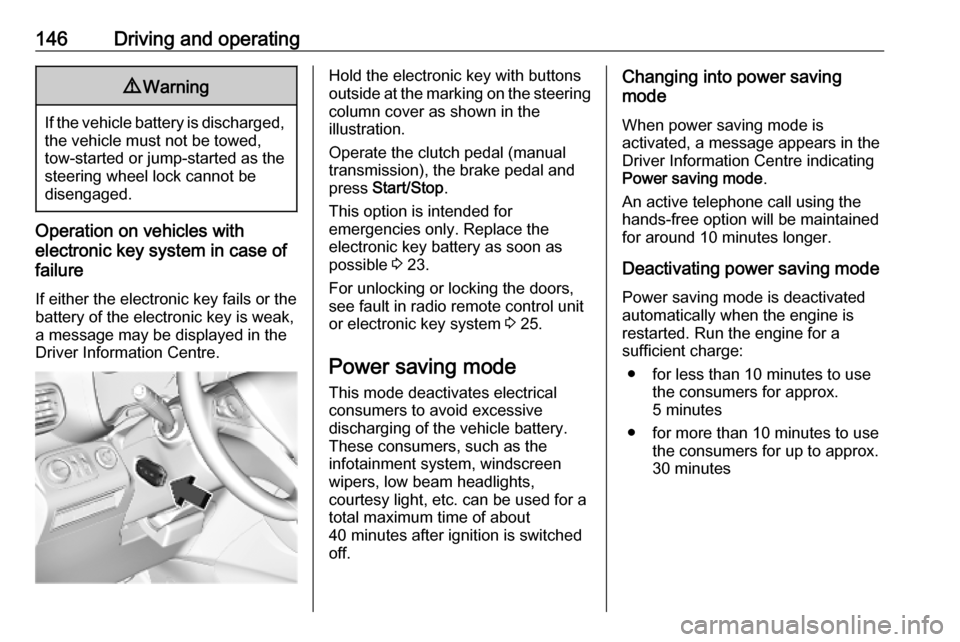
Hold the electronic key with buttons
outside at the marking on the steering column cover as shown in the
illustration.
Operate the clutch pedal (manual
transmission), the brake pedal and
press Start/Stop .
This option is intended for
emergencies only. Replace the
electronic key battery as soon as
possible 3 23.
For unlocking or locking the doors,
see fault in radio remote control unit
or electronic key system 3 25.
Power saving mode
This mode deactivates electrical
consumers to avoid excessive
discharging of the vehicle battery.
These consumers, such as the
infotainment system, windscreen
wipers, low beam headlights,
courtesy light, etc. can be used for a
total maximum time of about
40 minutes after ignition is switched
off.Changing into power saving
mode
When power saving mode is
activated, a message appears in the
Driver Information Centre indicating
Power saving mode .
An active telephone call using the
hands-free option will be maintained
for around 10 minutes longer.
Deactivating power saving mode
Power saving mode is deactivated
automatically when the engine is
restarted. Run the engine for a
sufficient charge:
● for less than 10 minutes to use the consumers for approx.
5 minutes
● for more than 10 minutes to use the consumers for up to approx.
30 minutes
Page 199 of 279

Driving and operating197Always check the surrounding of
the vehicle before driving.
Displayed images may be further
or closer than they appear. The
area displayed is limited and
objects that are close to either
edge of the bumper or under the
bumper are not displayed on the
screen.
System limitations
Caution
For optimal operation of the
system, it is important to keep the
lense of the camera in the tailgate between the number plate lightsalways clean. Rinse the lense with water and wipe with a soft cloth.
Do not clean the lense with a
steam-jet or high-pressure jet
cleaner.
The panoramic view system may not
operate properly when:
● The surrounding is dark.
● The sun or the beam of headlights is shining directly into
the camera lenses.
● During nighttime driving.
● Weather limits visibility, such as fog, rain, or snow.
● The camera lenses are blocked by snow, ice, slush, mud, dirt.
● The vehicle is towing a trailer.
● The vehicle had an accident.
● There are extreme temperature changes.
Rear view camera The view of the camera is displayed
in the Info Display.9 Warning
The rear view camera does not
replace driver vision. Note that
objects that are outside the
camera's field of view and the
parking assist sensors, e.g. below
the bumper or underneath the
vehicle, are not displayed.
Do not reverse or park the vehicle
using only the rear view camera.
Always check the surrounding of
the vehicle before driving.
Switching on
Rear view camera is automatically
activated when reverse gear is
engaged.
Functionality
Page 200 of 279

198Driving and operatingThe camera is mounted in the tailgateor the left rear door.
The area displayed by the camera is
limited. The distance of the image that
appears on the display differs from
the actual distance.
Guidelines
Dynamic guidelines are horizontal
lines at one metre intervals projected
onto the picture to define the distance
to displayed objects.
Trajectory lane of the vehicle is
shown in accordance with the
steering angle.
Deactivation of guidelines
Info Display 3 114.
Vehicle personalisation 3 119.
Switching off The camera is switched off when a
forward gear is engaged.
System limitations The rear view camera may not
operate properly when:
● the surrounding is dark
● the beam of headlights is shining
directly into the camera lenses
● weather limits visibility, such as fog, rain, or snow
● the camera lenses are blocked by snow, ice, slush, mud, dirt.
Clean the lense, rinse with water,
and wipe with a soft cloth
● the tailgate will be opened
● the vehicle is towing an electrically connected trailer,bicycle carrier, etc.● the vehicle had a rear end accident
● there are extreme temperature changes
Lane keep assist Lane keep assist helps to avoid
crashes due to unintentional lane
departures. A front camera located at the top of the windscreen observes
the lane markings between which the
vehicle is driving. If the vehicle
approaches a lane marking, the
steering wheel is gently turned to
position the vehicle back into the lane. The driver will then notice a turning
movement of the steering wheel. Turn
steering wheel in same direction, if
system steers not sufficient. Turn
steering wheel gently into opposite
direction, if lane change is intended.
When the system steers to correct the trajectory of the vehicle, a flashes
yellow in the instrument cluster.
A warning message in the Driver
Information Centre accompanied by a warning chime alerts the driver when
immediate driver´s action is required.
Page 212 of 279

210Vehicle careVehicle careGeneral Information...................210
Accessories and vehicle modifications .......................... 210
Vehicle storage ........................211
End-of-life vehicle recovery .....212
Vehicle checks ........................... 212
Performing work ......................212
Bonnet ..................................... 212
Engine oil ................................. 213
Engine coolant ......................... 214
Washer fluid ............................ 215
Brakes ..................................... 215
Brake fluid ............................... 215
Vehicle battery ......................... 215
Diesel fuel system bleeding .....217
Wiper blade replacement ........217
Bulb replacement .......................218
Halogen headlights ..................218
LED headlights ........................ 220
Front fog lights ......................... 220
Front turn lights .......................221
Tail lights ................................. 222
Side turn lights ......................... 224
Number plate light ...................225
Interior lights ............................ 225Electrical system........................225
Fuses ....................................... 225
Engine compartment fuse box . 226
Instrument panel fuse box .......227
Vehicle tools .............................. 228
Tools ........................................ 228
Wheels and tyres .......................229
Winter tyres ............................. 229
Tyre designations ....................230
Tyre pressure .......................... 230
Tyre deflation detection system .................................... 231
Tread depth ............................. 232
Changing tyre and wheel size . 233
Wheel covers ........................... 233
Tyre chains .............................. 233
Tyre repair kit .......................... 234
Wheel changing .......................237
Spare wheel ............................ 238
Jump starting ............................. 242
Towing ....................................... 243
Towing the vehicle ...................243
Towing another vehicle ...........244
Appearance care .......................245
Exterior care ............................ 245
Interior care ............................. 247General Information
Accessories and vehiclemodifications
We recommend the use of genuine
parts and accessories and factory approved parts specific for your
vehicle type. We cannot assess or guarantee reliability of other products
- even if they have a regulatory or
otherwise granted approval.
Any modification, conversion or other changes made to standard vehicle
specifications (including, without
limitation, software modifications,
modifications of the electronic control
units) may invalidate the warranty
offered by Opel. Furthermore, such
changes may affect driver assistance
systems, may impact fuel
consumption, CO 2 emissions and
other emissions of the vehicle and
cause the vehicle to no longer
conform to the operating permit,
impacting the validity of your vehicle
registration.
Page 220 of 279

218Vehicle careBulb replacement
Switch off the ignition and switch off
the relevant switch or close the doors.
Only hold a new bulb at the base. Do not touch the bulb glass with bare
hands.
Use only the same bulb type for
replacement.
Replace headlight bulbs from within
the engine compartment.
Bulb check After a bulb replacement switch on
the ignition, operate and check the
lights.
Halogen headlights
Halogen headlights with separate
bulbs for low beam and high beam.
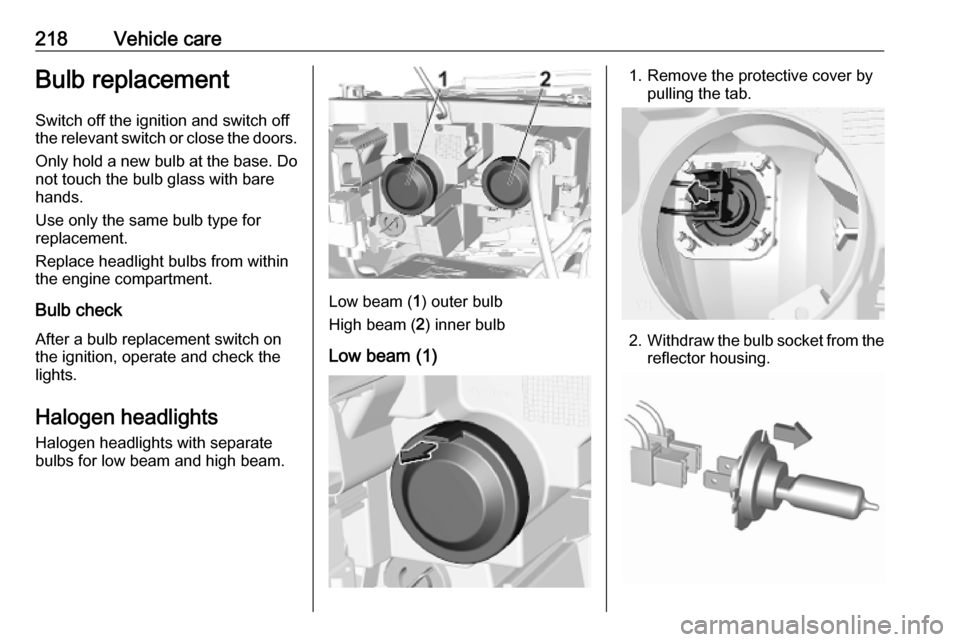
Low beam ( 1) outer bulb
High beam ( 2) inner bulb
Low beam (1)
1. Remove the protective cover by pulling the tab.
2.Withdraw the bulb socket from the
reflector housing.
Page 222 of 279

220Vehicle careSidelight / daytime running light
with bulbs
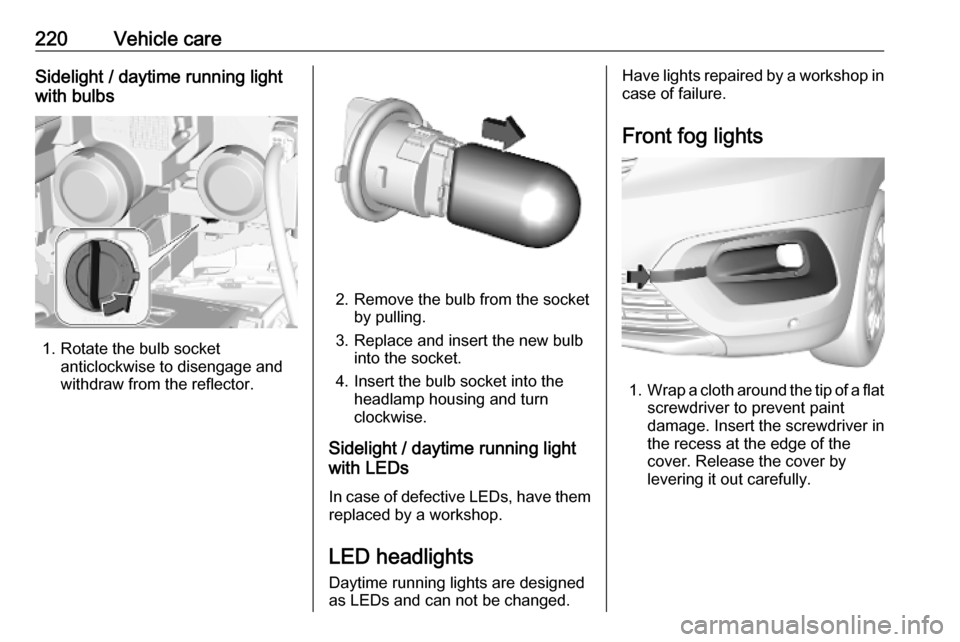
1. Rotate the bulb socket anticlockwise to disengage and
withdraw from the reflector.
2. Remove the bulb from the socket by pulling.
3. Replace and insert the new bulb into the socket.
4. Insert the bulb socket into the headlamp housing and turn
clockwise.
Sidelight / daytime running light
with LEDs
In case of defective LEDs, have them replaced by a workshop.
LED headlights Daytime running lights are designedas LEDs and can not be changed.
Have lights repaired by a workshop in
case of failure.
Front fog lights
1. Wrap a cloth around the tip of a flat
screwdriver to prevent paint
damage. Insert the screwdriver in
the recess at the edge of the
cover. Release the cover by
levering it out carefully.
Page 245 of 279

Vehicle care2433. Connect the black lead to thenegative terminal of the booster
battery.
4. Connect the other end of the black
lead to a vehicle grounding point
of your vehicle in the engine
compartment.
Route the leads so that they cannot
catch on rotating parts in the engine
compartment.
To start the engine: 1. Start the engine of the vehicle providing the jump.
2. After five minutes, start the other engine. Start attempts should be
made for no longer than
15 seconds at an interval of one
minute.
3. Allow both engines to idle for approx. three minutes with the
leads connected.
4. Switch on electrical consumers e.g. headlights, heated rear
window of the vehicle receiving
the jump start.
5. Reverse above sequence exactly when removing leads.Towing
Towing the vehicle
Wrap a cloth around the tip of a flat
screwdriver, for example, to prevent
paint damage. Insert the screwdriverin the slot at the lower part of the cap.
Release the cap carefully.
The towing eye is stowed with the vehicle tools 3 228.
Screw in the towing eye as far as it will
go until it stops in a horizontal
position.
Attach a tow rope – or better still a tow
rod – to the towing eye.
The towing eye must only be used for
towing and not for recovering the
vehicle.
Switch on ignition to release steering
wheel lock and to permit operation of
brake lights, horn and windscreen
wiper.
Page 276 of 279

274GGauges ....................................... 100
Gear shifting ............................... 107
General information ...................205
Glass panel .................................. 45
Glovebox ..................................... 71
Glovebox cooler ......................... 141
H Halogen headlights ....................218
Hand brake ................................. 161
Hazard warning flashers ............125
Headlight flash ........................... 124
Headlight range adjustment ......124
Headlights................................... 122 Headlights when driving abroad 125
Head restraint adjustment .............8
Head restraints ............................ 46
Head-up display.......................... 116
Heated mirrors ............................. 39
Heated rear window ..................... 43
Heated steering wheel .................90
Heated windscreen .......................43
Heating ........................................ 51
Heating and ventilation system . 131
High beam ......................... 110, 123
High beam assist ................110, 123
Hill start assist ........................... 164
Horn ....................................... 14, 91I
Identification plate .....................254
Ignition switch positions .............144
Immobiliser .................................. 38
Indicators .................................... 100
Inductive charging ........................96
Info Display ................................. 114
Installing seats .............................. 53
Instrument cluster ........................98
Instrument panel fuse box .........227
Instrument panel illumination control .................................... 127
Instrument panel overview ........... 10
Interior care ............................... 247
Interior lighting ............................ 127
Interior lights ...................... 128, 225
Interior mirrors .............................. 40
Introduction .................................... 3
J
Jump starting ............................. 242
K Keys ............................................. 21
Keys, locks ................................... 21
L Ladder flap.................................... 76
Lane keep assist ................108, 198
Lashing eyes ............................... 80
LED headlights ...................110, 220Lighting features .........................129
Light switch ................................ 122
Load compartment ................33, 76
Load compartment cover .............77
Load compartment grille ...............83
Loading ............................. 49, 52, 53
Loading information .....................87
Low beam ................................... 110
Low fuel ..................................... 109
M
Malfunction indicator light ..........106
Manual anti-dazzle ......................40
Manual mode ............................. 157
Manual transmission .................. 159
Mirror adjustment ........................... 8
Misted light covers .....................127
N New vehicle running-in ..............144
Number plate light .....................225
O Object detection systems ...........185
Odometer ................................... 101
Oil, engine .......................... 252, 256
Outside temperature ....................93
Overcab storage ..........................75
Overhead console .......................73
Overrun cut-off ........................... 148