remove seats OPEL COMBO E 2020 Manual user
[x] Cancel search | Manufacturer: OPEL, Model Year: 2020, Model line: COMBO E, Model: OPEL COMBO E 2020Pages: 283, PDF Size: 29.4 MB
Page 49 of 283
Seats, restraints47Seats, restraintsHead restraints............................ 47
Front seats ................................... 48
Seat position .............................. 48
Seat adjustment ........................49
Seat folding ............................... 50
Armrest ...................................... 52
Heating ...................................... 52
Rear seats ................................... 53
Second row seats ......................53
Third row seats .......................... 54
Seat belts ..................................... 57
Three-point seat belt .................58
Airbag system .............................. 60
Front airbag system ...................63
Side airbag system ....................63
Curtain airbag system ...............64
Airbag deactivation ....................65
Child restraints ............................. 66
Child restraint systems ..............66
Child restraint installation locations ................................... 69Head restraints
Position9 Warning
Only drive with the head restraint
set to the proper position.
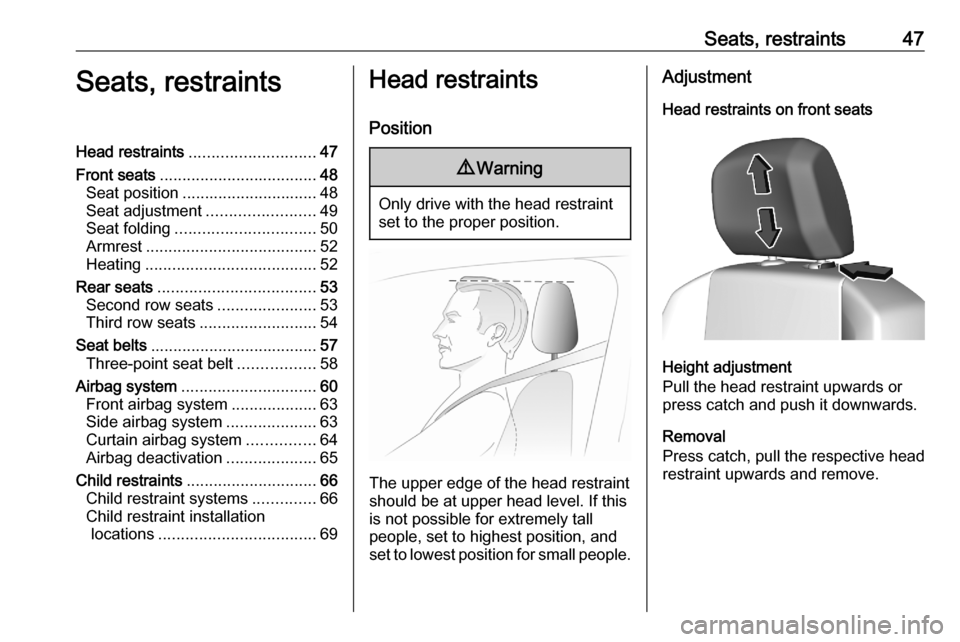
The upper edge of the head restraint
should be at upper head level. If this
is not possible for extremely tall
people, set to highest position, and
set to lowest position for small people.
Adjustment
Head restraints on front seats
Height adjustment
Pull the head restraint upwards or
press catch and push it downwards.
Removal
Press catch, pull the respective head
restraint upwards and remove.
Page 50 of 283
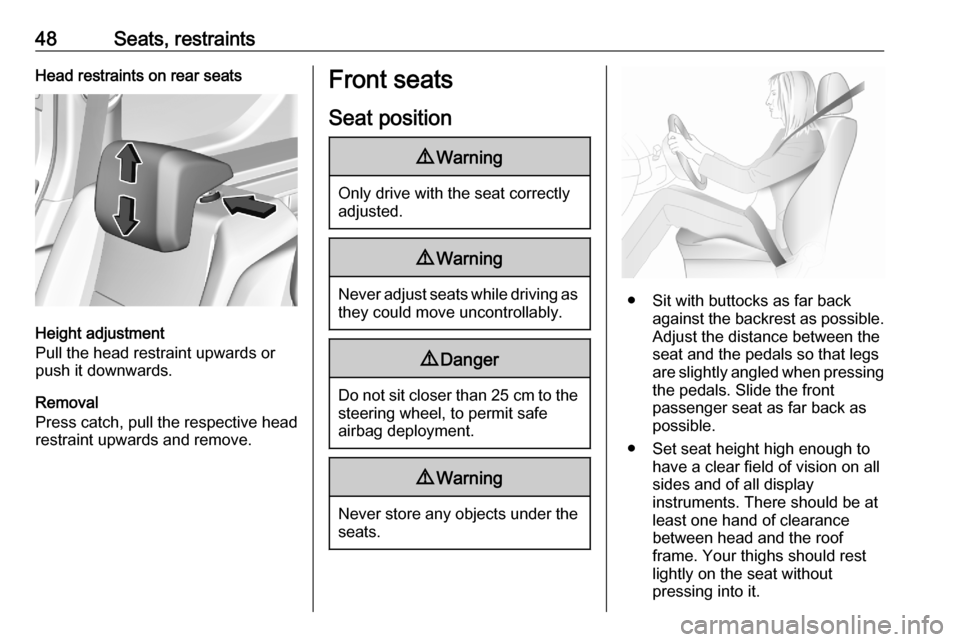
48Seats, restraintsHead restraints on rear seats
Height adjustment
Pull the head restraint upwards or
push it downwards.
Removal
Press catch, pull the respective head
restraint upwards and remove.
Front seats
Seat position9 Warning
Only drive with the seat correctly
adjusted.
9 Warning
Never adjust seats while driving as
they could move uncontrollably.
9 Danger
Do not sit closer than 25 cm to the
steering wheel, to permit safe
airbag deployment.
9 Warning
Never store any objects under the
seats.
● Sit with buttocks as far back against the backrest as possible.
Adjust the distance between the
seat and the pedals so that legs
are slightly angled when pressing the pedals. Slide the front
passenger seat as far back as
possible.
● Set seat height high enough to have a clear field of vision on allsides and of all display
instruments. There should be at
least one hand of clearance
between head and the roof
frame. Your thighs should rest
lightly on the seat without
pressing into it.
Page 52 of 283
50Seats, restraintsPush the lever, adjust inclination and
release the lever. Do not lean on
backrest when adjusting.
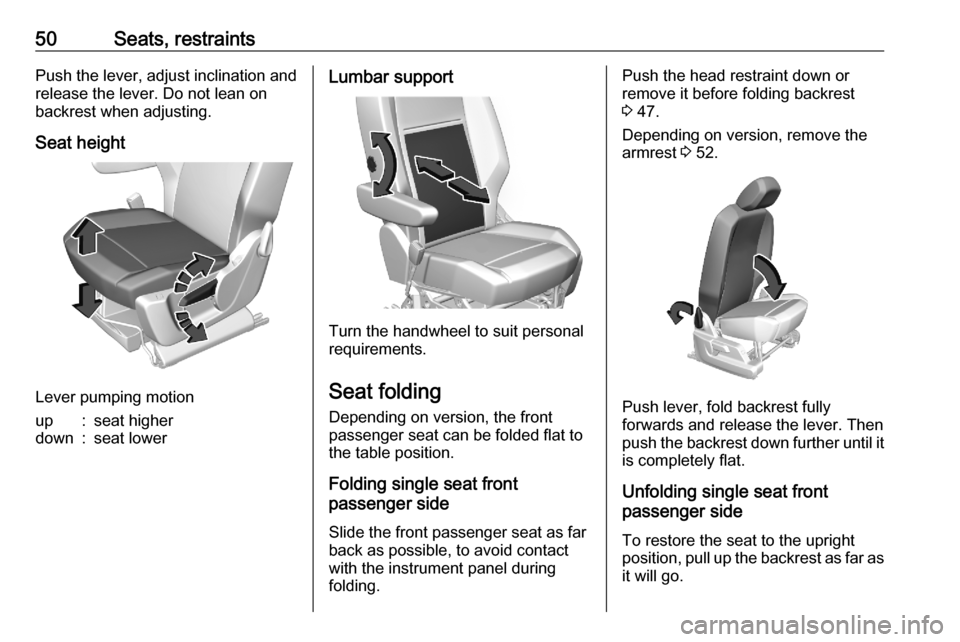
Seat height
Lever pumping motion
up:seat higherdown:seat lowerLumbar support
Turn the handwheel to suit personal
requirements.
Seat folding Depending on version, the front
passenger seat can be folded flat to the table position.
Folding single seat front
passenger side
Slide the front passenger seat as far
back as possible, to avoid contact
with the instrument panel during
folding.
Push the head restraint down or
remove it before folding backrest
3 47.
Depending on version, remove the
armrest 3 52.
Push lever, fold backrest fully
forwards and release the lever. Then
push the backrest down further until it
is completely flat.
Unfolding single seat front
passenger side
To restore the seat to the upright
position, pull up the backrest as far as
it will go.
Page 54 of 283
52Seats, restraintsTo restore the seat cushion to the
original position, push the lever and
lower the seat cushion till it is
engaged.9 Warning
When the front passenger seat is
in the folded position, the front
passenger airbag system must be deactivated.
Airbag deactivation 3 65.
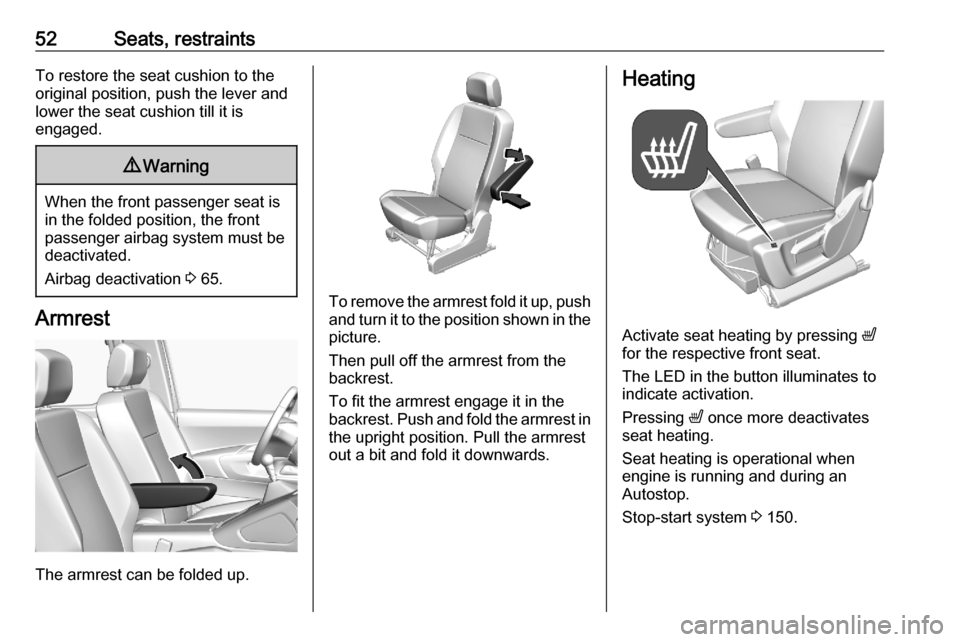
Armrest
The armrest can be folded up.
To remove the armrest fold it up, push
and turn it to the position shown in the
picture.
Then pull off the armrest from the
backrest.
To fit the armrest engage it in the
backrest. Push and fold the armrest in the upright position. Pull the armrest
out a bit and fold it downwards.
Heating
Activate seat heating by pressing ß
for the respective front seat.
The LED in the button illuminates to
indicate activation.
Pressing ß once more deactivates
seat heating.
Seat heating is operational when
engine is running and during an
Autostop.
Stop-start system 3 150.
Page 55 of 283
Seats, restraints53Rear seats
Second row seats
Depending on the equipment, the
rear seat backrest is divided into two
or three parts. All parts can be folded
down.
Before folding rear seat backrests,
execute the following if necessary:
● Move front seats forward.
● Remove the load compartment cover 3 78.
Folding the seats 1. Push the head restraint downwards 3 47.
2. Check that the outer seat belts are
lying correctly on the backrests.
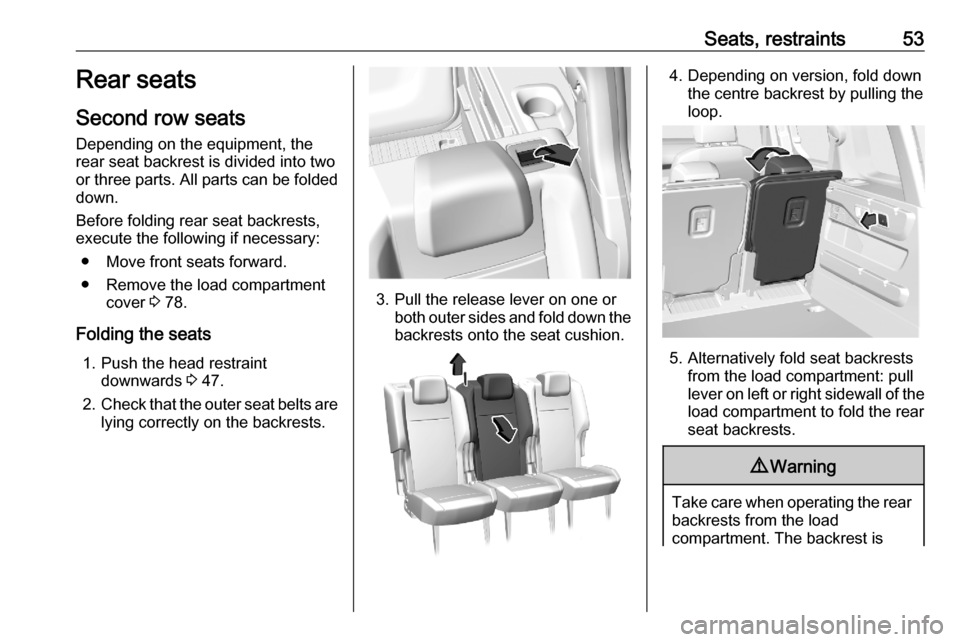
3. Pull the release lever on one or both outer sides and fold down the
backrests onto the seat cushion.
4. Depending on version, fold down the centre backrest by pulling the
loop.
5. Alternatively fold seat backrests from the load compartment: pull
lever on left or right sidewall of the
load compartment to fold the rear
seat backrests.
9 Warning
Take care when operating the rear
backrests from the load
compartment. The backrest is
Page 57 of 283
Seats, restraints559Warning
Always make sure that the load in
the vehicle is securely stowed.
Otherwise objects can be thrown
around inside the vehicle and
cause personal injury or damage
to the load or vehicle.
Depending on version, the load
compartment area can be increased
by folding up or removing the third row
seats.
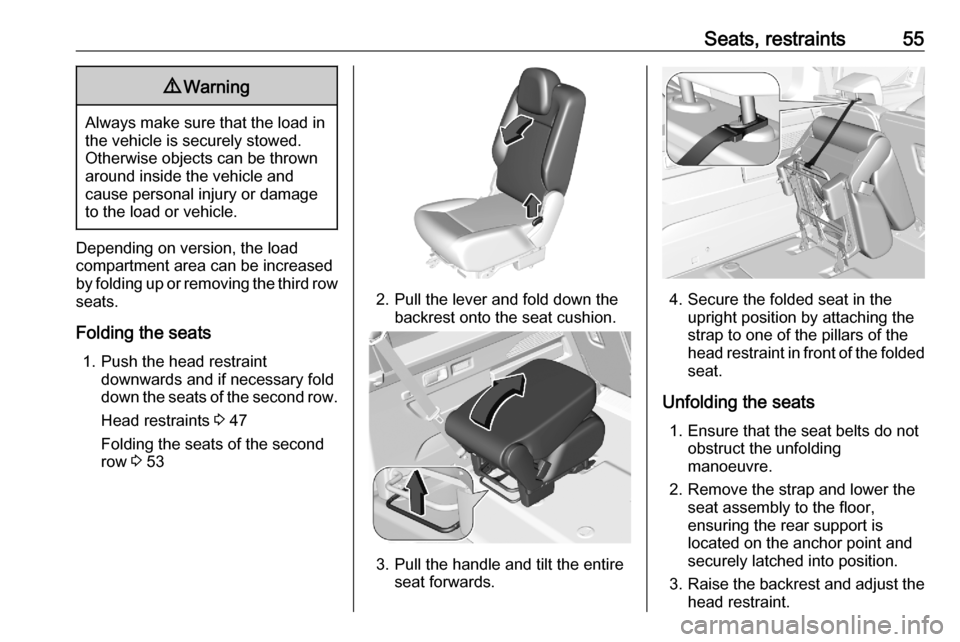
Folding the seats 1. Push the head restraint downwards and if necessary fold
down the seats of the second row.
Head restraints 3 47
Folding the seats of the second
row 3 53
2. Pull the lever and fold down the
backrest onto the seat cushion.
3. Pull the handle and tilt the entire seat forwards.
4. Secure the folded seat in theupright position by attaching the
strap to one of the pillars of the
head restraint in front of the folded seat.
Unfolding the seats 1. Ensure that the seat belts do not obstruct the unfolding
manoeuvre.
2. Remove the strap and lower the seat assembly to the floor,
ensuring the rear support is
located on the anchor point and
securely latched into position.
3. Raise the backrest and adjust the
head restraint.
Page 58 of 283
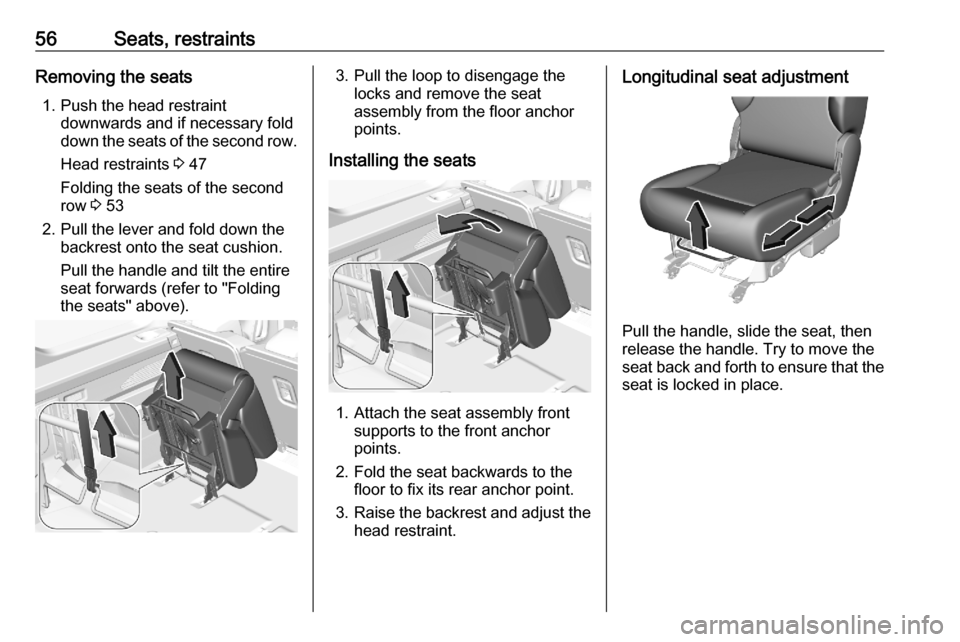
56Seats, restraintsRemoving the seats1. Push the head restraint downwards and if necessary fold
down the seats of the second row.
Head restraints 3 47
Folding the seats of the second
row 3 53
2. Pull the lever and fold down the backrest onto the seat cushion.
Pull the handle and tilt the entire seat forwards (refer to "Folding
the seats" above).3. Pull the loop to disengage the locks and remove the seat
assembly from the floor anchor
points.
Installing the seats
1. Attach the seat assembly front supports to the front anchor
points.
2. Fold the seat backwards to the floor to fix its rear anchor point.
3. Raise the backrest and adjust the
head restraint.
Longitudinal seat adjustment
Pull the handle, slide the seat, then
release the handle. Try to move the seat back and forth to ensure that the
seat is locked in place.
Page 61 of 283
Seats, restraints59
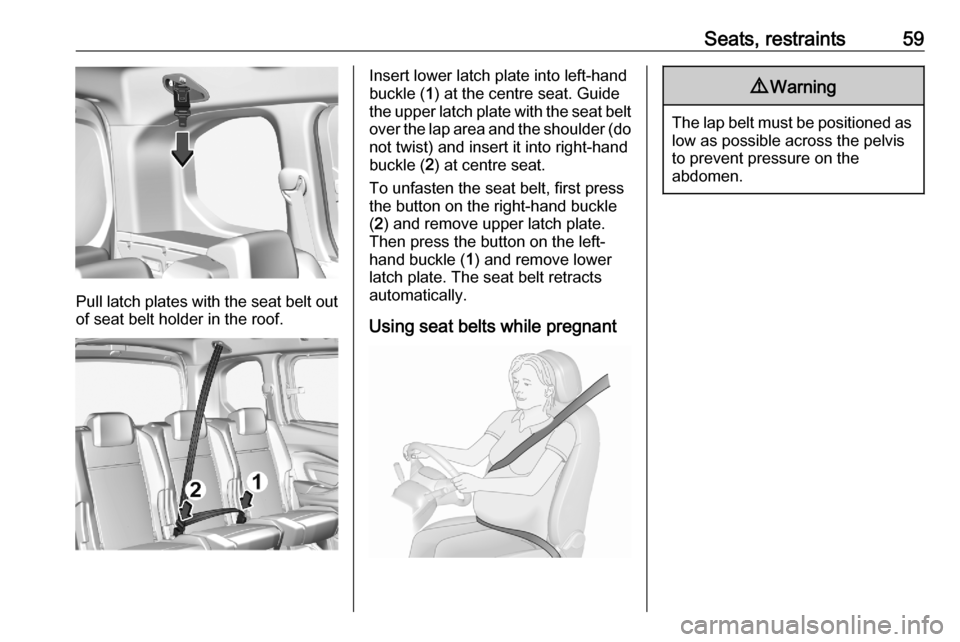
Pull latch plates with the seat belt out
of seat belt holder in the roof.
Insert lower latch plate into left-hand
buckle ( 1) at the centre seat. Guide
the upper latch plate with the seat belt
over the lap area and the shoulder (do
not twist) and insert it into right-hand
buckle ( 2) at centre seat.
To unfasten the seat belt, first press
the button on the right-hand buckle
( 2 ) and remove upper latch plate.
Then press the button on the left-
hand buckle ( 1) and remove lower
latch plate. The seat belt retracts
automatically.
Using seat belts while pregnant9 Warning
The lap belt must be positioned as
low as possible across the pelvis
to prevent pressure on the
abdomen.
Page 70 of 283

68Seats, restraints●Group II, Group III :
Römer Kidfix XP with or without
ISOFIX for children from 15 kg to
36 kg
● Group III : Graco Booster for
children from 22 kg to 36 kg
Ensure that the child restraint system to be installed is compatible with the
vehicle type.
Ensure that the mounting location of
the child restraint system within the
vehicle is correct, see following
tables.
Allow children to enter and exit the
vehicle only on the side facing away
from the traffic.
When the child restraint system is not
in use, secure the seat with a seat belt or remove it from the vehicle.
Note
Do not affix anything on the child restraint systems and do not cover
them with any other materials.
A child restraint system which has
been subjected to stress in an
accident must be replaced.
Page 71 of 283

Seats, restraints69Child restraint installation locations
Permissible options for fastening a child restraint system with a three-point seat belt
Weight class
On front passenger seatOn outer seats in
the second rowOn centre seat in
the second rowOn seats in the
third rowactivated airbagdeactivated airbagGroup 0, Group 0+: up to 13 kgXU 1,2U3UU3Group I: 9 to 18 kgUFU1,2U 3,4UU3,4Group II: 15 to 25 kgUFU1,2U3,4UU3,4Group III: 22 to 36 kgUFU1,2U3,4UU3,4U:universal suitability for forward-facing or rearward-facing child restraint systems in conjunction with three-point seat
beltUF:universal suitability for forward-facing child restraint systems in conjunction with three-point seat beltX:no child restraint system permitted in this weight class1:move seat forwards as far as necessary and adjust seat backrest inclination as far as necessary to a vertical position
to ensure that the belt runs forwards from the upper anchorage point2:adjust seat backrest inclination as far as necessary to a vertical position to ensure that the belt is tight on the buckle
side3:move the respective front seat ahead of the child restraint system forwards as far as necessary4:adjust the respective headrest as necessary or remove if required