torque OPEL COMBO E 2020 Manual user
[x] Cancel search | Manufacturer: OPEL, Model Year: 2020, Model line: COMBO E, Model: OPEL COMBO E 2020Pages: 283, PDF Size: 29.4 MB
Page 152 of 283

150Driving and operatingStarting the vehicle at low
temperatures
Starting the engine without additional
heaters is possible down to -25 °С for diesel engines and -30 °C for petrol
engines. Required is an engine oil
with the correct viscosity, the correct
fuel, performed services and a
sufficiently charged vehicle battery.
With temperatures below -30 °C the
automatic transmission requires a
warming phase of approx.
five minutes. The selector lever must
be in position P.
Heating functionalities Note
Individual heating functionalities,
such as heated seats or heated
steering wheel, may be temporarily
unavailable in the event of electrical
loading constraints. Functions will
be resumed after some minutes.Turbo engine warm-up
Upon start-up, engine available
torque may be limited for a short time, especially when the engine
temperature is cold. The limitation is
to allow the lubrication system to fully
protect the engine.
Overrun cut-off
The fuel supply is automatically cut off
during overrun, i.e. when the vehicle
is driven with a gear engaged but accelerator pedal is released.
Depending on driving conditions, the
overrun cut-off may be deactivated.
Stop-start system The stop-start system helps to save
fuel and to reduce the exhaust
emissions. When conditions allow, it
switches off the engine as soon as the
vehicle is at a low speed or at a
standstill, e.g. at a traffic light or in a
traffic jam.Activation
The stop-start system is available as
soon as the engine is started, the
vehicle starts-off and the conditions
as stated below in this section are
fulfilled.
The system is ready to operate when
the LED in the button Ò is not
illuminated. To activate the system
when the system is deactivated,
press Ó.
If the stop-start system is temporarily
not available and the button Ò is
pressed, the LED in the button
flashes.
Page 171 of 283

Driving and operating169A LED illuminates and a status
message appears in the Driver
Information Centre to confirm the
chosen mode.
ESC off mode 9
The ESC and Traction Control are
deactivated in this mode.
An LED in the button a illuminates.
ESC and Traction Control are
reactivated automatically from
50 km/h or everytime the ignition is
switched on.
Standard mode 2
This mode is calibrated for a low level
of wheel spin, based on the different
types of grip generally encountered in normal day to day driving.
Everytime the ignition is switched off,
the system is automatically reset to
this mode.
Snow mode 3
This mode adapts to the grip
conditions encountered by each
wheel when starting.When advancing, the system
optimises wheel spin to guarantee the
best acceleration based on the
available traction. Recommended in
cases of deep snow and steep
inclines.
This mode is active up to a speed of 50 km/h.
Mud mode 4
This mode allows considerable wheel
spin at start-up for the wheel with the
least grip, this removes mud and re-
establishes traction.
Simultaneously, the wheel with the
most grip is provided with the most
torque possible.
This mode is active up to a speed of
80 km/h.
Sand mode 1
This mode allows a small amount of simultaneous wheel spin on the two
drive wheels, enabling the vehicle to
advance and reduce the risk of
sinking.
This mode is active up to a speed of
120 km/h.Caution
Do not use the other modes on
sand as the vehicle may become
stuck.
Page 207 of 283

Driving and operating205driver, the system triggers the first
level of alert. The driver is notified by
a message and an audible signal is
given.
After three first level alerts, the
system triggers a new alert with a
message, accompanied by a more
pronounced audible signal.
In certain driving conditions (poor
road surface or strong winds), the
system may give alerts independent of the driver's level of vigilance.
The driver drowsiness detection is reinitialised when the ignition hasbeen switched off for a few minutes or
the speed remains below 65 km/h for a few minutes.
System limitations
In the following situations, the system
may not operate properly or even not operate at all:
● poor visibility caused by inadequate lighting of the
roadway, falling snow, heavy
rain, dense fog etc.● dazzle caused by headlights of oncoming vehicles, low sun,
reflections on damp roads,
leaving a tunnel, alternating
shade and light etc.
● windscreen area in front of the camera covered by dirt, snow,
stickers etc.
● no lane markings detected or multiple lane markings due to
roadworks
● close vehicles ahead ● winding roads or narrow roadsFuel
Fuel for petrol engines The petrol engines are compatible
with bio-fuels that conform to current
and future European standards and
and can be obtained from filling
stations:
Petrol that meets the EN228
standard, mixed with a biofuel
meeting the EN15376 standard.
Use fuel with the recommended
octane rating. A lower octane rating
can reduce engine power and torque
and slightly increases fuel
consumption.
Page 243 of 283

Vehicle care241Repeat the checking procedure
once more after driving further
10 km but no more than ten
minutes to check that there is no
more loss of pressure.
If the tyre pressure has fallen
below 150 kPa (1.5 bar), the
vehicle must not be used. Seek
the assistance of a workshop.
17. Stow away tyre repair kit in load compartment.
Note
The driving characteristics of the
repaired tyre are severely affected, therefore have this tyre replaced.
If unusual noise is heard or the
compressor becomes hot, turn
compressor off for at least 30 min.
The built-in safety valve opens at a
pressure of 700 kPa (7 bar).
Note the expiry date of the kit. After
this date its sealing capability is no
longer guaranteed. Pay attention to
storage information on sealant
bottle.Replace the used sealant bottle. Dispose of the bottle as prescribed
by applicable laws.
The compressor and sealant can be
used from approx. -30 °C.
Wheel changing Make the following preparations and
observe the following information:
● Park the vehicle on a level, firm and non-skid surface. The front
wheels must be in the straight- ahead position.
● If necessary, place a chock under
the wheel diagonally opposite the wheel to be changed.
● Apply the parking brake and engage first gear, reverse gear or
P .
● If the ground on which the vehicle
is standing is soft, a solid board
(max. 1 cm thick) should be
placed under the jack.
● Take heavy objects out of the vehicle before jacking up.
● No people or animals may be in the vehicle when it is jacked-up.● Never crawl under a jacked-up vehicle.
● Do not start the vehicle when it is
raised on the jack.
● Before screwing in the wheel bolts, clean them.9Warning
Do not grease wheel bolts.
Tightening torques
Caution
If the vehicle is equipped with alloy
wheels, tighten the wheel bolts
manually at least for the first five
turns.
There are two different types of
wheels with two different bolts and tightening torques.
Page 244 of 283

242Vehicle care
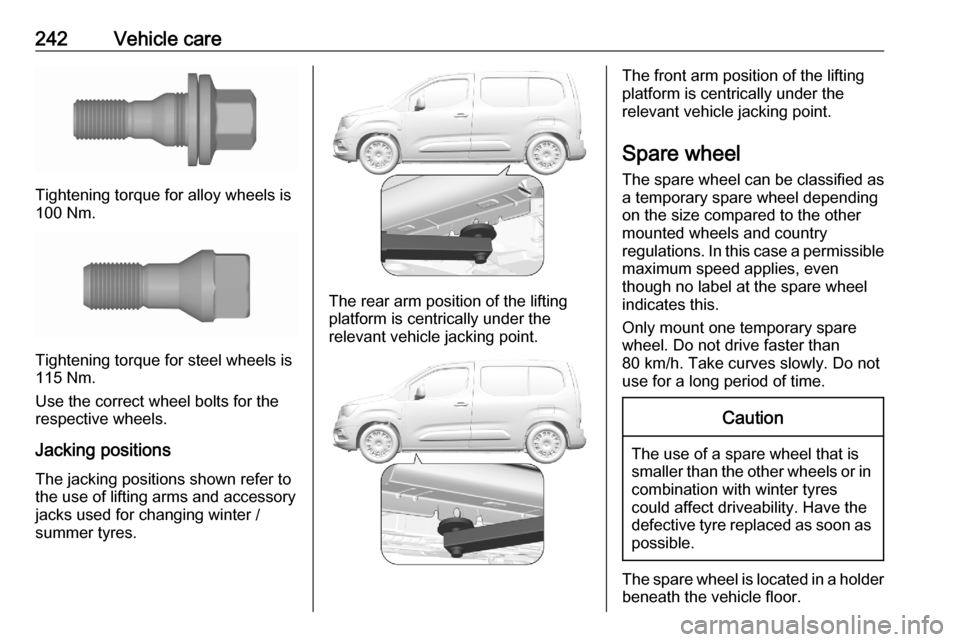
Tightening torque for alloy wheels is
100 Nm.
Tightening torque for steel wheels is
115 Nm.
Use the correct wheel bolts for the respective wheels.
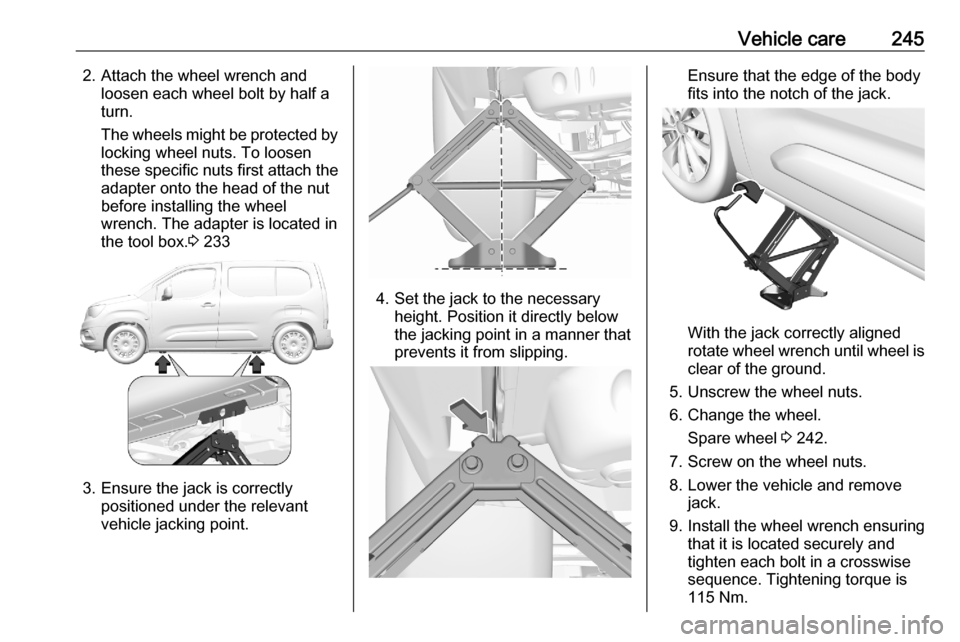
Jacking positions The jacking positions shown refer to
the use of lifting arms and accessory
jacks used for changing winter /
summer tyres.
The rear arm position of the lifting
platform is centrically under the
relevant vehicle jacking point.
The front arm position of the lifting
platform is centrically under the
relevant vehicle jacking point.
Spare wheel The spare wheel can be classified as
a temporary spare wheel depending
on the size compared to the other
mounted wheels and country
regulations. In this case a permissible maximum speed applies, even
though no label at the spare wheel
indicates this.
Only mount one temporary spare
wheel. Do not drive faster than
80 km/h. Take curves slowly. Do not use for a long period of time.Caution
The use of a spare wheel that issmaller than the other wheels or in combination with winter tyres
could affect driveability. Have the defective tyre replaced as soon as
possible.
The spare wheel is located in a holder
beneath the vehicle floor.
Page 247 of 283

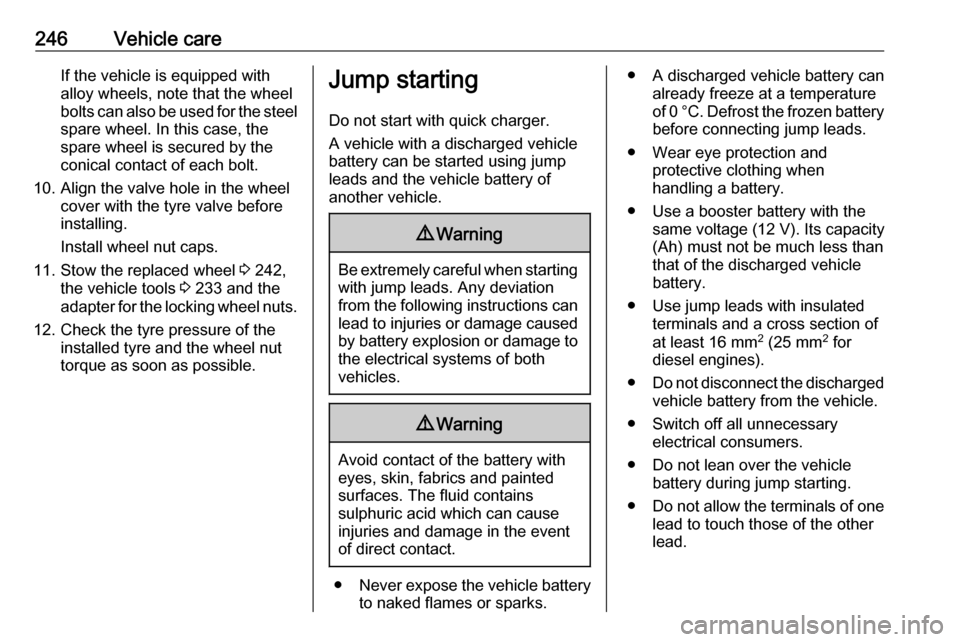
Vehicle care2452. Attach the wheel wrench andloosen each wheel bolt by half a
turn.
The wheels might be protected by locking wheel nuts. To loosen
these specific nuts first attach the
adapter onto the head of the nut
before installing the wheel
wrench. The adapter is located in
the tool box. 3 233
3. Ensure the jack is correctly
positioned under the relevant
vehicle jacking point.
4. Set the jack to the necessary height. Position it directly below
the jacking point in a manner that
prevents it from slipping.
Ensure that the edge of the body
fits into the notch of the jack.
With the jack correctly aligned
rotate wheel wrench until wheel is
clear of the ground.
5. Unscrew the wheel nuts.
6. Change the wheel. Spare wheel 3 242.
7. Screw on the wheel nuts.
8. Lower the vehicle and remove jack.
9. Install the wheel wrench ensuring that it is located securely and
tighten each bolt in a crosswise
sequence. Tightening torque is
115 Nm.
Page 248 of 283

246Vehicle careIf the vehicle is equipped with
alloy wheels, note that the wheel
bolts can also be used for the steel spare wheel. In this case, the
spare wheel is secured by the
conical contact of each bolt.
10. Align the valve hole in the wheel cover with the tyre valve before
installing.
Install wheel nut caps.
11. Stow the replaced wheel 3 242,
the vehicle tools 3 233 and the
adapter for the locking wheel nuts.
12. Check the tyre pressure of the installed tyre and the wheel nut
torque as soon as possible.Jump starting
Do not start with quick charger.
A vehicle with a discharged vehicle
battery can be started using jump
leads and the vehicle battery of
another vehicle.9 Warning
Be extremely careful when starting
with jump leads. Any deviation
from the following instructions can
lead to injuries or damage caused
by battery explosion or damage to the electrical systems of both
vehicles.
9 Warning
Avoid contact of the battery with
eyes, skin, fabrics and painted
surfaces. The fluid contains
sulphuric acid which can cause
injuries and damage in the event
of direct contact.
● Never expose the vehicle battery
to naked flames or sparks.
● A discharged vehicle battery can already freeze at a temperature
of 0 °C. Defrost the frozen battery before connecting jump leads.
● Wear eye protection and protective clothing when
handling a battery.
● Use a booster battery with the same voltage (12 V). Its capacity
(Ah) must not be much less than
that of the discharged vehicle battery.
● Use jump leads with insulated terminals and a cross section of
at least 16 mm 2
(25 mm 2
for
diesel engines).
● Do not disconnect the discharged
vehicle battery from the vehicle.
● Switch off all unnecessary electrical consumers.
● Do not lean over the vehicle battery during jump starting.
● Do not allow the terminals of one
lead to touch those of the other
lead.
Page 265 of 283

Technical data263Engine dataEngine identifier code
D12XHL
F12XHLF12XHTZ16XUD15DTLD15DTSales designation1.2 Turbo1.21.61.5 Turbo1.5 TurboEngineering codeEB2ADTEB2ADTSEC5FDV5REDV5RDPiston displacement [cm 3
]11991199158714991499Engine power [kW]8196855675at rpm55005500575035003500Torque [Nm]205230150230250at rpm17501750400017501750Fuel typePetrolPetrolPetrolDieselDieselOctane rating RON 1)2)recommended959595--possible98----1)
A country specific label at the fuel filler flap can supersede the engine specific requirement.
2) In certain countries, the use of a particular fuel, e.g. a specific octane rating, may be required to ensure proper engine operation.
Page 266 of 283
![OPEL COMBO E 2020 Manual user 264Technical dataEngine identifier codeD15DTHA16DTB16DTLB16DTSales designation1.5 Turbo1.6 Turbo1.6 Turbo1.6 TurboEngineering codeDV5RCDV6DDV6FEDV6FDPiston displacement [cm3
]1499156015601560Engine po OPEL COMBO E 2020 Manual user 264Technical dataEngine identifier codeD15DTHA16DTB16DTLB16DTSales designation1.5 Turbo1.6 Turbo1.6 Turbo1.6 TurboEngineering codeDV5RCDV6DDV6FEDV6FDPiston displacement [cm3
]1499156015601560Engine po](/img/37/18815/w960_18815-265.png)
264Technical dataEngine identifier codeD15DTHA16DTB16DTLB16DTSales designation1.5 Turbo1.6 Turbo1.6 Turbo1.6 TurboEngineering codeDV5RCDV6DDV6FEDV6FDPiston displacement [cm3
]1499156015601560Engine power [kW]96685574at rpm3750400035003750Torque [Nm]300230210255at rpm1750175017501750Fuel typeDieselDieselDieselDiesel