check engine OPEL COMBO E 2020 User Guide
[x] Cancel search | Manufacturer: OPEL, Model Year: 2020, Model line: COMBO E, Model: OPEL COMBO E 2020Pages: 283, PDF Size: 29.4 MB
Page 166 of 283

164Driving and operating3 106. The electric parking brake
operates automatically with
adequate force.
Before leaving the vehicle, check
the electric parking brake status.
Control indicator m 3 106.
The electric parking brake can always
be activated, even if the ignition is off.
Do not operate electric parking brake
system too often without engine
running as this will discharge the
vehicle battery.
Releasing
Switch on ignition. Keep foot brake
pedal depressed and then push
switch j.
Drive away function
Vehicles with manual transmission:
Depressing the clutch pedal and then
slightly releasing the clutch pedal and slightly depressing the accelerator
pedal releases the electric parking
brake automatically. This is only
possible if the automatic operation of
the electric parking brake is activated.
It is not possible when switch j is
pulled at the same time.
Vehicles with automatic transmission: Engaging D and then depressing the
accelerator pedal releases the
electric parking brake automatically.
This is only possible if the automatic
operation of the electric parking brake
is activated. It is not possible when
switch j is pulled at the same time.
Braking when vehicle is moving
When the vehicle is moving and the switch j is kept pulled, the electric
parking brake system will decelerate the vehicle. As soon as the switch
j is released, braking will be
stopped.
The antilock brake system and the
Electronic Stability Control stabilise
the vehicle while the switch j is kept
pulled. If an error of the electric
parking brake occurs, a warning
message is displayed in the driver
information centre. If the antilock
brake system and the Electronic
Stability Control fail, one or both
indicators i and J illuminate in theinstrument cluster. In this case,
stability can only be provided by
repeatedly pulling and pushing the
switch j until the vehicle is
immobilised.
Automatic operation
Automatic operation includes
automatic application and automatic
release of the electric parking brake.
The electric parking brake can also be
applied or released manually by using
the switch j.
Automatic application: ● The electric parking brake is automatically applied when the
vehicle is stationary and the
ignition is switched off.
● j illuminates in the instrument
cluster and a display message
pops up to confirm the
application.
Page 167 of 283

Driving and operating165Automatic release:● Parking brake releases automatically after moving off.
● j extinguishes in the
instrument cluster and a display message pops up to confirm the
release.
If the vehicle is equipped with an
automatic transmission and the brake
is not released automatically, make
sure the front doors are correctly
closed.Deactivation of automatic operation 1. Start the engine.
2. If the parking brake is released, apply the parking brake pulling the
switch j.
3. Take your foot off the brake pedal.
4. Press the switch j for at least
10 s and maximum 15 s.
5. Release the switch j.
6. Press and hold the brake pedal. 7. Pull the switch j for 2 s.
The deactivation of the automatic operation of the electric parking brake
is confirmed by o illuminating in theinstrument cluster 3 106 . The electric
parking brake can only be applied and released manually.
To reactivate the automatic
operation, repeat the steps described above.
Functionality check
When the vehicle is not moving, the
electric parking brake might be
applied automatically. This is done to
check the system.
Fault
Failure mode of electric parking brake
is indicated by a control indicator j
and by a vehicle message which is
displayed in the Driver Information Centre.
Vehicle messages 3 117.
Control indicator j flashes: electric
parking brake is not fully applied or
released. When continuously
flashing, release electric parking
brake and retry applying.Brake assist
If brake pedal is depressed quickly
and forcefully, maximum brake force
is automatically applied.
Operation of brake assist might
become apparent by a pulse in the
brake pedal and a greater resistance when depressing the brake pedal.
Maintain steady pressure on the
brake pedal as long as full braking is
required. Maximum brake force is
automatically reduced when brake
pedal is released.
Hill start assist The system helps prevent unintendedmovement when driving away on
inclines.
When releasing the brake pedal after
stopping on an incline, brakes remain
on for further 2s. The brakes release
automatically as soon as the vehicle
begins to accelerate.
Page 194 of 283

192Driving and operatingExiting a parallel parking slot
Activation
Colour Info Display: when exiting a
parallel parking slot, activate the
system by pressing Í. Select Driving
functions on the Info Display and then
Park Assist . Select Exit parallel
parking space .
Select exit side by switching on the
respective turn light.
Engage reverse or forward gear,
release the steering wheel and start
moving without exceeding 5 km/h.Move forwards and backwards while
observing the warnings of the Parking
assist until the end of manoeuvre is
indicated. The manoeuvre is
complete when the vehicle's front
wheels are out of the parking slot.
After deactivation check control over
the vehicle.
Display indication
The instructions on the display show: ● general hints and warning messages
● the demand to stop the vehicle, when a parking slot is detected
● the direction of driving during the
parking manoeuvre
● the demand to shift into reverse or first gear
● the demand to stop or to drive slowly
● the successful completion of the parking manoeuvre indicated bya pop-up symbol and a chime
● the cancelling of a parking manoeuvreDeactivation
The current park assist manoeuvre is cancelled via the button to return to
the previous screen in the Info
Display. To deactivate the system
completely, press ¼ in the centre
console.
The system is deactivated
automatically:
● if the ignition is switched off
● if stalling the engine
● if no manoeuvre is started within 5 minutes of selection of the typeof manoeuvre
● after a prolonged stop of the vehicle during a manoeuvre
● if the Electronic Stability Control is triggered
● if the speed of the vehicle exceeds the stated limit
● when the driver interrupts movement of the steering wheel
● after seven manoeuvres for entering a perpendicular parking
slot (a manoeuvre consists of
one rear move or one forward
move)
Page 216 of 283

214Vehicle careVehicle careGeneral Information...................214
Accessories and vehicle modifications .......................... 214
Vehicle storage ........................215
End-of-life vehicle recovery .....216
Vehicle checks ........................... 216
Performing work ......................216
Bonnet ..................................... 216
Engine oil ................................. 217
Engine coolant ......................... 218
Washer fluid ............................ 219
Brakes ..................................... 219
Brake fluid ............................... 219
Vehicle battery ......................... 219
Diesel fuel system bleeding .....221
Wiper blade replacement ........222
Bulb replacement .......................222
Halogen headlights ..................222
LED headlights ........................ 225
Front fog lights ......................... 225
Front turn lights .......................226
Tail lights ................................. 226
Side turn lights ......................... 229
Number plate light ...................229
Interior lights ............................ 230Electrical system........................230
Fuses ....................................... 230
Engine compartment fuse box . 231
Instrument panel fuse box .......231
Vehicle tools .............................. 233
Tools ........................................ 233
Wheels and tyres .......................234
Winter tyres ............................. 234
Tyre designations ....................234
Tyre pressure .......................... 234
Tyre deflation detection system .................................... 235
Tread depth ............................. 236
Changing tyre and wheel size . 237
Wheel covers ........................... 237
Tyre chains .............................. 238
Tyre repair kit .......................... 238
Wheel changing .......................241
Spare wheel ............................ 242
Jump starting ............................. 246
Towing ....................................... 247
Towing the vehicle ...................247
Towing another vehicle ...........249
Appearance care .......................250
Exterior care ............................ 250
Interior care ............................. 251
Floor mats ............................... 252General Information
Accessories and vehicle modifications
We recommend the use of genuine parts and accessories and factory
approved parts specific for your
vehicle type. We cannot assess or
guarantee reliability of other products - even if they have a regulatory or
otherwise granted approval.
Any modification, conversion or other
changes made to standard vehicle
specifications (including, without
limitation, software modifications,
modifications of the electronic control units) may invalidate the warranty
offered by Opel. Furthermore, such
changes may affect driver assistance
systems, may impact fuel
consumption, CO 2 emissions and
other emissions of the vehicle and
cause the vehicle to no longer
conform to the operating permit,
impacting the validity of your vehicle
registration.
Page 217 of 283

Vehicle care215Caution
When transporting the vehicle on
a train or on a recovery vehicle, the
mud flaps might be damaged.
Cold protection covers
In order to prevent the accumulation
of snow at the radiator cooling fan, it is recommended to install removable
protection covers.
The protection covers must be
professionally installed, consult a
workshop.
Caution
The protection covers must be removed when one of the
following conditions occurs:
● The ambient temperature is above 10 °C.
● When the vehicle is towed.
● The vehicle is driven at speeds
above 120 km/h.
Vehicle storage
Storage for a long period of time If the vehicle is to be stored for several months:
● Wash and wax the vehicle.
● Have the wax in the engine compartment and underbody
checked.
● Clean and preserve the rubber seals.
● Fill up fuel tank completely.
● Change the engine oil.
● Drain the washer fluid reservoir.
● Check the coolant antifreeze and
corrosion protection.
● Adjust tyre pressure to the value specified for full load.
● Park the vehicle in a dry, well ventilated place. Engage first or
reverse gear or set selector lever
to P. Prevent the vehicle from
rolling.
● Do not apply the parking brake.● Open the bonnet, close all doors and lock the vehicle.
● Disconnect the clamp from the negative terminal of the vehicle
battery. Note that all systems are
not functional, e.g. anti-theft
alarm system.
Putting back into operation
When the vehicle is to be put back into
operation:
● Connect the clamp to the negative terminal of the vehicle
battery. Initialize the power
windows 3 42.
● Check tyre pressure.
● Fill up the washer fluid reservoir.
● Check the engine oil level.
● Check the coolant level.
● Fit the number plate if necessary.
Page 218 of 283
216Vehicle careEnd-of-life vehicle recoveryInformation on end-of-life vehicle
recovery centres and the recycling of
end-of-life vehicles is available on our website, where legally required. Only
entrust this work to an authorised
recycling centre.Vehicle checks
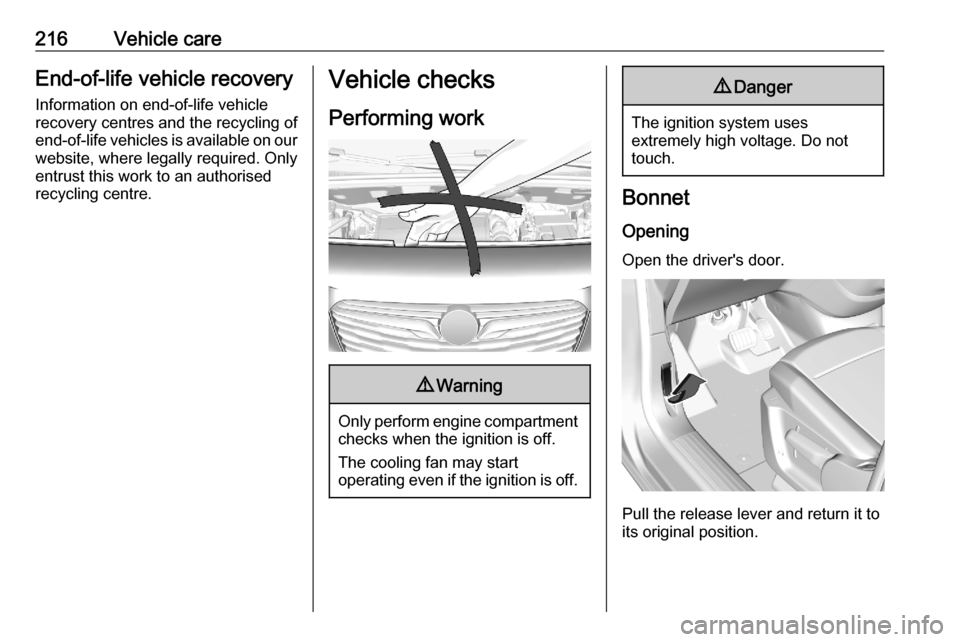
Performing work9 Warning
Only perform engine compartment
checks when the ignition is off.
The cooling fan may start
operating even if the ignition is off.
9 Danger
The ignition system uses
extremely high voltage. Do not
touch.
Bonnet
Opening
Open the driver's door.
Pull the release lever and return it to
its original position.
Page 219 of 283
Vehicle care217
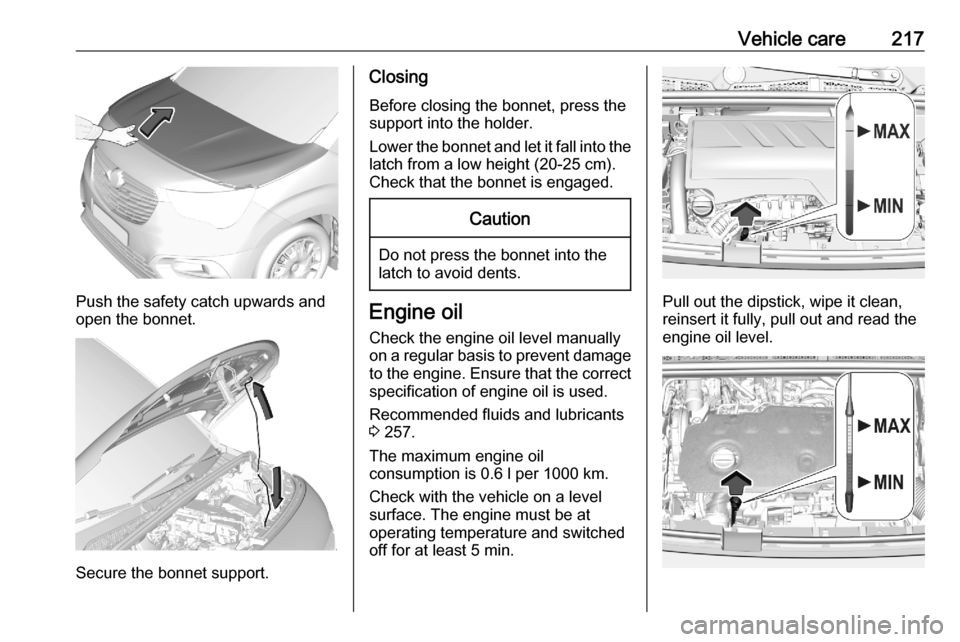
Push the safety catch upwards and
open the bonnet.
Secure the bonnet support.
Closing
Before closing the bonnet, press the
support into the holder.
Lower the bonnet and let it fall into the
latch from a low height (20-25 cm).
Check that the bonnet is engaged.Caution
Do not press the bonnet into the
latch to avoid dents.
Engine oil
Check the engine oil level manually
on a regular basis to prevent damage
to the engine. Ensure that the correct
specification of engine oil is used.
Recommended fluids and lubricants
3 257.
The maximum engine oil
consumption is 0.6 l per 1000 km.
Check with the vehicle on a level
surface. The engine must be at
operating temperature and switched
off for at least 5 min.Pull out the dipstick, wipe it clean,
reinsert it fully, pull out and read the
engine oil level.
Page 221 of 283
Vehicle care219the coolant concentration checked
and have the cause of the coolant
loss remedied by a workshop.
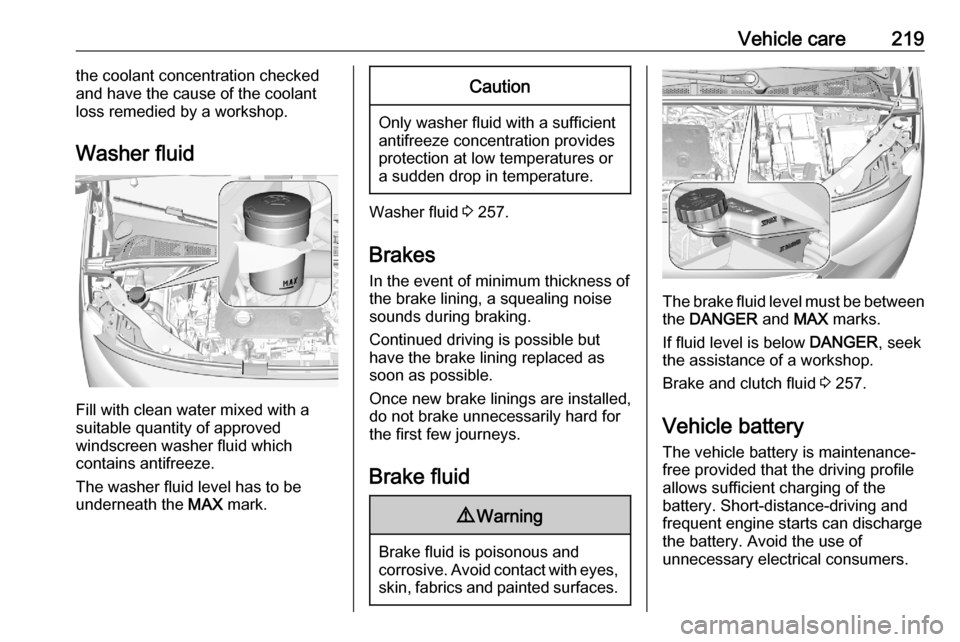
Washer fluid
Fill with clean water mixed with a
suitable quantity of approved
windscreen washer fluid which
contains antifreeze.
The washer fluid level has to be
underneath the MAX mark.
Caution
Only washer fluid with a sufficient
antifreeze concentration provides
protection at low temperatures or
a sudden drop in temperature.
Washer fluid 3 257.
Brakes In the event of minimum thickness of
the brake lining, a squealing noise
sounds during braking.
Continued driving is possible but
have the brake lining replaced as
soon as possible.
Once new brake linings are installed,
do not brake unnecessarily hard for
the first few journeys.
Brake fluid
9 Warning
Brake fluid is poisonous and
corrosive. Avoid contact with eyes,
skin, fabrics and painted surfaces.
The brake fluid level must be betweenthe DANGER and MAX marks.
If fluid level is below DANGER, seek
the assistance of a workshop.
Brake and clutch fluid 3 257.
Vehicle battery
The vehicle battery is maintenance-
free provided that the driving profile
allows sufficient charging of the
battery. Short-distance-driving and
frequent engine starts can discharge
the battery. Avoid the use of
unnecessary electrical consumers.
Page 224 of 283
222Vehicle careWiper blade replacementWindscreen
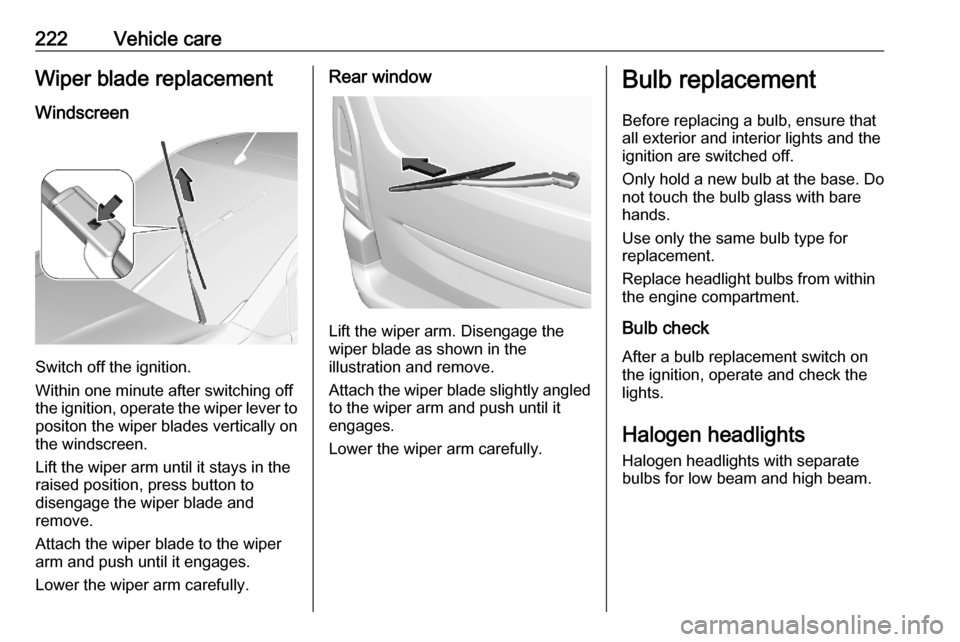
Switch off the ignition.
Within one minute after switching off
the ignition, operate the wiper lever to positon the wiper blades vertically on
the windscreen.
Lift the wiper arm until it stays in the
raised position, press button to
disengage the wiper blade and
remove.
Attach the wiper blade to the wiper
arm and push until it engages.
Lower the wiper arm carefully.
Rear window
Lift the wiper arm. Disengage the
wiper blade as shown in the
illustration and remove.
Attach the wiper blade slightly angled
to the wiper arm and push until it
engages.
Lower the wiper arm carefully.
Bulb replacement
Before replacing a bulb, ensure that
all exterior and interior lights and the
ignition are switched off.
Only hold a new bulb at the base. Do
not touch the bulb glass with bare
hands.
Use only the same bulb type for
replacement.
Replace headlight bulbs from within
the engine compartment.
Bulb check After a bulb replacement switch on
the ignition, operate and check the
lights.
Halogen headlights Halogen headlights with separate
bulbs for low beam and high beam.
Page 237 of 283
Vehicle care235The tyre pressure information label
on the left door frame indicates the
original equipment tyres and the
correspondent tyre pressures.
The tyre pressure data refers to cold
tyres. It applies to summer and winter
tyres.
Always inflate the spare tyre to the
pressure specified for full load.
Incorrect tyre pressures will impair
safety, vehicle handling, comfort and
fuel economy and will increase tyre
wear.
Tyre pressures differ depending on
various options. For the correct tyre
pressure value, follow the procedure
below:
1. Identify the engine identifier code.
Engine data 3 263.
2. Identify the respective tyre.
The tyre pressure tables show all
possible tyre combinations 3 266.
For the tyres approved for your
vehicle, refer to the EEC Certificate of
Conformity provided with your vehicle or other national registration
documents.The driver is responsible for correct adjustment of tyre pressure.9 Warning
If the pressure is too low, this can
result in considerable tyre warm-
up and internal damage, leading to tread separation and even to tyre
blow-out at high speeds.
9 Warning
For specific tyres the
recommended tyre pressure as
shown in the tyre pressure table may exceed the maximum tyre
pressure as indicated on the tyre.
Never exceed the maximum tyre
pressure as indicated on the tyre.
Temperature dependency
The tyre pressure depends on the
temperature of the tyre. During
driving, tyre temperature and
pressure increase. Tyre pressure
values provided on the tyre
information label and tyre pressure
chart are valid for cold tyres, which means at 20 °C.
The pressure increases by nearly
10 kPa for a 10 °C temperature
increase. This must be considered
when warm tyres are checked.
Tyre deflation detectionsystem
The tyre deflation detection system
continually checks the rotation speed
of all four wheels and warns on low
tyre pressure condition once vehicle
is driving. This is achieved by
comparing tyre rolling circumference
with reference values and further
signals.
If a tyre loses pressure the control
indicator w illuminates, a warning
chime is given and a warning
message is displayed in the Driver
Information Centre.
In this case reduce speed, avoid
sharp cornering and strong braking.
Stop at next safe opportunity and
check tyre pressure.
Control indicator w 3 108.