door lock OPEL CORSA 2017 Manual user
[x] Cancel search | Manufacturer: OPEL, Model Year: 2017, Model line: CORSA, Model: OPEL CORSA 2017Pages: 267, PDF Size: 8.01 MB
Page 70 of 267

68StoragePull the release handle on both sides,
pull the backrest forwards to the
vertical position and engage.
When unlocking, a red marking
appears next to the release lever. The
backrest is properly engaged when
the red marks on both sides near the
release lever are no longer visible.
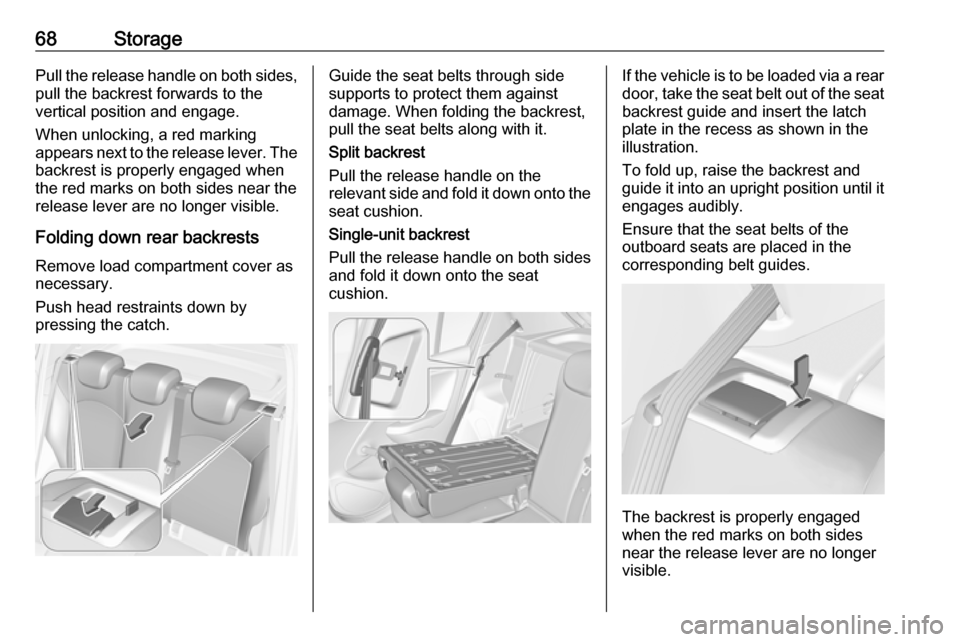
Folding down rear backrests Remove load compartment cover as
necessary.
Push head restraints down by
pressing the catch.Guide the seat belts through side
supports to protect them against
damage. When folding the backrest, pull the seat belts along with it.
Split backrest
Pull the release handle on the
relevant side and fold it down onto the seat cushion.
Single-unit backrest
Pull the release handle on both sides
and fold it down onto the seat
cushion.If the vehicle is to be loaded via a rear
door, take the seat belt out of the seat
backrest guide and insert the latch
plate in the recess as shown in the
illustration.
To fold up, raise the backrest and
guide it into an upright position until it engages audibly.
Ensure that the seat belts of the
outboard seats are placed in the corresponding belt guides.
The backrest is properly engaged
when the red marks on both sides
near the release lever are no longer
visible.
Page 71 of 267

Storage699Warning
Only drive the vehicle when the
backrests are securely locked into position. Otherwise there is a risk
of personal injury or damage to the
load or vehicle in the event of hard braking or a collision.
The seat belt of the centre seat could
be blocked when the backrest is
folded up too quickly. To unlock the
retractor, push in the seat belt or pull
it out by approx. 20 mm then release.
Load compartment cover
Do not place any objects on the cover.
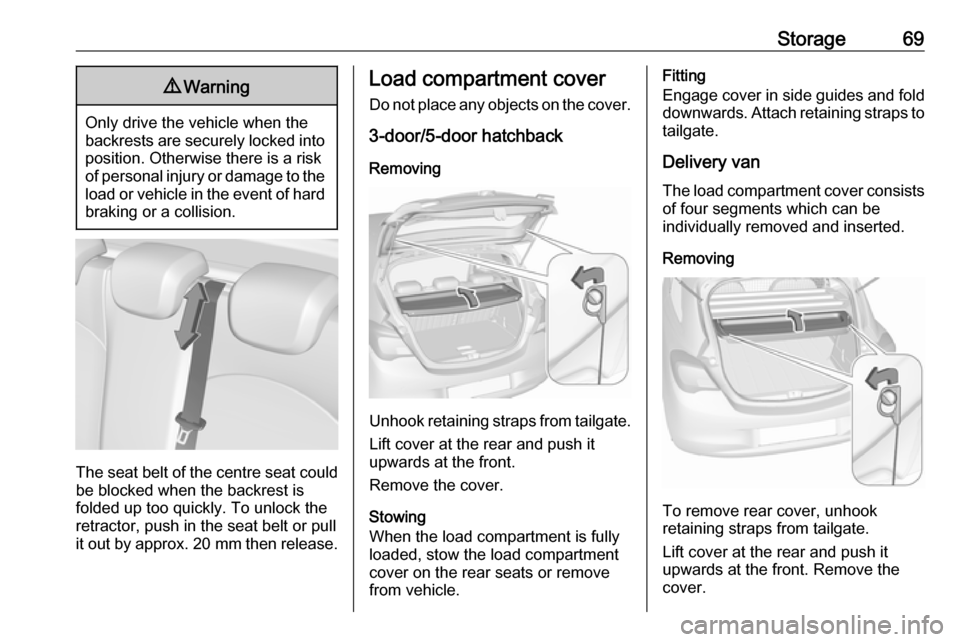
3-door/5-door hatchback
Removing
Unhook retaining straps from tailgate.Lift cover at the rear and push it
upwards at the front.
Remove the cover.
Stowing
When the load compartment is fully
loaded, stow the load compartment
cover on the rear seats or remove
from vehicle.
Fitting
Engage cover in side guides and fold
downwards. Attach retaining straps to tailgate.
Delivery van The load compartment cover consists
of four segments which can be
individually removed and inserted.
Removing
To remove rear cover, unhook
retaining straps from tailgate.
Lift cover at the rear and push it
upwards at the front. Remove the
cover.
Page 77 of 267

Instruments and controls75Instruments and
controlsControls ....................................... 76
Steering wheel adjustment ........76
Steering wheel controls .............76
Heated steering wheel ...............76
Horn ........................................... 77
Windscreen wiper/washer .........77
Rear window wiper/washer .......79
Outside temperature ..................79
Clock ......................................... 80
Power outlets ............................. 82
Inductive charging .....................82
Cigarette lighter ......................... 83
Ashtrays .................................... 83
Warning lights, gauges and indi‐
cators ........................................... 84
Instrument cluster ......................84
Speedometer ............................. 84
Odometer .................................. 84
Trip odometer ............................ 84
Tachometer ............................... 85
Fuel gauge ................................ 85
Fuel selector .............................. 86
Engine coolant temperature gauge ....................................... 87Service display.......................... 87
Control indicators ......................88
Turn signal ................................. 90
Seat belt reminder .....................91
Airbag and belt tensioners .........91
Airbag deactivation ....................92
Charging system .......................92
Malfunction indicator light ..........92
Service vehicle soon .................92
Brake and clutch system ...........93
Operate pedal ............................ 93
Antilock brake system (ABS) .....93
Gear shifting .............................. 93
Power steering .......................... 93
Lane departure warning ............93
Ultrasonic parking assist ...........94
Electronic Stability Control off ...94
Electronic Stability Control and Traction Control system ...........94
Traction Control system off .......94
Preheating ................................. 94
Diesel particle filter ....................94
Tyre pressure monitoring system ...................................... 95
Engine oil pressure ....................95
Low fuel ..................................... 95
Immobiliser ................................ 95
Reduced engine power .............95
Autostop .................................... 96
Exterior light .............................. 96High beam................................. 96
High beam assist .......................96
Fog light ..................................... 96
Rear fog light ............................. 96
Cruise control ............................ 96
Vehicle detected ahead .............96
Speed limiter ............................. 96
Traffic sign assistant ..................96
Door open .................................. 96
Information displays .....................97
Driver Information Centre ..........97
Colour-Info-Display ..................101
Graphic-Info-Display ................102
Vehicle messages ......................103
Warning chimes .......................105
Battery voltage ........................ 105
Vehicle personalisation ..............106
Telematics service .....................109
OnStar ..................................... 109
Page 92 of 267

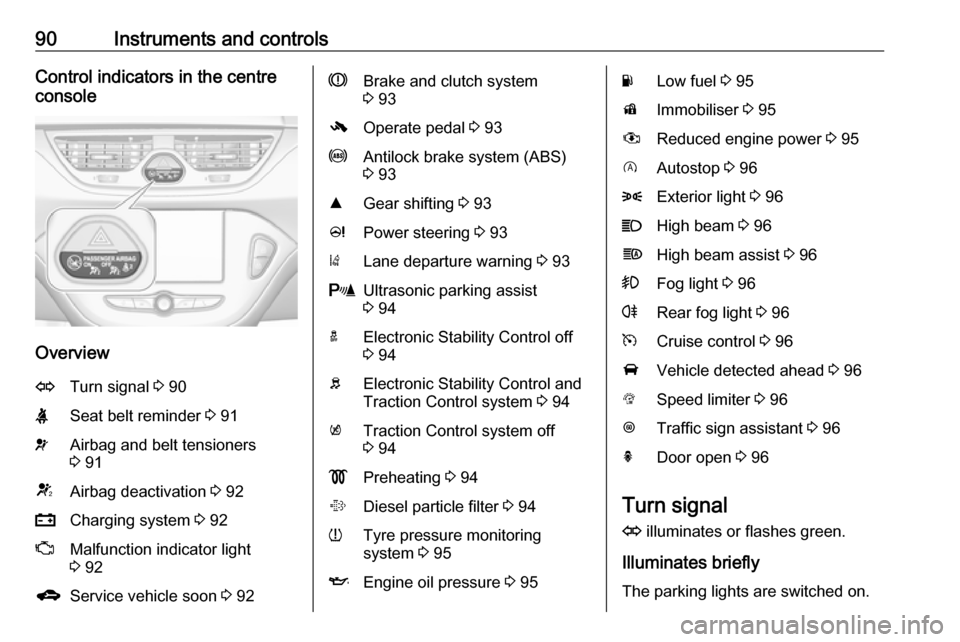
90Instruments and controlsControl indicators in the centre
console
Overview
OTurn signal 3 90XSeat belt reminder 3 91vAirbag and belt tensioners
3 91VAirbag deactivation 3 92pCharging system 3 92ZMalfunction indicator light
3 92gService vehicle soon 3 92RBrake and clutch system
3 93-Operate pedal 3 93uAntilock brake system (ABS)
3 93RGear shifting 3 93cPower steering 3 93)Lane departure warning 3 93rUltrasonic parking assist
3 94aElectronic Stability Control off
3 94bElectronic Stability Control and
Traction Control system 3 94kTraction Control system off
3 94!Preheating 3 94%Diesel particle filter 3 94wTyre pressure monitoring
system 3 95IEngine oil pressure 3 95YLow fuel 3 95dImmobiliser 3 95#Reduced engine power 3 95DAutostop 3 968Exterior light 3 96CHigh beam 3 96fHigh beam assist 3 96>Fog light 3 96rRear fog light 3 96mCruise control 3 96AVehicle detected ahead 3 96LSpeed limiter 3 96LTraffic sign assistant 3 96hDoor open 3 96
Turn signal
O illuminates or flashes green.
Illuminates briefly
The parking lights are switched on.
Page 109 of 267

Instruments and controls107Duration upon exit of vehicle:
Activates or deactivates and
changes the duration of exit
lighting.
● Power door locks
Auto door lock : Activates or
deactivates the automatic door
locking function after switching on ignition.
Stop door lock if door open :
Activates or deactivates the door locking function while a door isopen.
Delayed door lock : Activates or
deactivates the delayed door
locking function. This menu
option is displayed with Stop door
lock if door open deactivated.
Central locking system 3 24.
● Remote locking, unlocking,
starting
Remote unlock feedback :
Activates or deactivates the
hazard warning flasher feedback
whilst unlocking.
Passive door unlock : Changes
the configuration to unlock onlythe driver's door or the whole
vehicle whilst unlocking.
Auto relock doors : Activates or
deactivates the automatic relock
function after unlocking without
opening the vehicle.
● Restore factory settings :
Resets all settings to the default settings.
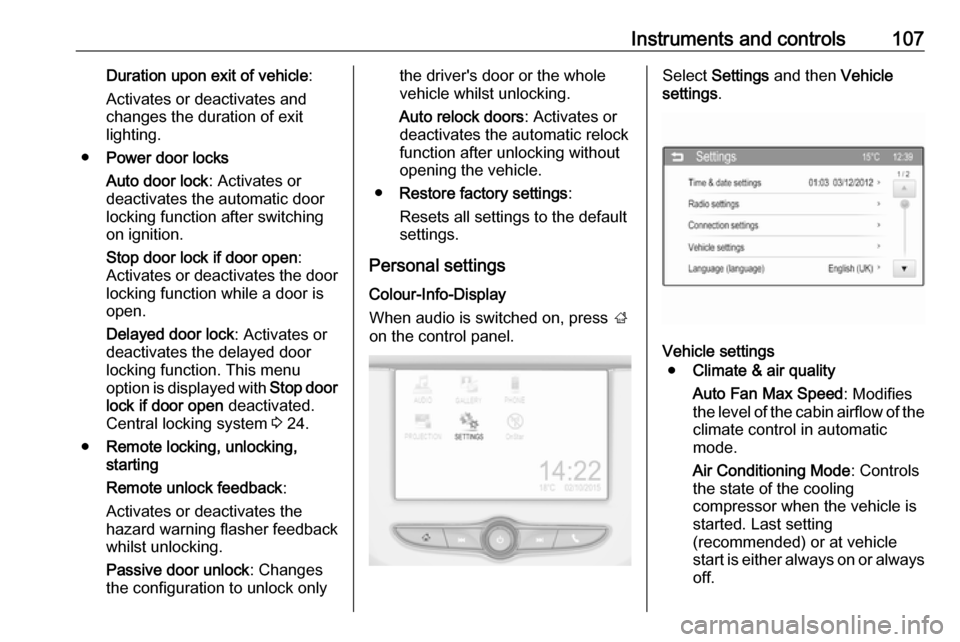
Personal settings Colour-Info-Display
When audio is switched on, press ;
on the control panel.Select Settings and then Vehicle
settings .
Vehicle settings
● Climate & air quality
Auto Fan Max Speed : Modifies
the level of the cabin airflow of the climate control in automatic
mode.
Air Conditioning Mode : Controls
the state of the cooling
compressor when the vehicle is
started. Last setting
(recommended) or at vehicle
start is either always on or always
off.
Page 110 of 267

108Instruments and controlsAuto Rear Defog: Automatically
activates heated rear window.
● Collision / Detection Systems
Park Assist : Activates or
deactivates the ultrasonic
parking assist. Activation is
selectable with or without
attached trailer coupling.
Side Blind Zone Alert : Activates
or deactivates side blind zone alert.
● Comfort and Convenience
Chime Volume : Changes the
volume of warning chimes.
Personalization By Driver :
Activates or deactivates the
personalisation function.
Auto Wipe in Reverse Gear :
Activates or deactivates
automatic switching on of the
rear window wiper when reverse gear is engaged.
● Lighting
Vehicle Locator Lights : Activates
or deactivates the entry lighting.Exit Lighting : Activates or
deactivates and changes the
duration of exit lighting.
● Power Door Locks
Unlocked Door Anti Lock Out :
Activates or deactivates the door
locking function while a door is open.
Auto Door Lock : Activates or
deactivates the automatic door locking function after switching
on ignition.
Auto Door Unlock : Changes the
configuration to unlock only the
driver's door or the whole vehicle after switching off ignition.
Delayed Door Lock : Activates or
deactivates the delayed door
locking function. This feature
delays the actual locking of the
doors until all doors are closed.
● Remote Lock, Unlock, Start
Remote Unlock Light Feedback :
Activates or deactivates the
hazard warning flasher feedback whilst unlocking.
Remote Door Unlock : Changes
the configuration to unlock onlythe driver's door or the whole
vehicle whilst unlocking.
Relock Remotely Unlocked
Doors : Activates or deactivates
the automatic relock function
after unlocking without opening
the vehicle.
Page 123 of 267

Lighting121Dome light
Spotlight incorporated in the inside
mirror housing comes on when
headlights are switched on.
Dome light illuminates gear shifting
console indirectly.
Reading lights
Operated by pressing 2 for the left
and right side.
Lighting features
Entry lighting
Welcome lighting
The following lights are switched on
for a short time by unlocking the
vehicle with the radio remote control:
● headlights
● tail lights
● number plate lights
● instrument panel light
● interior lights
Some functions are only operable
when it is dark outside, to facilitate locating the vehicle.
Lighting switches off immediately
when the ignition key is turned to
position 1 3 134.
Activation or deactivation of this
function can be changed in the
Info-Display.
Vehicle personalisation 3 106.
The settings can be saved for the key being used 3 24.The following lights will additionally
switch on when the driver's door is
opened:
● illumination of all switches
● Driver Information Centre
Exit lighting
The following lights switch on if the
key is removed from the ignition
switch:
● interior lights
● instrument panel light (only when
it is dark)
They will switch off automatically after
a delay and will be activated again if
the driver's door is opened.
Path lighting Headlights, tail lights and number
plate lights illuminate the surrounding area for an adjustable time after
leaving the vehicle.
Page 137 of 267

Driving and operating1350:ignition off: Some functions
remain active until key is
removed or driver's door is
opened, provided the ignition was
on previously1:accessory power mode: Steering wheel lock released, some
electrical functions are operable,
ignition is off2:ignition on power mode: Ignition
is on. Control indicators
illuminate and most electrical
functions are operable
Diesel engine is preheating.3:engine start: Release key after
starting procedure beginsSteering wheel lock
Remove key from ignition switch and
turn steering wheel until it engages.
Retained power off The following electronic systems areoperable until the driver's door is
opened or at the latest for ten minutes
after the ignition is switched off:
● power windows
● power outlets
● power sunroof
Starting the engineTurn key to position 1 to release the
steering wheel lock.
Manual transmission: operate clutch
and brake pedal.
Manual transmission automated:
operate brake pedal.
Automatic transmission: operate
brake pedal and move selector lever
to P or N.
Do not operate the accelerator pedal. Diesel engine: turn the key to position2 for preheating until control
indicator ! extinguishes.
Turn key briefly to position 3 and
release: an automatic procedure operates the starter after a brief
delay, until the engine is running. See
'Automatic Starter Control'.
Before restarting or to switch off the
engine, turn the key back to position
0 .
During an Autostop, the engine can
be started by depressing the clutch
pedal.
Page 147 of 267

Driving and operating145Caution
It is not advisable to drive with thehand resting on the selector lever.
Gear shift indication 3 93.
Stop-start system 3 136.
Manual transmission
automated
The automated manual transmission permits manual gearshifting (manual
mode) or automatic gearshifting
(automatic mode), both with
automatic clutch control.
Manual shifting is possible by tapping the selector lever in manual mode.
Note
When unlocking or opening a
vehicle door, a sound may be
audible caused by the hydraulic
system.Transmission display
In automatic mode, the driving
programme is indicated by D in the
Driver Information Centre.
In manual mode, M and the number
of the selected gear is indicated.
R indicates reverse gear.
N indicates neutral.
Starting the engine
To start the engine, depress the brake
pedal, if transmission is not in position N .
Page 192 of 267

190Vehicle careGeneral Information
Accessories and vehicle modifications
We recommend the use of genuine
parts and accessories and factory
approved parts specific for your
vehicle type. We cannot assess or guarantee reliability of other products
- even if they have a regulatory or
otherwise granted approval.
Any modification, conversion or other changes made to standard vehicle
specifications (including, without
limitation, software modifications,
modifications of the electronic control units) may invalidate the warranty
offered by Opel. Furthermore, such
changes may impact fuel
consumption, CO 2 emissions and
other emissions of the vehicle and
cause the vehicle to no longer
conform to the type approval,
impacting the validity of your vehicle
registration.Caution
When transporting the vehicle on
a train or on a recovery vehicle, the
mud flaps may be damaged.
Vehicle storage
Storage for a long period of time
If the vehicle is to be stored for several months:
● Wash and wax the vehicle.
● Have the wax in the engine compartment and underbody
checked.
● Clean and preserve the rubber seals.
● Fill up fuel tank completely.
● Change the engine oil.
● Drain the washer fluid reservoir.
● Check the coolant antifreeze and
corrosion protection.
● Adjust tyre pressure to the value specified for full load.
● Park the vehicle in a dry, wellventilated place. Engage first or
reverse gear or set selector lever
to P. Prevent the vehicle from
rolling.
● Do not apply the parking brake.
● Open the bonnet, close all doors and lock the vehicle.
● Disconnect the clamp from the negative terminal of the vehicle
battery. Beware that all systems
are not functional, e.g. anti-theft
alarm system.
Putting back into operation
When the vehicle is to be put back into
operation:
● Connect the clamp to the negative terminal of the vehicle
battery. Activate the electronics
of the power windows.
● Check tyre pressure.
● Fill up the washer fluid reservoir.
● Check the engine oil level.
● Check the coolant level.
● Fit the number plate if necessary.