ESP OPEL CORSA E 2017.5 Infotainment system
[x] Cancel search | Manufacturer: OPEL, Model Year: 2017.5, Model line: CORSA E, Model: OPEL CORSA E 2017.5Pages: 109, PDF Size: 2.27 MB
Page 40 of 109
40NavigationDestination input
The navigation application provides
different options to set a destination
for route guidance.
Destination input via map
It is possible to directly enter
destinations from the map screen.
Personal addresses on the map
You can predefine two address
shortcuts (e.g. Home and Work) to
easily start route guidance to these
two places. The addresses can be
defined in the settings menu and be
labelled individually. Then, they can
be directly selected from the map.
To save the addresses, select L on
the map, Navigation Settings and
then Set up My Places .
Select one of the menu items ( Home
and Work by default). Use the
keyboard to enter the required data in the address field. For a detailed
description of the keyboard, see
below.To change the name of the personal
address, select c to hide the
keyboard and select one of the items in the list. Alternatively, enter a newname in the first entry field.
If necessary, tap within one of the
entry fields to redisplay the keyboard
and select Done. The location is
saved as shortcut.
To start route guidance to one of
these locations, select the ═ screen
button on the map. The two
destinations are displayed.
Select one of the screen buttons. The Routes menu is displayed.
Activate the desired route and then
select Go to start route guidance.
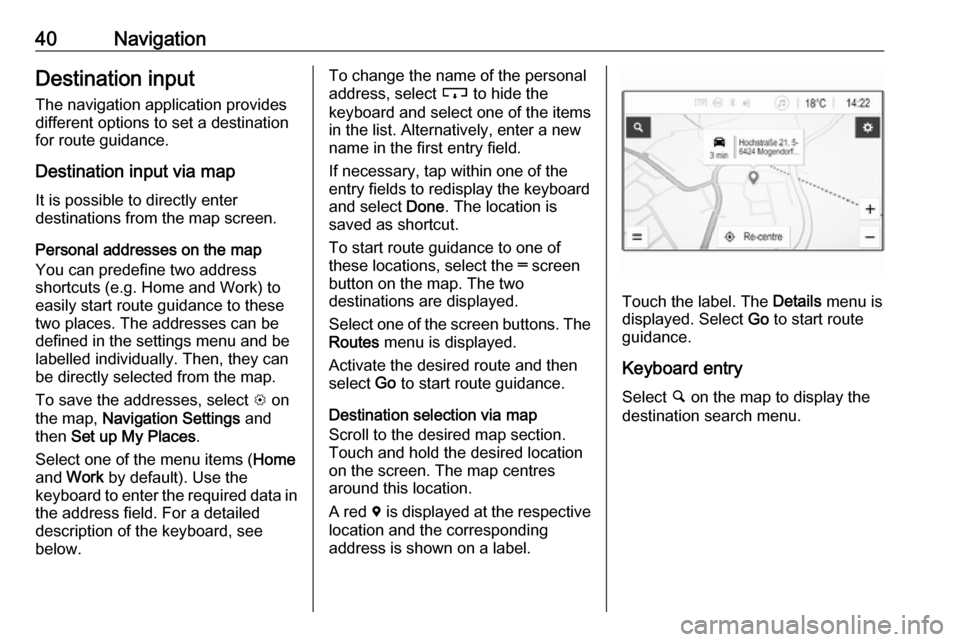
Destination selection via map
Scroll to the desired map section.
Touch and hold the desired location
on the screen. The map centres
around this location.
A red d is displayed at the respective
location and the corresponding
address is shown on a label.
Touch the label. The Details menu is
displayed. Select Go to start route
guidance.
Keyboard entry
Select ½ on the map to display the
destination search menu.
Page 41 of 109
Navigation41
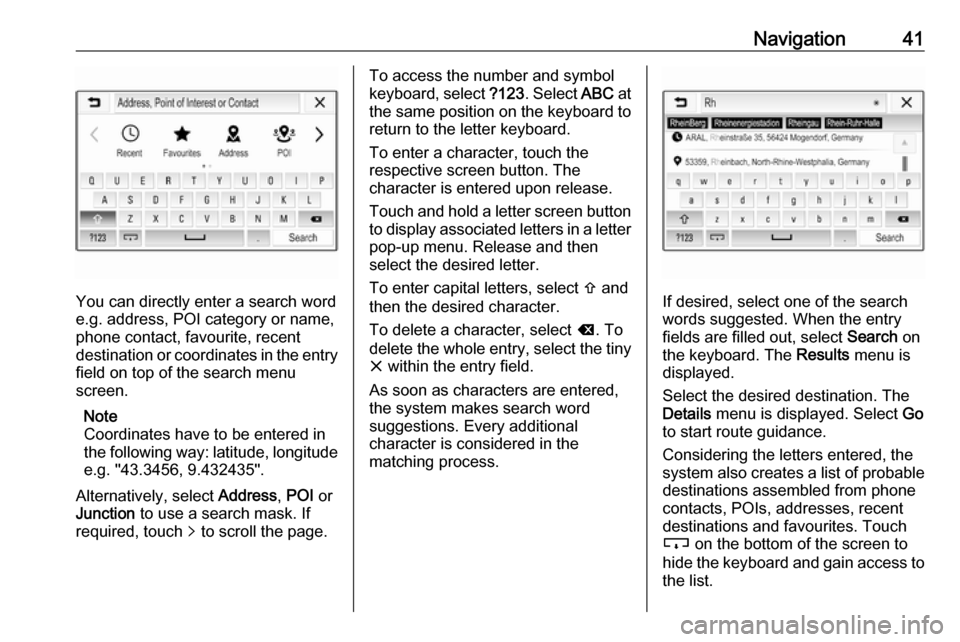
You can directly enter a search word
e.g. address, POI category or name,
phone contact, favourite, recent
destination or coordinates in the entry field on top of the search menu
screen.
Note
Coordinates have to be entered in
the following way: latitude, longitude
e.g. "43.3456, 9.432435".
Alternatively, select Address, POI or
Junction to use a search mask. If
required, touch q to scroll the page.
To access the number and symbol
keyboard, select ?123. Select ABC at
the same position on the keyboard to return to the letter keyboard.
To enter a character, touch the
respective screen button. The
character is entered upon release.
Touch and hold a letter screen button
to display associated letters in a letter pop-up menu. Release and then
select the desired letter.
To enter capital letters, select b and
then the desired character.
To delete a character, select k. To
delete the whole entry, select the tiny
x within the entry field.
As soon as characters are entered,
the system makes search word
suggestions. Every additional
character is considered in the
matching process.
If desired, select one of the search
words suggested. When the entry
fields are filled out, select Search on
the keyboard. The Results menu is
displayed.
Select the desired destination. The
Details menu is displayed. Select Go
to start route guidance.
Considering the letters entered, the
system also creates a list of probable
destinations assembled from phone
contacts, POIs, addresses, recent
destinations and favourites. Touch
c on the bottom of the screen to
hide the keyboard and gain access to the list.
Page 42 of 109

42NavigationTo redisplay the keyboard, tap within
the entry field.
If desired, select a destination from
the list. The Details menu is
displayed. Select Go to start route
guidance.
Lists with selectable destinations
To access the lists, select ½ on the
map and, if required, touch q to scroll
the page.
Select one of the options:
● Recent : list of destinations
recently used
● Favourites : list of destinations
stored as favourites
● Contacts : list of addresses stored
in the phone book of the mobile
phone currently connected via
Bluetooth
To choose a destination from one of
the lists, scroll through the respective
list and select the desired destination. The Details menu is displayed. Select
Go to start route guidance.Recent destinations
The recent destinations list is
automatically filled with destinations
used in route guidance.
The addresses in the recent
destinations list can be stored as
favourites. Enter the recent
destinations list, select n next to the
desired address to display additional
function buttons and then select f. If
the icon is filled, the address is saved
in the favourites list.
Addresses can be deleted from the
recent destinations list. Enter the
recent destinations list, select n next
to the desired address and then
select e to delete the respective
address.
Favourites
Favourites can be added when a f
icon is displayed next to an address.
When the star icon is filled, the
respective address is stored as a
favourite.The position of a favourite in the list
can be changed. Enter the favourites list, select n next to the desired
favourite to display additional function buttons and then select Q or P.
The name of a favourite can be changed. Enter the favourites list,
select n next to the desired favourite
to display additional function buttons
and then select o. A keyboard is
displayed. Enter the desired name
and then select Done.
Favourites can be deleted. Enter the favourites list, select n next to the
desired favourite to display additional
function buttons and then select f.
The favourite is deactivated (unfilled
star). If you select the icon again, the
favourite is reactivated (filled star).
When leaving the favourites list while
favourites are deactivated, they are
deleted from the list.
Contacts
You can search for addresses within
the list by using the keyboard. Enter
the first letters of the word (name or
Page 44 of 109
44NavigationChoose between the tabs:● Along Route : possible
destinations along the route
currently active
● At Destination : possible
destinations around the
destination of the route
The list can be sorted in two different
ways. Select l in the top right corner
of the screen and activate the desired
option.
If you activate sorting by relevance,
the system tries to give you the best
match according to your search term.
If you activate sorting by distance, the system arranges the destinations
according to their distance to your
current location.
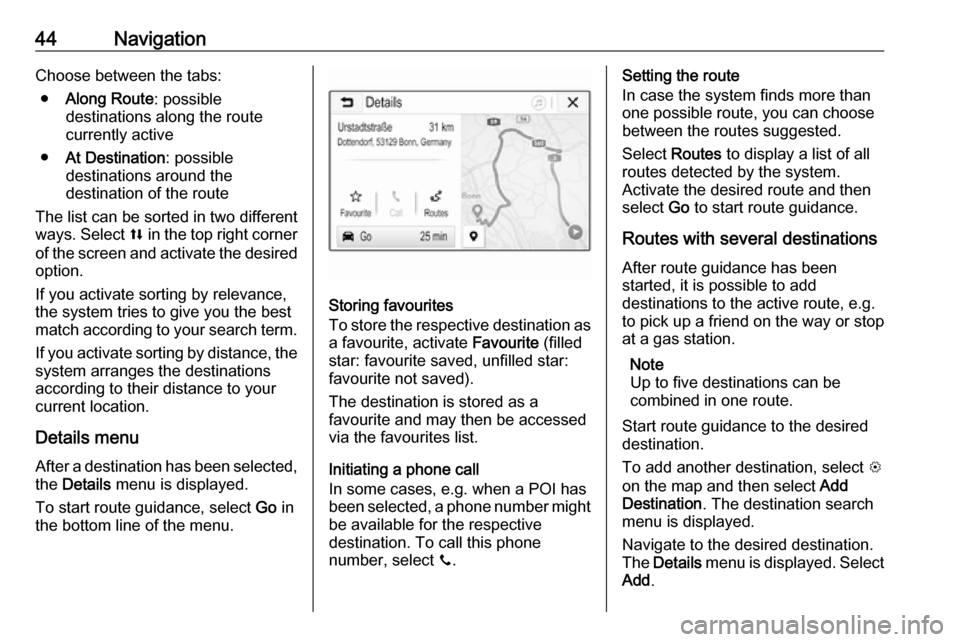
Details menu After a destination has been selected,
the Details menu is displayed.
To start route guidance, select Go in
the bottom line of the menu.
Storing favourites
To store the respective destination as a favourite, activate Favourite (filled
star: favourite saved, unfilled star:
favourite not saved).
The destination is stored as a
favourite and may then be accessed
via the favourites list.
Initiating a phone call
In some cases, e.g. when a POI has been selected, a phone number might
be available for the respective
destination. To call this phone
number, select y.
Setting the route
In case the system finds more than one possible route, you can choose
between the routes suggested.
Select Routes to display a list of all
routes detected by the system.
Activate the desired route and then
select Go to start route guidance.
Routes with several destinations After route guidance has been
started, it is possible to add
destinations to the active route, e.g.
to pick up a friend on the way or stop at a gas station.
Note
Up to five destinations can be
combined in one route.
Start route guidance to the desired
destination.
To add another destination, select L
on the map and then select Add
Destination . The destination search
menu is displayed.
Navigate to the desired destination.
The Details menu is displayed. Select
Add .
Page 46 of 109
46NavigationIn case a phone number is available,select y to start a phone call.
To change the order of the
destinations, select h in the field of
the destination whose position is to be changed. The order is rearranged
and the destination selected is set at
the first position.
To delete a destination from the route,
select e in the field of the respective
destination. The destination is
deleted and the route is rearranged.
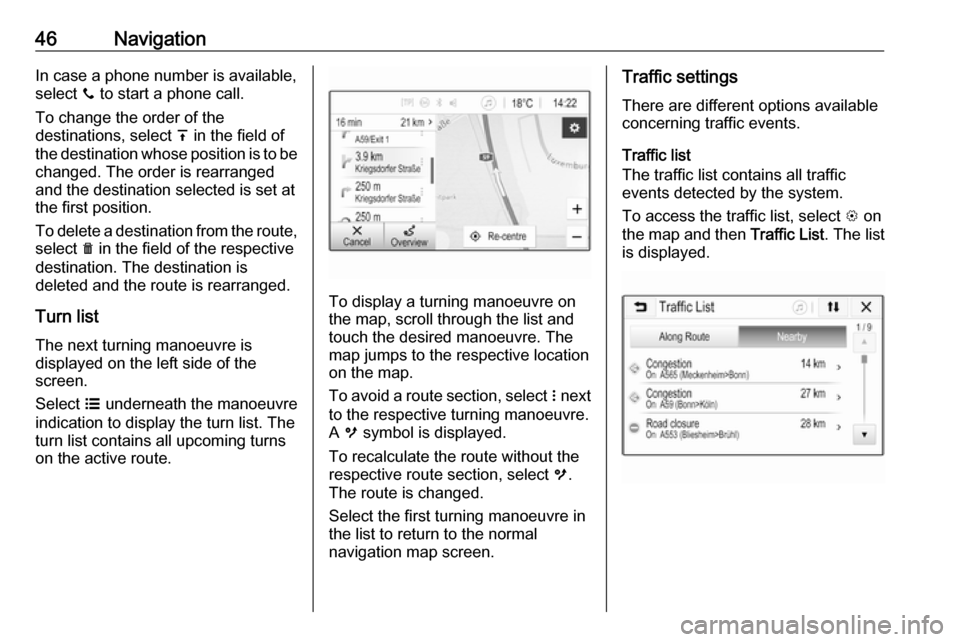
Turn listThe next turning manoeuvre is
displayed on the left side of the
screen.
Select a underneath the manoeuvre
indication to display the turn list. The
turn list contains all upcoming turns
on the active route.
To display a turning manoeuvre on
the map, scroll through the list and
touch the desired manoeuvre. The
map jumps to the respective location on the map.
To avoid a route section, select n next
to the respective turning manoeuvre.
A m symbol is displayed.
To recalculate the route without the
respective route section, select m.
The route is changed.
Select the first turning manoeuvre in
the list to return to the normal
navigation map screen.
Traffic settings
There are different options available
concerning traffic events.
Traffic list
The traffic list contains all traffic
events detected by the system.
To access the traffic list, select L on
the map and then Traffic List. The list
is displayed.
Page 47 of 109

Navigation47If route guidance is active, choose
between the tabs:
● Along Route : traffic events along
the active route
● Nearby : traffic events close to the
current location of the vehicleTraffic events
If required, scroll to the desired traffic
event.
To display additional information,
select the respective traffic event.List sorting
The nearby list can be organised in
two different ways.
To change the sorting order, select
l in the top right corner of the screen.
The Traffic Events Sorting menu is
displayed.
Activate the desired option.
Traffic station
The traffic message channel
providing the traffic information can
be personally set, if desired.
Select L on the map to display the
Options menu. Select Navigation
Settings and then Traffic Resource .
A list of all traffic stations currently
available is displayed.
By default, Auto is activated. The
station is adapted automatically by
the system.
If you want the traffic information to be
taken from a specific station, activate the respective station.
Traffic avoidance function
Traffic events are taken into
consideration when the system
determines a route to a destination.
During active route guidance, the
route can be modified according to
incoming traffic messages.
To set the parameters for these
modifications, select L on the map to
display the Options menu. Select
Navigation Settings , Routing options
and then Auto-Reroute to Avoid
Traffic .
If you want the system to
automatically modify the route
according to new traffic messages,
activate Automatically reroute .If you want to be consulted when a
route is modified, activate Always
ask .
If you do not want routes to be
modified, activate Never.
Route settings Parameters for road and route
selection can be set.
Road types
If desired, certain road types can be
avoided.
Select L on the map to display the
Options menu. Select Avoid on
Route and then activate the road
types you want to be avoided.
Note
If route guidance is active when
changing the road settings, the route is recalculated according to the new
settings.
Route type
To set the route type, select L on the
map to display the Options menu.
Select Navigation Settings , Routing
options and then Route type .
Page 51 of 109
Phone51interference is caused by the
mobile phone or if dangerous
situations can occur.
Bluetooth
The Phone portal is certified by the
Bluetooth Special Interest Group
(SIG).
You can find further information about the specification on the internet at
http://www.bluetooth.com.
Bluetooth connection
Bluetooth is a radio standard for the
wireless connection of e.g. mobile
phones, smartphones or other
devices.
Via the Bluetooth menu, pairing (PIN
code exchange between Bluetooth device and Infotainment system) and
connecting of the Bluetooth devices
to the Infotainment system are carried out.
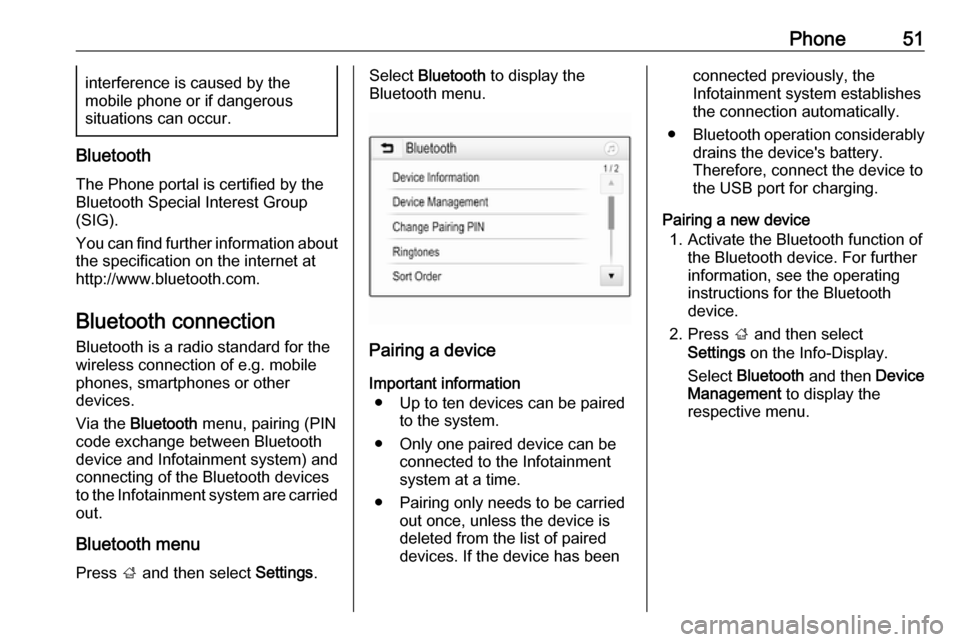
Bluetooth menu Press ; and then select Settings.
Select Bluetooth to display the
Bluetooth menu.
Pairing a device
Important information ● Up to ten devices can be paired to the system.
● Only one paired device can be connected to the Infotainment
system at a time.
● Pairing only needs to be carried out once, unless the device is
deleted from the list of paired
devices. If the device has been
connected previously, the
Infotainment system establishes
the connection automatically.
● Bluetooth operation considerably
drains the device's battery.
Therefore, connect the device to
the USB port for charging.
Pairing a new device 1. Activate the Bluetooth function of the Bluetooth device. For further
information, see the operating
instructions for the Bluetooth
device.
2. Press ; and then select
Settings on the Info-Display.
Select Bluetooth and then Device
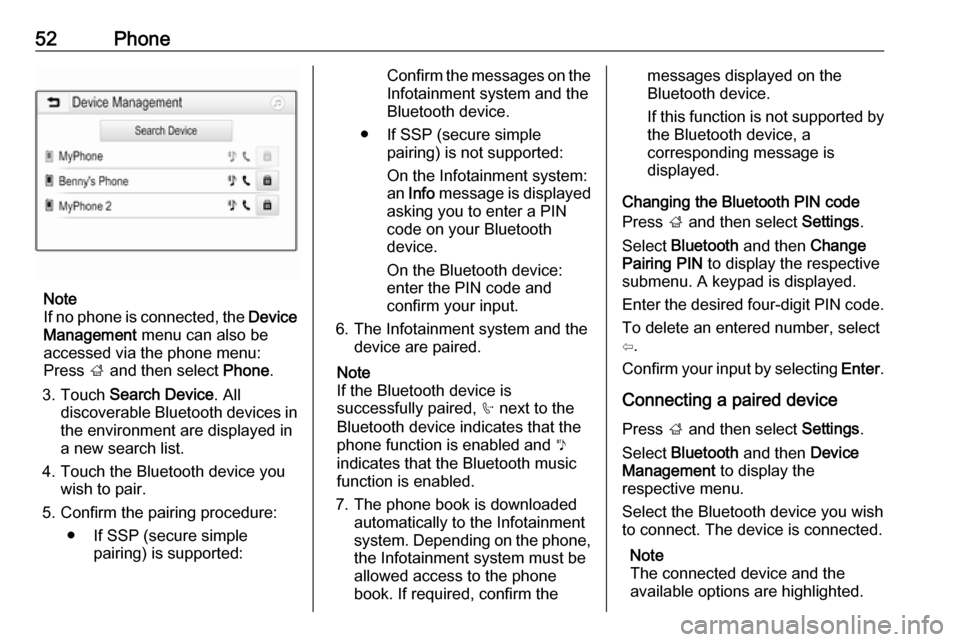
Management to display the
respective menu.
Page 52 of 109
52Phone
Note
If no phone is connected, the Device
Management menu can also be
accessed via the phone menu:
Press ; and then select Phone.
3. Touch Search Device . All
discoverable Bluetooth devices in
the environment are displayed in a new search list.
4. Touch the Bluetooth device you wish to pair.
5. Confirm the pairing procedure: ● If SSP (secure simple pairing) is supported:
Confirm the messages on the
Infotainment system and the
Bluetooth device.
● If SSP (secure simple pairing) is not supported:
On the Infotainment system: an Info message is displayed
asking you to enter a PIN
code on your Bluetooth
device.
On the Bluetooth device: enter the PIN code and
confirm your input.
6. The Infotainment system and the device are paired.
Note
If the Bluetooth device is
successfully paired, h next to the
Bluetooth device indicates that the
phone function is enabled and y
indicates that the Bluetooth music
function is enabled.
7. The phone book is downloaded automatically to the Infotainment
system. Depending on the phone, the Infotainment system must be
allowed access to the phone
book. If required, confirm themessages displayed on the
Bluetooth device.
If this function is not supported by
the Bluetooth device, a
corresponding message is
displayed.
Changing the Bluetooth PIN code
Press ; and then select Settings.
Select Bluetooth and then Change
Pairing PIN to display the respective
submenu. A keypad is displayed.
Enter the desired four-digit PIN code.
To delete an entered number, select
⇦.
Confirm your input by selecting Enter.
Connecting a paired device
Press ; and then select Settings.
Select Bluetooth and then Device
Management to display the
respective menu.
Select the Bluetooth device you wish
to connect. The device is connected.
Note
The connected device and the
available options are highlighted.
Page 53 of 109
Phone53Disconnecting a devicePress ; and then select Settings.
Select Bluetooth and then Device
Management to display the
respective menu.
Select the Bluetooth device currently connected. You are prompted with a message.
Select Yes to disconnect the device.
Deleting a device Press ; and then select Settings.
Select Bluetooth and then Device
Management to display the
respective menu.
Select e next to the Bluetooth device.
You are prompted with a message.
Select Yes to delete the device.
Device info Press ; and then select Settings.
Select Bluetooth and then Device
Information to display the respective
menu.The information displayed includes
Device Name , Address , and PIN
Code .
Emergency call9 Warning
Connection setup cannot be
guaranteed in all situations. For
this reason you should not rely
exclusively on a mobile phone
when a vitally important
communication (e.g. a medical
emergency) is concerned.
In some networks it may be
necessary for a valid SIM card to
be properly inserted in the mobile
phone.
9 Warning
Bear in mind that you can make
and receive calls with the mobile
phone if it is in a service area with
a sufficiently strong signal. Under
certain circumstances,
emergency calls cannot be made
on all mobile phone networks; it is
possible that they cannot be made when certain network services
and/or telephone functions are
active. You can enquire about this
with the local network operators.
The emergency call number can
differ depending on the region and country. Please enquire
beforehand about the correct
emergency call number for the
relevant region.
Making an emergency call
Dial the emergency call number (e.g.
112 ).
The telephone connection to the
emergency call centre is set up.
Answer when the service personnel
questions you about the emergency.
9 Warning
Do not end the call until you are
requested to do so by the
emergency call centre.
Page 54 of 109
54PhoneOperation
As soon as a connection via
Bluetooth has been set up between
your mobile phone and the
Infotainment system, you can operate many functions of your mobile phone
via the Infotainment system.
Note
In the hands-free mode, mobile
phone operation is still possible, e.g.
taking a call or adjusting the volume.
After setup of a connection between
the mobile phone and the
Infotainment system, mobile phone
data is transmitted to the Infotainment system. This can take some time
depending on the mobile phone and
the amount of data to be transferred.
During this period, operation of the
mobile phone via the Infotainment
system is possible only to a limited extent.
Note
Not every mobile phone supports all
functions of the phone portal.
Therefore, deviations from the range
of functions described below are
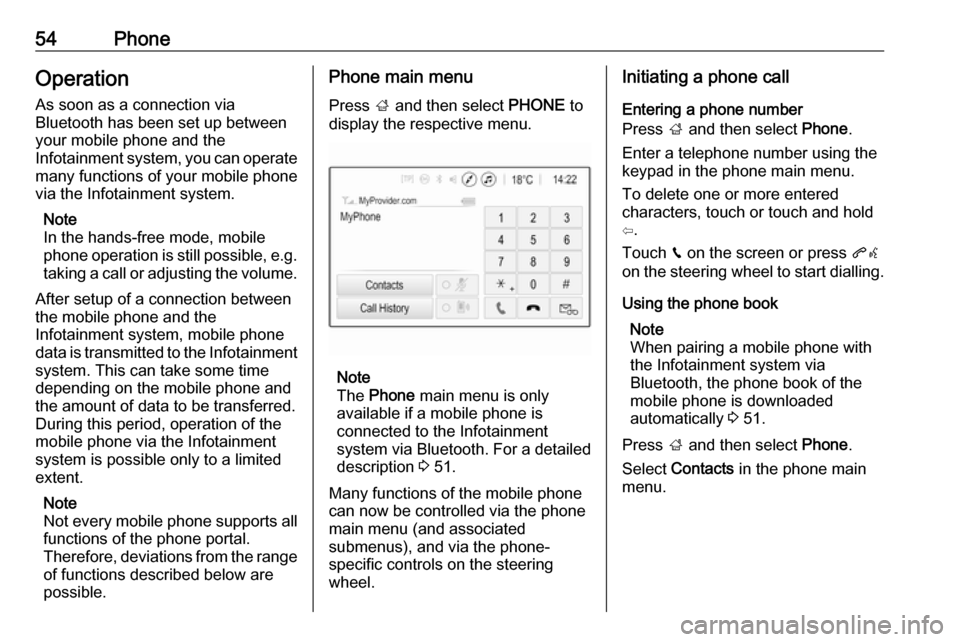
possible.Phone main menu
Press ; and then select PHONE to
display the respective menu.
Note
The Phone main menu is only
available if a mobile phone is connected to the Infotainment
system via Bluetooth. For a detailed
description 3 51.
Many functions of the mobile phone can now be controlled via the phone
main menu (and associated
submenus), and via the phone-
specific controls on the steering
wheel.
Initiating a phone call
Entering a phone number
Press ; and then select Phone.
Enter a telephone number using the
keypad in the phone main menu.
To delete one or more entered
characters, touch or touch and hold
⇦.
Touch v on the screen or press qw
on the steering wheel to start dialling.
Using the phone book Note
When pairing a mobile phone with
the Infotainment system via
Bluetooth, the phone book of the
mobile phone is downloaded
automatically 3 51.
Press ; and then select Phone.
Select Contacts in the phone main
menu.