OPEL CORSA E 2019 Manual user
Manufacturer: OPEL, Model Year: 2019, Model line: CORSA E, Model: OPEL CORSA E 2019Pages: 231, PDF Size: 6.87 MB
Page 51 of 231
Seats, restraints49Always comply with local or national
regulations. In some countries, the
use of child restraint systems is
forbidden on certain seats.
Child restraint systems can be
fastened with:
● Three-point seat belt
● ISOFIX brackets
● Top-tether anchors
Three-point seat belt
Child restraint systems can be
fastened by using a three-point seat
belt. After fastening the child restraint system the seat belt has to be
tightened 3 52.ISOFIX brackets
On rear seats
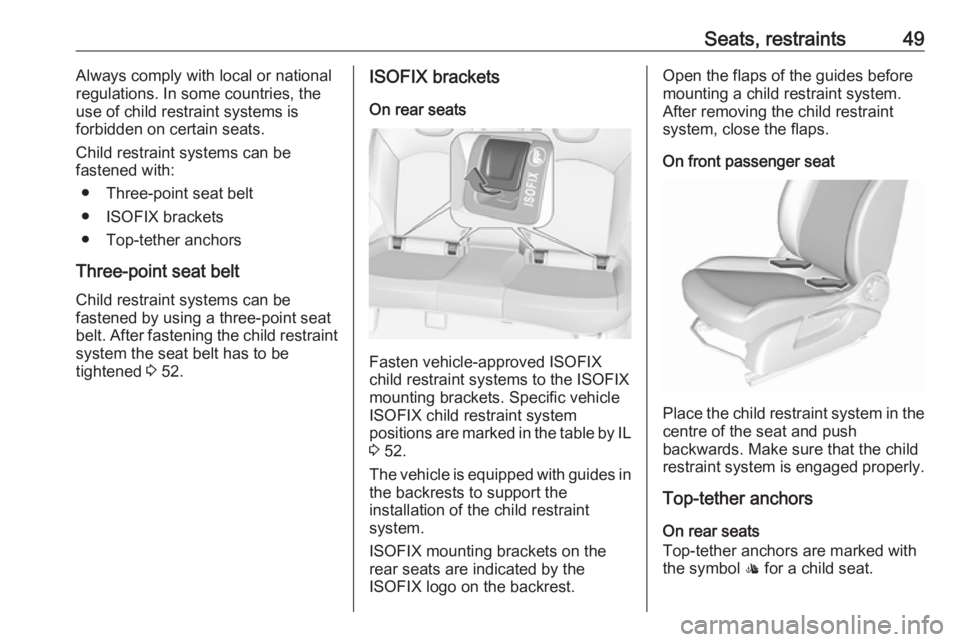
Fasten vehicle-approved ISOFIX
child restraint systems to the ISOFIX
mounting brackets. Specific vehicle
ISOFIX child restraint system
positions are marked in the table by IL
3 52.
The vehicle is equipped with guides in
the backrests to support the
installation of the child restraint
system.
ISOFIX mounting brackets on the
rear seats are indicated by the
ISOFIX logo on the backrest.
Open the flaps of the guides before
mounting a child restraint system.
After removing the child restraint
system, close the flaps.
On front passenger seat
Place the child restraint system in the
centre of the seat and push
backwards. Make sure that the child
restraint system is engaged properly.
Top-tether anchors
On rear seats
Top-tether anchors are marked with
the symbol : for a child seat.
Page 52 of 231
50Seats, restraints
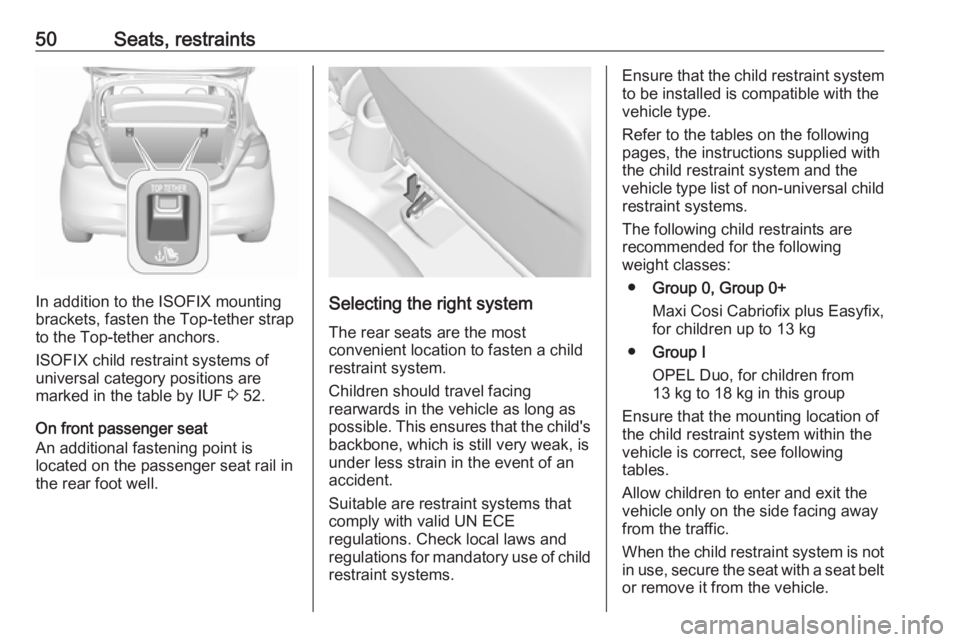
In addition to the ISOFIX mounting
brackets, fasten the Top-tether strap
to the Top-tether anchors.
ISOFIX child restraint systems of
universal category positions are
marked in the table by IUF 3 52.
On front passenger seat
An additional fastening point is
located on the passenger seat rail in the rear foot well.Selecting the right system
The rear seats are the most
convenient location to fasten a child
restraint system.
Children should travel facing
rearwards in the vehicle as long as
possible. This ensures that the child's
backbone, which is still very weak, is
under less strain in the event of an accident.
Suitable are restraint systems that
comply with valid UN ECE
regulations. Check local laws and
regulations for mandatory use of child restraint systems.
Ensure that the child restraint system to be installed is compatible with the
vehicle type.
Refer to the tables on the following
pages, the instructions supplied with
the child restraint system and the vehicle type list of non-universal child
restraint systems.
The following child restraints are
recommended for the following
weight classes:
● Group 0, Group 0+
Maxi Cosi Cabriofix plus Easyfix,
for children up to 13 kg
● Group I
OPEL Duo, for children from 13 kg to 18 kg in this group
Ensure that the mounting location of
the child restraint system within the
vehicle is correct, see following
tables.
Allow children to enter and exit the
vehicle only on the side facing away
from the traffic.
When the child restraint system is not
in use, secure the seat with a seat belt or remove it from the vehicle.
Page 53 of 231

Seats, restraints51Note
Do not affix anything on the child
restraint systems and do not cover
them with any other materials.
A child restraint system which has
been subjected to stress in an
accident must be replaced.
Page 54 of 231

52Seats, restraintsChild restraint installation locations
Permissible options for fastening a child restraint system with a three-point seat belt
Weight class
On front passenger seat
On rear outboard seatsOn rear centre seat
activated airbagdeactivated airbagGroup 0: up to 10 kgXU 1,2U/L 3XGroup 0+: up to 13 kgXU1,2U/L 3XGroup I: 9 to 18 kgXU1,2U/L 3,4XGroup II: 15 to 25 kgU1,2XU/L 3,4XGroup III: 22 to 36 kgU1,2XU/L 3,4XU:universal suitability in conjunction with three-point seat beltL:suitable for particular child restraint systems of the 'specific-vehicle', 'restricted' or 'semi-universal' categories. The
child restraint system must be approved for the specific vehicle type (refer to the vehicle type list of the child restraint
system)X:no child restraint system permitted in this weight class1:move seat forwards as far as necessary and adjust seat backrest as far as necessary to a vertical position to ensure that the belt runs forwards from the upper anchorage point2:move seat upwards as far as necessary and adjust seat backrest as far as necessary to a vertical position to ensurethat the belt is tight on the buckle side3:move the respective front seat ahead of the child restraint system forwards as far as necessary4:adjust the respective backrest to the rearmost position 3 57 , adjust the respective headrest as necessary or remove
if required 3 34
Page 55 of 231
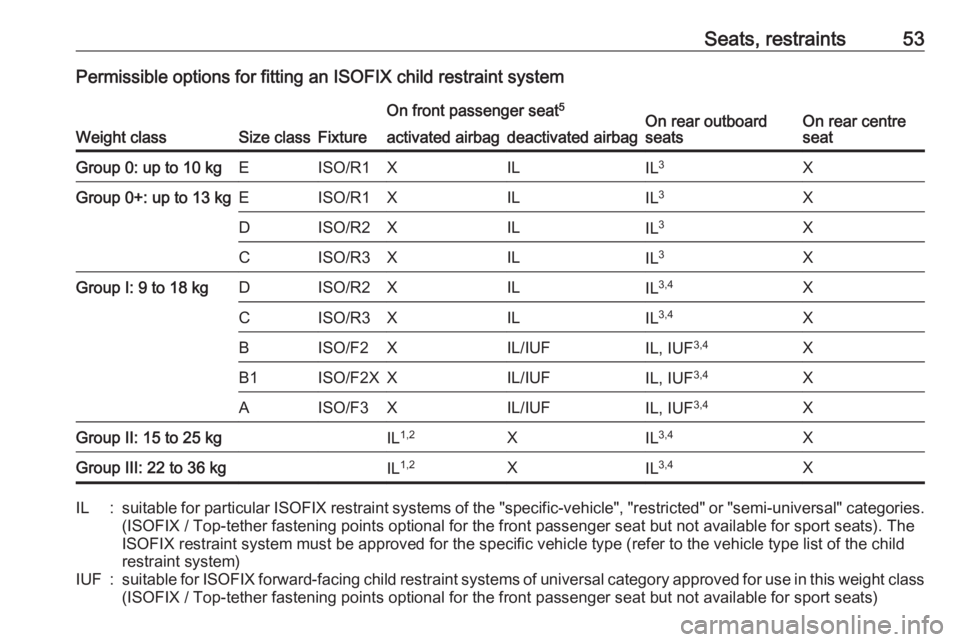
Seats, restraints53Permissible options for fitting an ISOFIX child restraint system
Weight classSize classFixture
On front passenger seat5On rear outboard
seatsOn rear centre
seatactivated airbagdeactivated airbagGroup 0: up to 10 kgEISO/R1XILIL 3XGroup 0+: up to 13 kgEISO/R1XILIL3XDISO/R2XILIL3XCISO/R3XILIL3XGroup I: 9 to 18 kgDISO/R2XILIL3,4XCISO/R3XILIL 3,4XBISO/F2XIL/IUFIL, IUF 3,4XB1ISO/F2XXIL/IUFIL, IUF3,4XAISO/F3XIL/IUFIL, IUF3,4XGroup II: 15 to 25 kgIL1,2XIL3,4XGroup III: 22 to 36 kgIL 1,2XIL3,4XIL:suitable for particular
ISOFIX restraint systems of the "specific-vehicle", "restricted" or "semi-universal" categories.
(ISOFIX / Top-tether fastening points optional for the front passenger seat but not available for sport seats). The ISOFIX restraint system must be approved for the specific vehicle type (refer to the vehicle type list of the child
restraint system)IUF:suitable for ISOFIX forward-facing child restraint systems of universal category approved for use in this weight class
(ISOFIX / Top-tether fastening points optional for the front passenger seat but not available for sport seats)
Page 56 of 231
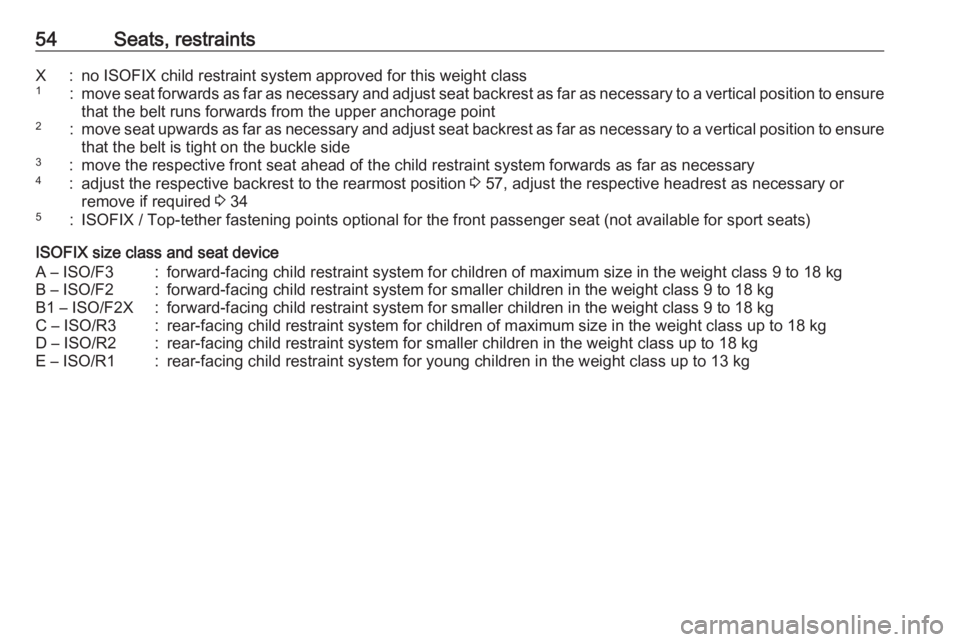
54Seats, restraintsX:no ISOFIX child restraint system approved for this weight class1:move seat forwards as far as necessary and adjust seat backrest as far as necessary to a vertical position to ensure
that the belt runs forwards from the upper anchorage point2:move seat upwards as far as necessary and adjust seat backrest as far as necessary to a vertical position to ensure
that the belt is tight on the buckle side3:move the respective front seat ahead of the child restraint system forwards as far as necessary4:adjust the respective backrest to the rearmost position 3 57, adjust the respective headrest as necessary or
remove if required 3 345:ISOFIX / Top-tether fastening points optional for the front passenger seat (not available for sport seats)
ISOFIX size class and seat device
A – ISO/F3:forward-facing child restraint system for children of maximum size in the weight class 9 to 18 kgB – ISO/F2:forward-facing child restraint system for smaller children in the weight class 9 to 18 kgB1 – ISO/F2X:forward-facing child restraint system for smaller children in the weight class 9 to 18 kgC – ISO/R3:rear-facing child restraint system for children of maximum size in the weight class up to 18 kgD – ISO/R2:rear-facing child restraint system for smaller children in the weight class up to 18 kgE – ISO/R1:rear-facing child restraint system for young children in the weight class up to 13 kg
Page 57 of 231
Storage55StorageStorage compartments................55
Glovebox ................................... 55
Cupholders ................................ 55
Front storage ............................. 56
Underseat storage .....................57
Load compartment .......................57
Load compartment cover ...........59
Rear floor storage cover ............59
Lashing eyes ............................. 60
Warning triangle ........................60
First aid kit ................................. 61
Roof rack system .........................61
Roof rack ................................... 61
Loading information .....................61Storage compartments9Warning
Do not store heavy or sharp
objects in the storage
compartments. Otherwise, the
storage compartment lid could
open and vehicle occupants could be injured by objects being thrown
around in the event of hard
braking, a sudden change in
direction or an accident.
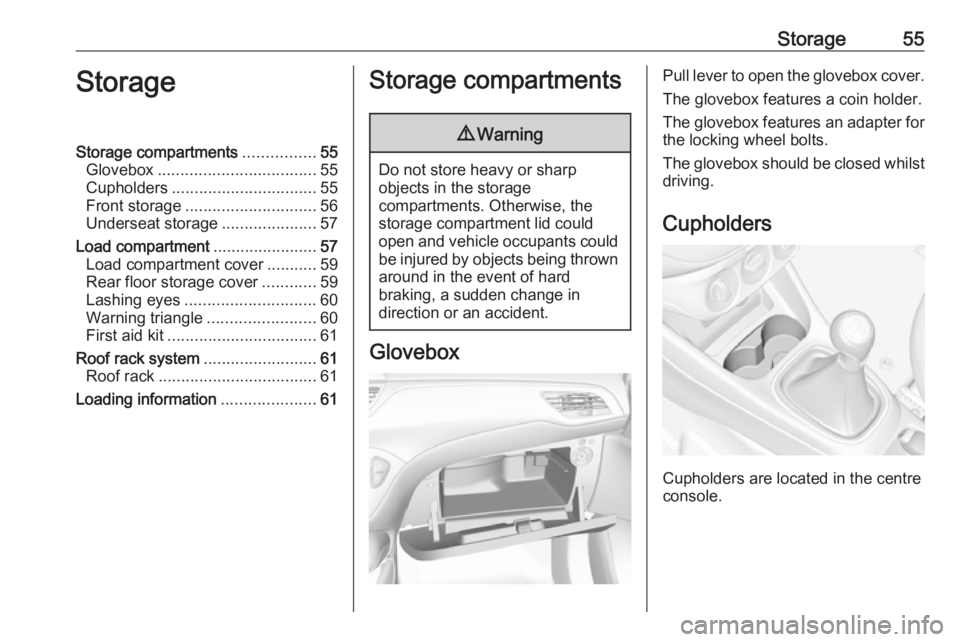
Glovebox
Pull lever to open the glovebox cover.
The glovebox features a coin holder.
The glovebox features an adapter for
the locking wheel bolts.
The glovebox should be closed whilst driving.
Cupholders
Cupholders are located in the centre
console.
Page 58 of 231

56Storage
The pockets in the doors are
designed to carry bottles.
Additional bottleholders are located in the rear side panels.
Flexible cupholder strap
A movable rubber strap is located in
the storage compartment in front of
the gear selector lever. Pull out the
strap to fix a cup or ashtray.
Front storage
Storage compartments are located
below the light switch, in the centre
console and in the doors.
Additional storage compartments are
located in the side panels beside the
rear seats.
Page 59 of 231

Storage57Underseat storage
Lift at recessed edge and pull out.
Maximum load: 1.5 kg. To close, push in and engage.
Load compartment
Load compartment extension
The rear backrest can be locked in
two positions. When transporting
bulky items, lock in an upright
position.
Split backrest
Pull the release handle on the
relevant side, pull the backrest
forwards to the vertical position and engage.
Single-unit backrest
Pull the release handle on both sides,
pull the backrest forwards to the
vertical position and engage.
When unlocking, a red marking
appears next to the release lever. The backrest is properly engaged when
the red marks on both sides near the release lever are no longer visible.
Folding down rear backrests Remove load compartment cover as
necessary.
Push head restraints down by
pressing the catch.
Page 60 of 231

58StorageGuide the seat belts through side
supports to protect them against
damage. When folding the backrest,
pull the seat belts along with it.
Split backrest
Pull the release handle on the
relevant side and fold it down onto the seat cushion.
Single-unit backrest
Pull the release handle on both sides
and fold it down onto the seat
cushion.If the vehicle is to be loaded via a rear
door, take the seat belt out of the seat
backrest guide and insert the latch
plate in the recess as shown in the
illustration.
To fold up, raise the backrest and
guide it into an upright position until it engages audibly.
Ensure that the seat belts of the
outboard seats are placed in the corresponding belt guides.
The backrest is properly engaged
when the red marks on both sides
near the release lever are no longer
visible.
9 Warning
Only drive the vehicle when the
backrests are securely locked into position. Otherwise there is a risk
of personal injury or damage to the
load or vehicle in the event of hard braking or a collision.
The seat belt of the centre seat could
be blocked when the backrest is
folded up too quickly. To unlock the
retractor, push in the seat belt or pull
it out by approx. 20 mm then release.