seats OPEL CORSA F 2020 Manual user
[x] Cancel search | Manufacturer: OPEL, Model Year: 2020, Model line: CORSA F, Model: OPEL CORSA F 2020Pages: 229, PDF Size: 21.14 MB
Page 45 of 229
Seats, restraints43Allow children to enter and exit the
vehicle only on the side facing away
from the traffic.
When the child restraint system is not
in use, secure the seat with a seat belt or remove it from the vehicle.
Note
Do not affix anything on the child restraint systems and do not cover
them with any other materials.
A child restraint system which has
been subjected to stress in an
accident must be replaced.
Page 46 of 229
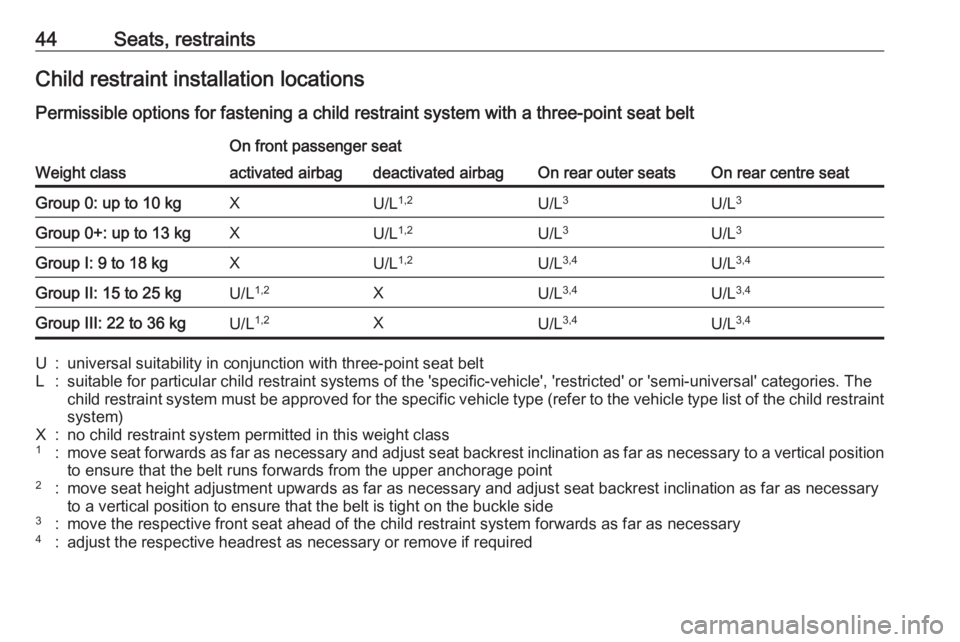
44Seats, restraintsChild restraint installation locations
Permissible options for fastening a child restraint system with a three-point seat belt
Weight class
On front passenger seat
On rear outer seatsOn rear centre seat
activated airbagdeactivated airbagGroup 0: up to 10 kgXU/L 1,2U/L 3U/L3Group 0+: up to 13 kgXU/L1,2U/L3U/L 3Group I: 9 to 18 kgXU/L1,2U/L3,4U/L 3,4Group II: 15 to 25 kgU/L1,2XU/L 3,4U/L3,4Group III: 22 to 36 kgU/L1,2XU/L3,4U/L3,4U:universal suitability in conjunction with three-point seat beltL:suitable for particular child restraint systems of the 'specific-vehicle', 'restricted' or 'semi-universal' categories. The
child restraint system must be approved for the specific vehicle type (refer to the vehicle type list of the child restraint
system)X:no child restraint system permitted in this weight class1:move seat forwards as far as necessary and adjust seat backrest inclination as far as necessary to a vertical position to ensure that the belt runs forwards from the upper anchorage point2:move seat height adjustment upwards as far as necessary and adjust seat backrest inclination as far as necessaryto a vertical position to ensure that the belt is tight on the buckle side3:move the respective front seat ahead of the child restraint system forwards as far as necessary4:adjust the respective headrest as necessary or remove if required
Page 47 of 229
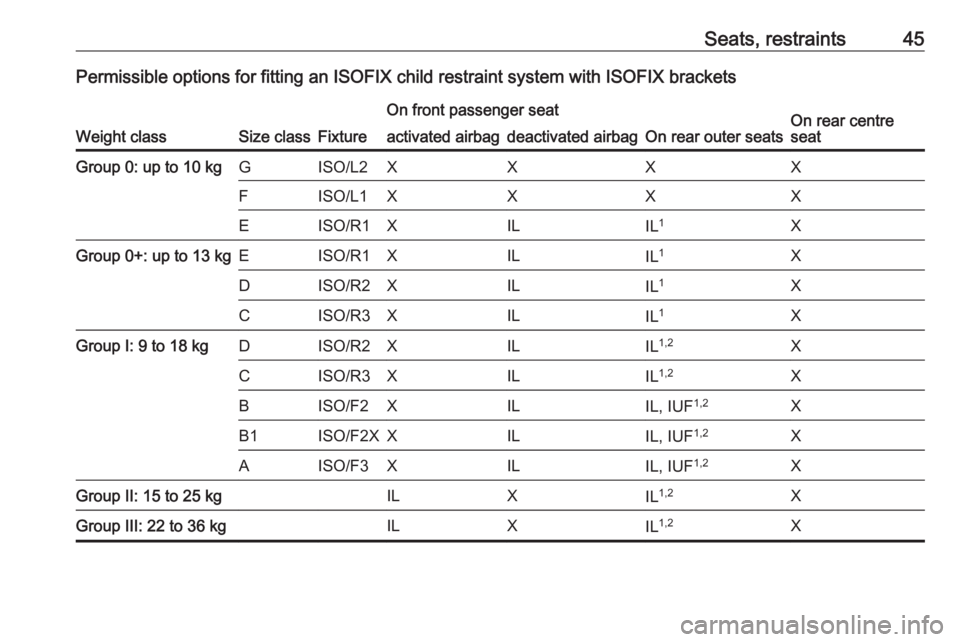
Seats, restraints45Permissible options for fitting an ISOFIX child restraint system with ISOFIX brackets
Weight classSize classFixture
On front passenger seat
On rear outer seatsOn rear centre
seatactivated airbagdeactivated airbagGroup 0: up to 10 kgGISO/L2XXXXFISO/L1XXXXEISO/R1XILIL 1XGroup 0+: up to 13 kgEISO/R1XILIL 1XDISO/R2XILIL1XCISO/R3XILIL1XGroup I: 9 to 18 kgDISO/R2XILIL1,2XCISO/R3XILIL1,2XBISO/F2XILIL, IUF 1,2XB1ISO/F2XXILIL, IUF1,2XAISO/F3XILIL, IUF 1,2XGroup II: 15 to 25 kgILXIL1,2XGroup III: 22 to 36 kgILXIL1,2X
Page 48 of 229
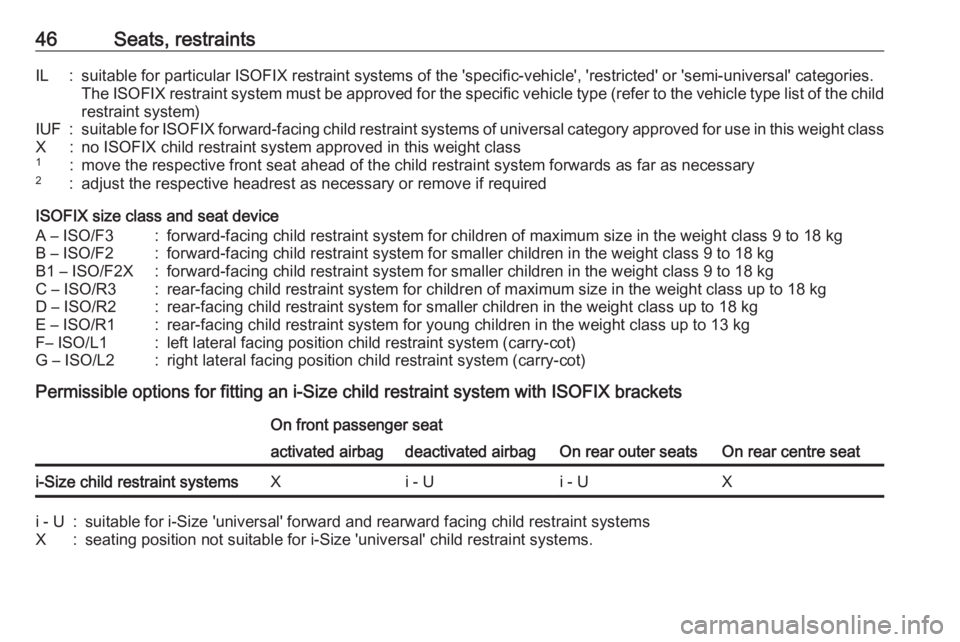
46Seats, restraintsIL:suitable for particular ISOFIX restraint systems of the 'specific-vehicle', 'restricted' or 'semi-universal' categories.
The ISOFIX restraint system must be approved for the specific vehicle type (refer to the vehicle type list of the child restraint system)IUF:suitable for ISOFIX forward-facing child restraint systems of universal category approved for use in this weight classX:no ISOFIX child restraint system approved in this weight class1:move the respective front seat ahead of the child restraint system forwards as far as necessary2:adjust the respective headrest as necessary or remove if required
ISOFIX size class and seat device
A – ISO/F3:forward-facing child restraint system for children of maximum size in the weight class 9 to 18 kgB – ISO/F2:forward-facing child restraint system for smaller children in the weight class 9 to 18 kgB1 – ISO/F2X:forward-facing child restraint system for smaller children in the weight class 9 to 18 kgC – ISO/R3:rear-facing child restraint system for children of maximum size in the weight class up to 18 kgD – ISO/R2:rear-facing child restraint system for smaller children in the weight class up to 18 kgE – ISO/R1:rear-facing child restraint system for young children in the weight class up to 13 kgF– ISO/L1:left lateral facing position child restraint system (carry-cot)G – ISO/L2:right lateral facing position child restraint system (carry-cot)
Permissible options for fitting an i-Size child restraint system with ISOFIX brackets
On front passenger seat
On rear outer seatsOn rear centre seat
activated airbagdeactivated airbagi-Size child restraint systemsXi - Ui - UXi - U:suitable for i-Size 'universal' forward and rearward facing child restraint systemsX:seating position not suitable for i-Size 'universal' child restraint systems.
Page 51 of 229

Storage49A storage compartment is located in
the centre console.Load compartment
The rear seat backrest is divided into
2/3 to 1/3 parts. Both parts can be
folded down individually to increase
the size of the load compartment.
Before folding rear seat backrests,
execute the following if necessary:
● Move front seats forward if necessary.
● Remove the load compartment cover 3 50.
● Press and hold the catch to push
the head restraints down 3 27.
Folding down/up rear backrests ● Check that the seat belts are not engaged in the seat belt buckles,
so that the backrests can be moved.
● Pull the release lever on one or both outer sides and fold down
the backrests onto the seat
cushion.
● To fold up, raise the backrests and guide them into an upright
position until they engage
audibly. Make sure that the belts
are positioned correctly and stay
clear of the folding area.
Page 68 of 229
66Instruments and controls
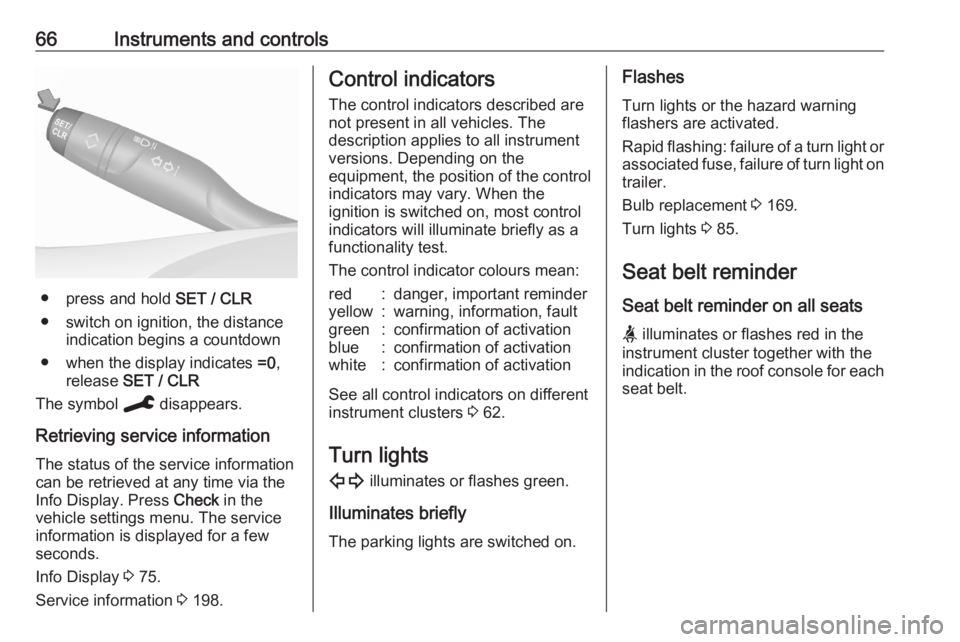
● press and hold SET / CLR
● switch on ignition, the distance indication begins a countdown
● when the display indicates =0,
release SET / CLR
The symbol C disappears.
Retrieving service information The status of the service information
can be retrieved at any time via the
Info Display. Press Check in the
vehicle settings menu. The service
information is displayed for a few
seconds.
Info Display 3 75.
Service information 3 198.
Control indicators
The control indicators described are
not present in all vehicles. The
description applies to all instrument
versions. Depending on the
equipment, the position of the control
indicators may vary. When the
ignition is switched on, most control indicators will illuminate briefly as afunctionality test.
The control indicator colours mean:red:danger, important reminderyellow:warning, information, faultgreen:confirmation of activationblue:confirmation of activationwhite:confirmation of activation
See all control indicators on different
instrument clusters 3 62.
Turn lights
1 illuminates or flashes green.
Illuminates briefly The parking lights are switched on.
Flashes
Turn lights or the hazard warning
flashers are activated.
Rapid flashing: failure of a turn light or associated fuse, failure of turn light on
trailer.
Bulb replacement 3 169.
Turn lights 3 85.
Seat belt reminder
Seat belt reminder on all seats
a illuminates or flashes red in the
instrument cluster together with the
indication in the roof console for each
seat belt.
Page 84 of 229
82LightingHigh beam is switched on
automatically at a speed above
45 km/h. High beam is switched off at a speed below 35 km/h, but high
beam assist remains active.
The green control indicator B
illuminates continuously when the
high beam assist is activated, the blue
A illuminates when high beam is
on.
Control indicator B 3 72, A
3 72.
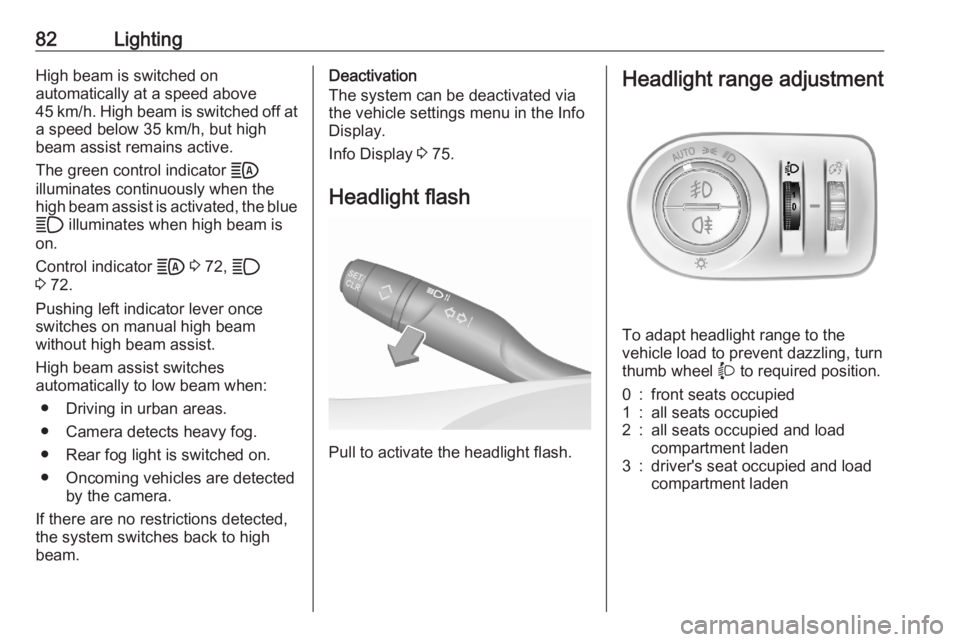
Pushing left indicator lever once
switches on manual high beam
without high beam assist.
High beam assist switches
automatically to low beam when:
● Driving in urban areas.
● Camera detects heavy fog.
● Rear fog light is switched on.
● Oncoming vehicles are detected by the camera.
If there are no restrictions detected, the system switches back to high
beam.Deactivation
The system can be deactivated via
the vehicle settings menu in the Info
Display.
Info Display 3 75.
Headlight flash
Pull to activate the headlight flash.
Headlight range adjustment
To adapt headlight range to the
vehicle load to prevent dazzling, turn thumb wheel X to required position.
0:front seats occupied1:all seats occupied2:all seats occupied and load
compartment laden3:driver's seat occupied and load
compartment laden
Page 92 of 229
90Climate controlDemisting and defrosting
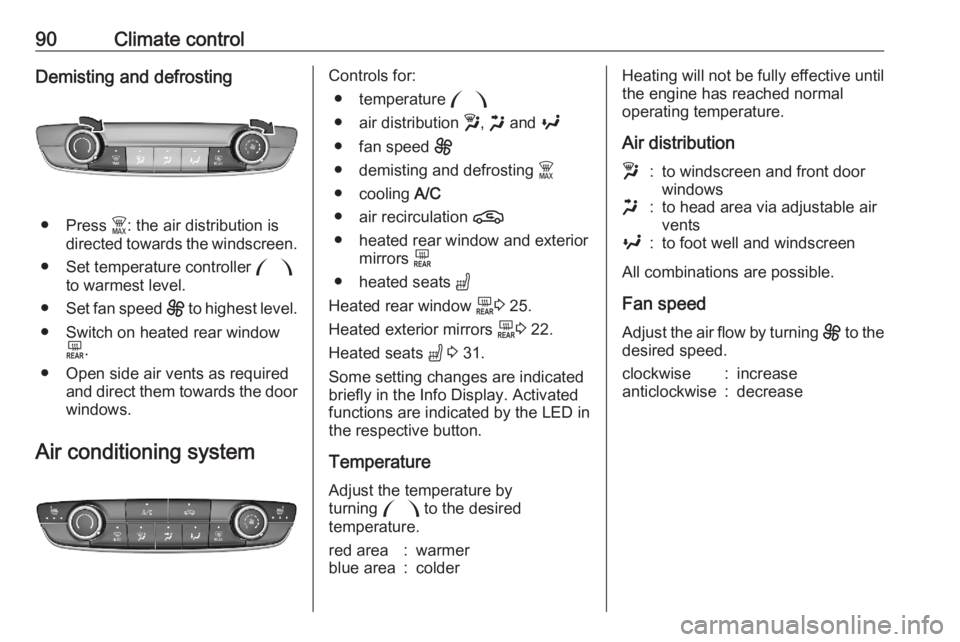
● Press $: the air distribution is
directed towards the windscreen.
● Set temperature controller :
to warmest level.
● Set fan speed E to highest level.
● Switch on heated rear window f.
● Open side air vents as required and direct them towards the doorwindows.
Air conditioning system
Controls for: ● temperature :
● air distribution w, x and y
● fan speed E
● demisting and defrosting $
● cooling A/C
● air recirculation n
● heated rear window and exterior mirrors f
● heated seats "
Heated rear window f3 25.
Heated exterior mirrors f3 22.
Heated seats " 3 31.
Some setting changes are indicated briefly in the Info Display. Activated
functions are indicated by the LED in
the respective button.
Temperature
Adjust the temperature by
turning : to the desired
temperature.red area:warmerblue area:colderHeating will not be fully effective until
the engine has reached normal
operating temperature.
Air distributionw:to windscreen and front door
windowsx:to head area via adjustable air
ventsy:to foot well and windscreen
All combinations are possible.
Fan speed
Adjust the air flow by turning E to the
desired speed.
clockwise:increaseanticlockwise:decrease
Page 94 of 229
92Climate control● Set temperature control : to
coldest level.
● Set fan speed E to highest level.
● Open all vents.
Heated rear window, windscreen and exterior mirrors f 3 25.
Heated seats q 3 31.
Demisting and defrosting the
windows
● Press $: the air distribution is
directed towards the windscreen.
● Set temperature controller :
to warmest level.
● Switch on cooling A/C, if
required.
● Set fan speed E to highest level.
● Switch on heated rear window
f.
● Open side air vents as required and direct them towards the doorwindows.
Note
If à is pressed while the engine is
running, an Autostop will be inhibited until à is pressed again.
If à is pressed while the engine is in
an Autostop, the engine will restart
automatically.
Stop-start system 3 103.
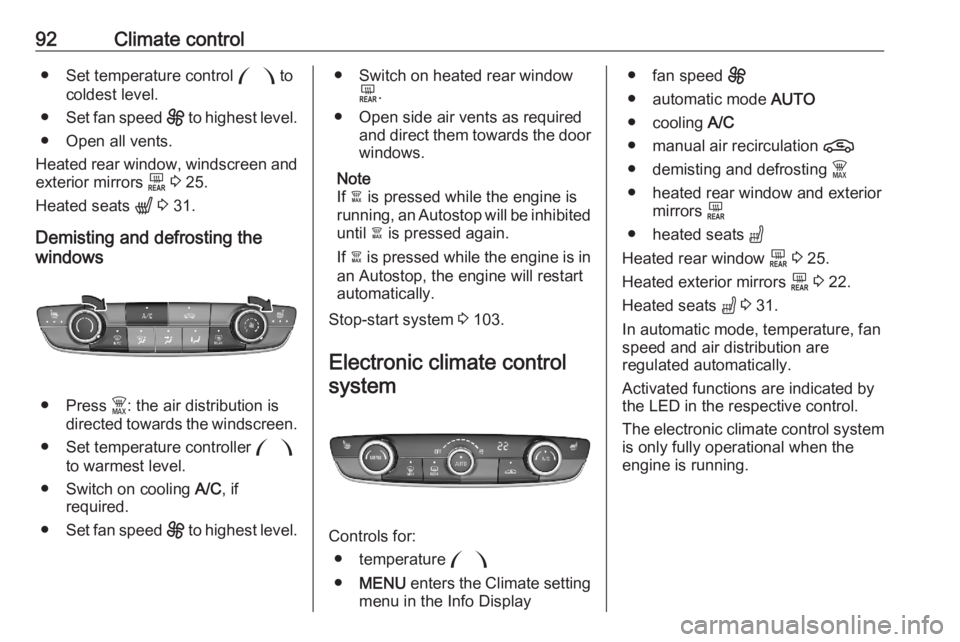
Electronic climate control system
Controls for: ● temperature :
● MENU enters the Climate setting
menu in the Info Display
● fan speed E
● automatic mode AUTO
● cooling A/C
● manual air recirculation n
● demisting and defrosting $
● heated rear window and exterior mirrors f
● heated seats "
Heated rear window f 3 25.
Heated exterior mirrors f 3 22.
Heated seats " 3 31.
In automatic mode, temperature, fan
speed and air distribution are
regulated automatically.
Activated functions are indicated by
the LED in the respective control.
The electronic climate control system
is only fully operational when the
engine is running.
Page 95 of 229
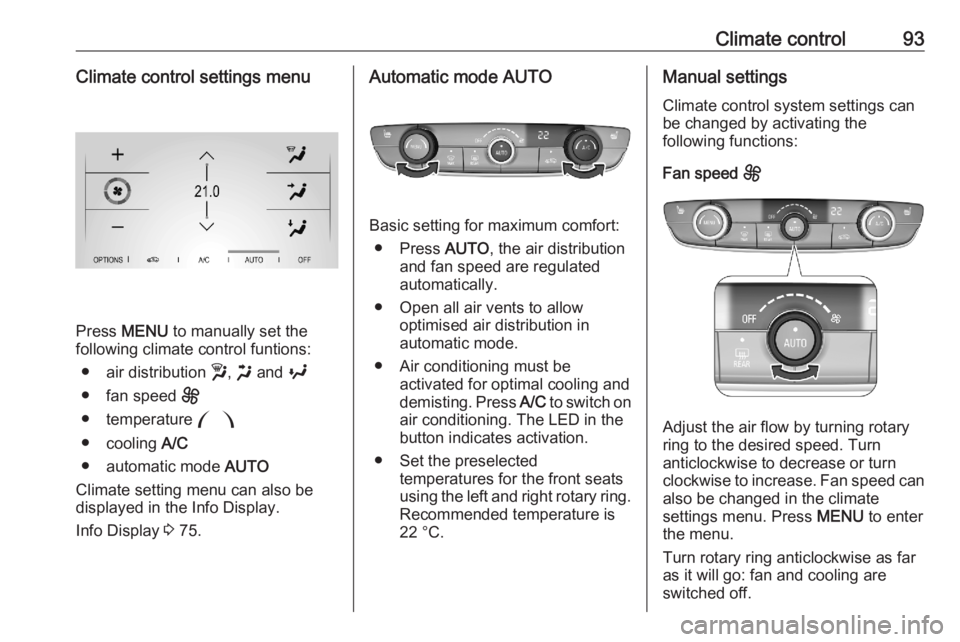
Climate control93Climate control settings menu
Press MENU to manually set the
following climate control funtions:
● air distribution w, x and y
● fan speed E
● temperature :
● cooling A/C
● automatic mode AUTO
Climate setting menu can also be displayed in the Info Display.
Info Display 3 75.
Automatic mode AUTO
Basic setting for maximum comfort:
● Press AUTO, the air distribution
and fan speed are regulated
automatically.
● Open all air vents to allow optimised air distribution in
automatic mode.
● Air conditioning must be activated for optimal cooling and
demisting. Press A/C to switch on
air conditioning. The LED in the
button indicates activation.
● Set the preselected temperatures for the front seats
using the left and right rotary ring. Recommended temperature is
22 °C.
Manual settings
Climate control system settings can
be changed by activating the
following functions:
Fan speed E
Adjust the air flow by turning rotary
ring to the desired speed. Turn
anticlockwise to decrease or turn
clockwise to increase. Fan speed can also be changed in the climate
settings menu. Press MENU to enter
the menu.
Turn rotary ring anticlockwise as far
as it will go: fan and cooling are
switched off.