lock OPEL CORSA F 2020 Manual user
[x] Cancel search | Manufacturer: OPEL, Model Year: 2020, Model line: CORSA F, Model: OPEL CORSA F 2020Pages: 229, PDF Size: 21.14 MB
Page 140 of 229
138Driving and operatingThe system can only be deactivated
by deactivating the active emergency braking in the vehicle personalisation
3 77. When ignition is switched on
next time, system is activated.
Front pedestrian alert
When approaching a detected
pedestrian too quickly, a warning
message is displayed in the Driver
Information Centre. A warning chime
is provided.
Cruise control or adaptive cruise control may be disengaged when the
front pedestrian alert occurs.
System limitations
In the following cases, front
pedestrian protection may not detect
a pedestrian ahead or sensor
performance is limited:
● vehicle speed is out of range from
5 km/h to 80 km/h in forward gear
● driving on winding or hilly roads
● driving in the dark
● weather limits visibility, such as fog, rain, or snow● the sensor in the windscreen orthe radar unit behind the front
bumper are blocked by snow, ice,
slush, mud, dirt etc.
● the windscreen is damaged or affected by foreign objects, e.g.
stickers
● the front bumper is damaged or affected by foreign objects, e.g.
license plate support
Parking assist General information
When attaching a trailer or bicycle
carrier to the trailer hitch, the parking
assist is deactivated.9 Warning
The driver bears full responsibility
for the parking manoeuvre.
Always check the surrounding
area when driving backwards or
forwards while using parking
assist system.
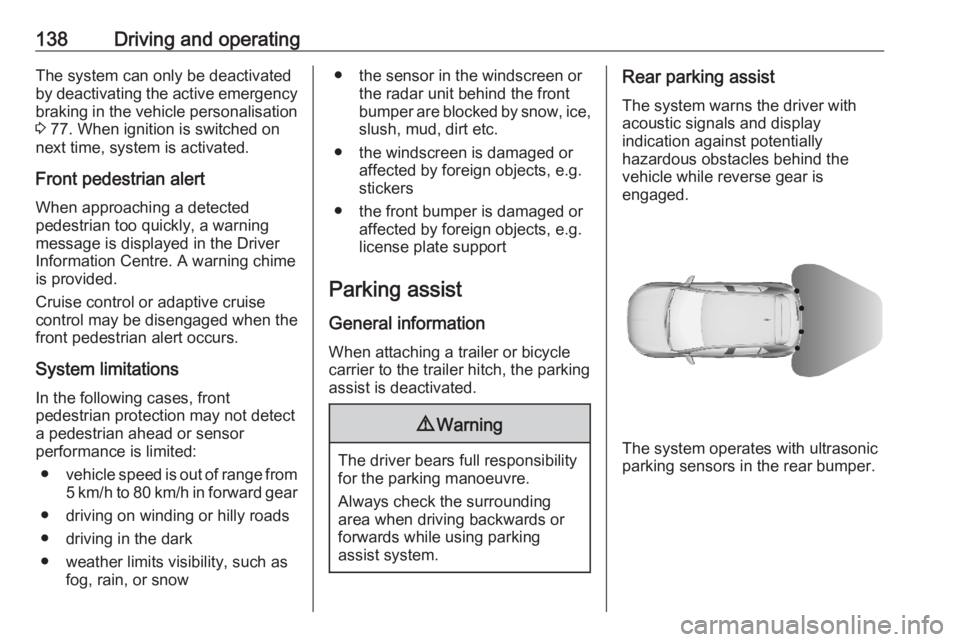
Rear parking assist
The system warns the driver with
acoustic signals and display
indication against potentially
hazardous obstacles behind the
vehicle while reverse gear is
engaged.
The system operates with ultrasonic
parking sensors in the rear bumper.
Page 152 of 229
150Driving and operatingDeactivation
Panoramic view system is
deactivated when:
● towing an electrically connected trailer, bicycle carrier, etc.
● a certain forward speed is exceeded or if reverse gear is not
engaged for 7 seconds
● by pressing the icon q in the left
upper corner of the touch screen
General information9 Warning
The panoramic view system does
not replace driver vision. It will not display children, pedestrians,
cyclists, crossing traffic, animals,
or any other objects outside of the camera view area, e. g. below the
bumper, or underneath the
vehicle.
Do not drive or park the vehicle
using only the panoramic view
system.
Always check the surrounding of
the vehicle before driving.
Displayed images may be further
or closer than they appear. The
area displayed is limited and
objects that are close to either
edge of the bumper or under the
bumper are not displayed on the
screen.
System limitations
Caution
For optimal operation of the
system, it is important to keep the
lense of the camera in the tailgate between the number plate lightsand the lense in the front grill
below the emblem always clean.
Rinse the lenses with water and
wipe with a soft cloth.
Do not clean the lenses with a
steam-jet or high-pressure jet
cleaner.
The panoramic view system may not
operate properly when:
● The surrounding is dark.
● The sun or the beam of headlights is shining directly into
the camera lenses.
● Weather limits visibility, such as fog, rain, or snow.
● The camera lenses are blocked by snow, ice, slush, mud, dirt.
● The vehicle had an accident. ● There are extreme temperature changes.
Rear view camera The rear view camera assists the
driver when reversing by displaying a
view of the area behind the vehicle.
The view of the camera is displayed
in the Info Display.9 Warning
The rear view camera does not
replace driver vision. Note that
objects that are outside the
Page 153 of 229
Driving and operating151camera's field of view and the
parking assist sensors, e.g. below
the bumper or underneath the
vehicle, are not displayed.
Do not reverse or park the vehicle using only the rear view camera.
Always check the surrounding of
the vehicle before driving.
Switching on
Rear view camera is automatically
activated when reverse gear is
engaged.
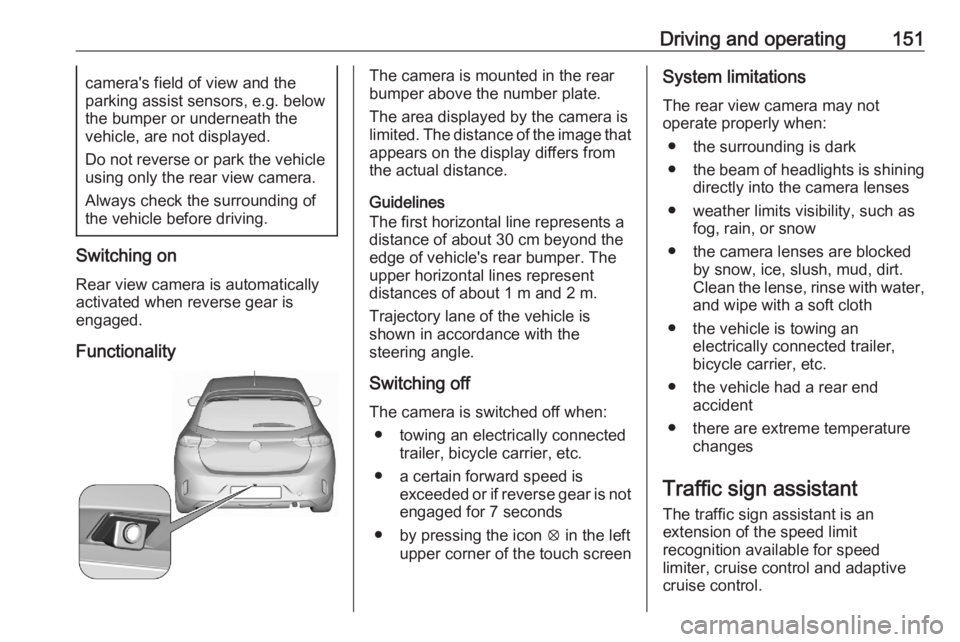
Functionality
The camera is mounted in the rear
bumper above the number plate.
The area displayed by the camera is
limited. The distance of the image that
appears on the display differs from
the actual distance.
Guidelines
The first horizontal line represents a
distance of about 30 cm beyond the
edge of vehicle's rear bumper. The
upper horizontal lines represent
distances of about 1 m and 2 m.
Trajectory lane of the vehicle is
shown in accordance with the
steering angle.
Switching off
The camera is switched off when: ● towing an electrically connected trailer, bicycle carrier, etc.
● a certain forward speed is exceeded or if reverse gear is not
engaged for 7 seconds
● by pressing the icon q in the left
upper corner of the touch screenSystem limitations
The rear view camera may not
operate properly when:
● the surrounding is dark
● the beam of headlights is shining
directly into the camera lenses
● weather limits visibility, such as fog, rain, or snow
● the camera lenses are blocked by snow, ice, slush, mud, dirt.Clean the lense, rinse with water,
and wipe with a soft cloth
● the vehicle is towing an electrically connected trailer,
bicycle carrier, etc.
● the vehicle had a rear end accident
● there are extreme temperature changes
Traffic sign assistant
The traffic sign assistant is an
extension of the speed limit
recognition available for speed
limiter, cruise control and adaptive
cruise control.
Page 159 of 229
Driving and operating157application of the special servicingconditions referred to as "Arduous
conditions".
For more information, contact a
dealer or a qualified workshop.Caution
The use of any other type of (bio)
fuel (vegetable or animal oils, pure
or diluted, domestic fuel etc.) is
strictly prohibited (risk of damage
to the engine and fuel system).
Note
The only Diesel additives authorised for use are those that meet the
B715000 standard.
Low temperature operation
At temperatures below 0 °C, some
diesel products with biodiesel blends may clog, freeze or gel, which mayaffect the fuel supply system. Starting
and engine operation may not work
properly. Make sure to fill winter
grade diesel fuel at ambient
temperatures below 0 °C.
Arctic grade diesel fuel can be used
in extreme cold temperatures below
-20 °C. Using this fuel grade in warm
or hot climates is not recommended
and may cause engine stalling, poor starting or damage on the fuel
injection system.
Refuelling9 Danger
Before refuelling, switch off
ignition and any external heaters
with combustion chambers.
Follow the operating and safety
instructions of the filling station
when refuelling.
9 Danger
Fuel is flammable and explosive.
No smoking. No naked flames or
sparks.
If you can smell fuel in your
vehicle, have the cause of this
remedied immediately by a
workshop.
A label with symbols at the fuel filler
flap is indicating the allowed fuel
types. In Europe the pump nozzles of the filling stations are marked with
these symbols. Refuel only the
allowed fuel type.Caution
In case of misfuelling, do not
switch on ignition.
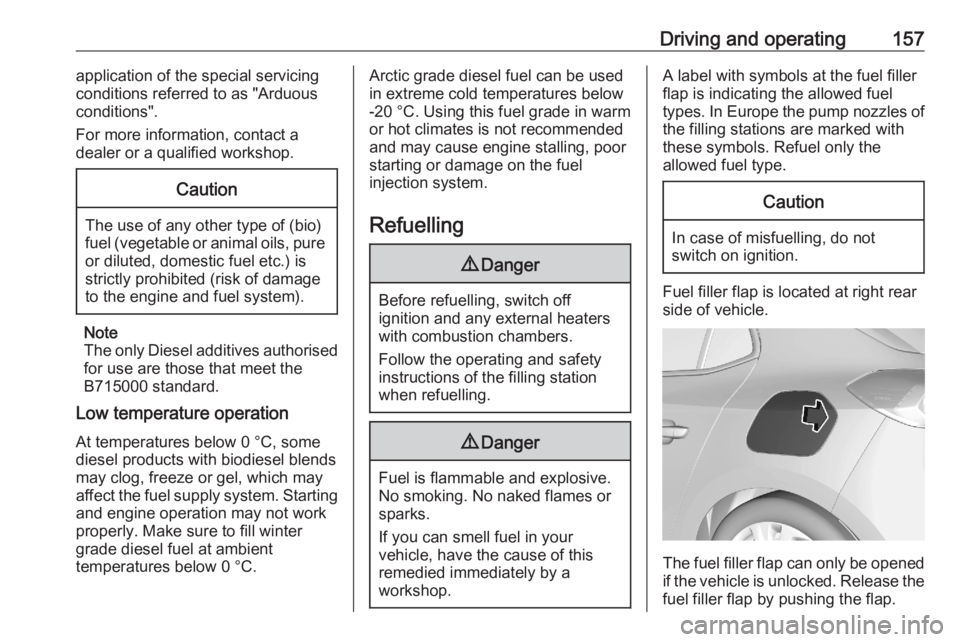
Fuel filler flap is located at right rear
side of vehicle.
The fuel filler flap can only be opened
if the vehicle is unlocked. Release the
fuel filler flap by pushing the flap.
Page 160 of 229
158Driving and operatingPetrol and diesel refuelling
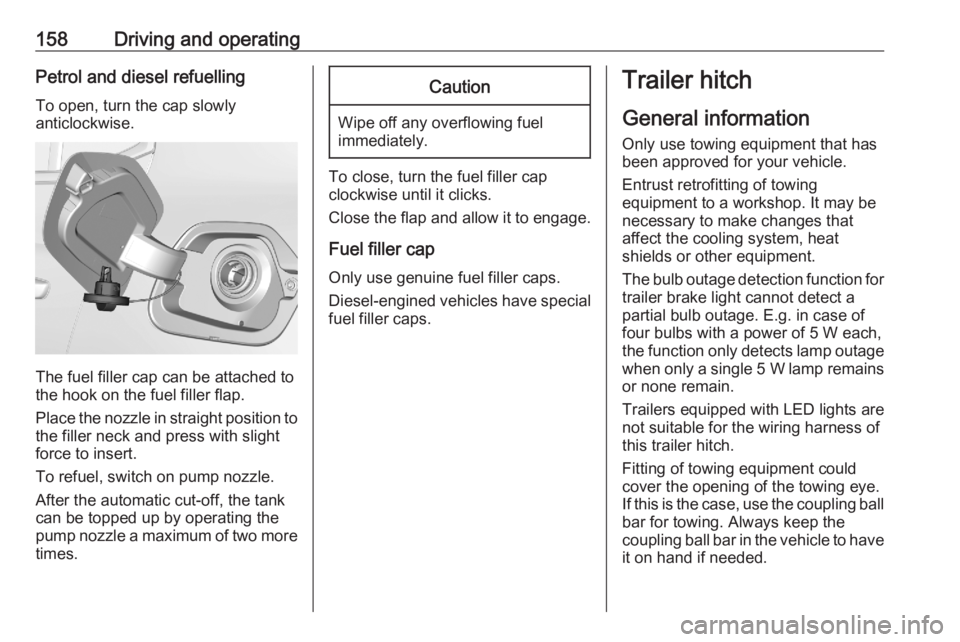
To open, turn the cap slowly
anticlockwise.
The fuel filler cap can be attached to
the hook on the fuel filler flap.
Place the nozzle in straight position to the filler neck and press with slight
force to insert.
To refuel, switch on pump nozzle.
After the automatic cut-off, the tank can be topped up by operating the
pump nozzle a maximum of two more
times.
Caution
Wipe off any overflowing fuel
immediately.
To close, turn the fuel filler cap
clockwise until it clicks.
Close the flap and allow it to engage.
Fuel filler cap
Only use genuine fuel filler caps.
Diesel-engined vehicles have special fuel filler caps.
Trailer hitch
General information
Only use towing equipment that has
been approved for your vehicle.
Entrust retrofitting of towing
equipment to a workshop. It may be
necessary to make changes that
affect the cooling system, heat
shields or other equipment.
The bulb outage detection function for
trailer brake light cannot detect a
partial bulb outage. E.g. in case of
four bulbs with a power of 5 W each,
the function only detects lamp outage when only a single 5 W lamp remains
or none remain.
Trailers equipped with LED lights are
not suitable for the wiring harness of
this trailer hitch.
Fitting of towing equipment could
cover the opening of the towing eye.
If this is the case, use the coupling ball
bar for towing. Always keep the
coupling ball bar in the vehicle to have it on hand if needed.
Page 164 of 229
162Vehicle careCaution
When transporting the vehicle on
a train or on a recovery vehicle, the
mud flaps might be damaged.
Vehicle storage
Storage for a long period of time
If the vehicle is to be stored for several months:
● Wash and wax the vehicle.
● Have the wax in the engine compartment and underbody
checked.
● Clean and preserve the rubber seals.
● Fill up fuel tank completely.
● Change the engine oil.
● Drain the washer fluid reservoir.
● Check the coolant antifreeze and
corrosion protection.
● Adjust tyre pressure to the value specified for full load.
● Park the vehicle in a dry, wellventilated place. Engage first or
reverse gear or set selector lever
to P. Prevent the vehicle from
rolling.
● Do not apply the parking brake.
● Open the bonnet, close all doors and lock the vehicle.
● Disconnect the clamp from the negative terminal of the vehicle
battery. Note that all systems are
not functional, e.g. anti-theft
alarm system.
Putting back into operation
When the vehicle is to be put back into operation:
● Connect the clamp to the negative terminal of the vehicle
battery. Initialise the power
windows 3 23.
● Check tyre pressure.
● Fill up the washer fluid reservoir.
● Check the engine oil level.
● Check the coolant level.
● Fit the number plate if necessary.End-of-life vehicle recovery
Information on end-of-life vehicle
recovery centres and the recycling of
end-of-life vehicles is available on our website, where legally required. Only
entrust this work to an authorised
recycling centre.
Page 173 of 229
Vehicle care171
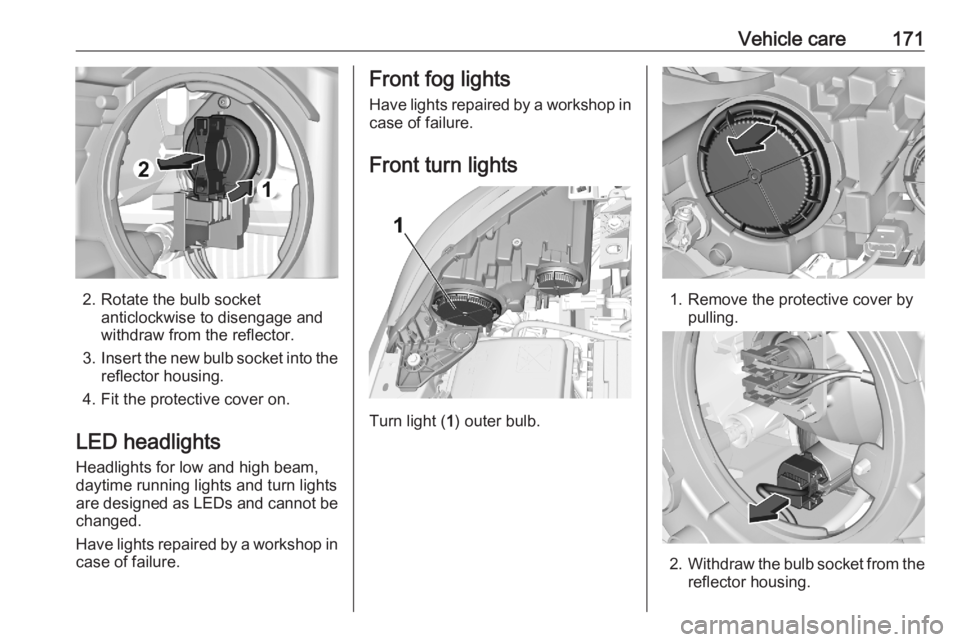
2. Rotate the bulb socketanticlockwise to disengage and
withdraw from the reflector.
3. Insert the new bulb socket into the
reflector housing.
4. Fit the protective cover on.
LED headlights Headlights for low and high beam,
daytime running lights and turn lights
are designed as LEDs and cannot be
changed.
Have lights repaired by a workshop in
case of failure.
Front fog lights
Have lights repaired by a workshop in case of failure.
Front turn lights
Turn light ( 1) outer bulb.
1. Remove the protective cover by
pulling.
2.Withdraw the bulb socket from the
reflector housing.
Page 175 of 229
Vehicle care173
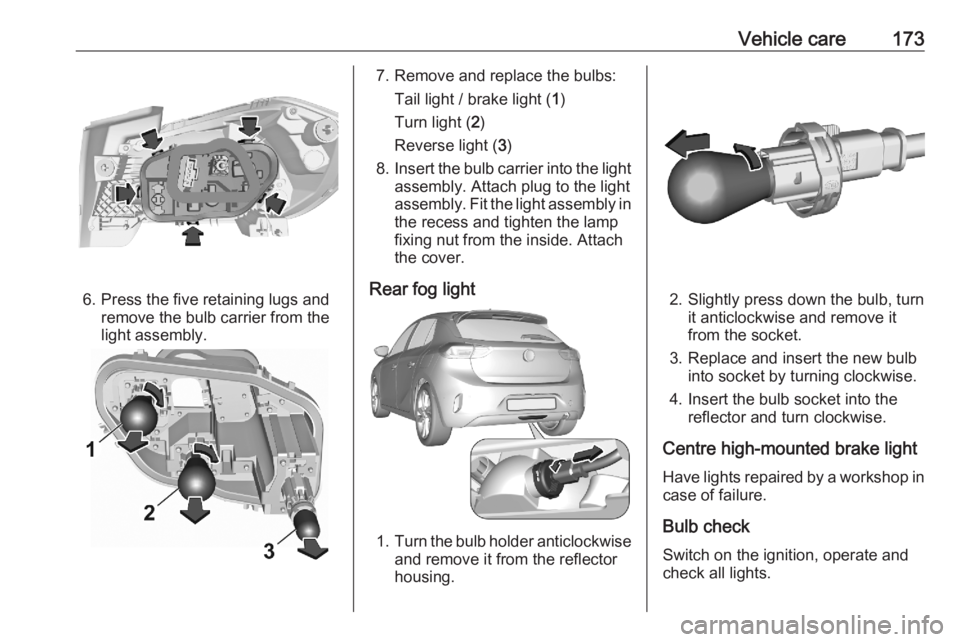
6. Press the five retaining lugs andremove the bulb carrier from the
light assembly.
7. Remove and replace the bulbs:
Tail light / brake light ( 1)
Turn light ( 2)
Reverse light ( 3)
8. Insert the bulb carrier into the light
assembly. Attach plug to the light
assembly. Fit the light assembly in the recess and tighten the lamp
fixing nut from the inside. Attach
the cover.
Rear fog light
1. Turn the bulb holder anticlockwise
and remove it from the reflector
housing.
2. Slightly press down the bulb, turn it anticlockwise and remove it
from the socket.
3. Replace and insert the new bulb into socket by turning clockwise.
4. Insert the bulb socket into the reflector and turn clockwise.
Centre high-mounted brake light Have lights repaired by a workshop in
case of failure.
Bulb check Switch on the ignition, operate and
check all lights.
Page 177 of 229
Vehicle care175Engine compartment fusebox
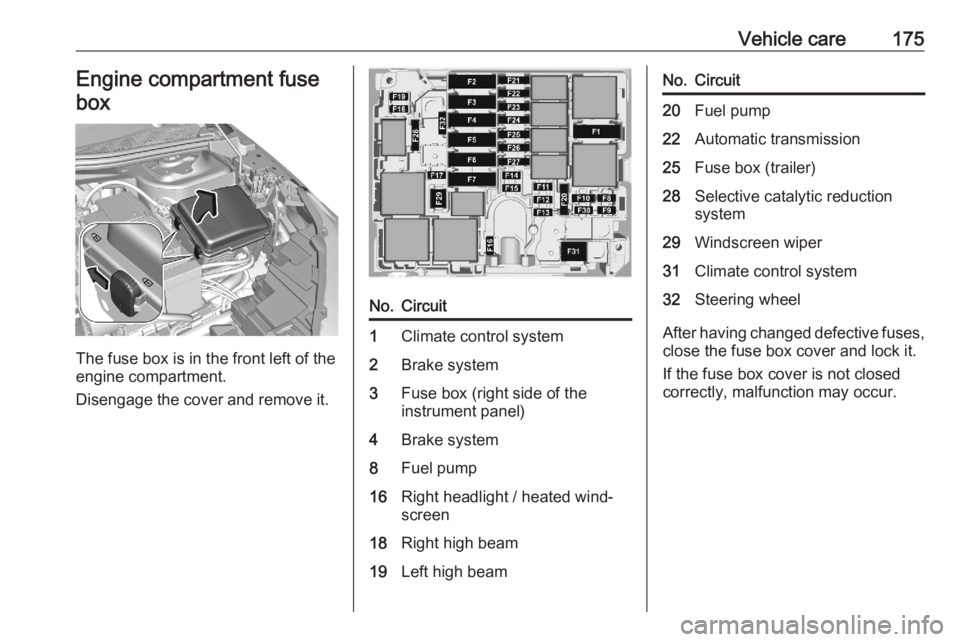
The fuse box is in the front left of the
engine compartment.
Disengage the cover and remove it.
No.Circuit1Climate control system2Brake system3Fuse box (right side of the
instrument panel)4Brake system8Fuel pump16Right headlight / heated wind‐
screen18Right high beam19Left high beamNo.Circuit20Fuel pump22Automatic transmission25Fuse box (trailer)28Selective catalytic reduction
system29Windscreen wiper31Climate control system32Steering wheel
After having changed defective fuses,
close the fuse box cover and lock it.
If the fuse box cover is not closed
correctly, malfunction may occur.
Page 178 of 229
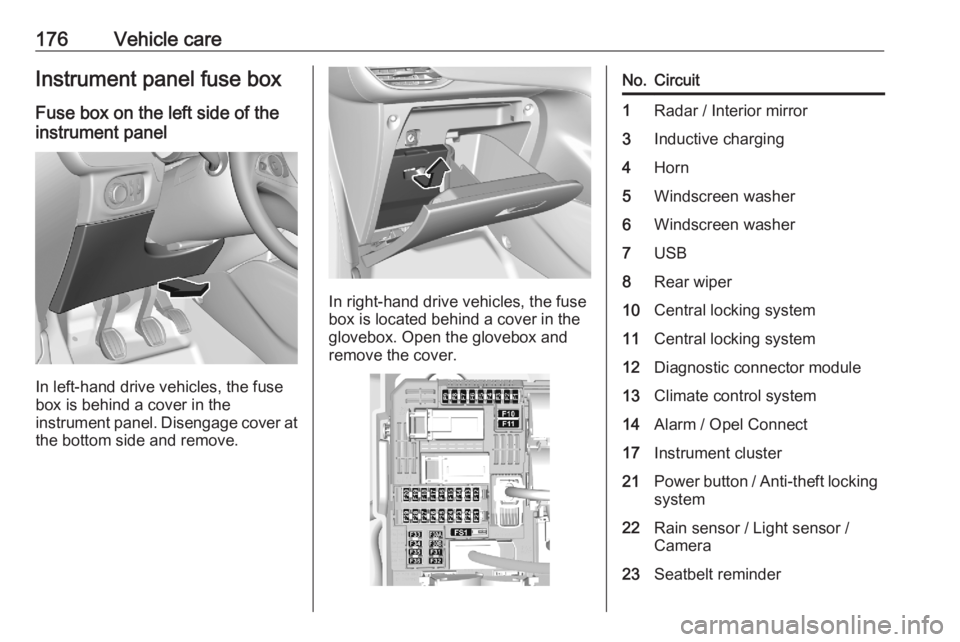
176Vehicle careInstrument panel fuse boxFuse box on the left side of the
instrument panel
In left-hand drive vehicles, the fuse
box is behind a cover in the
instrument panel. Disengage cover at
the bottom side and remove.
In right-hand drive vehicles, the fuse
box is located behind a cover in the
glovebox. Open the glovebox and
remove the cover.
No.Circuit1Radar / Interior mirror3Inductive charging4Horn5Windscreen washer6Windscreen washer7USB8Rear wiper10Central locking system11Central locking system12Diagnostic connector module13Climate control system14Alarm / Opel Connect17Instrument cluster21Power button / Anti-theft locking system22Rain sensor / Light sensor /
Camera23Seatbelt reminder