engine OPEL CORSA F 2020 Manual user
[x] Cancel search | Manufacturer: OPEL, Model Year: 2020, Model line: CORSA F, Model: OPEL CORSA F 2020Pages: 229, PDF Size: 21.14 MB
Page 166 of 229
164Vehicle careClosing
Before closing the bonnet, press the
support into the holder.
Lower the bonnet and let it fall into the latch from a low height (20-25 cm).
Check that the bonnet is engaged.Caution
Do not press the bonnet into the
latch to avoid dents.
Engine oil
Check the engine oil level manually
on a regular basis to prevent damage
to the engine. Ensure that the correct
specification of oil is used.
Recommended fluids and lubricants
3 201.
The maximum engine oil
consumption is 0.6 l per 1000 km.
Check with the vehicle on a level
surface. The engine must be at
operating temperature and switched
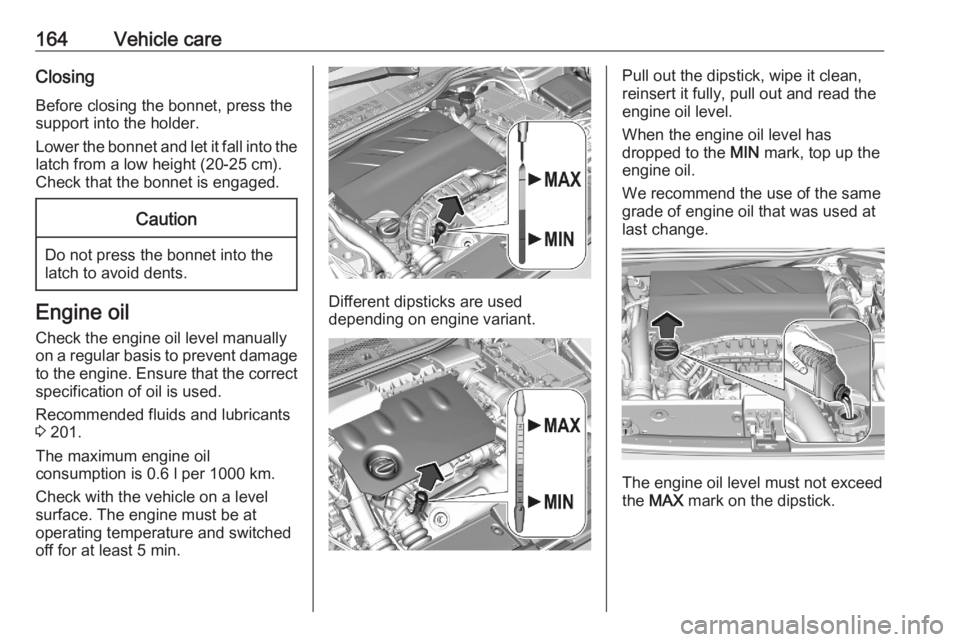
off for at least 5 min.Different dipsticks are used
depending on engine variant.
Pull out the dipstick, wipe it clean,
reinsert it fully, pull out and read the
engine oil level.
When the engine oil level has
dropped to the MIN mark, top up the
engine oil.
We recommend the use of the same
grade of engine oil that was used at
last change.
The engine oil level must not exceed
the MAX mark on the dipstick.
Page 167 of 229
Vehicle care165Caution
Overfilled engine oil must be
drained or suctioned out. If the oil exceeds the maximum level, do
not start the vehicle and contact a
workshop.
Capacities 3 209.
Fit the cap on straight and tighten it.
Engine coolant The factory filled coolant provides
freeze protection down to approx.
-37 °C.
Caution
Only use approved antifreeze.
Coolant and antifreeze 3 201.
Coolant level
Caution
Too low a coolant level can cause engine damage.
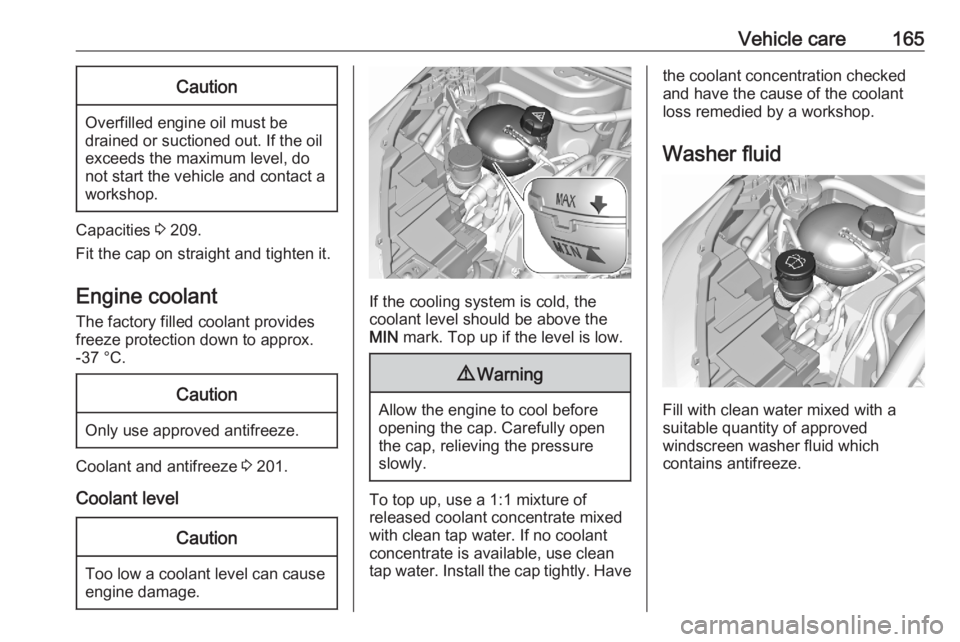
If the cooling system is cold, the
coolant level should be above the
MIN mark. Top up if the level is low.
9Warning
Allow the engine to cool before
opening the cap. Carefully open
the cap, relieving the pressure
slowly.
To top up, use a 1:1 mixture of
released coolant concentrate mixed
with clean tap water. If no coolant
concentrate is available, use clean
tap water. Install the cap tightly. Have
the coolant concentration checked
and have the cause of the coolant
loss remedied by a workshop.
Washer fluid
Fill with clean water mixed with a
suitable quantity of approved
windscreen washer fluid which
contains antifreeze.
Page 168 of 229
166Vehicle careCaution
Only washer fluid with a sufficient
antifreeze concentration provides
protection at low temperatures or
a sudden drop in temperature.
Washer fluid 3 201.
Brakes In the event of minimum thickness of
the brake lining, a squealing noise
sounds during braking.
Continued driving is possible but
have the brake lining replaced as
soon as possible.
Once new brake linings are installed,
do not brake unnecessarily hard for
the first few journeys.
Brake fluid
9 Warning
Brake fluid is poisonous and
corrosive. Avoid contact with eyes,
skin, fabrics and painted surfaces.
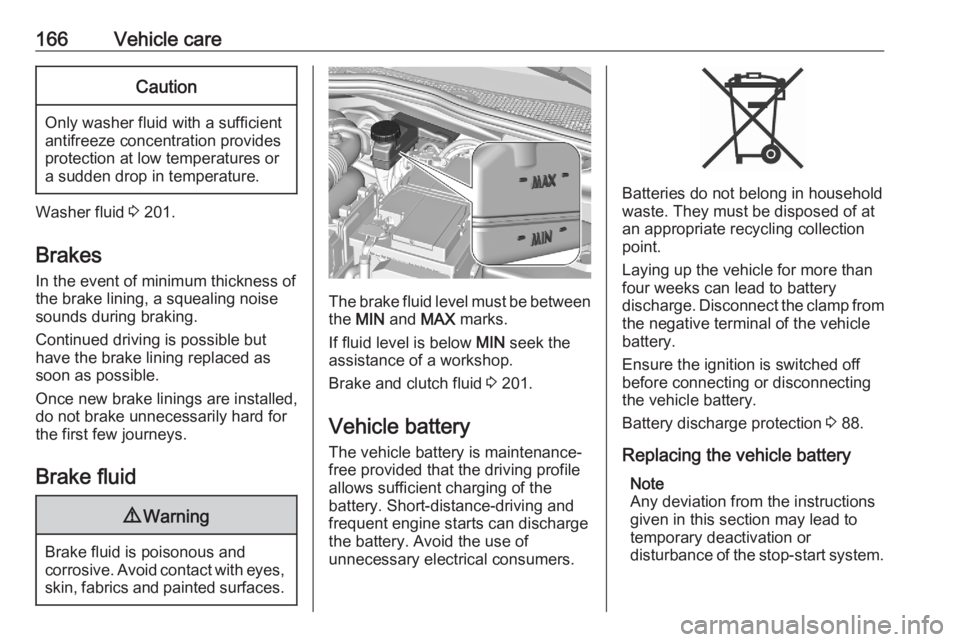
The brake fluid level must be betweenthe MIN and MAX marks.
If fluid level is below MIN seek the
assistance of a workshop.
Brake and clutch fluid 3 201.
Vehicle battery
The vehicle battery is maintenance-
free provided that the driving profile
allows sufficient charging of the
battery. Short-distance-driving and
frequent engine starts can discharge
the battery. Avoid the use of
unnecessary electrical consumers.
Batteries do not belong in household
waste. They must be disposed of at
an appropriate recycling collection
point.
Laying up the vehicle for more than
four weeks can lead to battery
discharge. Disconnect the clamp from the negative terminal of the vehicle
battery.
Ensure the ignition is switched off
before connecting or disconnecting
the vehicle battery.
Battery discharge protection 3 88.
Replacing the vehicle battery Note
Any deviation from the instructions
given in this section may lead to temporary deactivation or
disturbance of the stop-start system.
Page 170 of 229
168Vehicle care● See the Owner's Manual forfurther information.
● Explosive gas may be present in the vicinity of the vehicle battery.
Power saving mode This mode deactivates electrical
consumers to avoid excessive
discharging of the vehicle battery.
These consumers, such as the
Infotainment system, windscreen
wipers, low beam headlights,
courtesy light, etc. can be used for a
total maximum time of about
40 minutes after ignition is switched
off.
Changing into power saving mode
When power saving mode is
activated, a message appears in the
Driver Information Centre.
An active telephone call using the
hands-free option will be maintained
for around 10 minutes longer.Deactivating power saving mode
Power saving mode is deactivated
automatically when the engine is
restarted. Run the engine for a
sufficient charge:
● for less than 10 minutes to use the consumers for approx.
5 minutes
● for more than 10 minutes to use the consumers for up to approx.
30 minutes
Heating functionalities Note
Individual heating functionalities,
such as heated seats or heated
steering wheel, may be temporarily
unavailable in the event of electrical
loading constraints. Functions will
be resumed after some minutes.Diesel fuel system bleeding
If the tank has been run dry, the diesel
fuel system must be bled. Refuel at
least five lieter diesel. Switch on the
ignition for about 60 seconds and switch off again. Then crank the
engine. If the engine does not start
directly, repeat this process a few
times. If the engine then fails to start,
seek the assistance of a workshop.
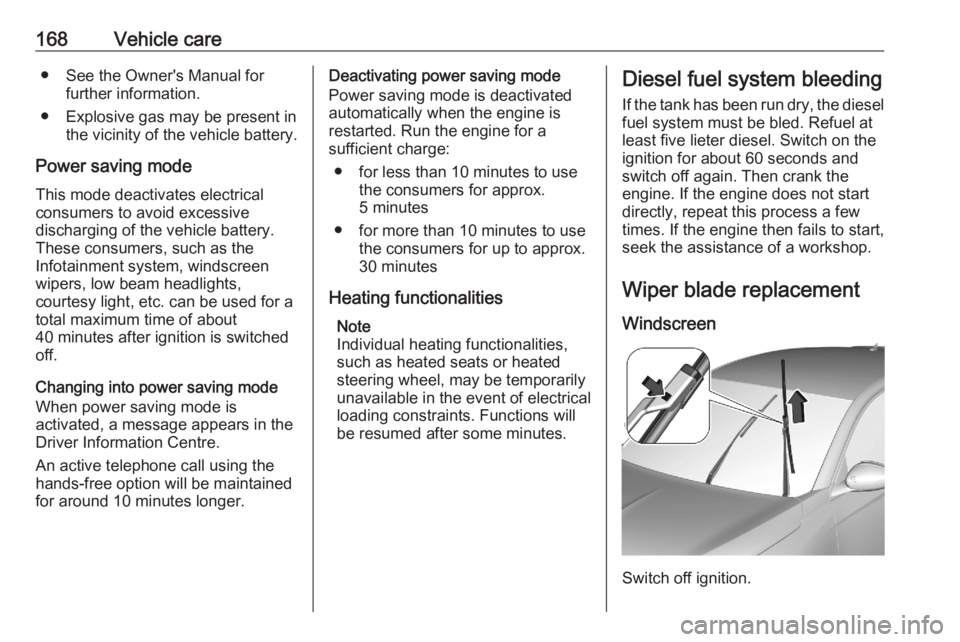
Wiper blade replacementWindscreen
Switch off ignition.
Page 171 of 229
Vehicle care169Within one minute after switching off
ignition, operate the wiper lever to
position the wiper blades vertically on
the windscreen.
Lift the wiper arm until it stays in the
raised position, press button to
disengage the wiper blade and
remove.
Attach the new wiper blade to the wiper arm and push until it engages.
Lower wiper arm carefully.
To return the wiper arms to their
original position, switch on the ignition and operate the wiper lever.
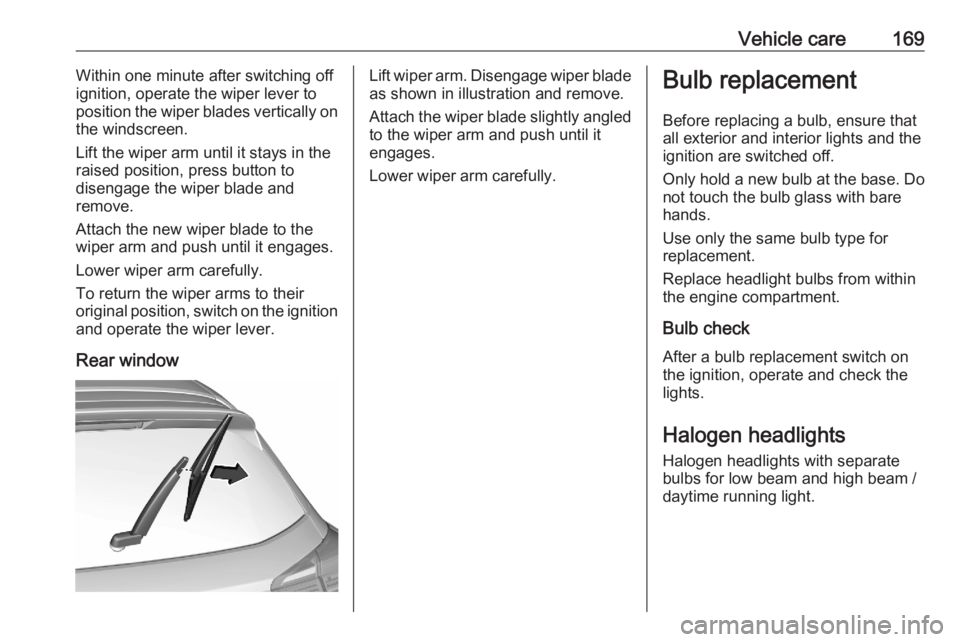
Rear windowLift wiper arm. Disengage wiper blade as shown in illustration and remove.
Attach the wiper blade slightly angled
to the wiper arm and push until it
engages.
Lower wiper arm carefully.Bulb replacement
Before replacing a bulb, ensure thatall exterior and interior lights and the
ignition are switched off.
Only hold a new bulb at the base. Do
not touch the bulb glass with bare
hands.
Use only the same bulb type for
replacement.
Replace headlight bulbs from within the engine compartment.
Bulb check After a bulb replacement switch on
the ignition, operate and check the
lights.
Halogen headlights Halogen headlights with separate
bulbs for low beam and high beam /
daytime running light.
Page 176 of 229
174Vehicle careNumber plate lightHave lights repaired by a workshop in
case of failure.
Interior lights
Have the following bulbs replaced by
a workshop:
● courtesy light, reading lights
● load compartment light
● instrument panel illuminationElectrical system
Fuses Data on the replacement fuse must
match the data on the defective fuse.
The three fuse boxes are located in: ● engine compartment
● instrument panel
Before replacing a fuse, turn off the
respective switch and the ignition.
A blown fuse can be recognised by its melted wire.Caution
Do not replace the fuse until the
cause of the fault has been
remedied.
Some functions are protected by
several fuses.
Fuses may also be inserted without
existence of a function.
Fuse extractor
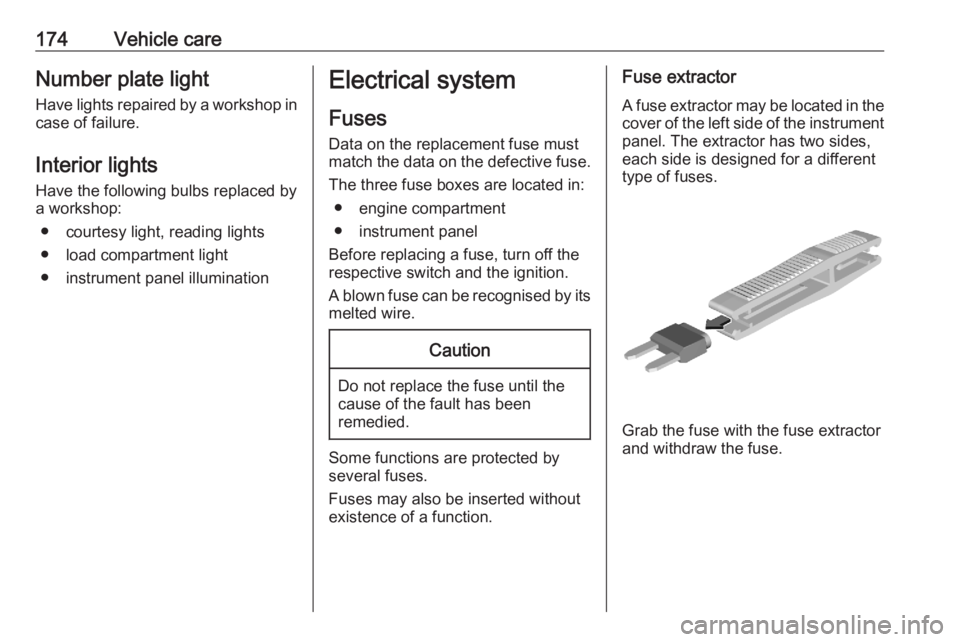
A fuse extractor may be located in the
cover of the left side of the instrument panel. The extractor has two sides,
each side is designed for a different
type of fuses.
Grab the fuse with the fuse extractor
and withdraw the fuse.
Page 177 of 229
Vehicle care175Engine compartment fusebox
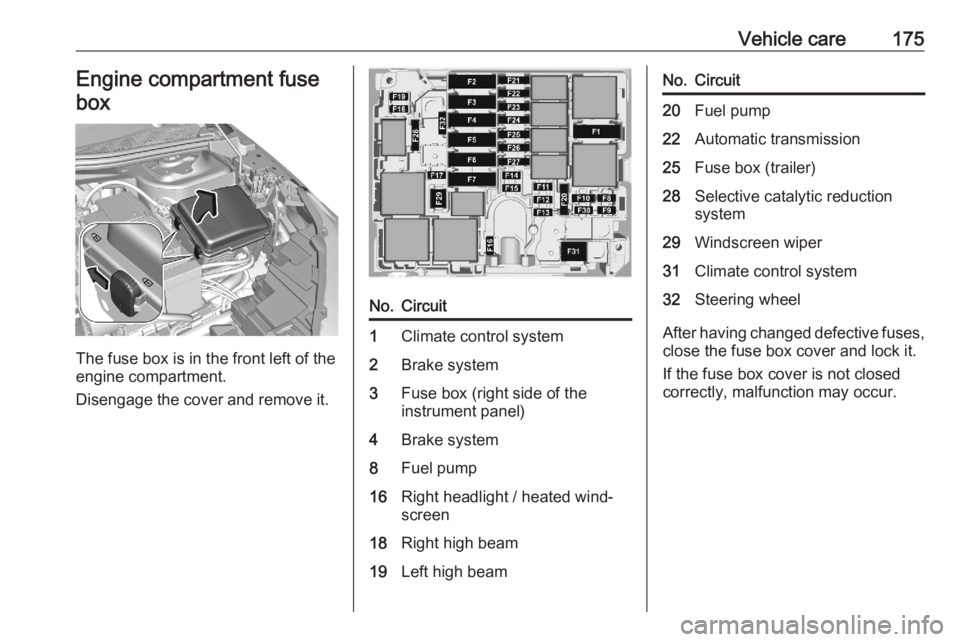
The fuse box is in the front left of the
engine compartment.
Disengage the cover and remove it.
No.Circuit1Climate control system2Brake system3Fuse box (right side of the
instrument panel)4Brake system8Fuel pump16Right headlight / heated wind‐
screen18Right high beam19Left high beamNo.Circuit20Fuel pump22Automatic transmission25Fuse box (trailer)28Selective catalytic reduction
system29Windscreen wiper31Climate control system32Steering wheel
After having changed defective fuses,
close the fuse box cover and lock it.
If the fuse box cover is not closed
correctly, malfunction may occur.
Page 182 of 229

180Vehicle careThe tyre pressure information labelon the right door frame indicates theoriginal equipment tyres and the
correspondent tyre pressures.
The tyre pressure data refers to cold
tyres. It applies to summer and winter tyres.
Always inflate the spare tyre to the
pressure specified for full load.
Incorrect tyre pressures will impair
safety, vehicle handling, comfort and fuel economy and will increase tyre
wear.
Tyre pressures differ depending on
various options. For the correct tyre
pressure value, follow the procedure
below:
1. Identify the engine identifier code.
Engine data 3 207.
2. Identify the respective tyre.
The tyre pressure tables show all
possible tyre combinations 3 210.
For the tyres approved for your
vehicle, refer to the EEC Certificate of
Conformity provided with your vehicle
or other national registration
documents.The driver is responsible for correct
adjustment of tyre pressure.9 Warning
If the pressure is too low, this can
result in considerable tyre warm-
up and internal damage, leading to tread separation and even to tyre
blow-out at high speeds.
9 Warning
For specific tyres the
recommended tyre pressure as
shown in the tyre pressure table may exceed the maximum tyre
pressure as indicated on the tyre.
Never exceed the maximum tyre
pressure as indicated on the tyre.
Temperature dependency
The tyre pressure depends on the
temperature of the tyre. During
driving, tyre temperature and
pressure increase. Tyre pressure
values provided on the tyre
information label and tyre pressure
chart are valid for cold tyres, which means at 20 °C.
The pressure increases by nearly
10 kPa for a 10 °C temperature
increase. This must be considered
when warm tyres are checked.
Tyre deflation detectionsystem
The tyre deflation detection system
continually checks the rotation speed
of all four wheels and warns on low
tyre pressure condition once vehicle
is driving. This is achieved by
comparing tyre rolling circumference
with reference values and further
signals.
If a tyre loses pressure the control
indicator w illuminates and a warning
message is displayed in the Driver Information Centre.
Control indicator w 3 71.
In this case reduce speed, avoid
sharp cornering and strong braking.
Stop at next safe opportunity and
check tyre pressure.
Page 186 of 229
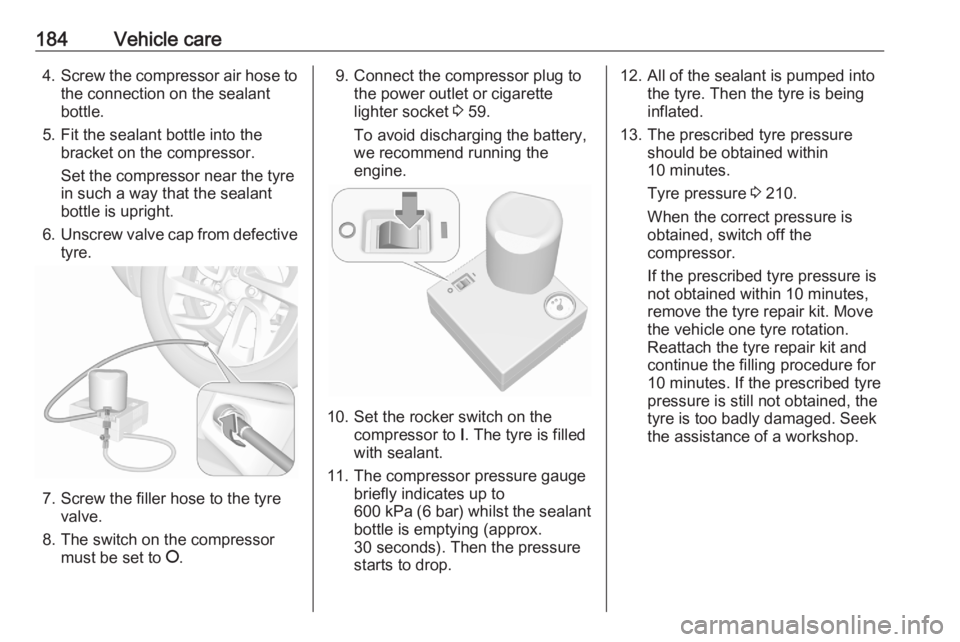
184Vehicle care4.Screw the compressor air hose to
the connection on the sealant
bottle.
5. Fit the sealant bottle into the bracket on the compressor.
Set the compressor near the tyre
in such a way that the sealant
bottle is upright.
6. Unscrew valve cap from defective
tyre.
7. Screw the filler hose to the tyre valve.
8. The switch on the compressor must be set to J.
9. Connect the compressor plug to
the power outlet or cigarette
lighter socket 3 59.
To avoid discharging the battery,
we recommend running the
engine.
10. Set the rocker switch on the compressor to I. The tyre is filled
with sealant.
11. The compressor pressure gauge briefly indicates up to
600 kPa (6 bar) whilst the sealant
bottle is emptying (approx.
30 seconds). Then the pressure
starts to drop.
12. All of the sealant is pumped into the tyre. Then the tyre is being
inflated.
13. The prescribed tyre pressure should be obtained within
10 minutes.
Tyre pressure 3 210.
When the correct pressure is
obtained, switch off the
compressor.
If the prescribed tyre pressure is
not obtained within 10 minutes,
remove the tyre repair kit. Move
the vehicle one tyre rotation.
Reattach the tyre repair kit and
continue the filling procedure for 10 minutes. If the prescribed tyre
pressure is still not obtained, the
tyre is too badly damaged. Seek
the assistance of a workshop.
Page 193 of 229
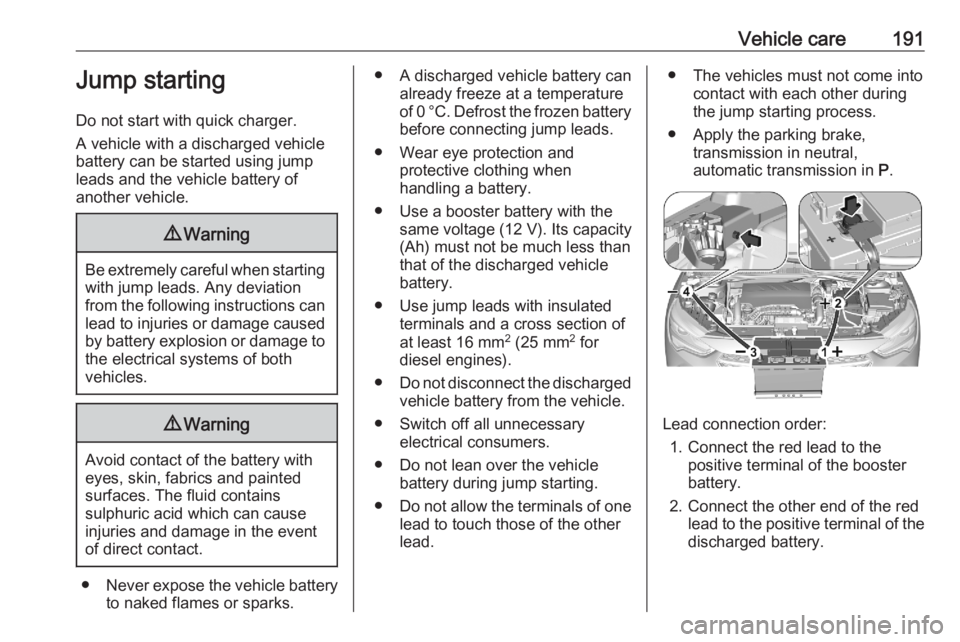
Vehicle care191Jump starting
Do not start with quick charger.
A vehicle with a discharged vehicle
battery can be started using jump
leads and the vehicle battery of
another vehicle.9 Warning
Be extremely careful when starting
with jump leads. Any deviation
from the following instructions can
lead to injuries or damage caused
by battery explosion or damage to the electrical systems of both
vehicles.
9 Warning
Avoid contact of the battery with
eyes, skin, fabrics and painted
surfaces. The fluid contains
sulphuric acid which can cause
injuries and damage in the event
of direct contact.
● Never expose the vehicle battery
to naked flames or sparks.
● A discharged vehicle battery can already freeze at a temperature
of 0 °C. Defrost the frozen battery before connecting jump leads.
● Wear eye protection and protective clothing when
handling a battery.
● Use a booster battery with the same voltage (12 V). Its capacity
(Ah) must not be much less than
that of the discharged vehicle battery.
● Use jump leads with insulated terminals and a cross section of
at least 16 mm 2
(25 mm 2
for
diesel engines).
● Do not disconnect the discharged
vehicle battery from the vehicle.
● Switch off all unnecessary electrical consumers.
● Do not lean over the vehicle battery during jump starting.
● Do not allow the terminals of one
lead to touch those of the other
lead.● The vehicles must not come into contact with each other during
the jump starting process.
● Apply the parking brake, transmission in neutral,
automatic transmission in P.
Lead connection order:
1. Connect the red lead to the positive terminal of the booster
battery.
2. Connect the other end of the red lead to the positive terminal of the
discharged battery.