light OPEL CORSA F 2020 Manual user
[x] Cancel search | Manufacturer: OPEL, Model Year: 2020, Model line: CORSA F, Model: OPEL CORSA F 2020Pages: 229, PDF Size: 21.14 MB
Page 3 of 229
Introduction.................................... 2
In brief ............................................ 6
Keys, doors and windows ..............9
Seats, restraints ........................... 27
Storage ........................................ 47
Instruments and controls .............54
Lighting ........................................ 80
Climate control ............................. 89
Driving and operating ...................98
Vehicle care ............................... 161
Service and maintenance ..........198
Technical data ........................... 203
Customer information ................212
Index .......................................... 222Contents
Page 9 of 229

In brief71Power windows .....................23
2 Exterior mirrors .....................21
3 Side air vents ........................ 96
4 Turn lights, headlight
flash, low / high beam ...........85
Parking lights ........................ 86
Buttons for Driver
Information Centre ................73
5 Cruise control .....................120
Adaptive cruise control .......124
Speed limiter ....................... 122
Heated steering wheel ..........55
6 Instruments ........................... 63
Driver Information Centre ...... 73
7 Infotainment controls
8 Windscreen wiper and
washer, rear wiper and
washer ................................. 56
9 Power button ....................... 100
10 Central locking system .........12
11 Centre air vents .................... 96
12 Controls for Info Display
operation .............................. 7513Anti-theft alarm system
status LED ........................... 19
14 Info Display .......................... 75
15 Hazard warning flashers ......85
16 Glovebox .............................. 47
17 Climate control system ......... 90
18 USB charging port ................ 59
19 Power outlet .......................... 59
20 Parking assist / Advanced
parking assist .....................138
Lane keep assist .................152
Stop start system ................103
Electronic Stability Control
and Traction Control ...........118
21 Manual transmission ..........114
Automatic transmission ......110
22 Manual parking brake ........115
Electric parking brake ........115
23 Ignition switch ....................... 99
24 Steering wheel adjustment ..55
25 Horn ..................................... 56
26 Fuse box ............................ 176
27 Bonnet release lever ..........16328Light switch .......................... 80
Headlight range
adjustment ........................... 82
Front / rear fog lights ............85
Instrument illumination .........87
Page 12 of 229
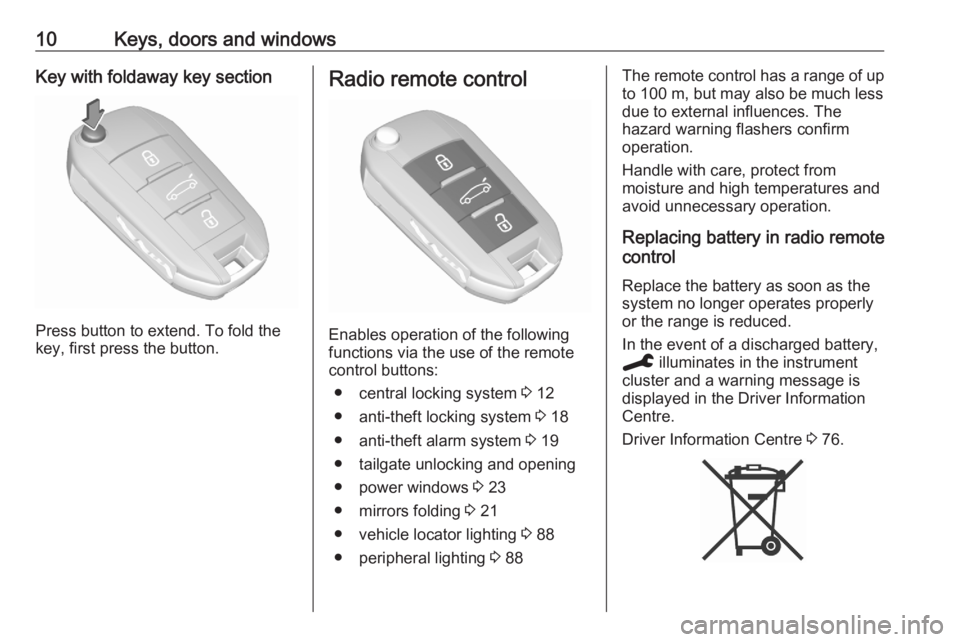
10Keys, doors and windowsKey with foldaway key section
Press button to extend. To fold the
key, first press the button.
Radio remote control
Enables operation of the following
functions via the use of the remote control buttons:
● central locking system 3 12
● anti-theft locking system 3 18
● anti-theft alarm system 3 19
● tailgate unlocking and opening
● power windows 3 23
● mirrors folding 3 21
● vehicle locator lighting 3 88
● peripheral lighting 3 88
The remote control has a range of up
to 100 m, but may also be much less
due to external influences. The
hazard warning flashers confirm
operation.
Handle with care, protect from
moisture and high temperatures and
avoid unnecessary operation.
Replacing battery in radio remote
control
Replace the battery as soon as the
system no longer operates properly
or the range is reduced.
In the event of a discharged battery,
C illuminates in the instrument
cluster and a warning message is
displayed in the Driver Information
Centre.
Driver Information Centre 3 76.
Page 16 of 229
14Keys, doors and windowsElectronic key system operationThis system allows automatic vehicle
locking and unlocking simply by
detection of the electronic key. The
electronic key must be outside the
vehicle.
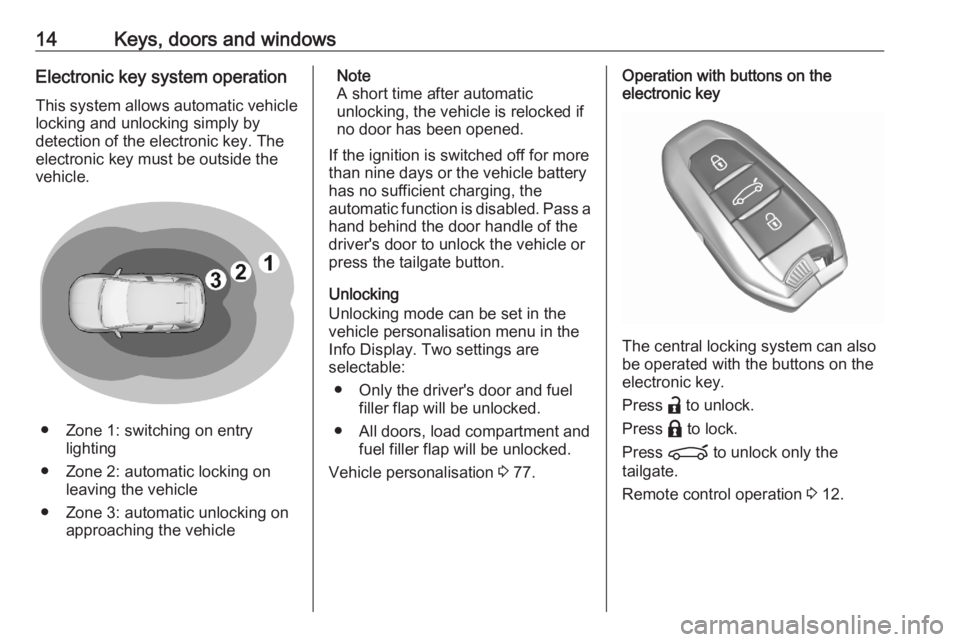
● Zone 1: switching on entry lighting
● Zone 2: automatic locking on leaving the vehicle
● Zone 3: automatic unlocking on approaching the vehicle
Note
A short time after automatic
unlocking, the vehicle is relocked if
no door has been opened.
If the ignition is switched off for more than nine days or the vehicle battery
has no sufficient charging, the
automatic function is disabled. Pass a hand behind the door handle of the
driver's door to unlock the vehicle or
press the tailgate button.
Unlocking
Unlocking mode can be set in the
vehicle personalisation menu in the
Info Display. Two settings are
selectable:
● Only the driver's door and fuel filler flap will be unlocked.
● All doors, load compartment and fuel filler flap will be unlocked.
Vehicle personalisation 3 77.Operation with buttons on the
electronic key
The central locking system can also
be operated with the buttons on the
electronic key.
Press a to unlock.
Press b to lock.
Press ? to unlock only the
tailgate.
Remote control operation 3 12.
Page 22 of 229
20Keys, doors and windows3. Leave the vehicle and close thedoors.
4. Activate the anti-theft alarm system.
Indication LED in the ! button flashes if the
anti-theft alarm system is activated.
The hazard warning lights illuminates for a few seconds.
Deactivation Unlocking the vehicle with radio
remote control by pressing a or with
the electronic key deactivates the
anti-theft alarm system.
The system is not deactivated by
unlocking the front door with the key
or with the central locking button in
the passenger compartment.
The hazard warning lights flash for a
few seconds.Alarm
When triggered, the alarm siren
sounds and the hazard warning lights flash simultaneously. The number
and duration of alarm signals are
stipulated by legislation.
The anti-theft alarm can be
deactivated by pressing a or
switching on the ignition.
A triggered alarm, which has not been interrupted by the driver, will be
indicated by the LED in the
button !. The LED will flash quickly
the next time the vehicle is unlocked.
If the battery has been reconnected
(e.g. after maintenance work), wait for 10 minutes to restart the engine.
Fault
If the LED in the button !
illuminates permanently when
switching on the ignition, seek the
assistance of a workshop.
Locking the vehicle without
activation of the anti-theft alarm
Lock the vehicle by locking the front
door with the integral key.Immobiliser
The system is part of the ignition
switch and checks whether the
vehicle is allowed to be started with
the key being used.
The immobiliser is activated
automatically.
Note
Radio Frequency Identification
(RFID) tags may cause interference with the key. Do not have it placednear the key when starting the
vehicle.
Note
The immobiliser does not lock the doors. Always lock the vehicle after
leaving it 3 12.
Switch on the anti-theft alarm
system 3 19.
Emergency operation of electronic
key 3 100.
Page 23 of 229
Keys, doors and windows21Exterior mirrors
Convex shape
The shape of the mirror makes
objects appear smaller, which will
affect the ability to estimate
distances.
Side blind spot assistant 3 21.
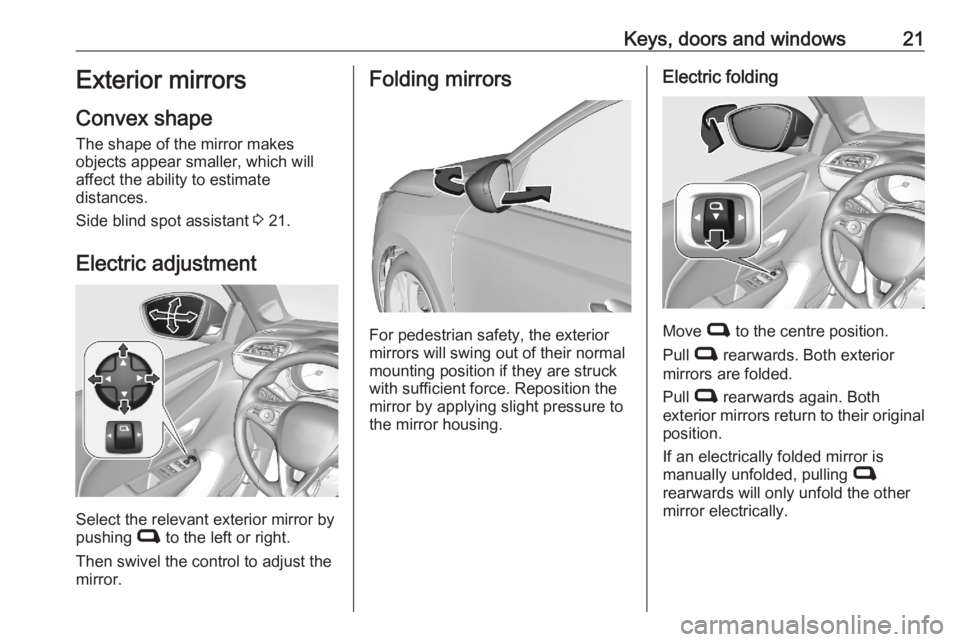
Electric adjustment
Select the relevant exterior mirror by
pushing C to the left or right.
Then swivel the control to adjust the
mirror.
Folding mirrors
For pedestrian safety, the exterior
mirrors will swing out of their normal
mounting position if they are struck
with sufficient force. Reposition the mirror by applying slight pressure tothe mirror housing.
Electric folding
Move C to the centre position.
Pull C rearwards. Both exterior
mirrors are folded.
Pull C rearwards again. Both
exterior mirrors return to their original position.
If an electrically folded mirror is
manually unfolded, pulling C
rearwards will only unfold the other
mirror electrically.
Page 26 of 229
24Keys, doors and windows
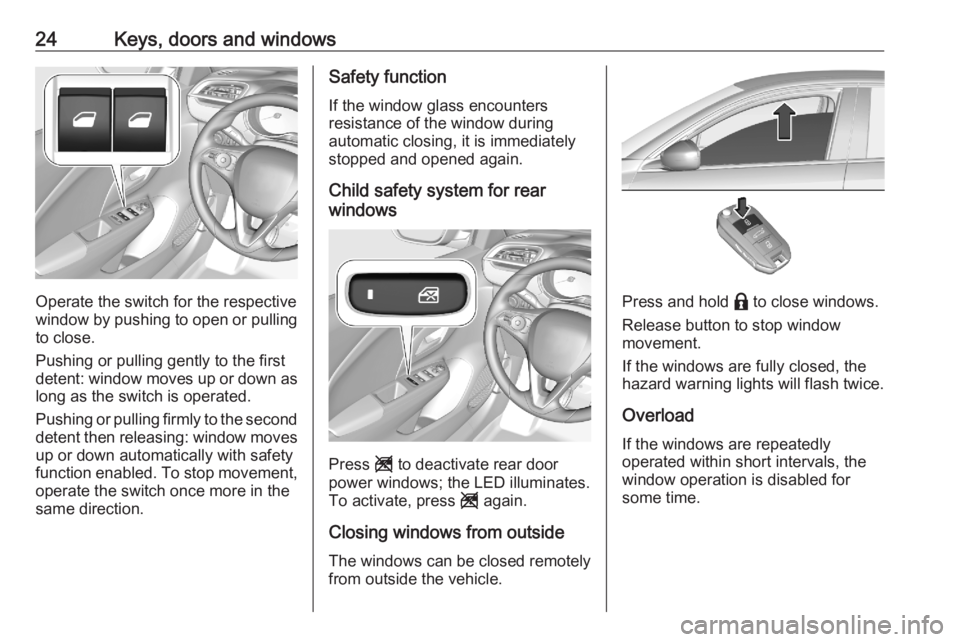
Operate the switch for the respective
window by pushing to open or pulling to close.
Pushing or pulling gently to the first
detent: window moves up or down as long as the switch is operated.
Pushing or pulling firmly to the second
detent then releasing: window moves
up or down automatically with safety
function enabled. To stop movement,
operate the switch once more in the
same direction.
Safety function
If the window glass encounters
resistance of the window during
automatic closing, it is immediately
stopped and opened again.
Child safety system for rear
windows
Press g to deactivate rear door
power windows; the LED illuminates.
To activate, press g again.
Closing windows from outside The windows can be closed remotely
from outside the vehicle.
Press and hold b to close windows.
Release button to stop window
movement.
If the windows are fully closed, the
hazard warning lights will flash twice.
Overload
If the windows are repeatedly
operated within short intervals, the
window operation is disabled for
some time.
Page 28 of 229
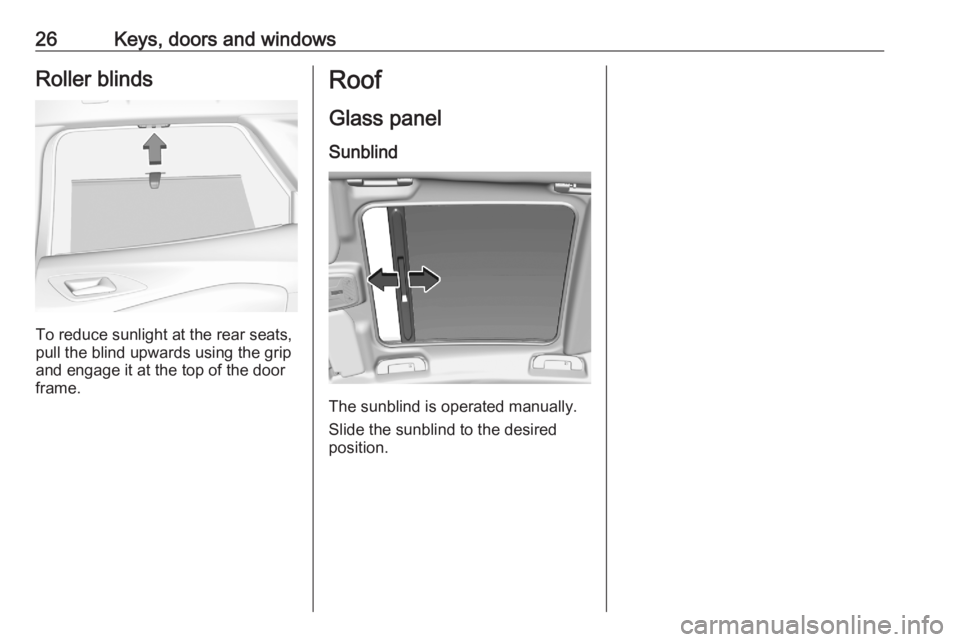
26Keys, doors and windowsRoller blinds
To reduce sunlight at the rear seats,
pull the blind upwards using the grip
and engage it at the top of the door
frame.
Roof
Glass panel
Sunblind
The sunblind is operated manually.
Slide the sunblind to the desired position.
Page 30 of 229
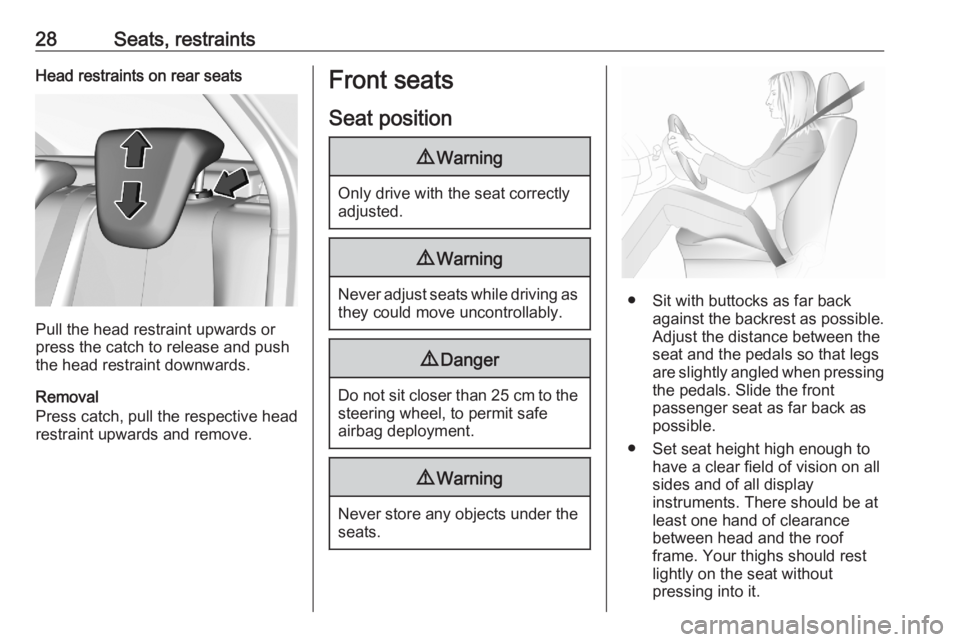
28Seats, restraintsHead restraints on rear seats
Pull the head restraint upwards or
press the catch to release and push the head restraint downwards.
Removal
Press catch, pull the respective head
restraint upwards and remove.
Front seats
Seat position9 Warning
Only drive with the seat correctly
adjusted.
9 Warning
Never adjust seats while driving as
they could move uncontrollably.
9 Danger
Do not sit closer than 25 cm to the
steering wheel, to permit safe
airbag deployment.
9 Warning
Never store any objects under the
seats.
● Sit with buttocks as far back against the backrest as possible.
Adjust the distance between the
seat and the pedals so that legs
are slightly angled when pressing the pedals. Slide the front
passenger seat as far back as
possible.
● Set seat height high enough to have a clear field of vision on allsides and of all display
instruments. There should be at
least one hand of clearance
between head and the roof
frame. Your thighs should rest
lightly on the seat without
pressing into it.
Page 31 of 229
Seats, restraints29● Sit with shoulders as far backagainst the backrest as possible.
Set the backrest rake so that it is possible to easily reach the
steering wheel with arms slightly
bent. Maintain contact between
shoulders and the backrest when turning the steering wheel. Do
not angle the backrest too far
back. We recommend a
maximum rake of approx. 25°.
● Adjust seat and steering wheel in
a way that the wrist rests on top
of the steering wheel while the
arm is fully extended and
shoulders are on the backrest.
● Adjust the steering wheel 3 55.
● Adjust the head restraint 3 27.
● Adjust the lumbar support so that
it supports the natural shape ofthe spine.
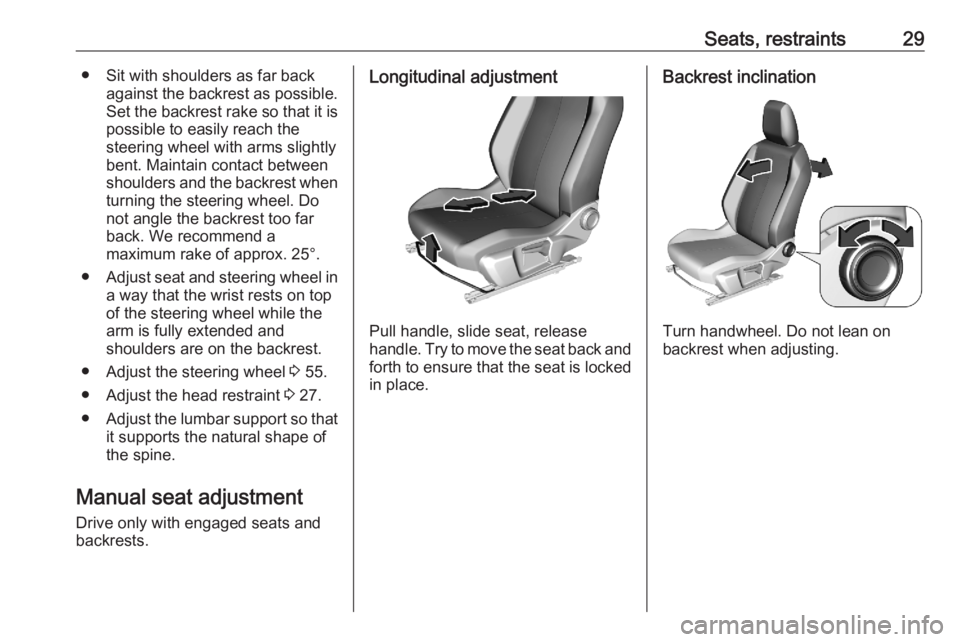
Manual seat adjustment
Drive only with engaged seats and
backrests.Longitudinal adjustment
Pull handle, slide seat, release
handle. Try to move the seat back and forth to ensure that the seat is locked
in place.
Backrest inclination
Turn handwheel. Do not lean on
backrest when adjusting.