tow OPEL CROSSLAND X 2017.75 Manual user
[x] Cancel search | Manufacturer: OPEL, Model Year: 2017.75, Model line: CROSSLAND X, Model: OPEL CROSSLAND X 2017.75Pages: 245, PDF Size: 7.6 MB
Page 160 of 245
158Driving and operatingDisplay indication
The instructions on the display show: ● General hints and warning messages.
● The demand to stop the vehicle, when a parking slot is detected.
● The direction of driving during the
parking manoeuvre.
● The demand to shift into reverse or first gear.
● The demand to stop or to drive slowly.
● The successful completion of the
parking manoeuvre indicated by
a pop-up symbol and a chime.
● The cancelling of a parking manoeuvre.
Deactivation The current park assist manoeuvre is
cancelled via the button to return to
the previous screen in the Colour-
Info-Display. To deactivate the
system completely, press r Off in
the centre console.The system is deactivated
automatically:
● if the ignition is switched off
● if stalling the engine
● if no manoeuvre is started within 5 minutes of selection of the type
of manoeuvre
● after a prolonged stop of the vehicle during a manoeuvre
● if the electronic stability control (ESC) is triggered
● if the speed of the vehicle exceeds the stated limit
● when the driver interrupts movement of the steering wheel
● after 4 manoeuvre cycles
● on opening the driver's door
● if one of the front wheels encounters an obstacle
● parking manoeuvre successfully ended
Deactivation by the driver or by the system during manoeuvring will be indicated on the display. Additionally,
an acoustic signal sounds.The system is switched off
automatically when towing a
electrically connected trailer.
Contact your dealer to switch off the
system for a prolonged period.
Fault
In the event of a fault, $ flashes for a
few seconds, accompanied by an
acoustic signal. If the fault occurs during the use of the system, $
extinguishes.
In the event of a fault in the power
steering, c flashes in the instrument
panel, accompanied by a message.9 Warning
Under certain circumstances,
various reflective surfaces on
objects or clothing as well as
external noise sources may cause the system to fail to detect
obstacles.
Special attention must be paid to
low obstacles which can damage
the lower part of the bumper.
Page 163 of 245
Driving and operating161The state of the system is stored
when switching off the ignition.
The system is automatically
deactivated when towing an
electrically connected trailer.
Fault
In the event of a fault, B flashes for a
few moments in the instrument panel,
accompanied by F and a
display message. Contact a dealer or a qualified workshop to have the
system checked.
Panoramic view system
This system allows views of the
vehicle's surroundings to be
displayed as a nearly 180° picture in
the Info display, like a bird's eye view.
The system uses: ● rear camera, installed in the tailgate
● ultrasonic parking sensors in the rear bumper
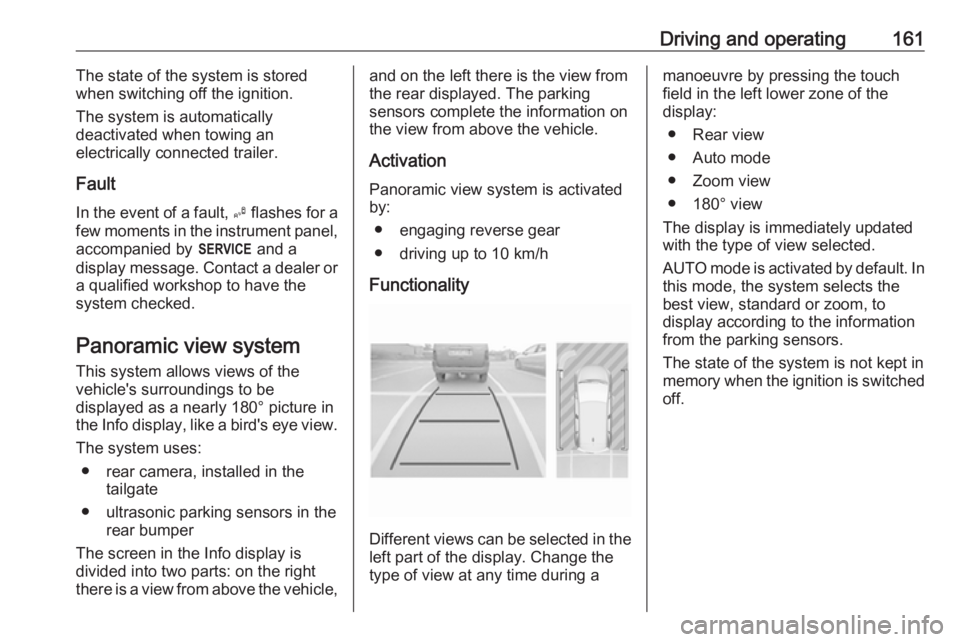
The screen in the Info display is
divided into two parts: on the right
there is a view from above the vehicle,and on the left there is the view from
the rear displayed. The parking
sensors complete the information on
the view from above the vehicle.
Activation
Panoramic view system is activated
by:
● engaging reverse gear
● driving up to 10 km/h
Functionality
Different views can be selected in the left part of the display. Change the
type of view at any time during a
manoeuvre by pressing the touch
field in the left lower zone of the
display:
● Rear view
● Auto mode
● Zoom view
● 180° view
The display is immediately updated
with the type of view selected.
AUTO mode is activated by default. In
this mode, the system selects the
best view, standard or zoom, to
display according to the information
from the parking sensors.
The state of the system is not kept in
memory when the ignition is switched
off.
Page 165 of 245
Driving and operating163DeactivationPanoramic view system is
deactivated when:
● driving faster than 10 km/h
● seven seconds after disengaging
reverse gear
● by pressing the icon q in the left
upper corner of the touch screen
● opening the tailgate
General information9 Warning
The panoramic view system does
not replace driver vision. It will not display children, pedestrians,
cyclists, crossing traffic, animals,
or any other objects outside of the camera view area, e. g. below the
bumper, or underneath the
vehicle.
Do not drive or park the vehicle
using only the panoramic view
system.
Always check the surrounding of
the vehicle before driving.
Displayed images may be further
or closer than they appear. The
area displayed is limited and
objects that are close to either
edge of the bumper or under the
bumper are not displayed on the
screen.
System limitations
Caution
For optimal operation of the
system, it is important to keep the
lense of the camera in the tailgate between the number plate lightsalways clean. Rinse the lense with water and wipe with a soft cloth.
Do not clean the lense with a
steam-jet or high-pressure jet
cleaner.
The panoramic view system may not
operate properly when:
● The surrounding is dark.
● The sun or the beam of headlights is shining directly into
the camera lenses.
● During nighttime driving.
● Weather limits visibility, such as fog, rain, or snow.
● The camera lenses are blocked by snow, ice, slush, mud, dirt.
● The vehicle is towing a trailer.
● The vehicle had an accident.
● There are extreme temperature changes.
Rear view camera The rear view camera assists the
driver when reversing by displaying a
view of the area behind the vehicle.
The view of the camera is displayed
in the Info-Display.9 Warning
The rear view camera does not
replace driver vision. Note that
objects that are outside the
camera's field of view and the
Page 167 of 245
Driving and operating165● The camera lenses are blockedby snow, ice, slush, mud, dirt.
Clean the lense, rinse with water, and wipe with a soft cloth.
● The tailgate will be opened.
● The vehicle is towing an electrically connected trailer.
● The vehicle had a rear end accident.
● There are extreme temperature changes.
Lane departure warning The lane departure warning systemobserves the lane markings between
which the vehicle is driving via a front
camera. The system detects lane
changes and warns the driver in the
event of an unintended lane change
via visual and acoustic signals.
Criteria for the detection of an
unintended lane change are:
● No operation of turn signals.
● No brake pedal operation.
● No active accelerator operation or speeding-up.If the driver is active, no warning will
be issued.
Activation
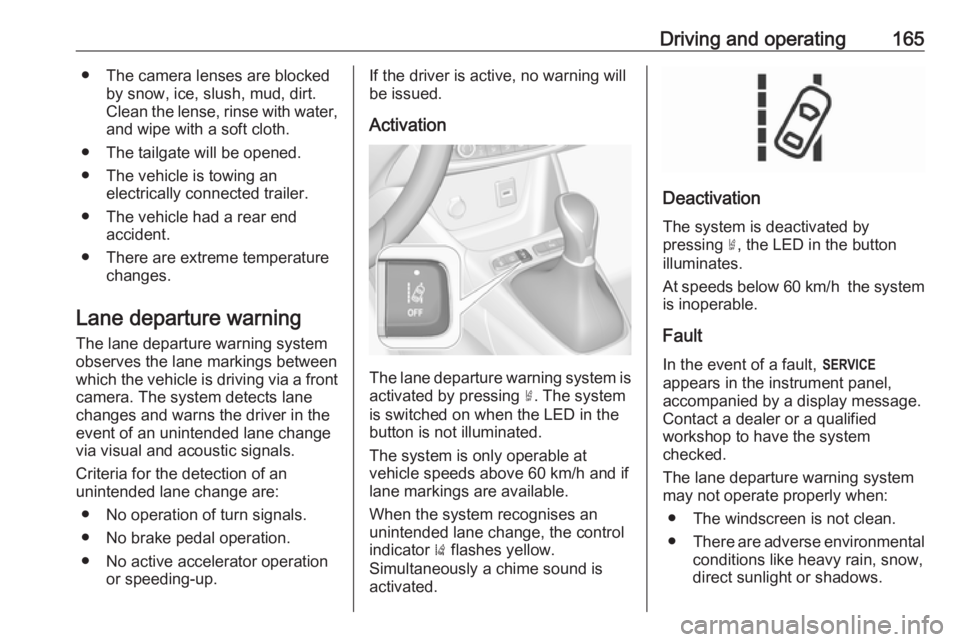
The lane departure warning system isactivated by pressing ½. The system
is switched on when the LED in the
button is not illuminated.
The system is only operable at
vehicle speeds above 60 km/h and if
lane markings are available.
When the system recognises an
unintended lane change, the control
indicator ) flashes yellow.
Simultaneously a chime sound is
activated.
Deactivation
The system is deactivated by
pressing ½, the LED in the button
illuminates.
At speeds below 60 km/h the system
is inoperable.
Fault
In the event of a fault, F
appears in the instrument panel,
accompanied by a display message.
Contact a dealer or a qualified
workshop to have the system
checked.
The lane departure warning system
may not operate properly when:
● The windscreen is not clean.
● There are adverse environmental
conditions like heavy rain, snow,
direct sunlight or shadows.
Page 172 of 245
170Driving and operatingFuel consumption data and CO2
emission data are determined
according to regulation R (EC) No.
715/2007 (in the version respectively
applicable), taking into consideration
the vehicle weight in running order, as specified by the regulation.
The figures are provided only for the
purpose of comparison between
different vehicle variants and must not be taken as a guarantee for the
actual fuel consumption of a
particular vehicle. Additional
equipment may result in higher
results than the stated consumption
and CO 2 figures. Furthermore, fuel
consumption is dependent on
personal driving style as well as road
and traffic conditions.Trailer hitch
General information
The factory-fitted towing equipment is folded up under the rear bumper
fascia.
Entrust retrofitting of towing
equipment to a workshop. It may be
necessary to make changes that
affect the cooling system, heat
shields or other equipment. Only use
towing equipment that has been
approved for your vehicle.
To avoid vehicle damage, the power
tailgate cannot be operated with the
radio remote control when a trailer is
electrically connected.
The bulb outage detection function for
trailer brake light cannot detect a
partial bulb outage, e.g. in case of four times five watt bulbs, the function only
detects lamp outage when only a
single five Watt lamp remains or none remain.
Fitting of towing equipment could
cover the opening of the towing eye.
If this is the case use the coupling ball
bar for towing.Driving characteristics and
towing tips
Before attaching a trailer, lubricatethe coupling ball. However, do not do
so if a stabiliser, which acts on the coupling ball, is being used to reduce snaking movements.
During trailer towing do not exceed a
speed of 80 km/h. A maximum speed
of 100 km/h is only appropriate if an
oscillation damper is used and the
permissible gross trailer weight does
not exceed the vehicle’s curb weight.
For trailers with low driving stability
and caravan trailers, the use of an
oscillation damper is strongly
recommended.
If the trailer starts snaking, drive more
slowly, do not attempt to correct the
steering and brake sharply if
necessary.
When driving downhill, drive in the
same gear as if driving uphill and
drive at a similar speed.
Adjust tyre pressure to the value
specified for full load 3 229.
Page 173 of 245
Driving and operating171Trailer towingTrailer loads
The permissible trailer loads are
vehicle and engine-dependent
maximum values which must not be
exceeded. The actual trailer load is
the difference between the actual
gross weight of the trailer and the
actual coupling socket load with the
trailer coupled.
The permissible trailer loads are
specified in the vehicle documents. In general, they are valid for gradients
up to 12%.
The permissible trailer load applies
up to the specified incline and at sea
level. Since engine power decreases
as altitude increases due to the air
becoming thinner, therefore reducing
climbing ability, the permissible gross train weight also decreases by 10%for every 1000 metres of altitude. The
gross train weight does not have to be reduced when driving on roads with
slight inclines (less than 8%, e.g.
motorways).The permissible gross train weight must not be exceeded. This weight is
specified on the identification plate
3 218.
Vertical coupling load
The vertical coupling load is the load
exerted by the trailer on the coupling
ball. It can be varied by changing the
weight distribution when loading the
trailer.
The maximum permissible vertical
coupling load of 60 kg is specified on
the towing equipment identification
plate and in the vehicle documents.
Always aim for the maximum load,
especially in the case of heavy
trailers. The vertical coupling load
should never fall below 25 kg.Rear axle load
When the trailer is coupled and the
towing vehicle fully loaded, the
permissible rear axle load (see
identification plate or vehicle
documents) may be exceeded by 60 kg , the gross vehicle weight rating
must not be exceeded. If the
permissible rear axle load is
exceeded, a maximum speed of
100 km/h applies.
Towing equipmentCaution
When operating without a trailer,
remove the coupling ball bar.
Stowage of coupling ball bar
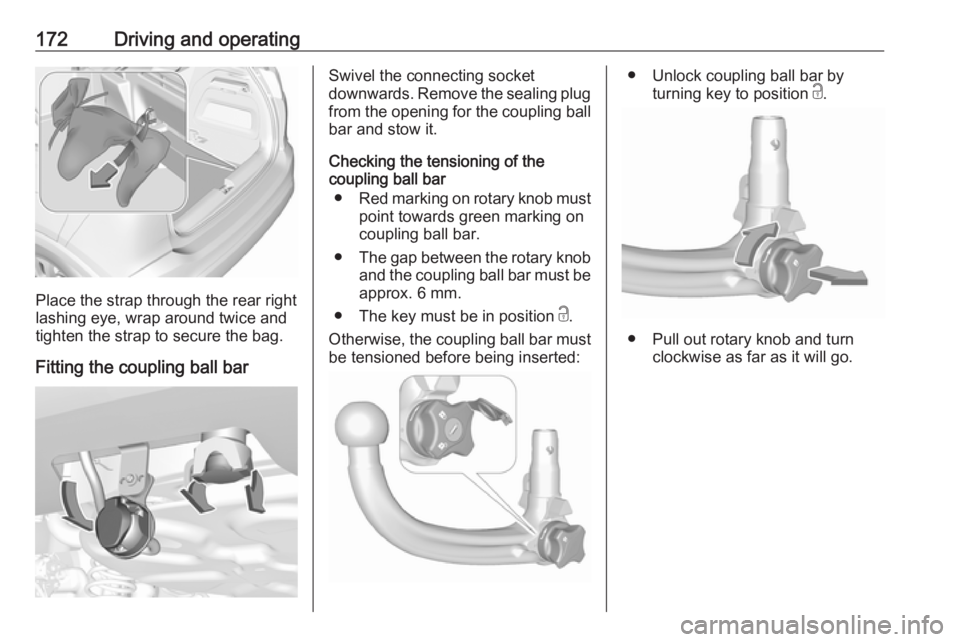
The bag with the coupling ball bar is
stowed on the rear floor cover in the
load compartment.
Page 174 of 245
172Driving and operating
Place the strap through the rear right
lashing eye, wrap around twice and
tighten the strap to secure the bag.
Fitting the coupling ball bar
Swivel the connecting socket
downwards. Remove the sealing plug from the opening for the coupling ball
bar and stow it.
Checking the tensioning of the
coupling ball bar
● Red marking on rotary knob must
point towards green marking on
coupling ball bar.
● The gap between the rotary knob
and the coupling ball bar must be approx. 6 mm.
● The key must be in position c.
Otherwise, the coupling ball bar must
be tensioned before being inserted:● Unlock coupling ball bar by
turning key to position c.
● Pull out rotary knob and turn
clockwise as far as it will go.
Page 175 of 245
Driving and operating173Inserting the coupling ball bar
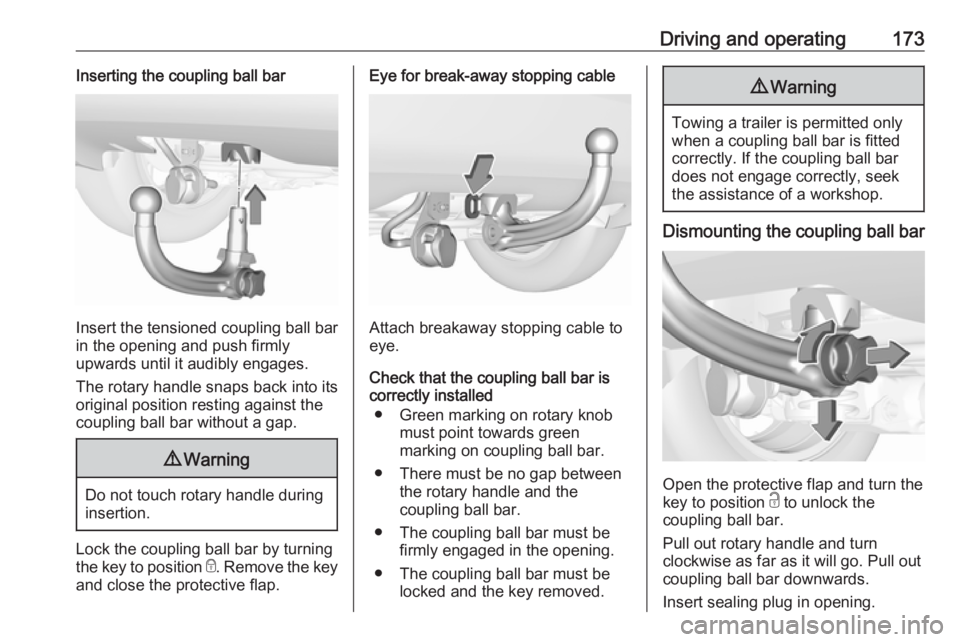
Insert the tensioned coupling ball bar
in the opening and push firmly
upwards until it audibly engages.
The rotary handle snaps back into its
original position resting against the
coupling ball bar without a gap.
9 Warning
Do not touch rotary handle during
insertion.
Lock the coupling ball bar by turning
the key to position e. Remove the key
and close the protective flap.
Eye for break-away stopping cable
Attach breakaway stopping cable to
eye.
Check that the coupling ball bar is correctly installed
● Green marking on rotary knob must point towards green
marking on coupling ball bar.
● There must be no gap between the rotary handle and the
coupling ball bar.
● The coupling ball bar must be firmly engaged in the opening.
● The coupling ball bar must be locked and the key removed.
9Warning
Towing a trailer is permitted only
when a coupling ball bar is fitted correctly. If the coupling ball bardoes not engage correctly, seekthe assistance of a workshop.
Dismounting the coupling ball bar
Open the protective flap and turn the
key to position c to unlock the
coupling ball bar.
Pull out rotary handle and turn
clockwise as far as it will go. Pull out coupling ball bar downwards.
Insert sealing plug in opening.
Page 176 of 245
174Driving and operatingSwivel the connecting socket
upwards.
Stow the coupling ball bar in the bag
and secure by fixing the strap through the rear right lashing eye. Wrap
around twice and tighten the strap to
secure the bag.
Page 177 of 245
Vehicle care175Vehicle careGeneral Information...................175
Accessories and vehicle modifications .......................... 175
Vehicle storage ........................176
End-of-life vehicle recovery .....176
Vehicle checks ........................... 177
Performing work ......................177
Bonnet ..................................... 177
Engine oil ................................. 178
Engine coolant ......................... 179
Washer fluid ............................ 179
Brakes ..................................... 180
Brake fluid ............................... 180
Vehicle battery ......................... 180
Diesel fuel system bleeding .....182
Wiper blade replacement ........182
Bulb replacement .......................183
Halogen headlights ..................183
LED headlights ........................ 185
Fog lights ................................. 185
Tail lights ................................. 186
Side turn signal lights ..............189
Number plate light ...................190
Interior lights ............................ 190
Instrument panel illumination ...190Electrical system ........................190
Fuses ....................................... 190
Engine compartment fuse box . 191
Instrument panel fuse box .......193
Vehicle tools .............................. 195
Tools ........................................ 195
Wheels and tyres .......................196
Winter tyres ............................. 196
Tyre designations ....................196
Tyre pressure .......................... 197
Tyre deflation detection system .................................... 198
Tread depth ............................. 199
Changing tyre and wheel size . 199
Wheel covers ........................... 200
Tyre chains .............................. 200
Tyre repair kit .......................... 200
Wheel changing .......................203
Spare wheel ............................ 206
Jump starting ............................. 207
Towing ....................................... 209
Towing the vehicle ...................209
Towing another vehicle ...........210
Appearance care .......................211
Exterior care ............................ 211
Interior care ............................. 213General Information
Accessories and vehiclemodifications
We recommend the use of genuine
parts and accessories and factory approved parts specific for your
vehicle type. We cannot assess or guarantee reliability of other products
- even if they have a regulatory or
otherwise granted approval.
Any modification, conversion or other changes made to standard vehicle
specifications (including, without
limitation, software modifications,
modifications of the electronic control
units) may invalidate the warranty
offered by Opel. Furthermore, such
changes may affect driver assistance
systems, may impact fuel
consumption, CO 2 emissions and
other emissions of the vehicle and
cause the vehicle to no longer
conform to the type approval,
impacting the validity of your vehicle
registration.