deactivate airbag OPEL CROSSLAND X 2017.75 Manual user
[x] Cancel search | Manufacturer: OPEL, Model Year: 2017.75, Model line: CROSSLAND X, Model: OPEL CROSSLAND X 2017.75Pages: 245, PDF Size: 7.6 MB
Page 58 of 245
56Seats, restraints
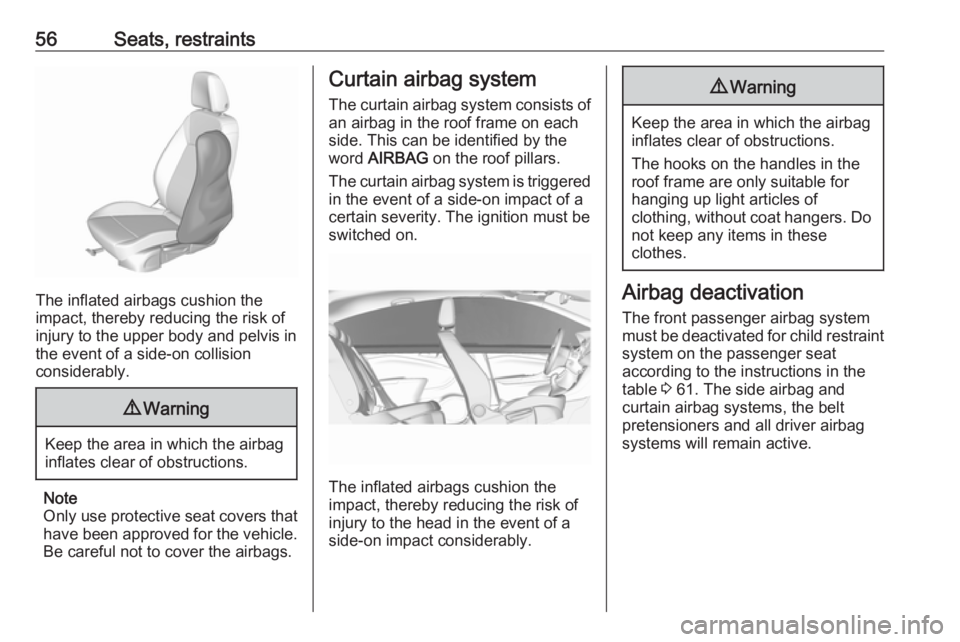
The inflated airbags cushion the
impact, thereby reducing the risk of
injury to the upper body and pelvis in
the event of a side-on collision
considerably.
9 Warning
Keep the area in which the airbag
inflates clear of obstructions.
Note
Only use protective seat covers that
have been approved for the vehicle.Be careful not to cover the airbags.
Curtain airbag system
The curtain airbag system consists of an airbag in the roof frame on each
side. This can be identified by the
word AIRBAG on the roof pillars.
The curtain airbag system is triggered
in the event of a side-on impact of a
certain severity. The ignition must be
switched on.
The inflated airbags cushion the
impact, thereby reducing the risk of
injury to the head in the event of a
side-on impact considerably.
9 Warning
Keep the area in which the airbag
inflates clear of obstructions.
The hooks on the handles in the
roof frame are only suitable for
hanging up light articles of
clothing, without coat hangers. Do not keep any items in these
clothes.
Airbag deactivation
The front passenger airbag system must be deactivated for child restraint
system on the passenger seat
according to the instructions in the
table 3 61. The side airbag and
curtain airbag systems, the belt
pretensioners and all driver airbag
systems will remain active.
Page 59 of 245
Seats, restraints57
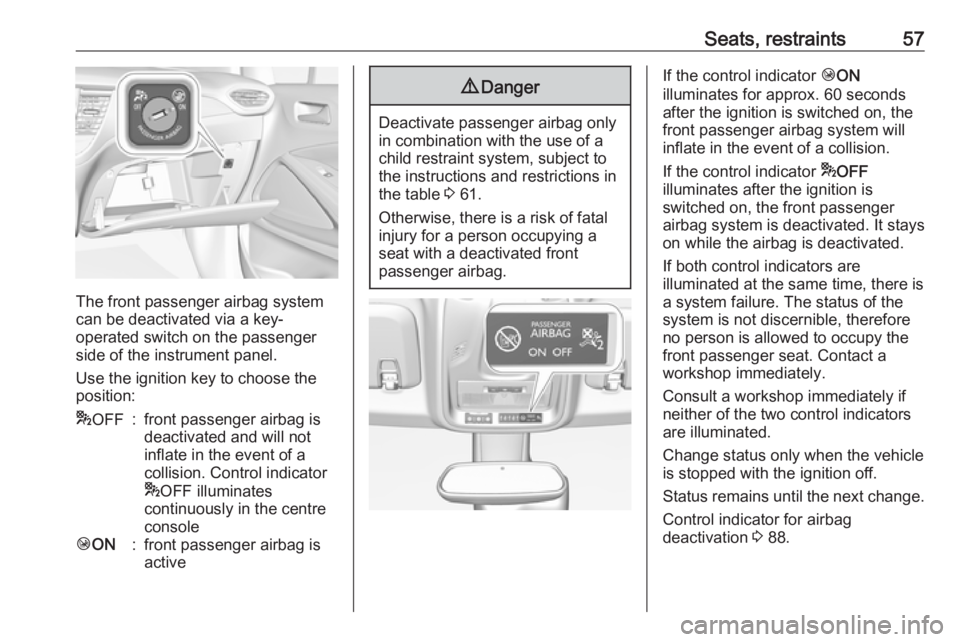
The front passenger airbag system
can be deactivated via a key-
operated switch on the passenger side of the instrument panel.
Use the ignition key to choose the position:
* OFF:front passenger airbag is
deactivated and will not
inflate in the event of a
collision. Control indicator
* OFF illuminates
continuously in the centre
consoleÓ ON:front passenger airbag is
active9 Danger
Deactivate passenger airbag only
in combination with the use of a
child restraint system, subject to
the instructions and restrictions in
the table 3 61.
Otherwise, there is a risk of fatal
injury for a person occupying a
seat with a deactivated front
passenger airbag.
If the control indicator ÓON
illuminates for approx. 60 seconds
after the ignition is switched on, the
front passenger airbag system will
inflate in the event of a collision.
If the control indicator *OFF
illuminates after the ignition is
switched on, the front passenger
airbag system is deactivated. It stays
on while the airbag is deactivated.
If both control indicators are
illuminated at the same time, there is
a system failure. The status of the
system is not discernible, therefore
no person is allowed to occupy the
front passenger seat. Contact a
workshop immediately.
Consult a workshop immediately if
neither of the two control indicators
are illuminated.
Change status only when the vehicle is stopped with the ignition off.
Status remains until the next change.
Control indicator for airbag
deactivation 3 88.
Page 60 of 245

58Seats, restraintsChild restraintsChild restraint systems9 Danger
If using a rear-facing child restraint
system on the front passenger
seat, the airbag system for the
front passenger seat must be
deactivated. This also applies to certain forward-facing child
restraint systems as indicated in
the tables 3 61.
Airbag deactivation 3 56.
Airbag label 3 52.
We recommend a child restraint system which is tailored specifically to the vehicle. For further information,
contact your workshop.
When a child restraint system is being
used, pay attention to the following
usage and installation instructions
and also those supplied with the child
restraint system.
Always comply with local or national
regulations. In some countries, the
use of child restraint systems is
forbidden on certain seats.
Child restraint systems can be
fastened with:
● Three-point seat belt
● ISOFIX brackets
● Top-tether anchor
Three-point seat belt
Child restraint systems can be
fastened by using a three-point seat
belt.
ISOFIX bracketsFasten vehicle-approved ISOFIX
child restraint systems to the ISOFIX
brackets. Specific vehicle ISOFIX
child restraint system positions are
marked in the ISOFIX table 3 61.
ISOFIX brackets are indicated by a label on the backrest.
An i-Size child restraint system is an
universal ISOFIX child restraint
system according UN Regulation No.
129.
All i-Size child restraint systems can be used on any vehicle seat suitable
for i-Size, i-Size table 3 61.
Either a Top-tether strap or a support leg must be used in addition to the
ISOFIX brackets.
Page 63 of 245
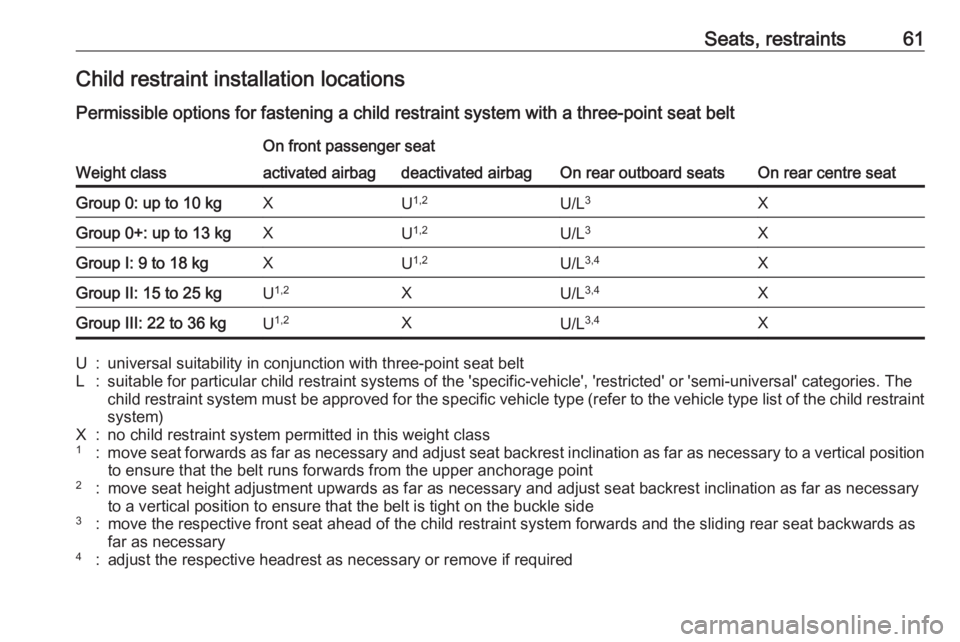
Seats, restraints61Child restraint installation locations
Permissible options for fastening a child restraint system with a three-point seat belt
Weight class
On front passenger seat
On rear outboard seatsOn rear centre seat
activated airbagdeactivated airbagGroup 0: up to 10 kgXU 1,2U/L 3XGroup 0+: up to 13 kgXU1,2U/L 3XGroup I: 9 to 18 kgXU1,2U/L 3,4XGroup II: 15 to 25 kgU1,2XU/L 3,4XGroup III: 22 to 36 kgU1,2XU/L 3,4XU:universal suitability in conjunction with three-point seat beltL:suitable for particular child restraint systems of the 'specific-vehicle', 'restricted' or 'semi-universal' categories. The
child restraint system must be approved for the specific vehicle type (refer to the vehicle type list of the child restraint
system)X:no child restraint system permitted in this weight class1:move seat forwards as far as necessary and adjust seat backrest inclination as far as necessary to a vertical position to ensure that the belt runs forwards from the upper anchorage point2:move seat height adjustment upwards as far as necessary and adjust seat backrest inclination as far as necessaryto a vertical position to ensure that the belt is tight on the buckle side3:move the respective front seat ahead of the child restraint system forwards and the sliding rear seat backwards as far as necessary4:adjust the respective headrest as necessary or remove if required
Page 64 of 245
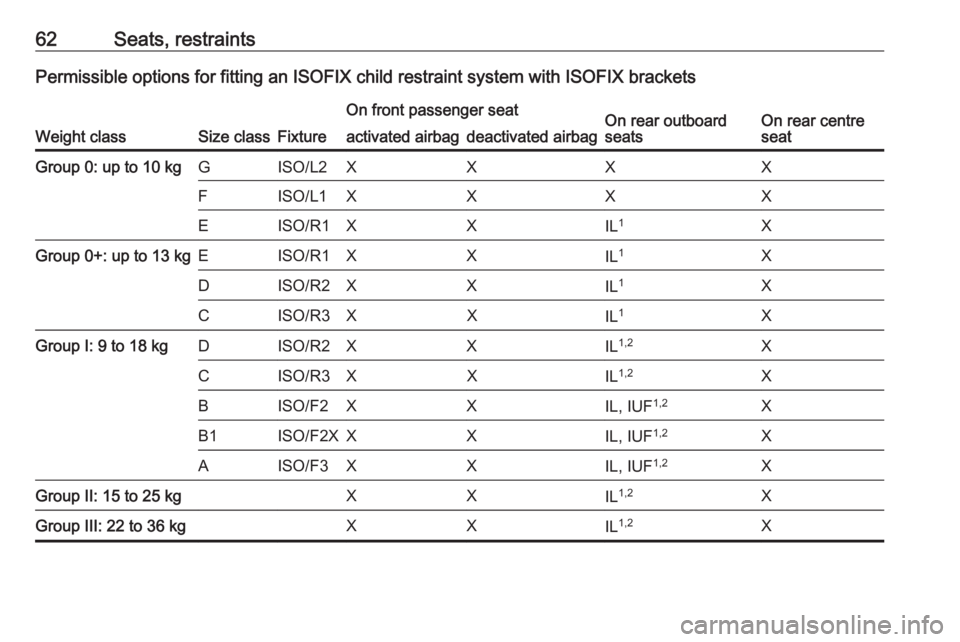
62Seats, restraintsPermissible options for fitting an ISOFIX child restraint system with ISOFIX brackets
Weight classSize classFixture
On front passenger seatOn rear outboard
seatsOn rear centre
seatactivated airbagdeactivated airbagGroup 0: up to 10 kgGISO/L2XXXXFISO/L1XXXXEISO/R1XXIL 1XGroup 0+: up to 13 kgEISO/R1XXIL 1XDISO/R2XXIL1XCISO/R3XXIL1XGroup I: 9 to 18 kgDISO/R2XXIL 1,2XCISO/R3XXIL1,2XBISO/F2XXIL, IUF 1,2XB1ISO/F2XXXIL, IUF 1,2XAISO/F3XXIL, IUF1,2XGroup II: 15 to 25 kgXXIL1,2XGroup III: 22 to 36 kgXXIL1,2X
Page 65 of 245
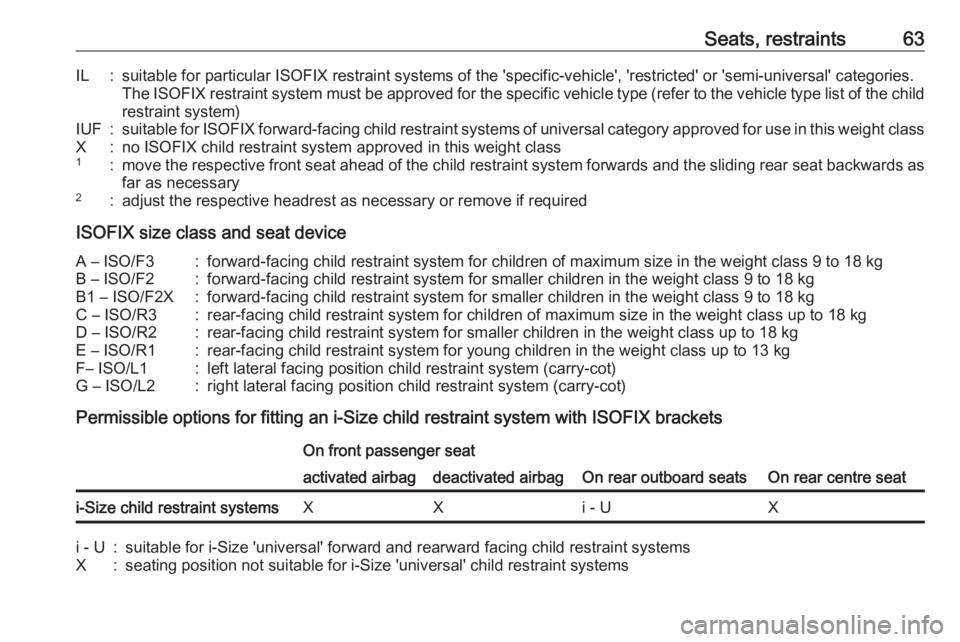
Seats, restraints63IL:suitable for particular ISOFIX restraint systems of the 'specific-vehicle', 'restricted' or 'semi-universal' categories.The ISOFIX restraint system must be approved for the specific vehicle type (refer to the vehicle type list of the child
restraint system)IUF:suitable for ISOFIX forward-facing child restraint systems of universal category approved for use in this weight classX:no ISOFIX child restraint system approved in this weight class1:move the respective front seat ahead of the child restraint system forwards and the sliding rear seat backwards as far as necessary2:adjust the respective headrest as necessary or remove if required
ISOFIX size class and seat device
A – ISO/F3:forward-facing child restraint system for children of maximum size in the weight class 9 to 18 kgB – ISO/F2:forward-facing child restraint system for smaller children in the weight class 9 to 18 kgB1 – ISO/F2X:forward-facing child restraint system for smaller children in the weight class 9 to 18 kgC – ISO/R3:rear-facing child restraint system for children of maximum size in the weight class up to 18 kgD – ISO/R2:rear-facing child restraint system for smaller children in the weight class up to 18 kgE – ISO/R1:rear-facing child restraint system for young children in the weight class up to 13 kgF– ISO/L1:left lateral facing position child restraint system (carry-cot)G – ISO/L2:right lateral facing position child restraint system (carry-cot)
Permissible options for fitting an i-Size child restraint system with ISOFIX brackets
On front passenger seat
On rear outboard seatsOn rear centre seat
activated airbagdeactivated airbagi-Size child restraint systemsXXi - UXi - U:suitable for i-Size 'universal' forward and rearward facing child restraint systemsX:seating position not suitable for i-Size 'universal' child restraint systems
Page 90 of 245

88Instruments and controlsAirbag deactivation
ÓON illuminates yellow.
The front passenger airbag is
activated.
* OFF illuminates yellow.
The front passenger airbag is
deactivated.
Airbag deactivation 3 56.
Charging system
p illuminates red.
Illuminates when the ignition is
switched on and extinguishes shortly
after the engine starts.
Illuminates when the engine is
running
Stop, switch off engine. Vehicle
battery is not charging. Engine
cooling may be interrupted. The
brake servo unit may cease to be
effective. Seek the assistance of a
workshop.
Malfunction indicator light
Z illuminates or flashes yellow.
Illuminates when the ignition is
switched on and extinguishes shortly
after the engine starts.
Illuminates when the engine is
running
Fault in the emission control system.The permitted emission limits may be
exceeded.
Seek the assistance of a workshop
immediately.Flashes when the engine is
running
The engine management system hasa fault that could lead to catalytic
converter damage. Ease up on the accelerator until the flashing stops.
Seek the assistance of a workshop
immediately.
Service vehicle soon
H illuminates yellow.
Illuminates briefly when the ignition is
switched on.
May illuminate together with other
control indicators and a
corresponding message in the Driver
Information Centre.
Seek the assistance of a workshop
immediately.
Stop engine
Y illuminates red.
Illuminates briefly when the ignition is switched on.
Page 106 of 245
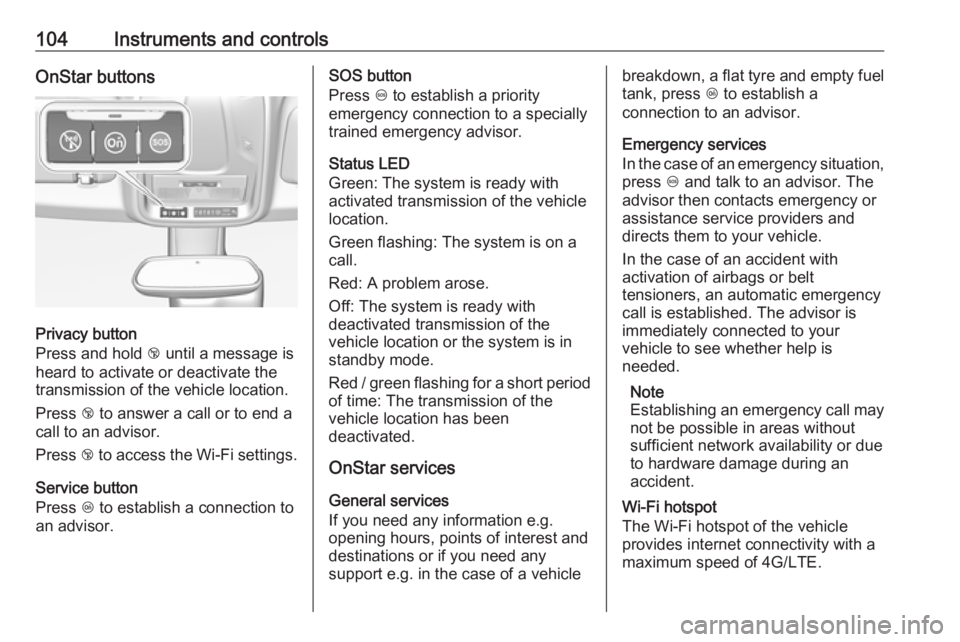
104Instruments and controlsOnStar buttons
Privacy button
Press and hold j until a message is
heard to activate or deactivate the
transmission of the vehicle location.
Press j to answer a call or to end a
call to an advisor.
Press j to access the Wi-Fi settings.
Service button
Press Z to establish a connection to
an advisor.
SOS button
Press [ to establish a priority
emergency connection to a specially
trained emergency advisor.
Status LED
Green: The system is ready with
activated transmission of the vehicle
location.
Green flashing: The system is on a
call.
Red: A problem arose.
Off: The system is ready with
deactivated transmission of the
vehicle location or the system is in
standby mode.
Red / green flashing for a short period of time: The transmission of the
vehicle location has been
deactivated.
OnStar services
General services
If you need any information e.g.
opening hours, points of interest and
destinations or if you need any
support e.g. in the case of a vehiclebreakdown, a flat tyre and empty fuel
tank, press Z to establish a
connection to an advisor.
Emergency services
In the case of an emergency situation,
press [ and talk to an advisor. The
advisor then contacts emergency or
assistance service providers and
directs them to your vehicle.
In the case of an accident with
activation of airbags or belt
tensioners, an automatic emergency
call is established. The advisor is
immediately connected to your
vehicle to see whether help is
needed.
Note
Establishing an emergency call may
not be possible in areas without
sufficient network availability or due
to hardware damage during an
accident.
Wi-Fi hotspot
The Wi-Fi hotspot of the vehicle
provides internet connectivity with a
maximum speed of 4G/LTE.
Page 108 of 245
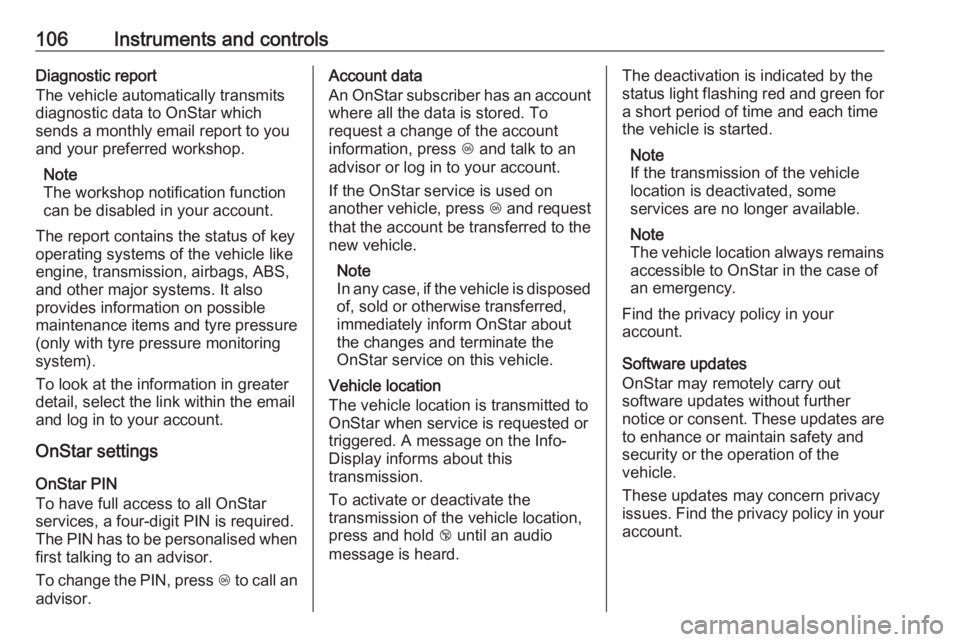
106Instruments and controlsDiagnostic report
The vehicle automatically transmits
diagnostic data to OnStar which
sends a monthly email report to you
and your preferred workshop.
Note
The workshop notification function
can be disabled in your account.
The report contains the status of key
operating systems of the vehicle like
engine, transmission, airbags, ABS,
and other major systems. It also
provides information on possible
maintenance items and tyre pressure (only with tyre pressure monitoring
system).
To look at the information in greater
detail, select the link within the email and log in to your account.
OnStar settings
OnStar PIN
To have full access to all OnStar
services, a four-digit PIN is required. The PIN has to be personalised when first talking to an advisor.
To change the PIN, press Z to call an
advisor.Account data
An OnStar subscriber has an account
where all the data is stored. To
request a change of the account
information, press Z and talk to an
advisor or log in to your account.
If the OnStar service is used on
another vehicle, press Z and request
that the account be transferred to the
new vehicle.
Note
In any case, if the vehicle is disposed of, sold or otherwise transferred,
immediately inform OnStar about
the changes and terminate the
OnStar service on this vehicle.
Vehicle location
The vehicle location is transmitted to OnStar when service is requested ortriggered. A message on the Info-
Display informs about this
transmission.
To activate or deactivate the
transmission of the vehicle location,
press and hold j until an audio
message is heard.The deactivation is indicated by the
status light flashing red and green for
a short period of time and each time
the vehicle is started.
Note
If the transmission of the vehicle
location is deactivated, some
services are no longer available.
Note
The vehicle location always remains accessible to OnStar in the case of
an emergency.
Find the privacy policy in your
account.
Software updates
OnStar may remotely carry out software updates without further notice or consent. These updates are
to enhance or maintain safety and
security or the operation of the
vehicle.
These updates may concern privacy
issues. Find the privacy policy in your account.
Page 134 of 245
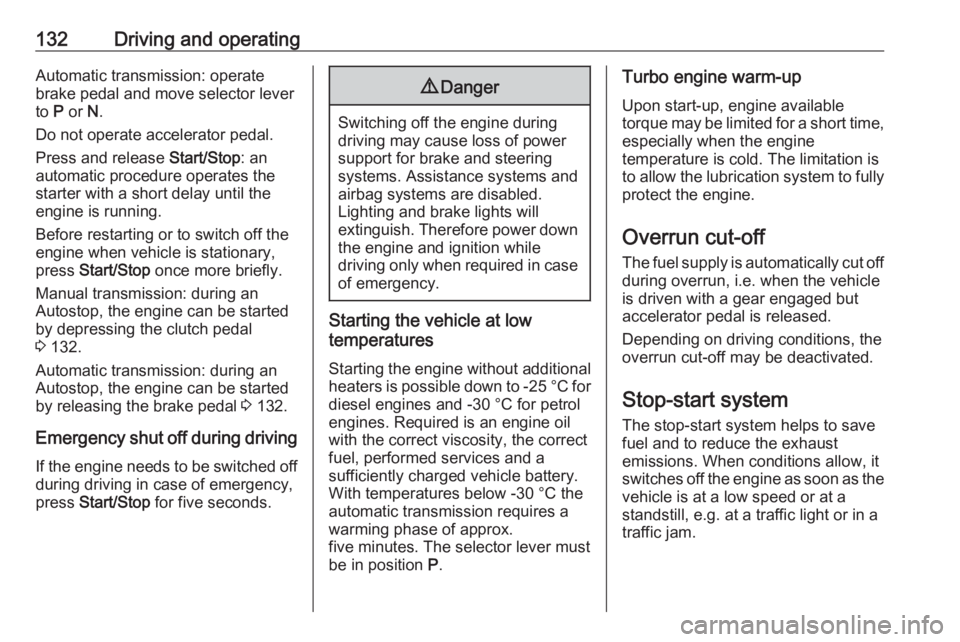
132Driving and operatingAutomatic transmission: operate
brake pedal and move selector lever
to P or N.
Do not operate accelerator pedal.
Press and release Start/Stop: an
automatic procedure operates the
starter with a short delay until the
engine is running.
Before restarting or to switch off the engine when vehicle is stationary, press Start/Stop once more briefly.
Manual transmission: during an
Autostop, the engine can be started
by depressing the clutch pedal
3 132.
Automatic transmission: during an
Autostop, the engine can be started
by releasing the brake pedal 3 132.
Emergency shut off during driving If the engine needs to be switched offduring driving in case of emergency,
press Start/Stop for five seconds.9Danger
Switching off the engine during
driving may cause loss of power
support for brake and steering
systems. Assistance systems and
airbag systems are disabled.
Lighting and brake lights will
extinguish. Therefore power down the engine and ignition while
driving only when required in case of emergency.
Starting the vehicle at low
temperatures
Starting the engine without additional
heaters is possible down to -25 °С for diesel engines and -30 °C for petrol
engines. Required is an engine oil
with the correct viscosity, the correct fuel, performed services and a
sufficiently charged vehicle battery.
With temperatures below -30 °C the
automatic transmission requires a
warming phase of approx.
five minutes. The selector lever must
be in position P.
Turbo engine warm-up
Upon start-up, engine available
torque may be limited for a short time, especially when the engine
temperature is cold. The limitation is
to allow the lubrication system to fully
protect the engine.
Overrun cut-off
The fuel supply is automatically cut off
during overrun, i.e. when the vehicle
is driven with a gear engaged but accelerator pedal is released.
Depending on driving conditions, the
overrun cut-off may be deactivated.
Stop-start system The stop-start system helps to save
fuel and to reduce the exhaust
emissions. When conditions allow, it
switches off the engine as soon as the
vehicle is at a low speed or at a
standstill, e.g. at a traffic light or in a traffic jam.