remove seats OPEL CROSSLAND X 2017.75 Owner's Manual
[x] Cancel search | Manufacturer: OPEL, Model Year: 2017.75, Model line: CROSSLAND X, Model: OPEL CROSSLAND X 2017.75Pages: 245, PDF Size: 7.6 MB
Page 53 of 245

Seats, restraints51
Pull latch plates with the belt out of
belt holder in the roof.
Insert lower latch plate into left-hand
buckle ( 1) at the centre seat. Guide
the upper latch plate with the belt over
the lap area and the shoulder (do not twist) and insert it into right-hand
buckle ( 2) at centre seat.
To unfasten the seat belt, first press the button on the right-hand buckle
( 2 ) and remove upper latch plate.
Then press the button on the left-
hand buckle ( 1) and remove lower
latch plate. The seat belt retracts
automatically.
Using the seat belt while pregnant9 Warning
The lap belt must be positioned as
low as possible across the pelvis
to prevent pressure on the
abdomen.
Page 61 of 245

Seats, restraints59
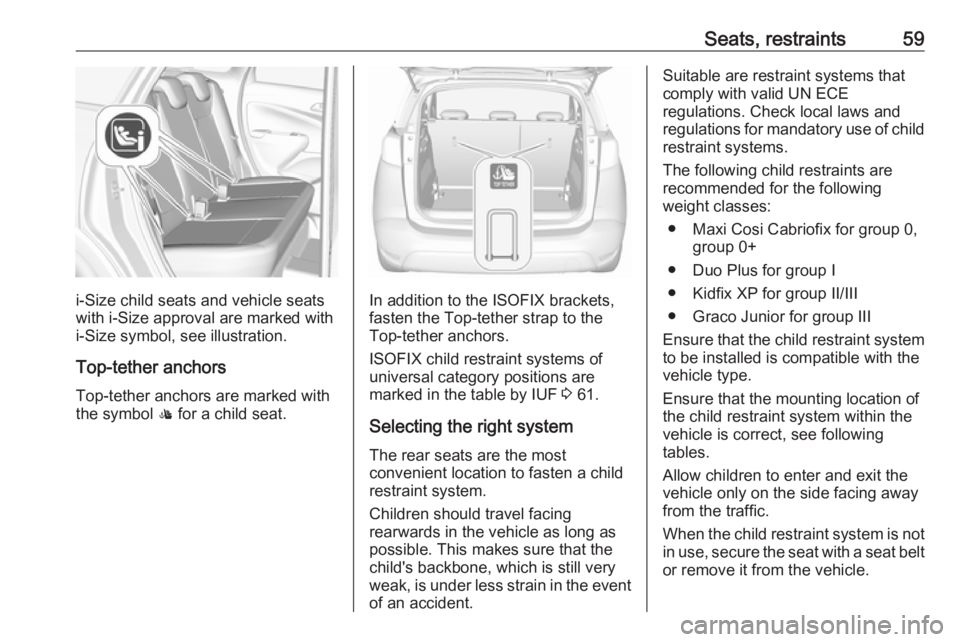
i-Size child seats and vehicle seats
with i-Size approval are marked with
i-Size symbol, see illustration.
Top-tether anchors
Top-tether anchors are marked with
the symbol : for a child seat.In addition to the ISOFIX brackets,
fasten the Top-tether strap to the
Top-tether anchors.
ISOFIX child restraint systems of
universal category positions are
marked in the table by IUF 3 61.
Selecting the right system
The rear seats are the most
convenient location to fasten a child
restraint system.
Children should travel facing
rearwards in the vehicle as long as
possible. This makes sure that the child's backbone, which is still very
weak, is under less strain in the event of an accident.
Suitable are restraint systems that
comply with valid UN ECE
regulations. Check local laws and
regulations for mandatory use of child restraint systems.
The following child restraints are
recommended for the following
weight classes:
● Maxi Cosi Cabriofix for group 0, group 0+
● Duo Plus for group I
● Kidfix XP for group II/III
● Graco Junior for group III
Ensure that the child restraint system
to be installed is compatible with the
vehicle type.
Ensure that the mounting location of
the child restraint system within the
vehicle is correct, see following
tables.
Allow children to enter and exit the
vehicle only on the side facing away
from the traffic.
When the child restraint system is not in use, secure the seat with a seat beltor remove it from the vehicle.
Page 63 of 245

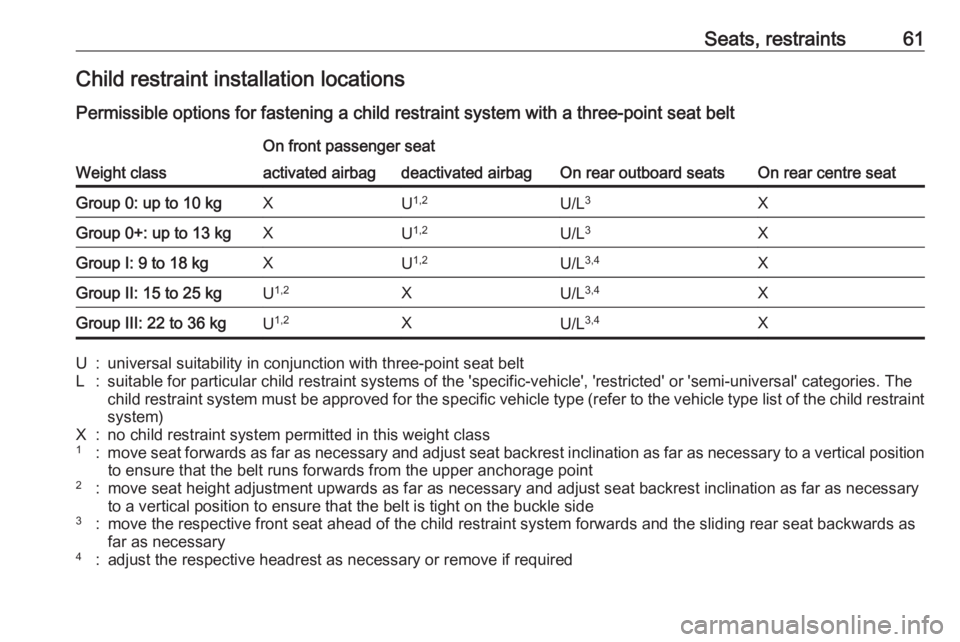
Seats, restraints61Child restraint installation locations
Permissible options for fastening a child restraint system with a three-point seat belt
Weight class
On front passenger seat
On rear outboard seatsOn rear centre seat
activated airbagdeactivated airbagGroup 0: up to 10 kgXU 1,2U/L 3XGroup 0+: up to 13 kgXU1,2U/L 3XGroup I: 9 to 18 kgXU1,2U/L 3,4XGroup II: 15 to 25 kgU1,2XU/L 3,4XGroup III: 22 to 36 kgU1,2XU/L 3,4XU:universal suitability in conjunction with three-point seat beltL:suitable for particular child restraint systems of the 'specific-vehicle', 'restricted' or 'semi-universal' categories. The
child restraint system must be approved for the specific vehicle type (refer to the vehicle type list of the child restraint
system)X:no child restraint system permitted in this weight class1:move seat forwards as far as necessary and adjust seat backrest inclination as far as necessary to a vertical position to ensure that the belt runs forwards from the upper anchorage point2:move seat height adjustment upwards as far as necessary and adjust seat backrest inclination as far as necessaryto a vertical position to ensure that the belt is tight on the buckle side3:move the respective front seat ahead of the child restraint system forwards and the sliding rear seat backwards as far as necessary4:adjust the respective headrest as necessary or remove if required
Page 65 of 245

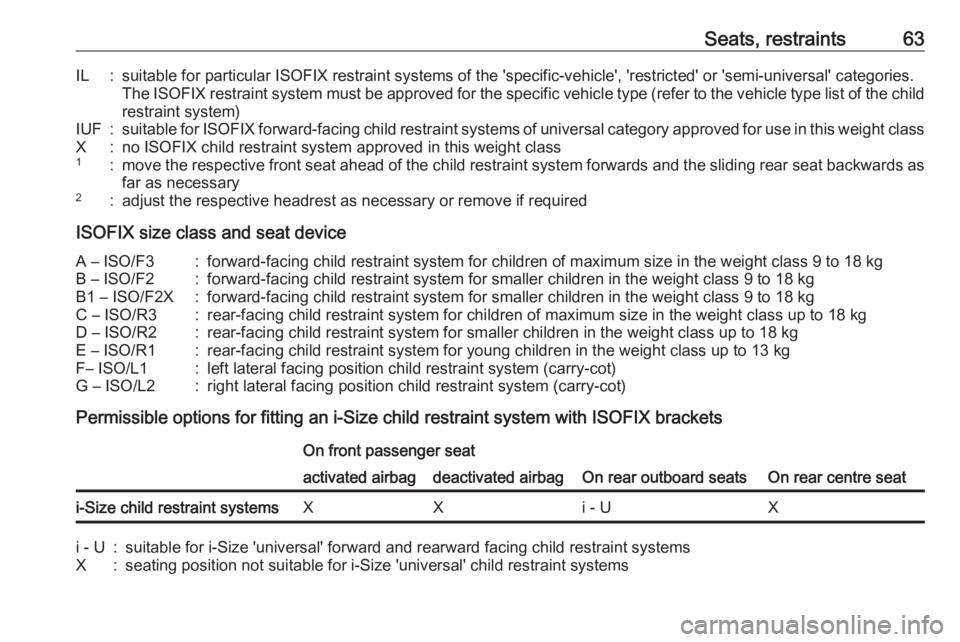
Seats, restraints63IL:suitable for particular ISOFIX restraint systems of the 'specific-vehicle', 'restricted' or 'semi-universal' categories.The ISOFIX restraint system must be approved for the specific vehicle type (refer to the vehicle type list of the child
restraint system)IUF:suitable for ISOFIX forward-facing child restraint systems of universal category approved for use in this weight classX:no ISOFIX child restraint system approved in this weight class1:move the respective front seat ahead of the child restraint system forwards and the sliding rear seat backwards as far as necessary2:adjust the respective headrest as necessary or remove if required
ISOFIX size class and seat device
A – ISO/F3:forward-facing child restraint system for children of maximum size in the weight class 9 to 18 kgB – ISO/F2:forward-facing child restraint system for smaller children in the weight class 9 to 18 kgB1 – ISO/F2X:forward-facing child restraint system for smaller children in the weight class 9 to 18 kgC – ISO/R3:rear-facing child restraint system for children of maximum size in the weight class up to 18 kgD – ISO/R2:rear-facing child restraint system for smaller children in the weight class up to 18 kgE – ISO/R1:rear-facing child restraint system for young children in the weight class up to 13 kgF– ISO/L1:left lateral facing position child restraint system (carry-cot)G – ISO/L2:right lateral facing position child restraint system (carry-cot)
Permissible options for fitting an i-Size child restraint system with ISOFIX brackets
On front passenger seat
On rear outboard seatsOn rear centre seat
activated airbagdeactivated airbagi-Size child restraint systemsXXi - UXi - U:suitable for i-Size 'universal' forward and rearward facing child restraint systemsX:seating position not suitable for i-Size 'universal' child restraint systems
Page 67 of 245

Storage65
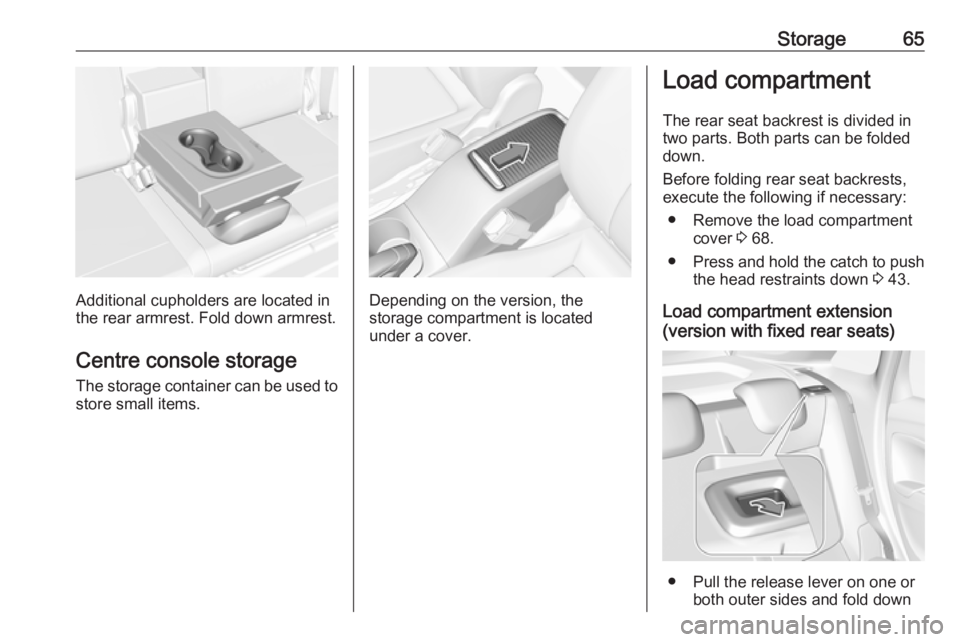
Additional cupholders are located in
the rear armrest. Fold down armrest.
Centre console storage
The storage container can be used to
store small items.Depending on the version, the
storage compartment is located
under a cover.
Load compartment
The rear seat backrest is divided in
two parts. Both parts can be folded
down.
Before folding rear seat backrests,
execute the following if necessary:
● Remove the load compartment cover 3 68.
● Press and hold the catch to push
the head restraints down 3 43.
Load compartment extension
(version with fixed rear seats)
● Pull the release lever on one or both outer sides and fold down
Page 71 of 245

Storage69The cover can also be stored behind
the rear seats.
Double load floor
The double load floor can be inserted
in the load compartment in two
positions:
● lower position above the spare wheel well cover
● upper position interlocked with the grab handle into back panel
trim
To remove, press the handle to
unlock the load floor and lift it up while
using the handle.
If mounted in the upper position, the
space between the load floor and the spare wheel well cover can be used
as a storage compartment.
In this position, if the rear seat
backrests are folded forwards, an
almost completely flat load bay is
created.
In the upper position, the double load
floor is able to withstand a maximum
load of 100 kg. In the lower position,
the double load floor is able to
withstand the maximum permissible
load.
Lashing eyes
The lashing eyes are designed to
secure items against slippage, e.g.
using lashing straps or luggage net.
Page 116 of 245

114LightingLighting featuresCentre console lighting A spotlight integrated in the overheadconsole illuminates the centre
console when headlights are
switched off.
Entry lighting
Welcome lighting Some or all of the following lights are
switched on for a short time by
unlocking the vehicle with the radio
remote control:
● headlights
● tail lights
● number plate lights
● instrument panel light
● interior lights
The number of activated lights
depends on the surrounding light
conditions.
The lighting switches off immediately
when the ignition is switched on.
Starting off 3 18.This function can be activated or
deactivated in the vehicle
personalisation.
Vehicle personalisation 3 100.
The following lights will additionally
switch on when the driver's door is
opened:
● illumination of some switches
● Driver Information Centre
● door pocket lights
Exit lighting The following lights are switched on if
the key is removed from the ignition
switch:
● interior lights
● instrument panel light
They will switch off automatically after
a delay. This function works only in
the dark. Theatre lighting is activated
if the driver's door is opened during
this time.Battery discharge protection
Vehicle battery state of charge
function
The function guarantees longest
vehicle battery life via a generator
with controllable power output and
optimised power distribution.
To prevent discharge of the vehicle
battery when driving, the following
systems are reduced automatically in two stages and finally switched off:
● auxiliary heater
● heated rear window and mirrors ● heated seats
● fan
In the second stage, a message
which confirms the activation of the
vehicle battery discharge protection
will be displayed in the Driver
Information Centre.
Switching off electric lights
To prevent discharge of the vehicle
battery when the ignition is switched
off, some interior lights are switched
off automatically after some time.
Page 197 of 245

Vehicle care195
In right-hand drive vehicles, the fuse
box is behind a cover in the
instrument panel. Disengage cover at
the side and remove.
No.Circuit1Heated rear window2Heated exterior mirrors3Front power window4Driver's door control unit5Rear power window6Heated seats7–8Infotainment9–10Power outlet rear11–12–Vehicle tools
Tools
Vehicles with spare wheel
The jack, tools, a strap for securing a damaged wheel and the towing eye
are placed in the tool box in the right
wall of the load compartment. Spare
wheel 3 206.