tow OPEL CROSSLAND X 2018.5 Manual user
[x] Cancel search | Manufacturer: OPEL, Model Year: 2018.5, Model line: CROSSLAND X, Model: OPEL CROSSLAND X 2018.5Pages: 261, PDF Size: 8.04 MB
Page 123 of 261

Climate control121● Switch on heatedwindscreen ,.
● Open side air vents as required and direct them towards the doorwindows.
Note
If à is pressed while the engine is
running, an Autostop will be inhibited
until à is pressed again.
If à is pressed while the engine is in
an Autostop, the engine will restart
automatically.
Stop-start system 3 136.
Air recirculation system 4Press 4 to activate air recirculation
mode, LED is indicated.
Select air recirculation to assist in
cooling the interior or in blocking
outside odours or exhaust.
Press 4 again to deactivate air
recirculation mode.9 Warning
The exchange of fresh air is
reduced in air recirculation mode.
In operation without cooling, the
air humidity increases, so the
windows may mist up from inside.
The quality of the passenger
compartment air deteriorates,
which may cause the occupants to
feel drowsy.
In warm and very humid ambient air
conditions, the windscreen may mist
up from outside when cold air is
directed towards it. If windscreen
mists up from outside, activate
windscreen wiper and deactivate l.
Maximum cooling
Briefly open the windows so that hot
air can disperse quickly.
● Switch on air conditioning A/C.
● Press 4 for air recirculation
system on.
● Press M for air distribution.
● Set temperature control £ to
coldest level.
● Set fan speed Z to highest level.
● Open all vents.
Page 127 of 261
Climate control125Air conditioning A/C
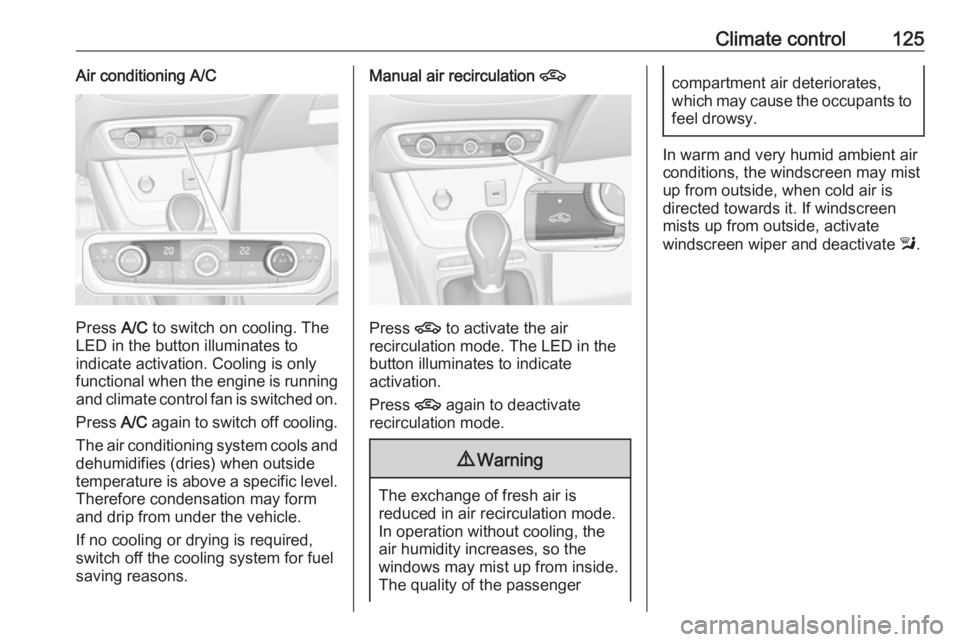
Press A/C to switch on cooling. The
LED in the button illuminates to
indicate activation. Cooling is only
functional when the engine is running and climate control fan is switched on.
Press A/C again to switch off cooling.
The air conditioning system cools and
dehumidifies (dries) when outside
temperature is above a specific level. Therefore condensation may form
and drip from under the vehicle.
If no cooling or drying is required,
switch off the cooling system for fuel
saving reasons.
Manual air recirculation 4
Press 4 to activate the air
recirculation mode. The LED in the
button illuminates to indicate
activation.
Press 4 again to deactivate
recirculation mode.
9 Warning
The exchange of fresh air is
reduced in air recirculation mode.
In operation without cooling, the
air humidity increases, so the
windows may mist up from inside.
The quality of the passenger
compartment air deteriorates,
which may cause the occupants to
feel drowsy.
In warm and very humid ambient air
conditions, the windscreen may mist
up from outside, when cold air is
directed towards it. If windscreen
mists up from outside, activate
windscreen wiper and deactivate l.
Page 132 of 261
130Driving and operatingDriving and
operatingDriving hints ............................... 131
Control of the vehicle ...............131
Steering ................................... 131
Starting and operating ...............131
New vehicle running-in ............131
Ignition switch positions ...........131
Power button ........................... 132
Power saving mode .................133
Starting the engine ..................134
Overrun cut-off ........................ 136
Stop-start system ....................136
Parking .................................... 138
Engine exhaust .......................... 139
Diesel particle filter ..................139
Catalytic converter ...................140
AdBlue ..................................... 140
Automatic transmission ..............143
Transmission display ...............143
Selector lever .......................... 143
Manual mode ........................... 144
Electronic driving programmes 145
Fault ........................................ 145
Interruption of power supply ....145Manual transmission ..................146
Brakes ........................................ 147
Antilock brake system .............147
Parking brake .......................... 148
Brake assist ............................. 148
Hill start assist ......................... 148
Ride control systems .................149
Electronic Stability Control and Traction Control system .........149
Driver assistance systems .........150
Cruise control .......................... 150
Speed limiter ........................... 153
Forward collision alert .............155
Active emergency braking .......157
Front pedestrian protection .....159
Parking assist .......................... 160
Advanced parking assist .........163
Side blind spot alert .................168
Panoramic view system ...........170
Rear view camera ...................172
Lane departure warning ..........174
Driver alert ............................... 175
Fuel ............................................ 176
Fuel for petrol engines .............176
Fuel for diesel engines ............176
Fuel for liquid gas operation ....177
Refuelling ................................ 178Trailer hitch................................ 181
General information .................181
Driving characteristics and towing tips .............................. 182
Trailer towing ........................... 182
Towing equipment ...................183
Page 135 of 261
Driving and operating1339Warning
If the vehicle battery is discharged,
the vehicle must not be towed,
tow-started or jump-started as the
steering wheel lock cannot be
disengaged.
Operation on vehicles with
electronic key system in case of
failure
If either the electronic key fails or the
battery of the electronic key is weak,
the Driver Information Centre may
display No Remote Detected or
Replace Battery in Remote Key when
you try to start the vehicle.
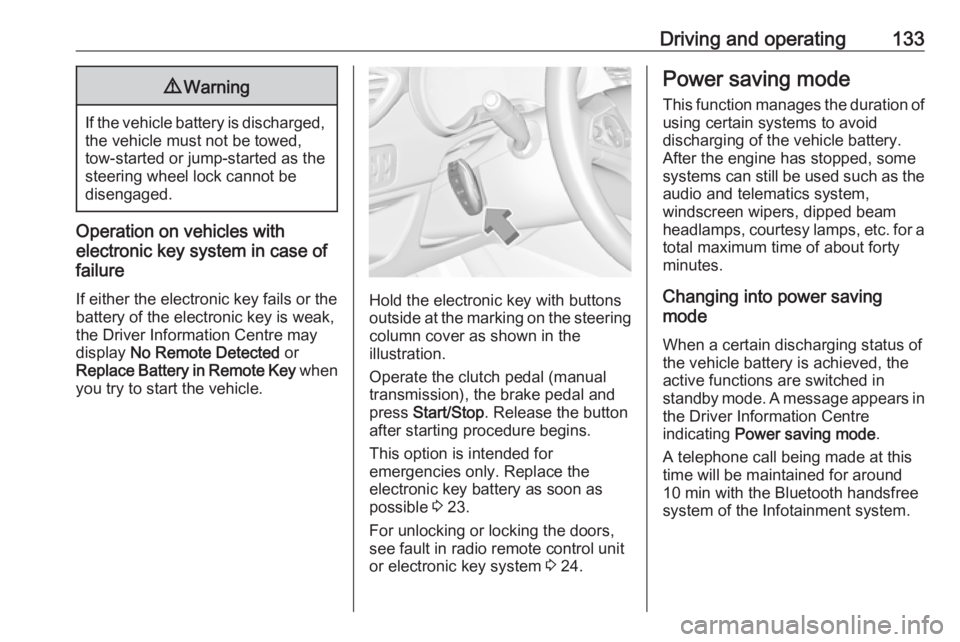
Hold the electronic key with buttons outside at the marking on the steering column cover as shown in the
illustration.
Operate the clutch pedal (manual
transmission), the brake pedal and
press Start/Stop . Release the button
after starting procedure begins.
This option is intended for
emergencies only. Replace the
electronic key battery as soon as
possible 3 23.
For unlocking or locking the doors,
see fault in radio remote control unit
or electronic key system 3 24.
Power saving mode
This function manages the duration of
using certain systems to avoid
discharging of the vehicle battery.
After the engine has stopped, some
systems can still be used such as the audio and telematics system,
windscreen wipers, dipped beam
headlamps, courtesy lamps, etc. for a total maximum time of about forty
minutes.
Changing into power saving
mode
When a certain discharging status of
the vehicle battery is achieved, the
active functions are switched in
standby mode. A message appears in the Driver Information Centre
indicating Power saving mode .
A telephone call being made at this
time will be maintained for around 10 min with the Bluetooth handsfree
system of the Infotainment system.
Page 140 of 261

138Driving and operatingRestart of the engine by the stop-
start system
The selector lever must be in neutralto enable an automatic restart.
If one of the following conditions
occurs during an Autostop, the
engine will be restarted automatically
by the stop-start system:
● The stop-start system is manually deactivated.
● The driver's seat belt is unfastened or the driver's door is
opened.
● The engine temperature is too low.
● The charging level of the vehicle battery is below a defined level.
● The brake vacuum is not sufficient.
● The climate control system requests an engine start.
● The air conditioning is manually switched on.
If an electrical accessory, e.g. a
portable CD player, is connected to
the power outlet, a brief power drop
during the restart might be noticeable.Parking9 Warning
● Do not park the vehicle on an
easily ignitable surface. The
high temperature of the
exhaust system could ignite the
surface.
● Always apply the parking brake. Activate the manual
parking brake without pressing the release button. Apply as
firmly as possible on a downhill slope or uphill slope. Depress
brake pedal at the same time to
reduce operating force.
● Switch off the engine.
● If the vehicle is on a level surface or uphill slope, engage
first gear or set the selector
lever to position P before
removing the ignition key or
switching off ignition on
vehicles with power button. On an uphill slope, turn the front
wheels away from the kerb.
If the vehicle is on a downhill
slope, engage reverse gear or
set the selector lever to position
P before removing the ignition
key or switching off ignition on
vehicles with power button.
Turn the front wheels towards
the kerb.
● Close the windows.
● Remove the ignition key from the ignition switch or switch off
ignition on vehicles with power
button. Turn the steering wheel until the steering wheel lock is
felt to engage.
● Lock the vehicle.
● Activate the anti-theft alarm system.
● The engine cooling fans may run
after the engine has been
switched off 3 188.
Caution
After running at high engine
speeds or with high engine loads,
operate the engine briefly at a low
Page 142 of 261
140Driving and operatingCatalytic converter
The catalytic converter reduces the
amount of harmful substances in the
exhaust gases.Caution
Fuel grades other than those listed on pages 3 176, 3 235 could
damage the catalytic converter or
electronic components.
Unburnt petrol will overheat and
damage the catalytic converter.
Therefore avoid excessive use of the starter, running the fuel tank
dry and starting the engine by
pushing or towing.
In the event of misfiring, uneven
engine running, a reduction in engine performance or other unusual
problems, have the cause of the fault
rectified by a workshop as soon as
possible. In an emergency, driving
can be continued for a short period,
keeping vehicle speed and engine
speed low.
AdBlue
General information
The selective catalytic reduction
(BlueInjection) is a method to
substantially reduce the nitrogen
oxides in the exhaust emission. This
is achieved by injecting a Diesel
Exhaust Fluid (DEF) into the exhaust
system. The ammonia released by
the fluid reacts with nitrous gases
(NO x) from the exhaust and turns it
into nitrogen and water.
The designation of this fluid is
AdBlue ®
. It is a non-toxic, non-
flammable, colourless and odourless
fluid which consists of 32% urea and
68% water.9 Warning
Avoid contact of your eyes or skin
with AdBlue.
In case of eye or skin contact,
rinse off with water.
Caution
Avoid contact of the paintwork with AdBlue.
In case of contact, rinse off with water.
AdBlue freezes at a temperature of
approx. -11 °C. As the vehicle is
equipped with an AdBlue pre-heater,
the emissions reduction at low
temperatures is ensured. The AdBlue
pre-heater works automatically.
Level warnings
The AdBlue consumption is
approximately 0.7 l per 1000 km. The
consumption can be higher
depending on driving behaviour (e.g.
high load or towing).
Depending on the calculated range of AdBlue, different messages are
displayed in the Driver Information
Centre. The messages and the
restrictions are a legal requirement.
Page 146 of 261
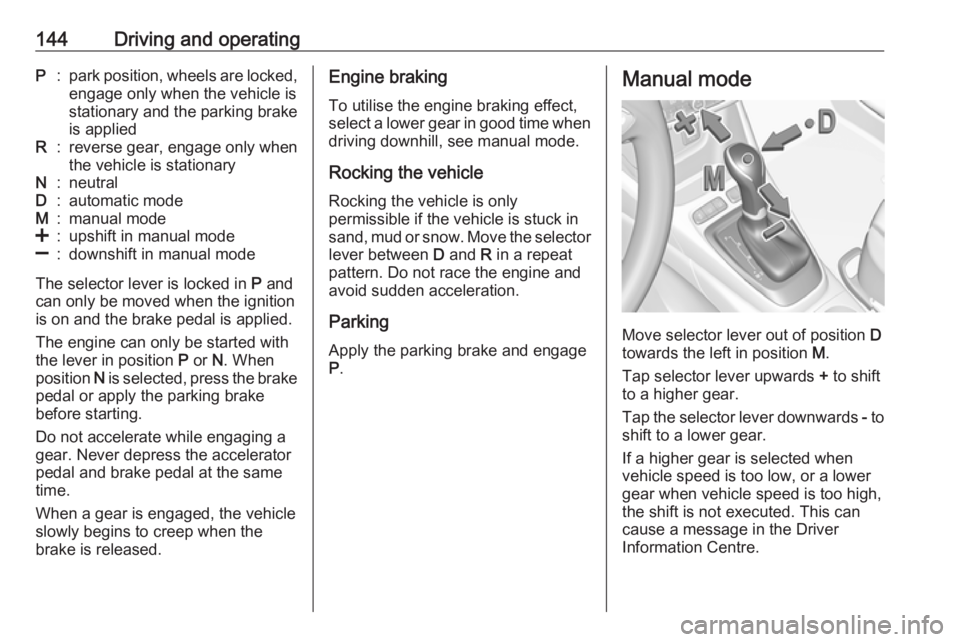
144Driving and operatingP:park position, wheels are locked,engage only when the vehicle is
stationary and the parking brake
is appliedR:reverse gear, engage only when
the vehicle is stationaryN:neutralD:automatic modeM:manual mode<:upshift in manual mode]:downshift in manual mode
The selector lever is locked in P and
can only be moved when the ignition
is on and the brake pedal is applied.
The engine can only be started with
the lever in position P or N. When
position N is selected, press the brake
pedal or apply the parking brake
before starting.
Do not accelerate while engaging a
gear. Never depress the accelerator
pedal and brake pedal at the same
time.
When a gear is engaged, the vehicle
slowly begins to creep when the
brake is released.
Engine braking
To utilise the engine braking effect,select a lower gear in good time when
driving downhill, see manual mode.
Rocking the vehicle Rocking the vehicle is only
permissible if the vehicle is stuck in
sand, mud or snow. Move the selector
lever between D and R in a repeat
pattern. Do not race the engine and
avoid sudden acceleration.
Parking
Apply the parking brake and engage P .Manual mode
Move selector lever out of position D
towards the left in position M.
Tap selector lever upwards + to shift
to a higher gear.
Tap the selector lever downwards - to
shift to a lower gear.
If a higher gear is selected when
vehicle speed is too low, or a lower
gear when vehicle speed is too high,
the shift is not executed. This can
cause a message in the Driver
Information Centre.
Page 149 of 261
Driving and operating147When clutch slip is detected for aspecific time, the engine power will be
reduced. A warning is displayed in the
Driver Information Centre. Release
the clutch.Caution
It is not advisable to drive with the hand resting on the selector lever.
Gear shift indication 3 91.
Stop-start system 3 136.
Brakes
The brake system comprises two
independent brake circuits.
If a brake circuit fails, the vehicle can
still be braked using the other brake
circuit. However, braking effect is
achieved only when the brake pedal
is depressed firmly. Considerably
more force is needed for this. The
braking distance is extended. Seek
the assistance of a workshop before
continuing the journey.
When the engine is not running, the
support of the brake servo unit
disappears once the brake pedal has been depressed once or twice.
Braking effect is not reduced, but
braking requires significantly greater
force. It is especially important to bear this in mind when being towed.
Control indicator R 3 90.
Antilock brake system
Antilock brake system (ABS)
prevents the wheels from locking.ABS starts to regulate brake pressure as soon as a wheel shows a tendency to lock. The vehicle remains
steerable, even during hard braking.
ABS control is made apparent
through a pulse in the brake pedal
and the noise of the regulation
process.
For optimum braking, keep the brake
pedal fully depressed throughout the
braking process, despite the fact that
the pedal is pulsating. Do not reduce
the pressure on the pedal.
When braking in an emergency, the
hazard warning flashers are switched
on automatically depending on the
force of deceleration. They are
switched off automatically the first
time you accelerate.
After starting off, the system performs
a self-test which may be audible.
Control indicator u 3 91.
Page 160 of 261
158Driving and operatingEmergency automatic braking may
slow the vehicle to a complete stop to
try to avoid a potential crash.9 Warning
Emergency automatic braking is
an emergency crash preparation
feature and is not designed to
avoid crashes. Do not rely on the
system to brake the vehicle.
Emergency automatic braking will
not brake outside of its operating speed range and only responds to
detected vehicles and
pedestrians.
Forward looking brake assist
In addition to emergency automatic
braking, the forward looking brake
assist function makes the brake assist more sensitive. Therefore, pressing
the brake pedal less strongly results in immediate hard braking. This
function helps the driver brake
quicker and harder before the
imminent collision.
9 Warning
Active emergency braking is not
designed to apply hard
autonomous braking or to
automatically avoid a collision. It is designed to reduce the vehicle
speed before a collision. It may not
react to animals. After a sudden
lane change, the system needs a
certain time to detect the next
preceding vehicle.
The complete attention of the
driver is always required while
driving. The driver must always be
ready to take action and apply the brakes and steer to avoid
collisions.
The system is designed to work with
all occupants wearing their seat belts.
Forward collision alert
3 155.
Front pedestrian protection
3 159.
Deactivation
Active emergency braking can bedeactivated in the personalisation
menu 3 101. If deactivated, m
illuminates in the instrument cluster
and a warning message is displayed
in the Driver Information Centre.
We recommend to deactivate the
system in the vehicle personalisation
in the following cases:
● when towing a trailer or caravan
● when carrying long objects on roof bars or a roof rack
● when the vehicle is being towed with the engine running
● when a spare wheel is fitted that is smaller than the other wheels
● before using an automatic car wash with the engine running
● before placing the vehicle on a rolling road in a workshop
● if the windscreen has been damaged close to the camera
● if the front bumper has been damaged
● if the brake lamps are not working
Page 167 of 261
Driving and operating165
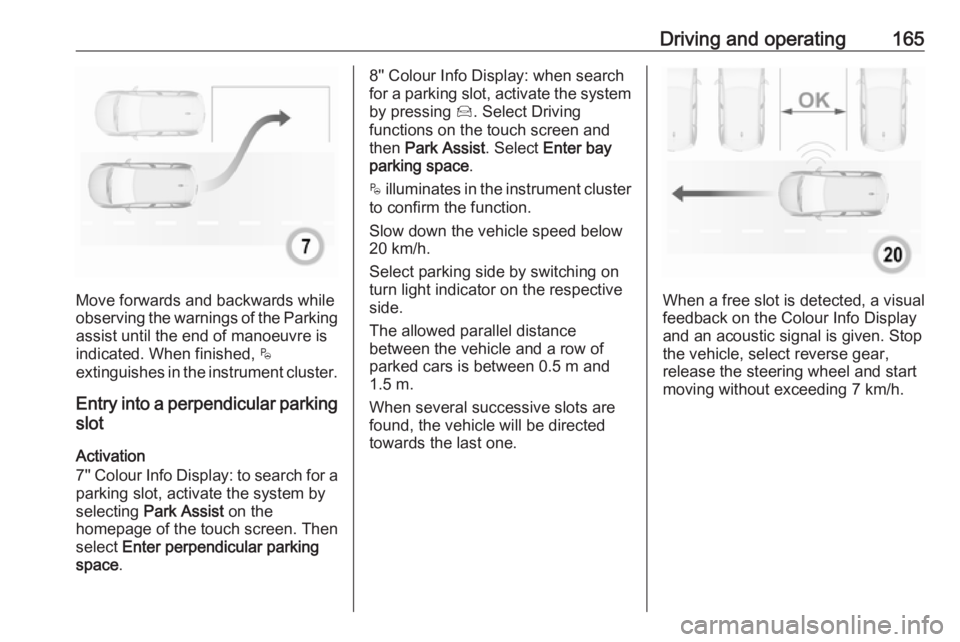
Move forwards and backwards while
observing the warnings of the Parking
assist until the end of manoeuvre is
indicated. When finished, $
extinguishes in the instrument cluster.
Entry into a perpendicular parking
slot
Activation
7'' Colour Info Display: to search for a parking slot, activate the system by
selecting Park Assist on the
homepage of the touch screen. Then
select Enter perpendicular parking
space .
8'' Colour Info Display: when search
for a parking slot, activate the system
by pressing Í. Select Driving
functions on the touch screen and
then Park Assist . Select Enter bay
parking space .
$ illuminates in the instrument cluster
to confirm the function.
Slow down the vehicle speed below
20 km/h.
Select parking side by switching on
turn light indicator on the respective
side.
The allowed parallel distance
between the vehicle and a row of
parked cars is between 0.5 m and
1.5 m.
When several successive slots are found, the vehicle will be directed
towards the last one.
When a free slot is detected, a visual
feedback on the Colour Info Display
and an acoustic signal is given. Stop
the vehicle, select reverse gear,
release the steering wheel and start
moving without exceeding 7 km/h.