parking brake OPEL CROSSLAND X 2018.5 User Guide
[x] Cancel search | Manufacturer: OPEL, Model Year: 2018.5, Model line: CROSSLAND X, Model: OPEL CROSSLAND X 2018.5Pages: 261, PDF Size: 8.04 MB
Page 150 of 261
148Driving and operatingFault9Warning
If there is a fault in the ABS, the
wheels may be liable to lock due
to braking that is heavier than
normal. The advantages of ABS are no longer available. During
hard braking, the vehicle can no longer be steered and may
swerve.
Have the cause of the fault remedied
by a workshop.
Parking brake
9 Warning
Before leaving the vehicle, check
parking brake status. Control
indicator R must illuminate
constantly.
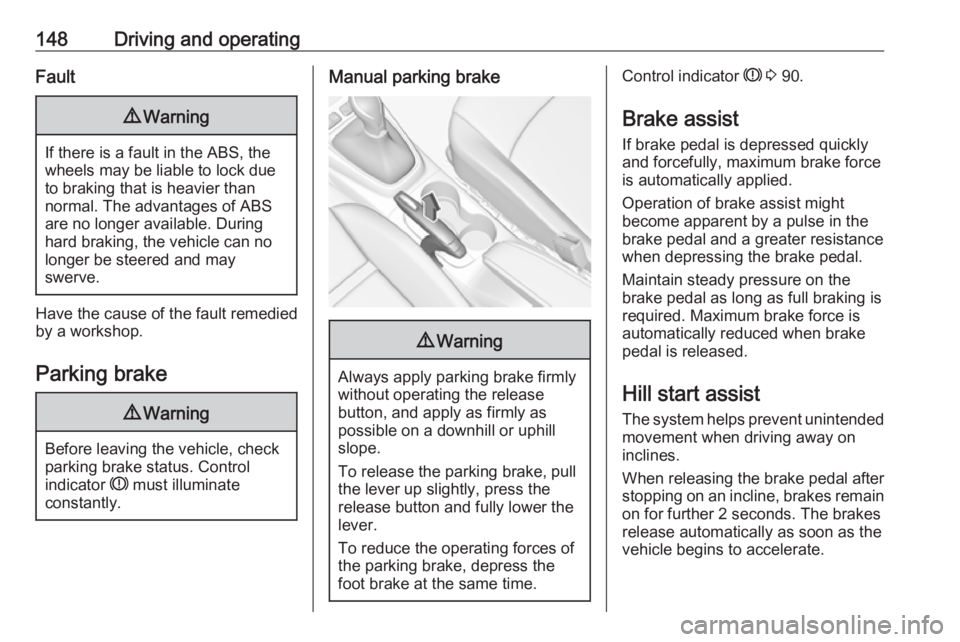
Manual parking brake9 Warning
Always apply parking brake firmly
without operating the release
button, and apply as firmly as
possible on a downhill or uphill
slope.
To release the parking brake, pull
the lever up slightly, press the
release button and fully lower the
lever.
To reduce the operating forces of
the parking brake, depress the
foot brake at the same time.
Control indicator R 3 90.
Brake assist
If brake pedal is depressed quickly
and forcefully, maximum brake force
is automatically applied.
Operation of brake assist might
become apparent by a pulse in the
brake pedal and a greater resistance when depressing the brake pedal.
Maintain steady pressure on the
brake pedal as long as full braking is
required. Maximum brake force is
automatically reduced when brake
pedal is released.
Hill start assist The system helps prevent unintendedmovement when driving away on
inclines.
When releasing the brake pedal after
stopping on an incline, brakes remain on for further 2 seconds. The brakes
release automatically as soon as the
vehicle begins to accelerate.
Page 161 of 261
Driving and operating159System limitationsIn some cases, the active emergencybraking system may provide an
automatic braking in situations that
seem to be unnecessary, for instance
in parking garages, due to traffic signs in a curve or due to vehicles in
another lane. This is normal
operation, the vehicle does not need
service. Firmly apply the accelerator
pedal to override the automatic
braking if the situation and the
surroundings permit.
In the following cases, active
emergency braking performance is limited:
● Driving on winding or hilly roads.
● Detecting all vehicles, especially vehicles with a trailer, tractors,
muddy vehicles, etc.
● Detecting a vehicle when weather limits visibility, such as infog, rain, or snow.
● Driving during nighttime.● Weather limits visibility, such as fog, rain, or snow.
● The windscreen is damaged or affected by foreign items, e.g.
stickers.
Complete attention is always required
while driving, and you should be
ready to take action and apply the
brakes and / or steer the vehicle to
avoid crashes.
Fault
In case the system requires a service, a message is displayed in the Driver
Information Centre.
If the system does not work as it
should do, vehicle messages are
displayed in the Driver Information
Centre.
Vehicle messages 3 100.
Front pedestrian protection Front pedestrian protection may help
to avoid or reduce the harm caused
by front-end crashes with pedestrians when driving forward.The system uses the front camera in
the windscreen to detect a pedestrian directly ahead in your path.
Front pedestrian protection can
detect and alert to pedestrians in a
forward gear at speeds between
5 km/h and 60 km/h.
During nighttime driving, system
performance is limited.9 Danger
Front pedestrian braking does not
provide an alert or automatically
brake the vehicle, unless it detects
a pedestrian.
The system may not detect
pedestrians, including children,
when the pedestrian is not directly ahead, not fully visible, not
standing upright, or when part of a
group.
Front pedestrian protection includes:
● detecting front pedestrian ahead● front pedestrian alert
Page 189 of 261
Vehicle care187Caution
When transporting the vehicle on
a train or on a recovery vehicle, the
mud flaps might be damaged.
Vehicle storage
Storage for a long period of time
If the vehicle is to be stored for several months:
● Wash and wax the vehicle.
● Have the wax in the engine compartment and underbody
checked.
● Clean and preserve the rubber seals.
● Fill up fuel tank completely.
● Change the engine oil.
● Drain the washer fluid reservoir.
● Check the coolant antifreeze and
corrosion protection.
● Adjust tyre pressure to the value specified for full load.
● Park the vehicle in a dry, wellventilated place. Engage first or
reverse gear or set selector lever
to P. Prevent the vehicle from
rolling.
● Do not apply the parking brake.
● Open the bonnet, close all doors and lock the vehicle.
● Disconnect the clamp from the negative terminal of the vehicle
battery. Beware that all systems
are not functional, e.g. anti-theft
alarm system.
Putting back into operation
When the vehicle is to be put back into
operation:
● Connect the clamp to the negative terminal of the vehicle
battery. Activate the electronics
of the power windows.
● Check tyre pressure.
● Fill up the washer fluid reservoir.
● Check the engine oil level.
● Check the coolant level.
● Fit the number plate if necessary.End-of-life vehicle recovery
Information on end-of-life vehicle
recovery centres and the recycling of
end-of-life vehicles is available on our website, where legally required. Only
entrust this work to an authorised
recycling centre.
Page 206 of 261
204Vehicle care
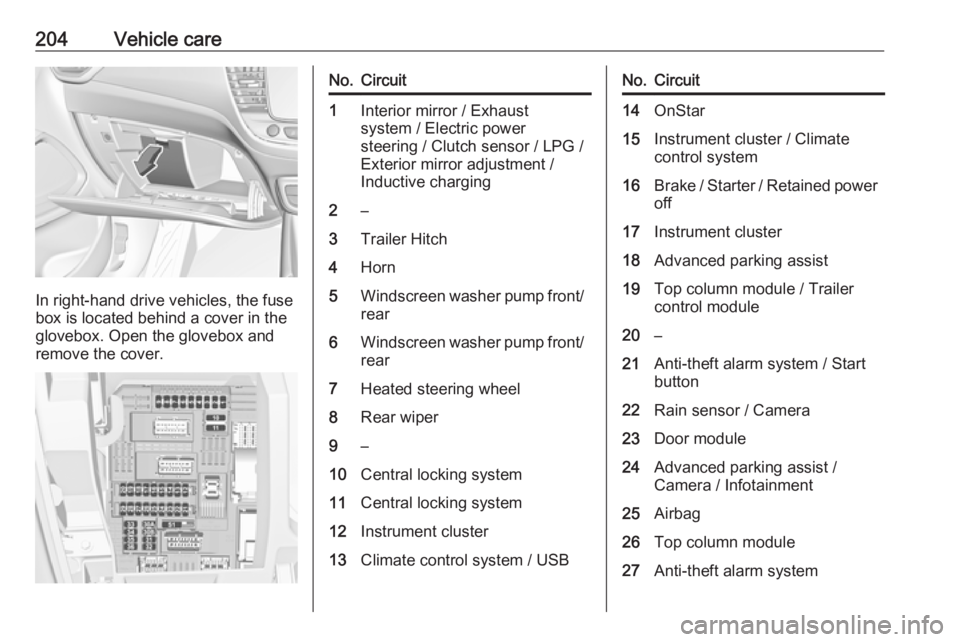
In right-hand drive vehicles, the fuse
box is located behind a cover in the
glovebox. Open the glovebox and
remove the cover.
No.Circuit1Interior mirror / Exhaust
system / Electric power
steering / Clutch sensor / LPG /
Exterior mirror adjustment /
Inductive charging2–3Trailer Hitch4Horn5Windscreen washer pump front/
rear6Windscreen washer pump front/ rear7Heated steering wheel8Rear wiper9–10Central locking system11Central locking system12Instrument cluster13Climate control system / USBNo.Circuit14OnStar15Instrument cluster / Climate
control system16Brake / Starter / Retained power off17Instrument cluster18Advanced parking assist19Top column module / Trailer
control module20–21Anti-theft alarm system / Start
button22Rain sensor / Camera23Door module24Advanced parking assist /
Camera / Infotainment25Airbag26Top column module27Anti-theft alarm system
Page 211 of 261
Vehicle care209In this case reduce speed, avoid
sharp cornering and strong braking. Stop at next safe opportunity and
check tyre pressure.
Control indicator w 3 92.
After adjusting tyre pressure initialise
system to extinguish the control
indicator and restart system.Caution
Deflation detection system warns
just about low tyre pressure
condition and does not replace
regular tyre maintenance by the
driver.
In case of a system malfunction a
message is displayed in the Driver
Information Centre. Set correct tyre
pressure and reinitialise system. If the
failure continues to be displayed,
contact a workshop. The system is
inoperable when ABS or ESC has a
malfunction or a temporary spare
wheel is used. Once the road tyre has
been refitted, check the tyre pressure with cold tyres and initialise the
system.
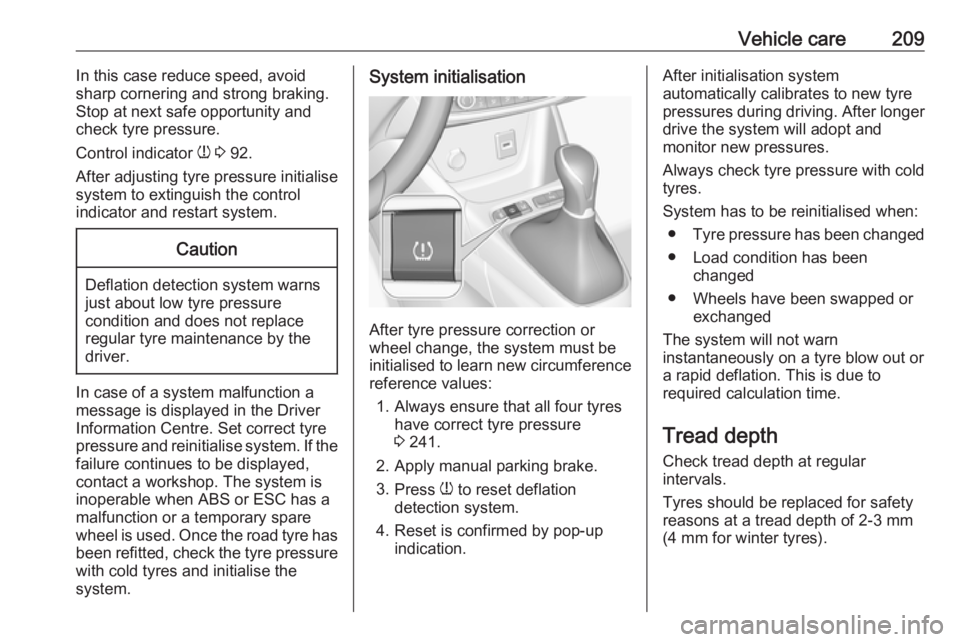
System initialisation
After tyre pressure correction or
wheel change, the system must be
initialised to learn new circumference reference values:
1. Always ensure that all four tyres have correct tyre pressure3 241.
2. Apply manual parking brake.
3. Press w to reset deflation
detection system.
4. Reset is confirmed by pop-up indication.
After initialisation system
automatically calibrates to new tyre
pressures during driving. After longer
drive the system will adopt and
monitor new pressures.
Always check tyre pressure with cold
tyres.
System has to be reinitialised when: ● Tyre pressure has been changed
● Load condition has been changed
● Wheels have been swapped or exchanged
The system will not warn instantaneously on a tyre blow out or
a rapid deflation. This is due to
required calculation time.
Tread depthCheck tread depth at regular
intervals.
Tyres should be replaced for safety
reasons at a tread depth of 2-3 mm
(4 mm for winter tyres).
Page 213 of 261
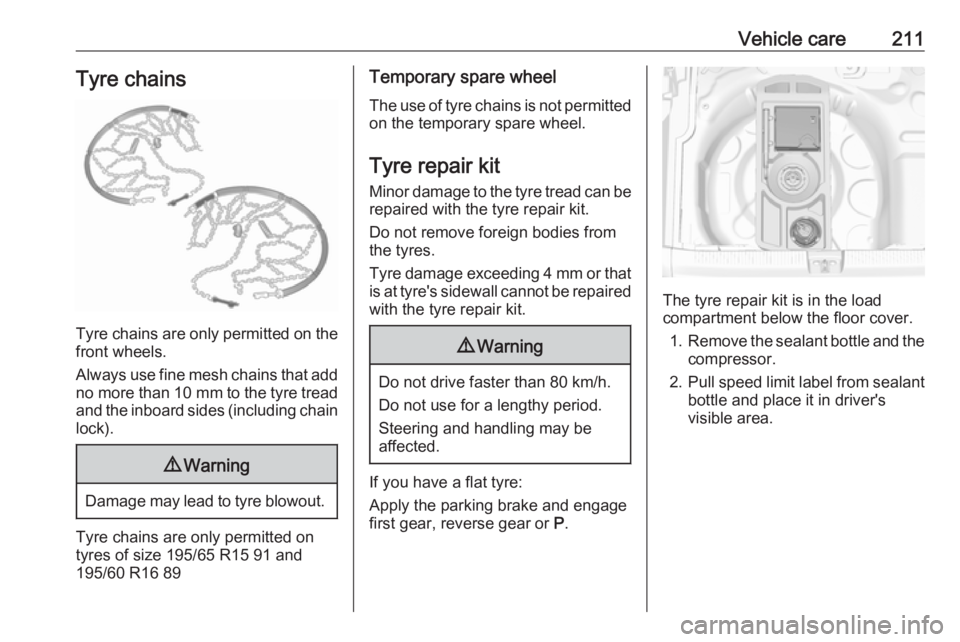
Vehicle care211Tyre chains
Tyre chains are only permitted on the
front wheels.
Always use fine mesh chains that add no more than 10 mm to the tyre tread
and the inboard sides (including chain lock).
9 Warning
Damage may lead to tyre blowout.
Tyre chains are only permitted on
tyres of size 195/65 R15 91 and
195/60 R16 89
Temporary spare wheel
The use of tyre chains is not permitted on the temporary spare wheel.
Tyre repair kit
Minor damage to the tyre tread can be
repaired with the tyre repair kit.
Do not remove foreign bodies from
the tyres.
Tyre damage exceeding 4 mm or that
is at tyre's sidewall cannot be repaired with the tyre repair kit.9 Warning
Do not drive faster than 80 km/h.
Do not use for a lengthy period.
Steering and handling may be
affected.
If you have a flat tyre:
Apply the parking brake and engage
first gear, reverse gear or P.
The tyre repair kit is in the load
compartment below the floor cover.
1. Remove the sealant bottle and the
compressor.
2. Pull speed limit label from sealant
bottle and place it in driver's
visible area.
Page 216 of 261
214Vehicle careRepeat the checking procedure
once more after driving further
10 km (but no more than ten
minutes) to check that there is no
more loss of pressure
If the tyre pressure has fallen
below 1.5 bar, the vehicle must
not be used. Seek the assistance
of a workshop.
17. Stow away tyre repair kit in load compartment.
Note
The driving characteristics of the repaired tyre are severely affected,
therefore have this tyre replaced.
If unusual noise is heard or the
compressor becomes hot, turn
compressor off for at least
30 minutes.
The built-in safety valve opens at a
pressure of seven bar.
Note the expiry date of the kit. After
this date its sealing capability is no
longer guaranteed. Pay attention to
storage information on sealant
bottle.Replace the used sealant bottle. Dispose of the bottle as prescribed
by applicable laws.
The compressor and sealant can be used from approx. -30 °C.
Wheel changing
Make the following preparations and
observe the following information:
● Park the vehicle on a level, firm and non-skid surface. The front
wheels must be in the straight- ahead position.
● If necessary, place a chock under
the wheel diagonally opposite the
wheel to be changed.
● Apply the parking brake and engage first gear, reverse gear orP .
● If the ground on which the vehicle
is standing is soft, a solid board
(max. 1 cm thick) should be
placed under the jack.
● Take heavy objects out of the vehicle before jacking up.
● No people or animals may be in the vehicle when it is jacked-up.● Never crawl under a jacked-upvehicle.
● Do not start the vehicle when it is
raised on the jack.
● Before screwing in the wheel bolts, clean them.9Warning
Do not grease wheel bolts.
Tightening torques
Caution
If the vehicle is equipped with alloy
wheels, tighten the wheel bolts
manually at least for the first five
turns.
There are two different types of
wheels with two different bolts and tightening torques.
Page 218 of 261
216Vehicle care
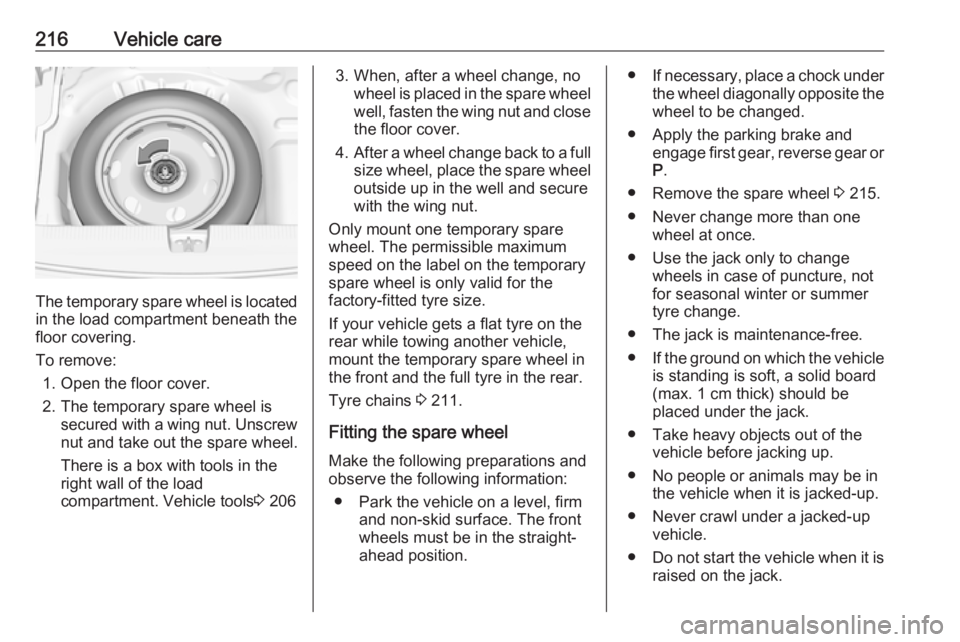
The temporary spare wheel is locatedin the load compartment beneath the
floor covering.
To remove: 1. Open the floor cover.
2. The temporary spare wheel is secured with a wing nut. Unscrew
nut and take out the spare wheel.
There is a box with tools in the
right wall of the load
compartment. Vehicle tools 3 206
3. When, after a wheel change, no
wheel is placed in the spare wheel
well, fasten the wing nut and close the floor cover.
4. After a wheel change back to a full
size wheel, place the spare wheel
outside up in the well and secure
with the wing nut.
Only mount one temporary spare
wheel. The permissible maximum
speed on the label on the temporary
spare wheel is only valid for the
factory-fitted tyre size.
If your vehicle gets a flat tyre on the rear while towing another vehicle,
mount the temporary spare wheel in
the front and the full tyre in the rear.
Tyre chains 3 211.
Fitting the spare wheel
Make the following preparations and
observe the following information:
● Park the vehicle on a level, firm and non-skid surface. The front
wheels must be in the straight- ahead position.● If necessary, place a chock under
the wheel diagonally opposite the
wheel to be changed.
● Apply the parking brake and engage first gear, reverse gear or
P .
● Remove the spare wheel 3 215.
● Never change more than one wheel at once.
● Use the jack only to change wheels in case of puncture, not
for seasonal winter or summer
tyre change.
● The jack is maintenance-free.
● If the ground on which the vehicle
is standing is soft, a solid board
(max. 1 cm thick) should be
placed under the jack.
● Take heavy objects out of the vehicle before jacking up.
● No people or animals may be in the vehicle when it is jacked-up.
● Never crawl under a jacked-up vehicle.
● Do not start the vehicle when it is
raised on the jack.
Page 222 of 261
220Vehicle care● A discharged vehicle battery canalready freeze at a temperature
of 0 °C. Defrost the frozen battery before connecting jump leads.
● Wear eye protection and protective clothing when
handling a battery.
● Use a booster battery with the same voltage (12 V). Its capacity
(Ah) must not be much less than
that of the discharged vehicle
battery.
● Use jump leads with insulated terminals and a cross section of
at least 16 mm 2
(25 mm 2
for
diesel engines).
● Do not disconnect the discharged
vehicle battery from the vehicle.
● Switch off all unnecessary electrical consumers.
● Do not lean over the vehicle battery during jump starting.
● Do not allow the terminals of one
lead to touch those of the other
lead.● The vehicles must not come into contact with each other during
the jump starting process.
● Apply the parking brake, transmission in neutral,
automatic transmission in P.
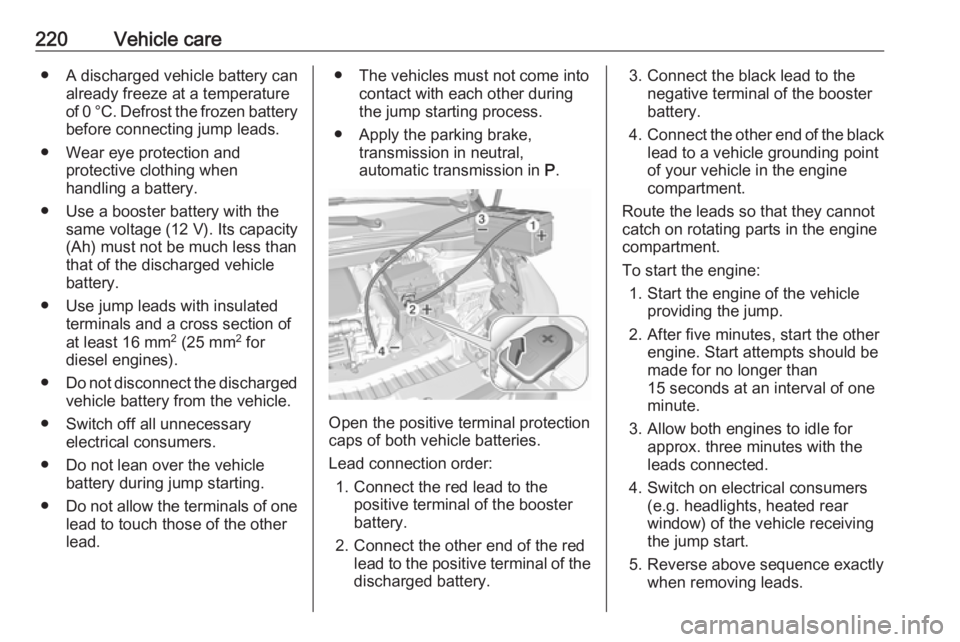
Open the positive terminal protection
caps of both vehicle batteries.
Lead connection order: 1. Connect the red lead to the positive terminal of the booster
battery.
2. Connect the other end of the red lead to the positive terminal of the
discharged battery.
3. Connect the black lead to the negative terminal of the boosterbattery.
4. Connect the other end of the black
lead to a vehicle grounding point
of your vehicle in the engine
compartment.
Route the leads so that they cannot
catch on rotating parts in the engine
compartment.
To start the engine: 1. Start the engine of the vehicle providing the jump.
2. After five minutes, start the other engine. Start attempts should be
made for no longer than
15 seconds at an interval of one
minute.
3. Allow both engines to idle for approx. three minutes with the
leads connected.
4. Switch on electrical consumers (e.g. headlights, heated rear
window) of the vehicle receiving
the jump start.
5. Reverse above sequence exactly when removing leads.
Page 223 of 261
Vehicle care221Towing
Towing the vehicle
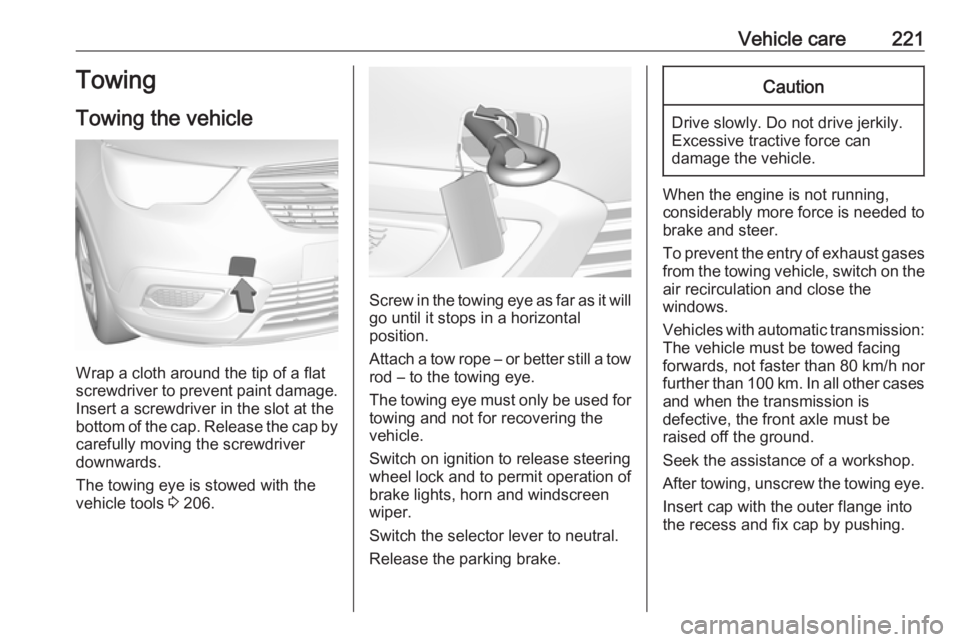
Wrap a cloth around the tip of a flat
screwdriver to prevent paint damage.
Insert a screwdriver in the slot at the
bottom of the cap. Release the cap by carefully moving the screwdriver
downwards.
The towing eye is stowed with the vehicle tools 3 206.
Screw in the towing eye as far as it will
go until it stops in a horizontal
position.
Attach a tow rope – or better still a tow
rod – to the towing eye.
The towing eye must only be used for
towing and not for recovering the
vehicle.
Switch on ignition to release steering
wheel lock and to permit operation of
brake lights, horn and windscreen
wiper.
Switch the selector lever to neutral.
Release the parking brake.
Caution
Drive slowly. Do not drive jerkily.
Excessive tractive force can
damage the vehicle.
When the engine is not running,
considerably more force is needed to
brake and steer.
To prevent the entry of exhaust gases from the towing vehicle, switch on the
air recirculation and close the
windows.
Vehicles with automatic transmission: The vehicle must be towed facing
forwards, not faster than 80 km/h nor further than 100 km. In all other cases
and when the transmission is
defective, the front axle must be
raised off the ground.
Seek the assistance of a workshop.
After towing, unscrew the towing eye.
Insert cap with the outer flange into
the recess and fix cap by pushing.