park assist OPEL CROSSLAND X 2018 Manual user
[x] Cancel search | Manufacturer: OPEL, Model Year: 2018, Model line: CROSSLAND X, Model: OPEL CROSSLAND X 2018Pages: 257, PDF Size: 7.81 MB
Page 171 of 257

Driving and operating169acoustic noise or mechanical
misalignments (sporadic false
warnings may occur).
Make sure that the front number
plate is properly mounted (not bent
and no gaps to the bumper on the left
or right side) and the sensors are
firmly in place.
Advanced parking assist system
may not respond to changes in the
available parking space after
initiating a parking manoeuvre. The
system may recognize an entry, a
gateway, a courtyard or even a crossing as a parking slot. After
selecting reverse gear the system
will start a parking manoeuvre. Take
care regarding the availability of the
suggested parking slot.
Surface irregularities, e.g. on
construction zones, are not detected
by the system. The driver accepts
responsibility.
Side blind spot alert
The Side blind spot alert system
detects and reports objects on either
side of the vehicle, within a specified
"blind spot" zone. The systemdisplays a visual alert in each exterior
mirror, when detecting objects that
may not be visible in the interior and
exterior mirrors.
Side blind spot alert uses some of the advanced parking assist sensors
which are located in the front and rear
bumper on both sides of the vehicle.9 Warning
Side blind spot alert does not
replace driver vision.
The system does not detect:
● vehicles outside the side blind zones which may be rapidly
approaching
● pedestrians, cyclists or animals
Before changing a lane, always
check all mirrors, look over the
shoulder and use the turn signal.
Activation
7'' Colour-Info-Display: select Blind
spot monitoring on the homepage of
the touch screen. System is activated by viewing W.
8'' Colour-Info-Display: press Í.
Select Driving functions on the touch screen and then Blind spot
monitoring . System is activated by
viewing on.
B illuminates continously green in the
instrument cluster to confirm the
function.
Functionality
When the system detects a vehicle in the side blind zone while driving
forwards, a round LED will illuminate
in the relevant exterior mirror.
The LED comes on immediately when being passed.
Page 175 of 257
Driving and operating173Displayed images may be further
or closer than they appear. The
area displayed is limited and
objects that are close to either
edge of the bumper or under the
bumper are not displayed on the
screen.
System limitations
Caution
For optimal operation of the
system, it is important to keep the
lense of the camera in the tailgate between the number plate lightsalways clean. Rinse the lense with water and wipe with a soft cloth.
Do not clean the lense with a
steam-jet or high-pressure jet
cleaner.
The panoramic view system may not
operate properly when:
● The surrounding is dark.
● The sun or the beam of headlights is shining directly into
the camera lenses.
● During nighttime driving.
● Weather limits visibility, such as fog, rain, or snow.
● The camera lenses are blocked by snow, ice, slush, mud, dirt.
● The vehicle is towing a trailer.
● The vehicle had an accident.
● There are extreme temperature changes.
Rear view camera The rear view camera assists the
driver when reversing by displaying a
view of the area behind the vehicle.
The view of the camera is displayed
in the Info-Display.9 Warning
The rear view camera does not
replace driver vision. Note that
objects that are outside the
camera's field of view and the
parking assist sensors, e.g. below
the bumper or underneath the
vehicle, are not displayed.
Do not reverse or park the vehicle
using only the rear view camera.
Always check the surrounding of
the vehicle before driving.
Switching on
Rear view camera is automatically
activated when reverse gear is
engaged.
Functionality
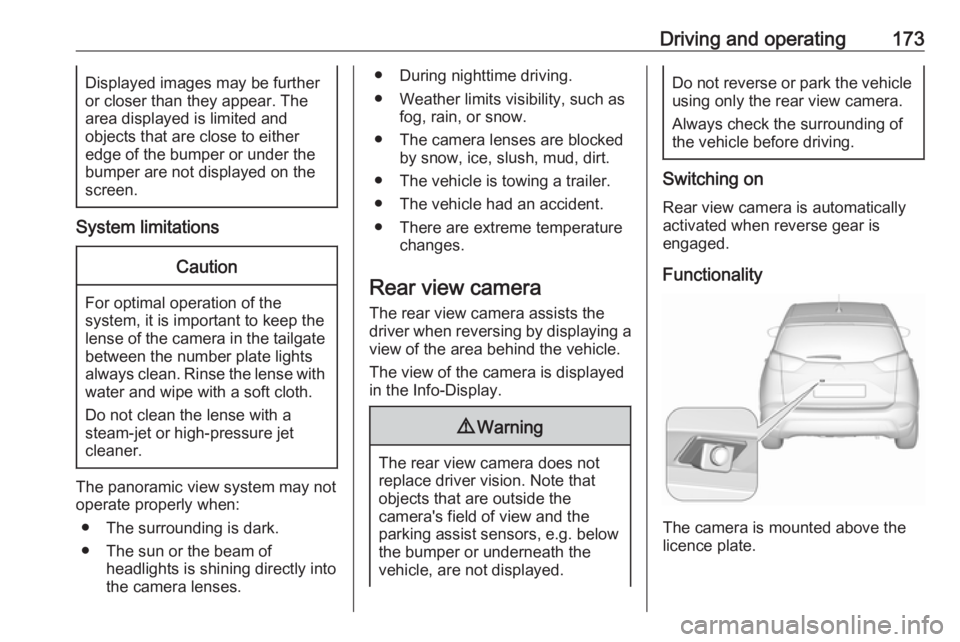
The camera is mounted above the
licence plate.
Page 180 of 257
178Driving and operatingSome fuel does not contain sufficient
quantities of additive to keep fuel injectors and intake valves clean.
To make up for this lack of
detergency, add Fuel System
Treatment PLUS to the fuel tank at
every engine oil change or every
10,000 km, whichever occurs first. It
is available at your workshop.
Fuels containing oxygenates such as
ethers and ethanol, as well as
reformulated fuel, are available in
some cities. If these fuels comply with the previously described
specification, then they are
acceptable to use. However, E85
(85% ethanol) and other fuels
containing more than 15% ethanol
must be used only in FlexFuel
vehicles.Caution
Do not use fuel containing
methanol. It can corrode metal
parts in the fuel system and also
damage plastic and rubber parts.
This damage would not be
covered by the vehicle warranty.
Some fuels, mainly high octane
racing fuels, can contain an octane
enhancing additive called
methylcyclopentadienyl manganese
tricarbonyl (MMT). Do not use fuels or fuel additives with MMT as they can
reduce spark plug life and affect
emission control system
performance. The malfunction
indicator light Z may turn on 3 91. If
this occurs, seek the assistance of a
workshop.
Fuel for diesel engines Only use diesel fuel that complies
with EN 590.
In countries outside the European
Union use Euro-Diesel fuel with a
sulfur concentration below 50 ppm.Caution
Use of fuel that does not comply to EN 590 or similar can lead to
engine powerloss, increased wear
or engine damage.
Do not use marine diesel oils, heating
oils, Aquazole and similar diesel-
water emulsions. Diesel fuels must
not be diluted with fuels for petrol
engines.
Low temperature operation At temperatures below 0° C, some
diesel products with biodiesel blends may clog, freeze or gel, which mayaffect the fuel supply system. Starting
and engine operation may not work
properly. Make sure to fill winter
grade diesel fuel at ambient
temperatures below 0° C.
Arctic grade diesel fuel can be used
in extreme cold temperatures below
-20° C. Using this fuel grade in warm
or hot climates is not recommended
and may cause engine stalling, poor starting or damage on the fuel
injection system.
Fuel for liquid gas operation
Liquid gas is known as LPG
(Liquefied Petroleum Gas) or under its French name GPL (Gaz de Pétrole Liquéfié). LPG is also known as
Autogas.
Page 193 of 257

Vehicle care191After having reconnected the battery
of a vehicle equipped with an anti-
theft alarm system, wait 10 minutes
until you start the engine.
Replacing the vehicle battery Note
Any deviation from the instructions
given in this section may lead to
temporary deactivation or
disturbance of the stop-start system.
When the vehicle battery is being
replaced, please ensure that there
are no open ventilation holes in the
vicinity of the positive terminal. If a
ventilation hole is open in this area, it
must be closed off with a dummy cap,
and the ventilation in the vicinity of the negative terminal must be opened.
Ensure that the battery is always
replaced by the same type of battery.
The vehicle battery has to be
replaced by a workshop.
Stop-start system 3 138.Charging the vehicle battery9 Warning
On vehicles with stop-start
system, ensure that the charging potential does not exceed
14.6 volts when using a battery
charger. Otherwise the vehicle
battery might be damaged.
Jump starting 3 217.
Warning label
Meaning of symbols: ● No sparks, naked flames or smoking.
● Always shield eyes. Explosive gases can cause blindness or
injury.
● Keep the vehicle battery out of reach of children.
● The vehicle battery contains sulphuric acid which could cause
blindness or serious burn
injuries.
● See the Owner's Manual for further information.
● Explosive gas may be present in the vicinity of the vehicle battery.
Diesel fuel system bleeding If the tank has been run dry, the diesel
fuel system must be bled. Switch on
the ignition three times for
15 seconds at a time. Then crank the
engine for a maximum of 40 seconds. Repeat this process after
no less than five seconds. If the
engine fails to start, seek the
assistance of a workshop.
Page 205 of 257
Vehicle care203
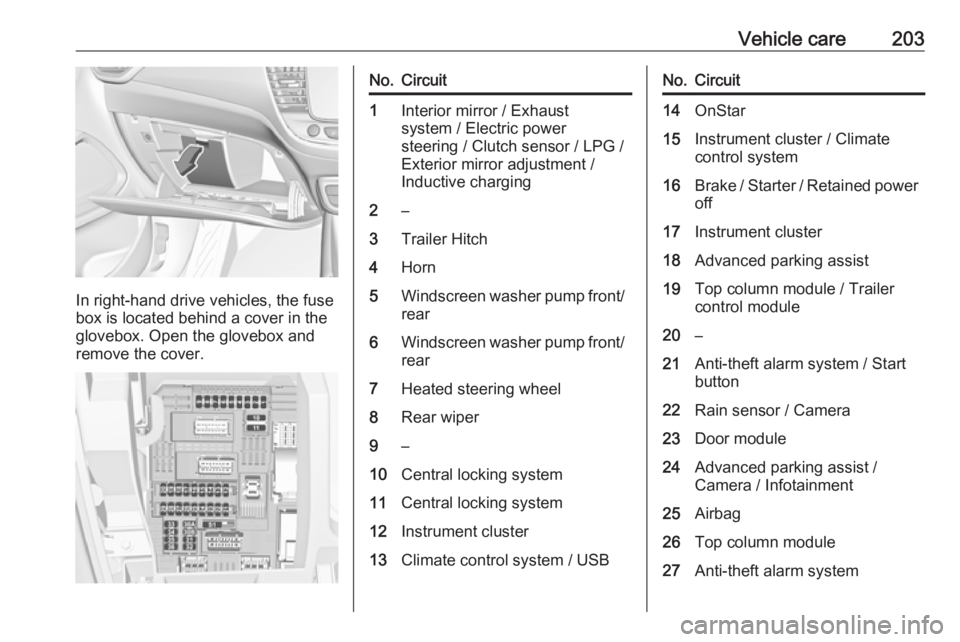
In right-hand drive vehicles, the fuse
box is located behind a cover in the
glovebox. Open the glovebox and
remove the cover.
No.Circuit1Interior mirror / Exhaust
system / Electric power
steering / Clutch sensor / LPG /
Exterior mirror adjustment /
Inductive charging2–3Trailer Hitch4Horn5Windscreen washer pump front/
rear6Windscreen washer pump front/ rear7Heated steering wheel8Rear wiper9–10Central locking system11Central locking system12Instrument cluster13Climate control system / USBNo.Circuit14OnStar15Instrument cluster / Climate
control system16Brake / Starter / Retained power off17Instrument cluster18Advanced parking assist19Top column module / Trailer
control module20–21Anti-theft alarm system / Start
button22Rain sensor / Camera23Door module24Advanced parking assist /
Camera / Infotainment25Airbag26Top column module27Anti-theft alarm system
Page 206 of 257

204Vehicle careNo.Circuit28–29Infotainment30–31Infotainment32Power outlet front33–34Heated exterior mirrors / Door
module35Instrument cluster / Light
switch / Advanced parking
assist/ Transmission control
module36Courtesy lights / Sunvisor
lights / Glovebox lightFuse box on the right side of the
instrument panel
In left-hand drive vehicles, the fuse
box is located behind a cover in the
glovebox. Open the glovebox and
remove the cover. Remove the
bracket.
In right-hand drive vehicles, the fuse
box is behind a cover in the
instrument panel. Disengage cover at
the side and remove.
Page 208 of 257

206Vehicle careWheels and tyres
Tyre condition, wheel condition Drive over edges slowly and at right
angles if possible. Driving over sharp
edges can cause tyre and wheel
damage. Do not trap tyres on the kerb when parking.
Regularly check the wheels for
damage. Seek the assistance of a
workshop in the event of damage or
unusual wear.
Winter tyres
Winter tyres improve driving safety at temperatures below 7 °C and shouldtherefore be fitted on all wheels.
In accordance with country-specific
regulations, affix the speed sticker in
the driver's field of view.
All tyre sizes are permitted as winter
tyres 3 239.Tyre designations
E.g. 195/65 R 15 91 T195:tyre width, mm65:cross-section ratio (tyre height
to tyre width), %R:belt type: RadialRF:type: RunFlat15:wheel diameter, inches91:load index e.g. 95 is equivalent
to 615 kgT:speed code letter
Speed code letter:
Q:up to 160 km/hS:up to 180 km/hT:up to 190 km/hH:up to 210 km/hV:up to 240 km/hW:up to 270 km/h
Choose a tyre appropriate for the
maximum speed of your vehicle.
The maximum speed is achievable at kerb weight with driver (75 kg) plus
125 kg payload. Optional equipment
could reduce the maximum speed of
the vehicle.
Performance 3 235.
Directional tyres
Directional tyres should be mounted
so that they rotate in the correct
direction. The proper rotation
direction is indicated by a symbol
(e.g. an arrow) on the sidewall.
Tyre pressure
Check the pressure of cold tyres at
least every 14 days and before any
long journey. Do not forget the spare
wheel. This also applies to vehicles
with tyre pressure monitoring system.
Tyre pressure 3 239.
Page 215 of 257
Vehicle care213Repeat the checking procedure
once more after driving further
10 km (but no more than ten
minutes) to check that there is no
more loss of pressure
If the tyre pressure has fallen
below 1.5 bar, the vehicle must
not be used. Seek the assistance
of a workshop.
17. Stow away tyre repair kit in load compartment.
Note
The driving characteristics of the
repaired tyre are severely affected, therefore have this tyre replaced.
If unusual noise is heard or the
compressor becomes hot, turn
compressor off for at least
30 minutes.
The built-in safety valve opens at a
pressure of seven bar.
Note the expiry date of the kit. After
this date its sealing capability is no
longer guaranteed. Pay attention to
storage information on sealant
bottle.Replace the used sealant bottle. Dispose of the bottle as prescribed
by applicable laws.
The compressor and sealant can be
used from approx. -30 °C.
Wheel changing Some vehicles are equipped with a
tyre repair kit instead of a spare wheel
3 210.
Make the following preparations and
observe the following information:
● Park the vehicle on a level, firm and non-skid surface. The front
wheels must be in the straight- ahead position.
● Apply the parking brake and engage first gear, reverse gear or
P .
● Remove the spare wheel 3 216.
● Never change more than one wheel at once.
● Use the jack only to change wheels in case of puncture, not
for seasonal winter or summer
tyre change.
● The jack is maintenance-free.● If the ground on which the vehicle
is standing is soft, a solid board
(max. 1 cm thick) should be
placed under the jack.
● Take heavy objects out of the vehicle before jacking up.
● No people or animals may be in the vehicle when it is jacked-up.
● Never crawl under a jacked-up vehicle.
● Do not start the vehicle when it is
raised on the jack.
● Before screwing in the wheel bolts, clean them.9Warning
Do not grease wheel bolts.
9Warning
Ensure to use always the correct
wheel bolts if changing the
wheels. When installing the spare
wheel, the bolts for alloy wheels can also be used.
Page 221 of 257
Vehicle care219Towing
Towing the vehicle
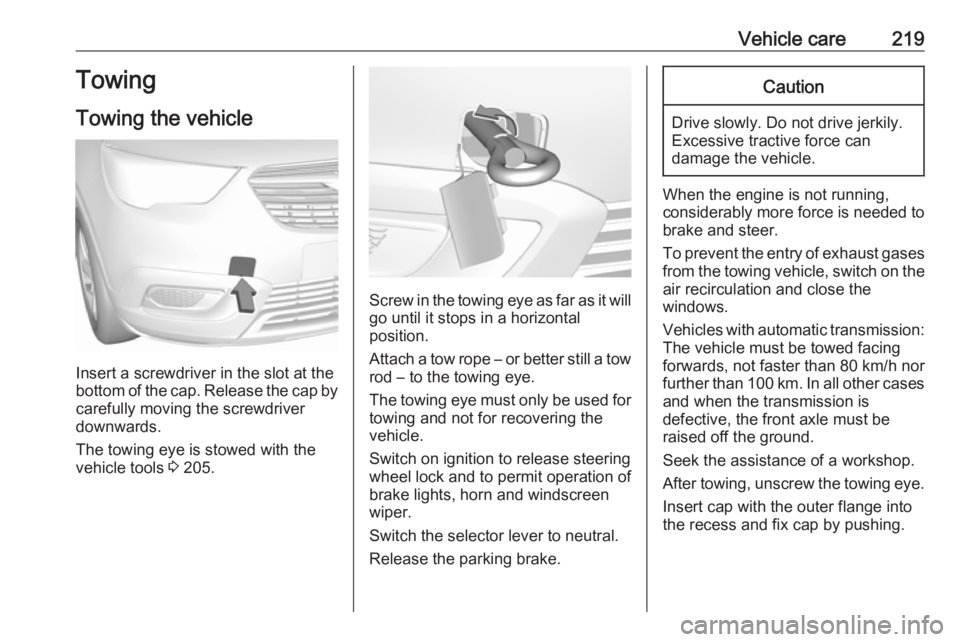
Insert a screwdriver in the slot at the
bottom of the cap. Release the cap by
carefully moving the screwdriver
downwards.
The towing eye is stowed with the vehicle tools 3 205.
Screw in the towing eye as far as it will
go until it stops in a horizontal
position.
Attach a tow rope – or better still a tow
rod – to the towing eye.
The towing eye must only be used for towing and not for recovering the
vehicle.
Switch on ignition to release steering wheel lock and to permit operation of
brake lights, horn and windscreen
wiper.
Switch the selector lever to neutral.
Release the parking brake.
Caution
Drive slowly. Do not drive jerkily.
Excessive tractive force can
damage the vehicle.
When the engine is not running,
considerably more force is needed to
brake and steer.
To prevent the entry of exhaust gases from the towing vehicle, switch on the
air recirculation and close the
windows.
Vehicles with automatic transmission: The vehicle must be towed facing
forwards, not faster than 80 km/h nor further than 100 km. In all other cases
and when the transmission is
defective, the front axle must be
raised off the ground.
Seek the assistance of a workshop.
After towing, unscrew the towing eye.
Insert cap with the outer flange into
the recess and fix cap by pushing.
Page 252 of 257
250IndexAAccessories and vehicle modifications .......................... 185
Active emergency braking ..........157
Adaptive forward lighting ...........113
AdBlue .................................. 94, 142
Adjustable air vents ...................129
Advanced parking assist ............164
Airbag and belt tensioners ...........91
Airbag deactivation ................57, 91
Airbag label................................... 52 Airbag system .............................. 52
Air conditioning regular operation ................................ 131
Air conditioning system .............. 121
Air intake .................................... 130
Air vents...................................... 129
Antilock brake system ................ 149
Antilock brake system (ABS) .......92
Anti-theft alarm system ................33
Anti-theft locking system .............. 32
Appearance care ........................221
Armrest ................................... 47, 48
Ashtrays ....................................... 81
Automatic anti-dazzle ..................37
Automatic light control ...............112
Automatic locking ........................29
Automatic transmission .............145
Autostop ............................... 95, 138
Auxiliary heater ........................... 128B
Battery discharge protection ......119
Battery voltage ........................... 102 Belts.............................................. 49
BlueInjection ............................... 142
Bonnet ....................................... 187
Brake and clutch fluid .................226
Brake and clutch system .............92
Brake assist ............................... 150
Brake fluid .................................. 190
Brakes ............................... 149, 190
Breakdown.................................. 219
Bulb replacement ....................... 192
C
Capacities .................................. 238
Catalytic converter .....................141
Central locking system ................25
Centre console lighting ..............118
Centre console storage ...............66
Changing tyre and wheel size ...209
Charging system .......................... 91
Child locks ................................... 30
Child restraint installation locations ................................... 61
Child restraints.............................. 58
Child restraint systems ................58
Cigarette lighter ........................... 81
Climate control ............................. 16
Climate control systems .............120