height OPEL CROSSLAND X 2018 Owner's Manual
[x] Cancel search | Manufacturer: OPEL, Model Year: 2018, Model line: CROSSLAND X, Model: OPEL CROSSLAND X 2018Pages: 257, PDF Size: 7.81 MB
Page 9 of 257
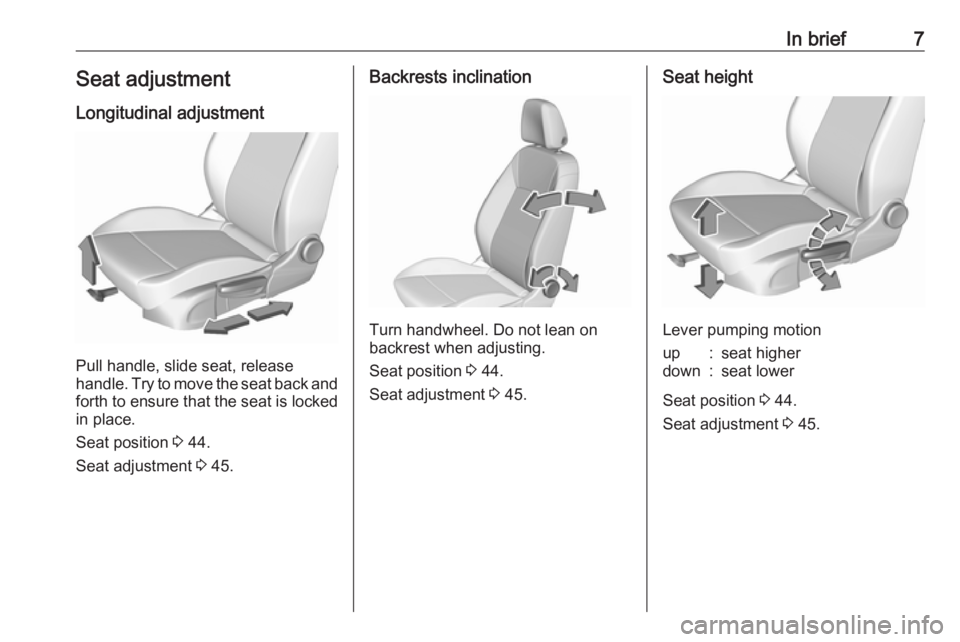
In brief7Seat adjustmentLongitudinal adjustment
Pull handle, slide seat, release
handle. Try to move the seat back and forth to ensure that the seat is locked
in place.
Seat position 3 44.
Seat adjustment 3 45.
Backrests inclination
Turn handwheel. Do not lean on
backrest when adjusting.
Seat position 3 44.
Seat adjustment 3 45.
Seat height
Lever pumping motion
up:seat higherdown:seat lower
Seat position 3 44.
Seat adjustment 3 45.
Page 10 of 257
8In briefSeat inclination
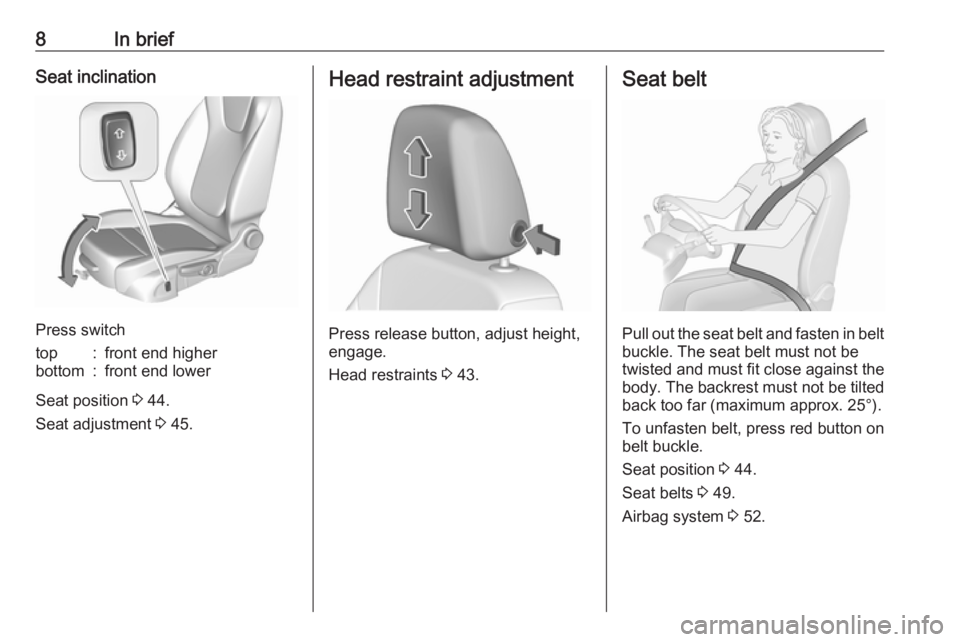
Press switch
top:front end higherbottom:front end lower
Seat position 3 44.
Seat adjustment 3 45.
Head restraint adjustment
Press release button, adjust height,
engage.
Head restraints 3 43.
Seat belt
Pull out the seat belt and fasten in belt
buckle. The seat belt must not be
twisted and must fit close against the
body. The backrest must not be tilted back too far (maximum approx. 25°).
To unfasten belt, press red button on belt buckle.
Seat position 3 44.
Seat belts 3 49.
Airbag system 3 52.
Page 45 of 257

Seats, restraints43Seats, restraintsHead restraints............................ 43
Front seats ................................... 44
Seat position .............................. 44
Seat adjustment ........................45
Armrest ...................................... 47
Heating ...................................... 47
Rear seats ................................... 48
Armrest ...................................... 48
Seat belts ..................................... 49
Three-point seat belt .................50
Airbag system .............................. 52
Front airbag system ...................55
Side airbag system ....................55
Curtain airbag system ...............56
Airbag deactivation ....................57
Child restraints ............................. 58
Child restraint systems ..............58
Child restraint installation locations ................................... 61Head restraints
Position9 Warning
Only drive with the head restraint
set to the proper position.
The upper edge of the head restraint
should be at upper head level. If this
is not possible for extremely tall
people, set to highest position, and
set to lowest position for small people.
Head restraints on front seats
Height adjustment
Press release button, adjust height,
engage.
Page 46 of 257
44Seats, restraintsHead restraints on rear seatsHeight adjustment
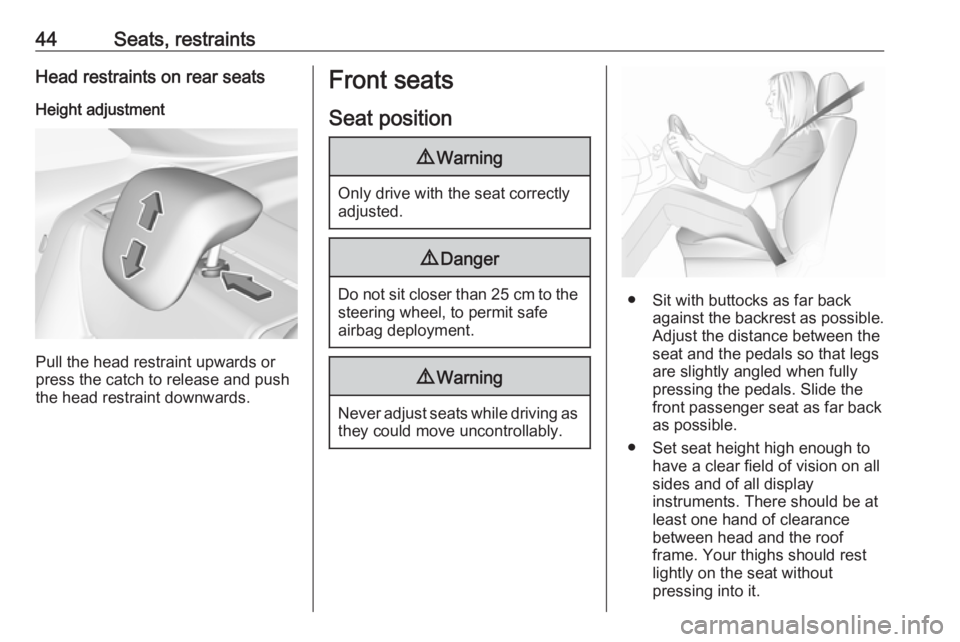
Pull the head restraint upwards or
press the catch to release and push the head restraint downwards.
Front seats
Seat position9 Warning
Only drive with the seat correctly
adjusted.
9 Danger
Do not sit closer than 25 cm to the
steering wheel, to permit safe
airbag deployment.
9 Warning
Never adjust seats while driving as
they could move uncontrollably.
● Sit with buttocks as far back against the backrest as possible.
Adjust the distance between the
seat and the pedals so that legs
are slightly angled when fully
pressing the pedals. Slide the
front passenger seat as far back
as possible.
● Set seat height high enough to have a clear field of vision on all
sides and of all display
instruments. There should be at
least one hand of clearance
between head and the roof
frame. Your thighs should rest
lightly on the seat without
pressing into it.
Page 48 of 257
46Seats, restraintsSeat height
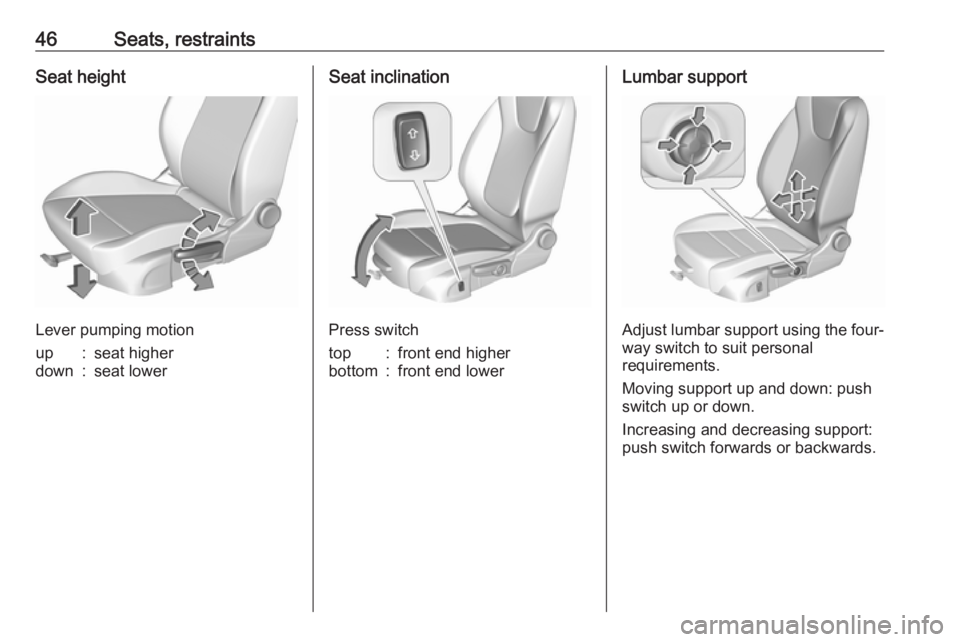
Lever pumping motion
up:seat higherdown:seat lowerSeat inclination
Press switch
top:front end higherbottom:front end lowerLumbar support
Adjust lumbar support using the four-way switch to suit personal
requirements.
Moving support up and down: push switch up or down.
Increasing and decreasing support:
push switch forwards or backwards.
Page 54 of 257
52Seats, restraintsAirbag systemThe airbag system consists of a
number of individual systems
depending on the scope of
equipment.
When triggered, the airbags inflate
within milliseconds. They also deflate
so quickly that it is often unnoticeable during the collision.9 Warning
The airbag system deploys in an
explosive manner, repairs must be performed by skilled personnel
only.
9 Warning
Adding accessories that change
the vehicle's frame, bumper
system, height, front end or side
sheet metal, may keep the airbag
system from working properly. The operation of the airbag system can
also be affected by changing any
parts of the front seats, seat belts,
airbag sensing and diagnostic
module, steering wheel,
instrument panel, inner door seals including the speakers, any of the
airbag modules, ceiling or pillar
trim, front sensors, side impact
sensors or airbag wiring.
Note
The airbag systems and belt
pretensioner control electronics are
located in the centre console area.
Do not put any magnetic objects in
this area.
Do not affix any objects onto the
airbag covers and do not cover them with other materials. Have damagedcovers replaced by a workshop.
Each airbag is triggered only once.
Have deployed airbags replaced by
a workshop. Furthermore, it may be
necessary to have the steering
wheel, the instrument panel, parts of
the panelling, the door seals,
handles and the seats replaced.
Do not make any modifications to
the airbag system as this will
invalidate the vehicle operating
permit.
Control indicator v for airbag systems
3 91.
Child restraint systems on front
passenger seat with airbag
systems
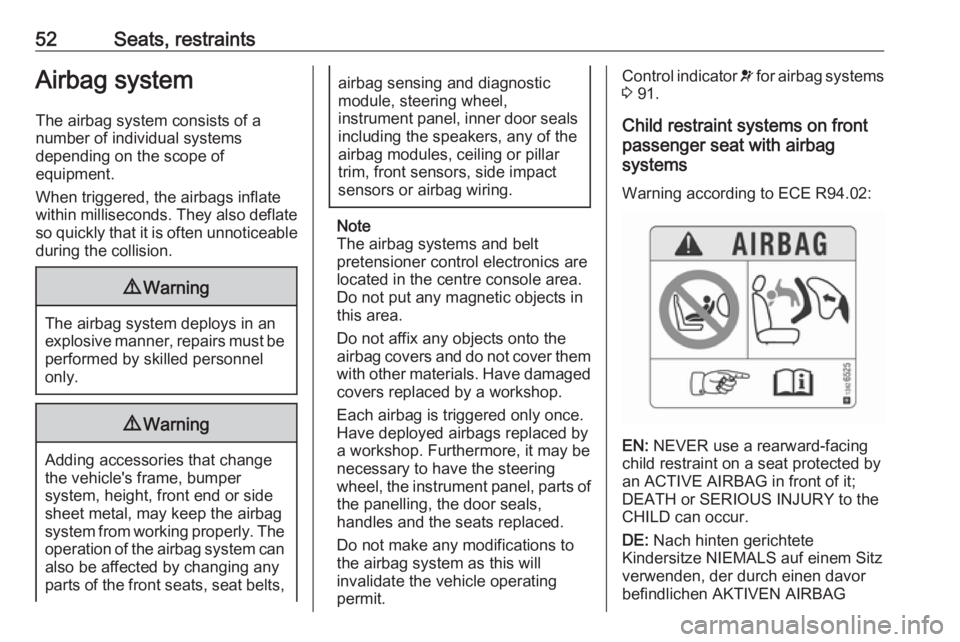
Warning according to ECE R94.02:
EN: NEVER use a rearward-facing
child restraint on a seat protected by
an ACTIVE AIRBAG in front of it;
DEATH or SERIOUS INJURY to the
CHILD can occur.
DE: Nach hinten gerichtete
Kindersitze NIEMALS auf einem Sitz
verwenden, der durch einen davor
befindlichen AKTIVEN AIRBAG
Page 63 of 257

Seats, restraints61Child restraint installation locations
Permissible options for fastening a child restraint system with a three-point seat belt
Weight class
On front passenger seat
On rear outboard seatsOn rear centre seat
activated airbagdeactivated airbagGroup 0: up to 10 kgXU 1,2U/L 3XGroup 0+: up to 13 kgXU1,2U/L 3XGroup I: 9 to 18 kgXU1,2U/L 3,4XGroup II: 15 to 25 kgU1,2XU/L 3,4XGroup III: 22 to 36 kgU1,2XU/L 3,4XU:universal suitability in conjunction with three-point seat beltL:suitable for particular child restraint systems of the 'specific-vehicle', 'restricted' or 'semi-universal' categories. The
child restraint system must be approved for the specific vehicle type (refer to the vehicle type list of the child restraint
system)X:no child restraint system permitted in this weight class1:move seat forwards as far as necessary and adjust seat backrest inclination as far as necessary to a vertical position to ensure that the belt runs forwards from the upper anchorage point2:move seat height adjustment upwards as far as necessary and adjust seat backrest inclination as far as necessaryto a vertical position to ensure that the belt is tight on the buckle side3:move the respective front seat ahead of the child restraint system forwards and the sliding rear seat backwards as far as necessary4:adjust the respective headrest as necessary or remove if required
Page 103 of 257

Instruments and controls1019Warning
If the head-up display image is too
bright or too high in your field of
view, it may obstruct your view
when it is dark outside. Be sure to keep the head-up display imagedim and placed low in your field of
view.
Adjust brightness
The Head-up display image will
automatically dim and brighten to
compensate for outside lighting.
Brightness can also be adjusted
manually as needed:
Press e to brighten the display. Press
æ to dim the display.
The image can temporarily light up
depending on angel and position of
sunlight.
Switching off
Press æ and hold to turn the Head-up
display off.
Language
Preferred language can be set in
vehicle personalisation menu 3 103.
Units
Units can be changed in vehicle
personalisation menu 3 103.
Care of Head-up display
Clean the screen of the Head-up
display with a soft cloth sprayed with
glass cleaner. Wipe the lens gently, then dry it.
System limitations Head-up display may not operate
properly when:
● The lens in the instrument panel is covered by objects or not
clean.
● Display brightness is too dim or bright.
● Image is not adjusted to the proper height.
● The driver wears polarized sunglasses.If the head-up image is not correct for
other reasons, contact a workshop.
Page 189 of 257

Vehicle care187Vehicle checks
Performing work9 Warning
Only perform engine compartment
checks when the ignition is off.
The cooling fan may start
operating even if the ignition is off.
9 Danger
The ignition system uses
extremely high voltage. Do not
touch.
Bonnet
Opening
Open the driver's door.
Pull the release lever and return it to
its original position.
Move the safety catch sideways to the
left vehicle side and open the bonnet.
The bonnet is held open
automatically.
If the bonnet is opened during an
Autostop, the engine will be restarted automatically for safety reasons.
Stop-start system 3 138.
Closing Lower the bonnet and let it fall into the
latch from a low height (20-25 cm).
Check that the bonnet is engaged.
Page 208 of 257

206Vehicle careWheels and tyres
Tyre condition, wheel condition Drive over edges slowly and at right
angles if possible. Driving over sharp
edges can cause tyre and wheel
damage. Do not trap tyres on the kerb when parking.
Regularly check the wheels for
damage. Seek the assistance of a
workshop in the event of damage or
unusual wear.
Winter tyres
Winter tyres improve driving safety at temperatures below 7 °C and shouldtherefore be fitted on all wheels.
In accordance with country-specific
regulations, affix the speed sticker in
the driver's field of view.
All tyre sizes are permitted as winter
tyres 3 239.Tyre designations
E.g. 195/65 R 15 91 T195:tyre width, mm65:cross-section ratio (tyre height
to tyre width), %R:belt type: RadialRF:type: RunFlat15:wheel diameter, inches91:load index e.g. 95 is equivalent
to 615 kgT:speed code letter
Speed code letter:
Q:up to 160 km/hS:up to 180 km/hT:up to 190 km/hH:up to 210 km/hV:up to 240 km/hW:up to 270 km/h
Choose a tyre appropriate for the
maximum speed of your vehicle.
The maximum speed is achievable at kerb weight with driver (75 kg) plus
125 kg payload. Optional equipment
could reduce the maximum speed of
the vehicle.
Performance 3 235.
Directional tyres
Directional tyres should be mounted
so that they rotate in the correct
direction. The proper rotation
direction is indicated by a symbol
(e.g. an arrow) on the sidewall.
Tyre pressure
Check the pressure of cold tyres at
least every 14 days and before any
long journey. Do not forget the spare
wheel. This also applies to vehicles
with tyre pressure monitoring system.
Tyre pressure 3 239.