stop start OPEL CROSSLAND X 2019.75 Manual user
[x] Cancel search | Manufacturer: OPEL, Model Year: 2019.75, Model line: CROSSLAND X, Model: OPEL CROSSLAND X 2019.75Pages: 253, PDF Size: 7.76 MB
Page 182 of 253
180Vehicle careWhen the vehicle battery is beingreplaced, ensure that there are no
open ventilation holes in the vicinity of
the positive terminal. If a ventilation
hole is open in this area, it must be
closed off with a dummy cap, and the ventilation in the vicinity of the
negative terminal must be opened.
Ensure that the vehicle battery is
always replaced by the same type of
battery.
The vehicle battery has to be
replaced by a workshop.
Stop-start system 3 126.
Charging the vehicle battery9 Warning
On vehicles with stop-start
system, ensure that the charging potential does not exceed 14.6 V
when using a battery charger.
Otherwise the vehicle battery may
be damaged.
Jump starting 3 207.
Discharge protection
Battery voltage
When the vehicle battery voltage is
running low, a warning message will
appear in the Driver Information
Centre.
When the vehicle is being driven, the
load reduction function temporarily
deactivates certain functions, e.g. the
heated rear window.
The deactivated functions are
reactivated automatically as soon as
conditions permit.
Idle boost
If charging of the vehicle battery is
required due to battery condition, the
power output of the generator must
be increased. This will be achieved by an idle boost which may be audible.
A message appears in the Driver
Information Centre.
Power outlet
The power outlets are deactivated in
the event of low vehicle battery
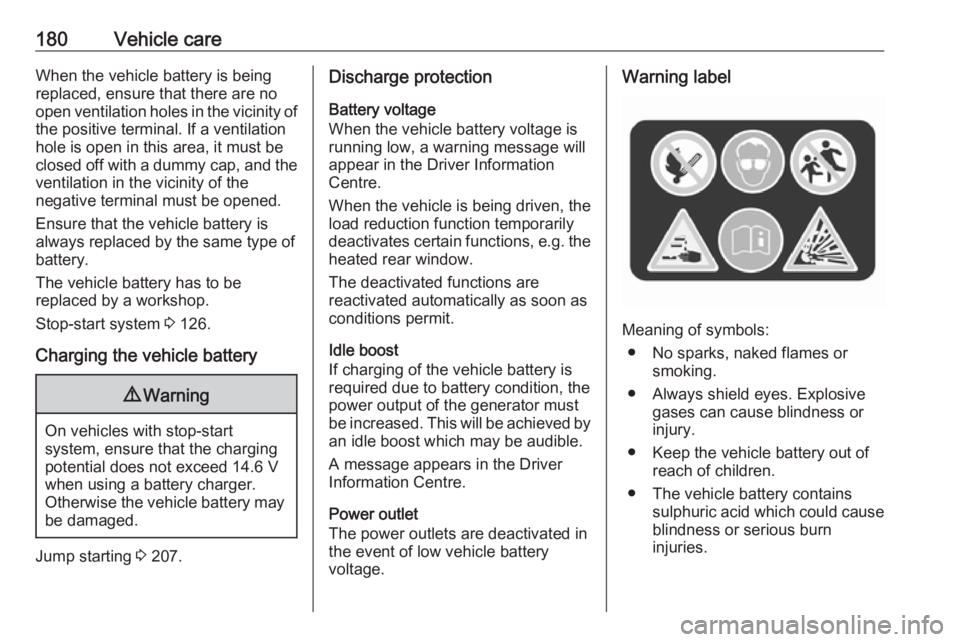
voltage.Warning label
Meaning of symbols:
● No sparks, naked flames or smoking.
● Always shield eyes. Explosive gases can cause blindness or
injury.
● Keep the vehicle battery out of reach of children.
● The vehicle battery contains sulphuric acid which could cause
blindness or serious burn
injuries.
Page 199 of 253
Vehicle care197The pressure increases by nearly
10 kPa for a 10 °C temperature
increase. This must be considered
when warm tyres are checked.
Tyre deflation detectionsystem
The tyre deflation detection system
continually checks the rotation speed
of all four wheels and warns on low
tyre pressure condition once vehicle
is driving. This is achieved by
comparing tyre rolling circumference
with reference values and further
signals.
If a tyre loses pressure the control
indicator w illuminates and a warning
message is displayed in the Driver
Information Centre.
In this case reduce speed, avoid
sharp cornering and strong braking.
Stop at next safe opportunity and
check tyre pressure.
Control indicator w 3 85.
After adjusting tyre pressure initialise
system to extinguish the control
indicator and restart system.Caution
Deflation detection system warns
just about low tyre pressure
condition and does not replace
regular tyre maintenance by the
driver.
In case of a system malfunction a
message is displayed in the Driver
Information Centre. Set correct tyre
pressure and reinitialise system. If the
failure continues to be displayed,
contact a workshop. The system is
inoperable when ABS or ESC has a
malfunction or a temporary spare
wheel is used.
In case of a system malfunction a
message is displayed in the Driver
Information Centre. Set correct tyre
pressure and reinitialise system. If the
failure continues to be displayed,
contact a workshop. The system is
inoperable when ABS or ESC has a
malfunction.
Once the road tyre has been refitted,
check the tyre pressure with cold
tyres and initialise the system.
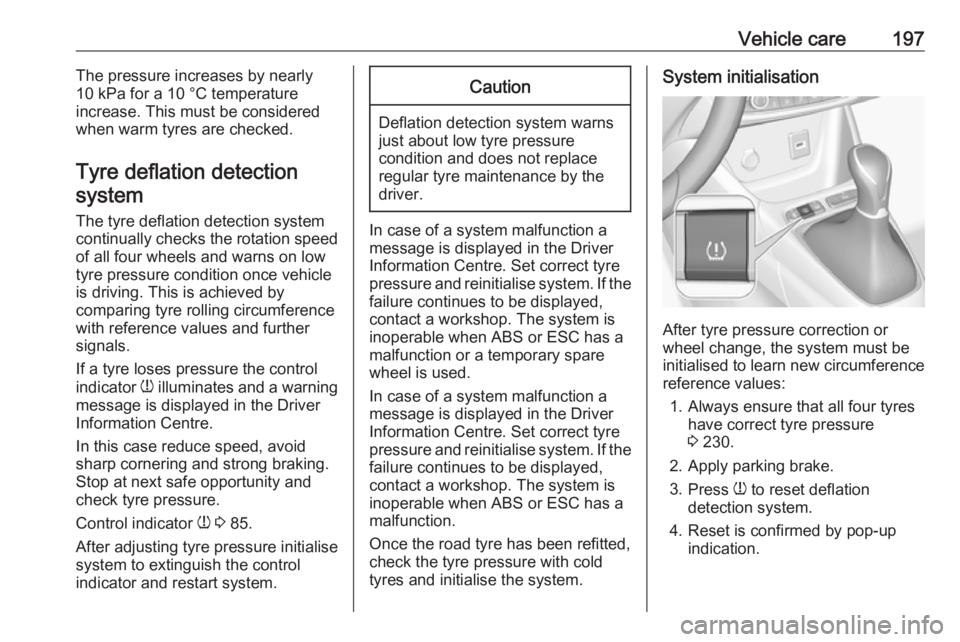
System initialisation
After tyre pressure correction or
wheel change, the system must be
initialised to learn new circumference reference values:
1. Always ensure that all four tyres have correct tyre pressure3 230.
2. Apply parking brake. 3. Press w to reset deflation
detection system.
4. Reset is confirmed by pop-up indication.
Page 203 of 253
Vehicle care201
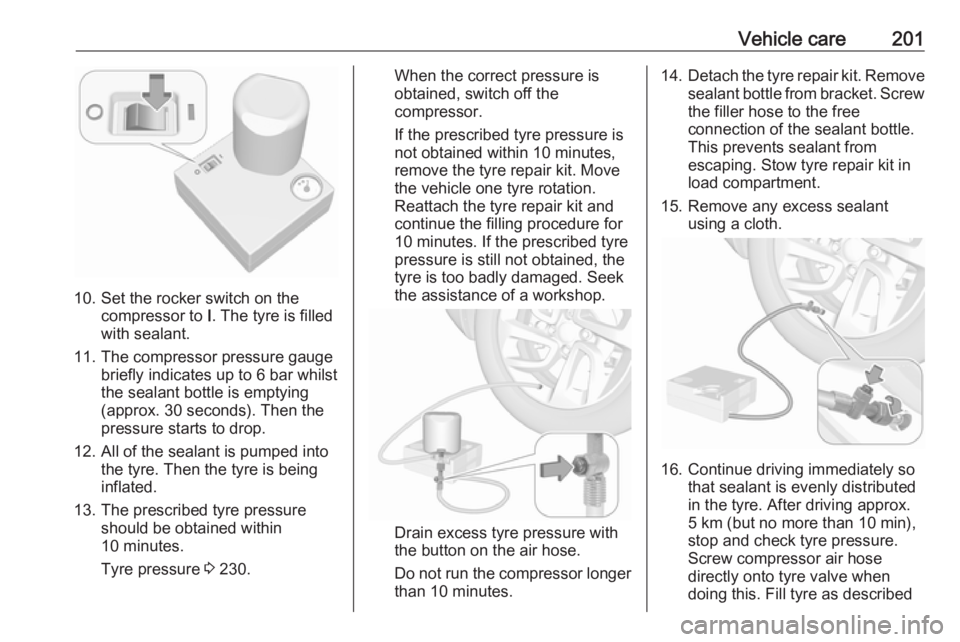
10. Set the rocker switch on thecompressor to I. The tyre is filled
with sealant.
11. The compressor pressure gauge briefly indicates up to 6 bar whilstthe sealant bottle is emptying
(approx. 30 seconds). Then the
pressure starts to drop.
12. All of the sealant is pumped into the tyre. Then the tyre is being
inflated.
13. The prescribed tyre pressure should be obtained within
10 minutes.
Tyre pressure 3 230.
When the correct pressure is
obtained, switch off the
compressor.
If the prescribed tyre pressure is
not obtained within 10 minutes,
remove the tyre repair kit. Move
the vehicle one tyre rotation.
Reattach the tyre repair kit and
continue the filling procedure for
10 minutes. If the prescribed tyre
pressure is still not obtained, the
tyre is too badly damaged. Seek
the assistance of a workshop.
Drain excess tyre pressure with
the button on the air hose.
Do not run the compressor longer
than 10 minutes.
14. Detach the tyre repair kit. Remove
sealant bottle from bracket. Screw
the filler hose to the free connection of the sealant bottle.
This prevents sealant from
escaping. Stow tyre repair kit in
load compartment.
15. Remove any excess sealant using a cloth.
16. Continue driving immediately sothat sealant is evenly distributed
in the tyre. After driving approx.
5 km (but no more than 10 min),
stop and check tyre pressure.
Screw compressor air hose
directly onto tyre valve when
doing this. Fill tyre as described
Page 217 of 253
Service and maintenance215General information
Service information
In order to ensure economical and
safe vehicle operation and to
maintain the value of your vehicle, it
is of vital importance that all
maintenance work is carried out at the proper intervals as specified.
The detailed, up-to-date service
schedule for your vehicle is available
at the workshop.
Severe operating conditions exist if one or more of the following
circumstances occur frequently: Cold starting, stop and go operation, e.g.
for taxis and police vehicles, trailer
operation, mountain driving, driving
on poor and sandy road surfaces,
increased air pollution, presence of
airborne sand and high dust content,
driving at high altitude and large
variations of temperature.
Under these severe operating
conditions, certain service work may
be required more frequently than the
regular service interval indicated inthe service display. Contact a
workshop for customised service
schedules.
Service display 3 80.
Page 251 of 253
249QQuickheat ................................... 117
R
Radio Frequency Identification (RFID) ..................................... 243
Radio remote control ...................21
Rain sensor .................................. 87
REACH ....................................... 235
Reading lights ............................ 106
Rear floor storage cover ..............64
Rear fog light ...............87, 105, 185
Rear seats ................................... 45
Rear view camera ...................... 162
Rear window wiper and washer ..73
Recommended fluids and lubricants ........................ 219, 223
Refuelling ................................... 167
Registered trademarks ...............239
Reverse light............................... 185
Reversing lights .........................105
Ride control systems ..................139
Roadside assistance ....................98
Roof .............................................. 39
Roof load ...................................... 67
Roof rack ..................................... 67
S Safety belts ................................... 46
Seat adjustment ....................... 7, 42
Seat belt ........................................ 8Seat belt reminder .......................81
Seat belts ..................................... 46
Seat heating ................................. 44
Seat position ................................ 41
Selective catalytic reduction .......130
Selector lever.............................. 134
Service ............................... 119, 215
Service display ............................ 80
Service information ....................215
Service vehicle soon .................... 83
Side airbag system ......................52
Side blind spot alert ..............87, 158
Sidelights .................................... 100
Side turn lights ........................... 189
Software acknowledgement .......235
Software update ......................... 238
SOS .............................................. 98
Spare wheel ............................... 203
Speed limiter......................... 87, 143
Speedometer ............................... 77
Starting and operating ................122
Starting off ................................... 16
Starting the engine ....................124
Steering ...................................... 122
Steering wheel adjustment ......9, 70
Steering wheel controls ...............70
Stop engine .................................. 83
Stop-start system........................ 126
Storage ......................................... 61
Storage compartments .................61Sun visor lights .......................... 107
Sun visors .................................... 38
Symbols ......................................... 4
System check ............................... 83
T
Tachometer ................................. 78
Tail lights ................................... 185
Three-point seat belt .................... 47
Through-loading facility ................62
Tools .......................................... 194
Tow bar....................................... 169
Towing ................................ 169, 208
Towing another vehicle .............209
Towing equipment .....................170
Towing the vehicle .....................208
Trailer hitch ................................. 169
Trailer towing ............................. 170
Transmission ............................... 16
Transmission display .................133
Tread depth ............................... 198
Trip odometer .............................. 78
Turn lights ............................ 81, 104
Tyre chains ................................ 199
Tyre deflation detection system . 197
Tyre designations ......................195
Tyre pressure ............................ 196
Tyre pressures ........................... 231
Tyre repair kit ............................. 199