deactivate OPEL CROSSLAND X 2019 Manual user
[x] Cancel search | Manufacturer: OPEL, Model Year: 2019, Model line: CROSSLAND X, Model: OPEL CROSSLAND X 2019Pages: 263, PDF Size: 8.11 MB
Page 30 of 263
28Keys, doors and windowsOperation with the key in case of
a central locking system fault
In case of a fault, e.g. vehicle battery
or remote control / electronic key
battery is discharged, the driver's
door can be locked or unlocked with
the mechanical key.
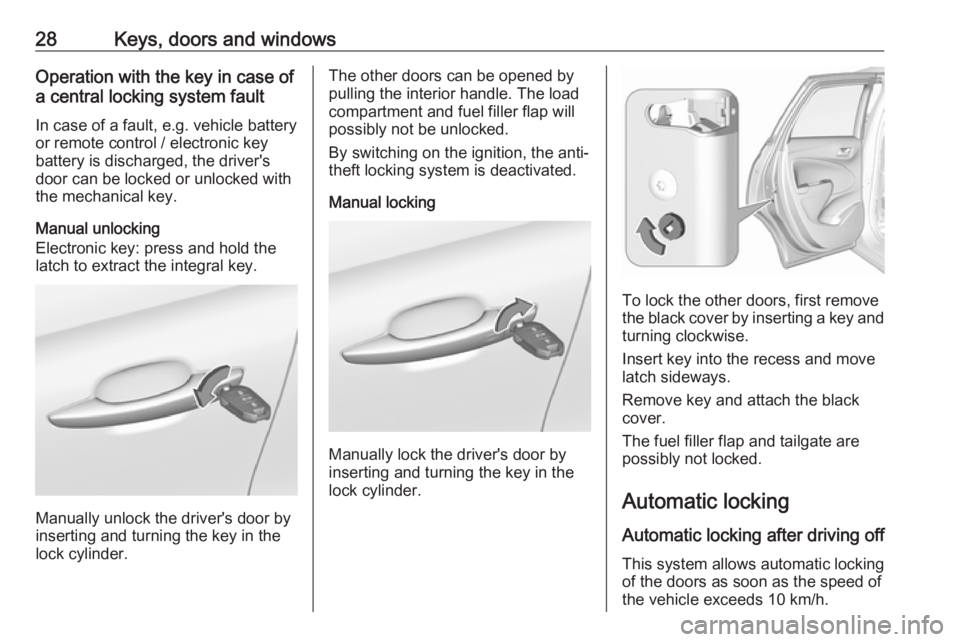
Manual unlocking
Electronic key: press and hold the
latch to extract the integral key.
Manually unlock the driver's door by
inserting and turning the key in the
lock cylinder.
The other doors can be opened by
pulling the interior handle. The load
compartment and fuel filler flap will
possibly not be unlocked.
By switching on the ignition, the anti- theft locking system is deactivated.
Manual locking
Manually lock the driver's door by
inserting and turning the key in the lock cylinder.
To lock the other doors, first remove
the black cover by inserting a key and turning clockwise.
Insert key into the recess and move
latch sideways.
Remove key and attach the black
cover.
The fuel filler flap and tailgate are
possibly not locked.
Automatic locking Automatic locking after driving off This system allows automatic locking
of the doors as soon as the speed of
the vehicle exceeds 10 km/h.
Page 31 of 263
Keys, doors and windows29If one of the doors or the load
compartment is open, the automatic
central locking does not take place.
This is signalled by the sound of the
locks rebounding, accompanied by
illumination of h in the instrument
panel, an audible signal and the display of an alert message.
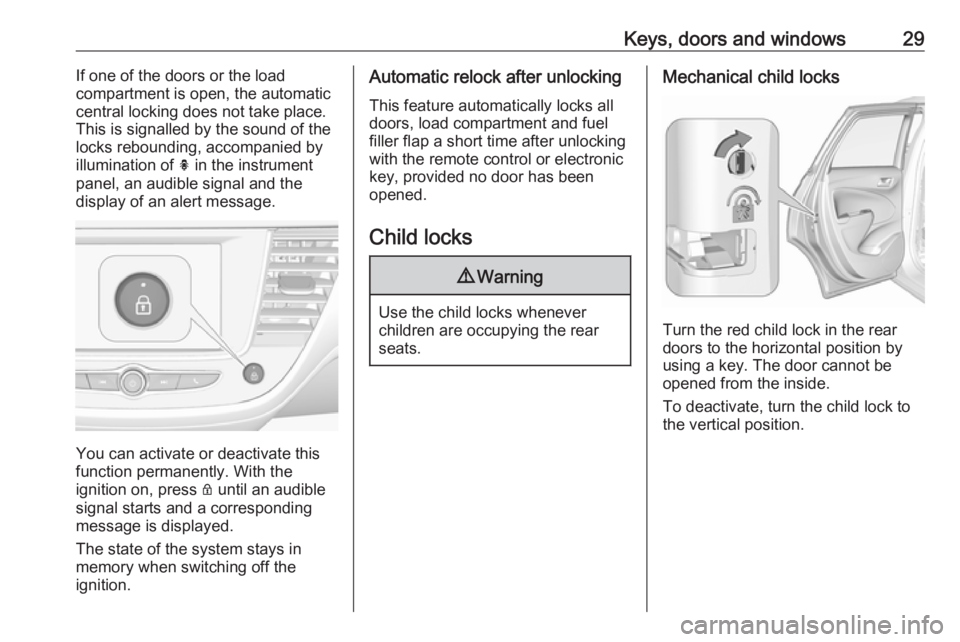
You can activate or deactivate this
function permanently. With the
ignition on, press Q until an audible
signal starts and a corresponding message is displayed.
The state of the system stays in
memory when switching off the
ignition.
Automatic relock after unlocking
This feature automatically locks all
doors, load compartment and fuel
filler flap a short time after unlocking
with the remote control or electronic
key, provided no door has been
opened.
Child locks9 Warning
Use the child locks whenever
children are occupying the rear
seats.
Mechanical child locks
Turn the red child lock in the rear
doors to the horizontal position by
using a key. The door cannot be
opened from the inside.
To deactivate, turn the child lock to
the vertical position.
Page 35 of 263
Keys, doors and windows33Activation without monitoring of
passenger compartment and
vehicle inclination
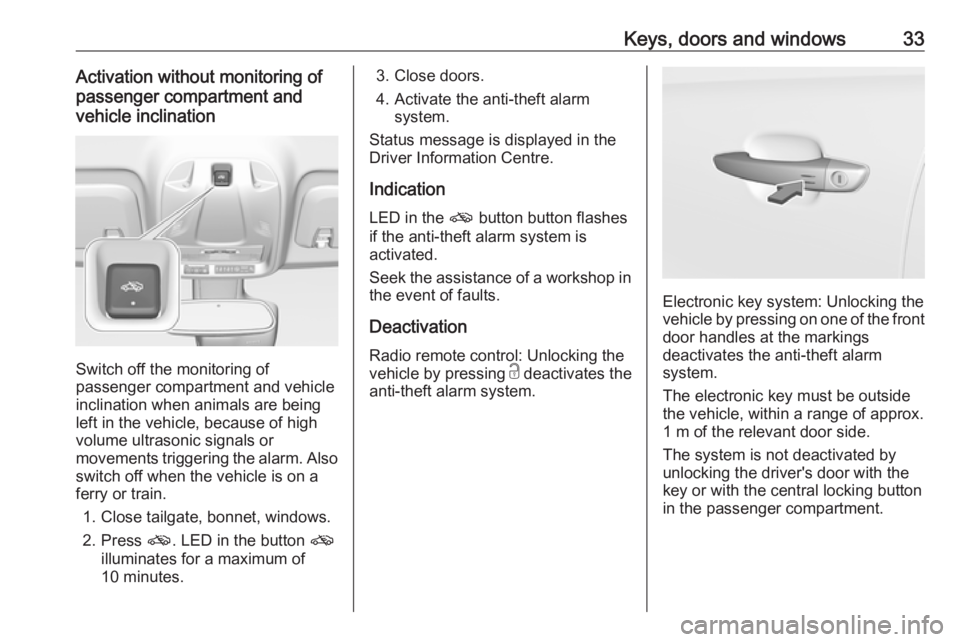
Switch off the monitoring of
passenger compartment and vehicle
inclination when animals are being
left in the vehicle, because of high
volume ultrasonic signals or
movements triggering the alarm. Also switch off when the vehicle is on a
ferry or train.
1. Close tailgate, bonnet, windows.
2. Press o. LED in the button o
illuminates for a maximum of
10 minutes.
3. Close doors.
4. Activate the anti-theft alarm system.
Status message is displayed in the
Driver Information Centre.
Indication
LED in the o button button flashes
if the anti-theft alarm system is
activated.
Seek the assistance of a workshop in the event of faults.
Deactivation Radio remote control: Unlocking the
vehicle by pressing c deactivates the
anti-theft alarm system.
Electronic key system: Unlocking the
vehicle by pressing on one of the front
door handles at the markings
deactivates the anti-theft alarm
system.
The electronic key must be outside
the vehicle, within a range of approx. 1 m of the relevant door side.
The system is not deactivated by
unlocking the driver's door with the
key or with the central locking button
in the passenger compartment.
Page 36 of 263
34Keys, doors and windowsAlarmWhen triggered, the alarm siren
sounds and the hazard warning lights flash simultaneously. The number
and duration of alarm signals are
stipulated by legislation.
The anti-theft alarm system can be
deactivated by pressing c, by
pressing on one of the front door
handles at the markings with
electronic key system or switching on
the ignition.
A triggered alarm, which has not been interrupted by the driver, will be
indicated by the hazard warning
lights. They will flash quickly four
times the next time the vehicle is
unlocked with the radio remote
control.
Vehicle messages 3 101.
If the vehicle's battery is to be
disconnected (e.g. for maintenance
work), the alarm siren must be
deactivated as follows: switch the
ignition on then off, then disconnect
the vehicle's battery within
15 seconds.Immobiliser
The system is part of the ignition
switch and checks whether the
vehicle is allowed to be started with the key being used.
The immobiliser is activated
automatically after the key has been
removed from the ignition switch.
Note
Radio Frequency Identification
(RFID) tags may cause interference
with the key. Do not have it placed
near the key when starting the
vehicle.
Note
The immobiliser does not lock the
doors. You should always lock the
vehicle after leaving it and switch on
the anti-theft alarm system 3 24,
3 32.Exterior mirrors
Convex shape
The shape of the mirror makes
objects appear smaller, which will
affect the ability to estimate
distances.
Side blind spot alert 3 169.
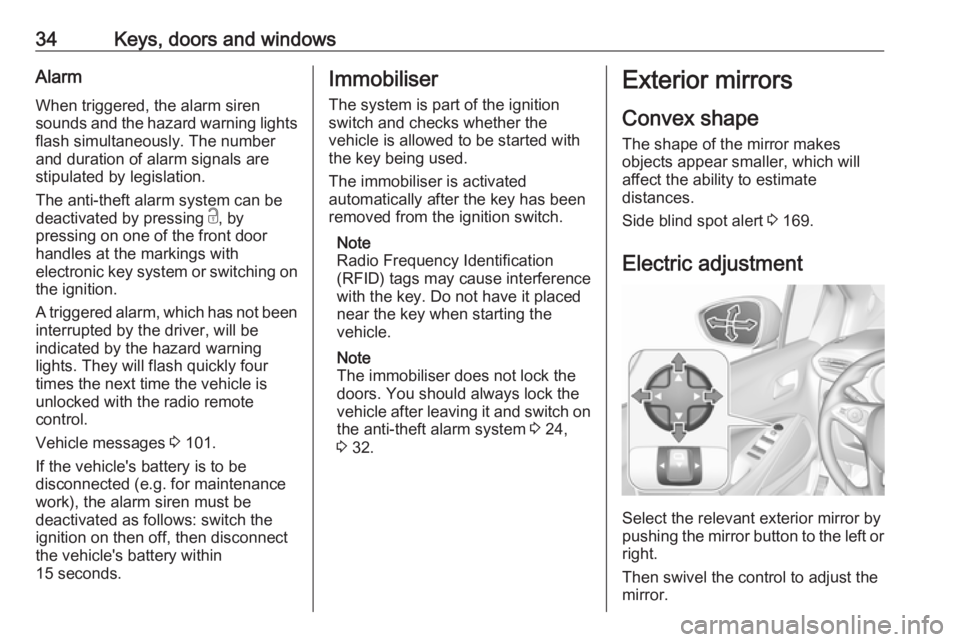
Electric adjustment
Select the relevant exterior mirror by
pushing the mirror button to the left or right.
Then swivel the control to adjust the
mirror.
Page 40 of 263
38Keys, doors and windowsChild safety system for rear
windows
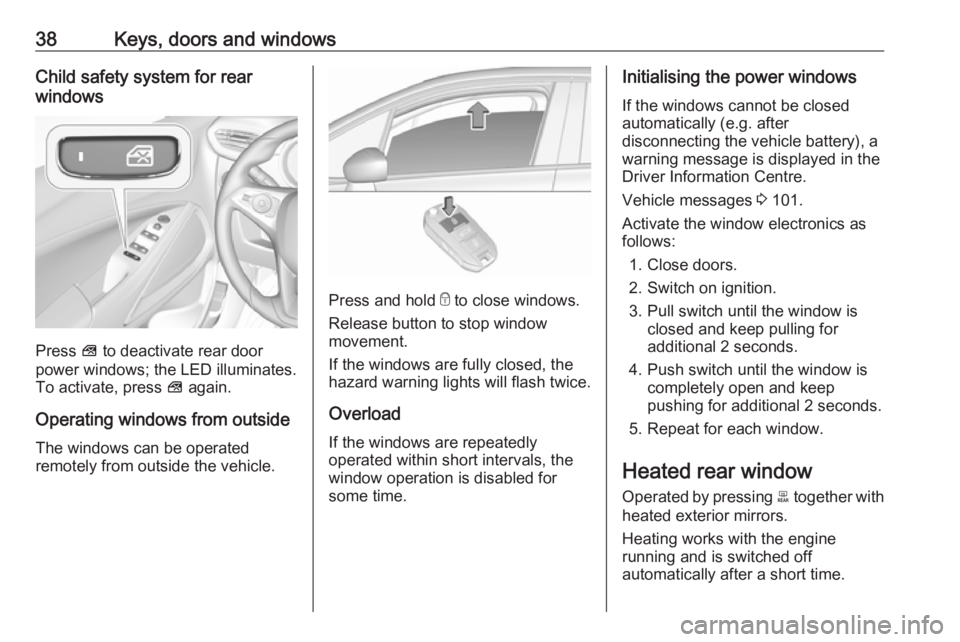
Press V to deactivate rear door
power windows; the LED illuminates.
To activate, press V again.
Operating windows from outside
The windows can be operated
remotely from outside the vehicle.
Press and hold e to close windows.
Release button to stop window
movement.
If the windows are fully closed, the
hazard warning lights will flash twice.
Overload
If the windows are repeatedly
operated within short intervals, the
window operation is disabled for
some time.
Initialising the power windows
If the windows cannot be closed
automatically (e.g. after
disconnecting the vehicle battery), a
warning message is displayed in the
Driver Information Centre.
Vehicle messages 3 101.
Activate the window electronics as
follows:
1. Close doors.
2. Switch on ignition.
3. Pull switch until the window is closed and keep pulling for
additional 2 seconds.
4. Push switch until the window is completely open and keep
pushing for additional 2 seconds.
5. Repeat for each window.
Heated rear window
Operated by pressing b together with
heated exterior mirrors.
Heating works with the engine
running and is switched off
automatically after a short time.
Page 58 of 263
56Seats, restraintsAirbag deactivation
The front passenger airbag system
must be deactivated for child restraint system on the passenger seat
according to the instructions in the
table 3 60. The side airbag and
curtain airbag systems, the belt
pretensioners and all driver airbag
systems will remain active.
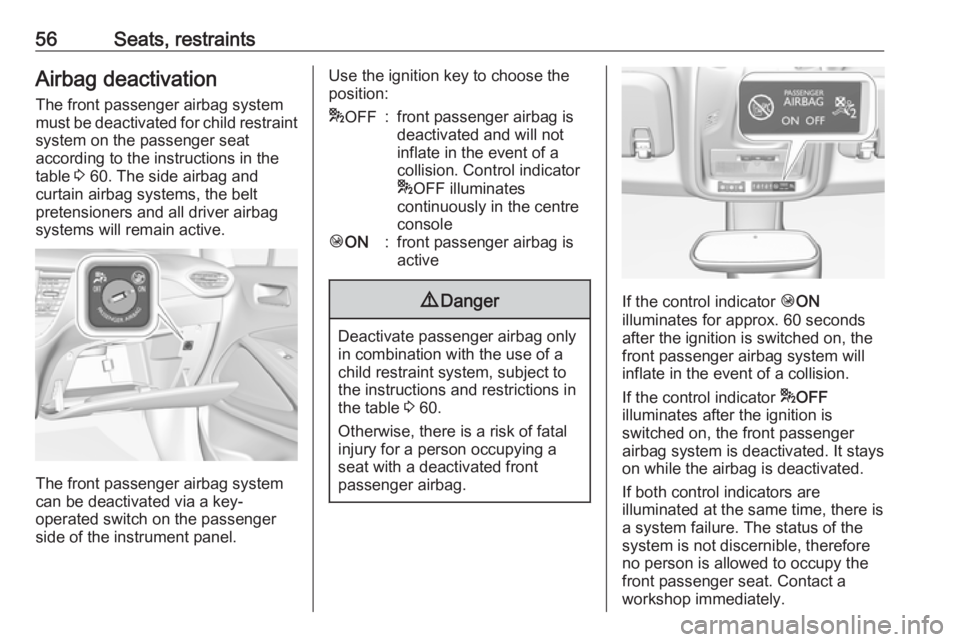
The front passenger airbag system
can be deactivated via a key-
operated switch on the passenger side of the instrument panel.
Use the ignition key to choose theposition:* OFF:front passenger airbag is
deactivated and will not
inflate in the event of a
collision. Control indicator
* OFF illuminates
continuously in the centre
consoleÓ ON:front passenger airbag is
active9 Danger
Deactivate passenger airbag only
in combination with the use of a
child restraint system, subject to
the instructions and restrictions in
the table 3 60.
Otherwise, there is a risk of fatal
injury for a person occupying a
seat with a deactivated front
passenger airbag.
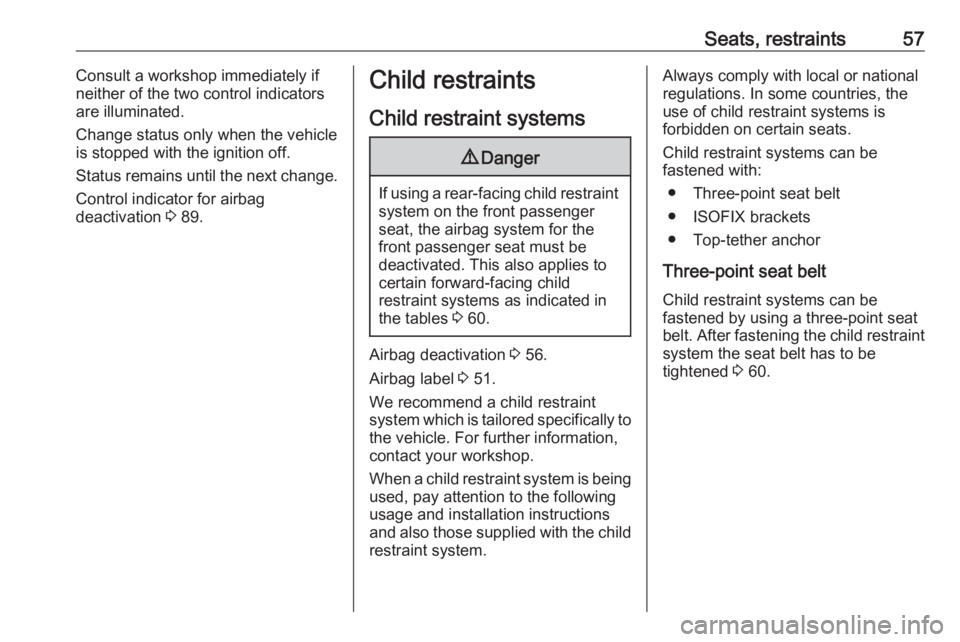
If the control indicator ÓON
illuminates for approx. 60 seconds
after the ignition is switched on, the
front passenger airbag system will
inflate in the event of a collision.
If the control indicator *OFF
illuminates after the ignition is
switched on, the front passenger
airbag system is deactivated. It stays
on while the airbag is deactivated.
If both control indicators are
illuminated at the same time, there is
a system failure. The status of the
system is not discernible, therefore
no person is allowed to occupy the
front passenger seat. Contact a
workshop immediately.
Page 59 of 263
Seats, restraints57Consult a workshop immediately if
neither of the two control indicators
are illuminated.
Change status only when the vehicle is stopped with the ignition off.
Status remains until the next change.
Control indicator for airbag
deactivation 3 89.Child restraints
Child restraint systems9 Danger
If using a rear-facing child restraint
system on the front passenger
seat, the airbag system for the
front passenger seat must be
deactivated. This also applies to certain forward-facing child
restraint systems as indicated in
the tables 3 60.
Airbag deactivation 3 56.
Airbag label 3 51.
We recommend a child restraint system which is tailored specifically to the vehicle. For further information,
contact your workshop.
When a child restraint system is being
used, pay attention to the following
usage and installation instructions
and also those supplied with the child
restraint system.
Always comply with local or national
regulations. In some countries, the
use of child restraint systems is
forbidden on certain seats.
Child restraint systems can be
fastened with:
● Three-point seat belt
● ISOFIX brackets
● Top-tether anchor
Three-point seat belt
Child restraint systems can be
fastened by using a three-point seat
belt. After fastening the child restraint system the seat belt has to be
tightened 3 60.
Page 62 of 263

60Seats, restraintsChild restraint installation locations
Permissible options for fastening a child restraint system with a three-point seat belt
Weight class
On front passenger seat
On rear outboard seatsOn rear centre seat
activated airbagdeactivated airbagGroup 0: up to 10 kgXU/L 1,2U/L 3XGroup 0+: up to 13 kgXU/L1,2U/L3XGroup I: 9 to 18 kgXU/L1,2U/L3,4XGroup II: 15 to 25 kgU/L1,2XU/L 3,4XGroup III: 22 to 36 kgU/L1,2XU/L3,4XU:universal suitability in conjunction with three-point seat beltL:suitable for particular child restraint systems of the 'specific-vehicle', 'restricted' or 'semi-universal' categories. The
child restraint system must be approved for the specific vehicle type (refer to the vehicle type list of the child restraint
system)X:no child restraint system permitted in this weight class1:move seat forwards as far as necessary and adjust seat backrest inclination as far as necessary to a vertical position to ensure that the belt runs forwards from the upper anchorage point2:move seat height adjustment upwards as far as necessary and adjust seat backrest inclination as far as necessaryto a vertical position to ensure that the belt is tight on the buckle side3:move the respective front seat ahead of the child restraint system forwards and the sliding rear seat backwards as far as necessary4:adjust the respective headrest as necessary or remove if required
Page 63 of 263
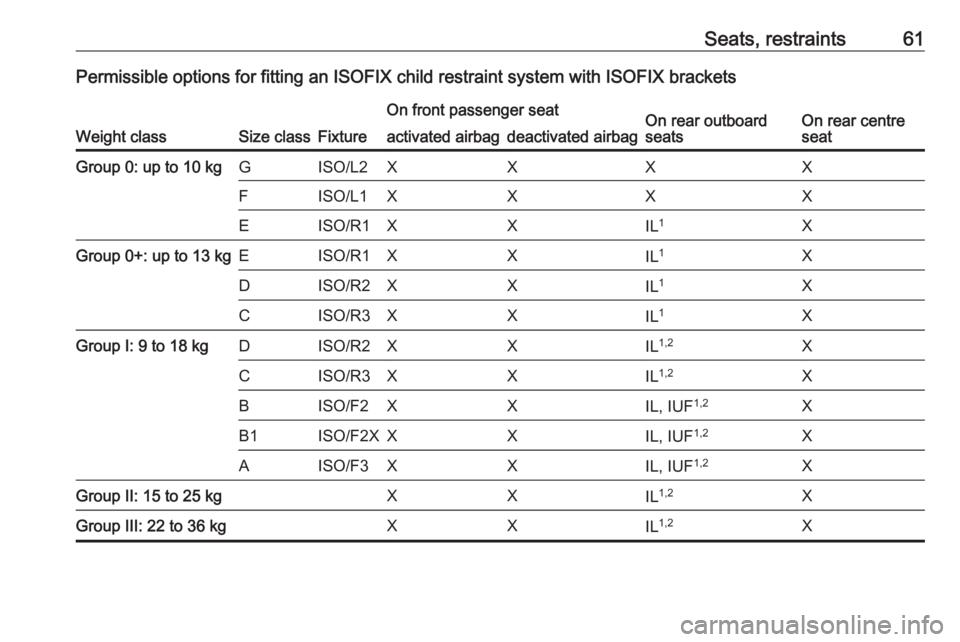
Seats, restraints61Permissible options for fitting an ISOFIX child restraint system with ISOFIX brackets
Weight classSize classFixture
On front passenger seatOn rear outboard
seatsOn rear centre
seatactivated airbagdeactivated airbagGroup 0: up to 10 kgGISO/L2XXXXFISO/L1XXXXEISO/R1XXIL 1XGroup 0+: up to 13 kgEISO/R1XXIL 1XDISO/R2XXIL1XCISO/R3XXIL1XGroup I: 9 to 18 kgDISO/R2XXIL1,2XCISO/R3XXIL1,2XBISO/F2XXIL, IUF 1,2XB1ISO/F2XXXIL, IUF1,2XAISO/F3XXIL, IUF 1,2XGroup II: 15 to 25 kgXXIL1,2XGroup III: 22 to 36 kgXXIL1,2X
Page 64 of 263
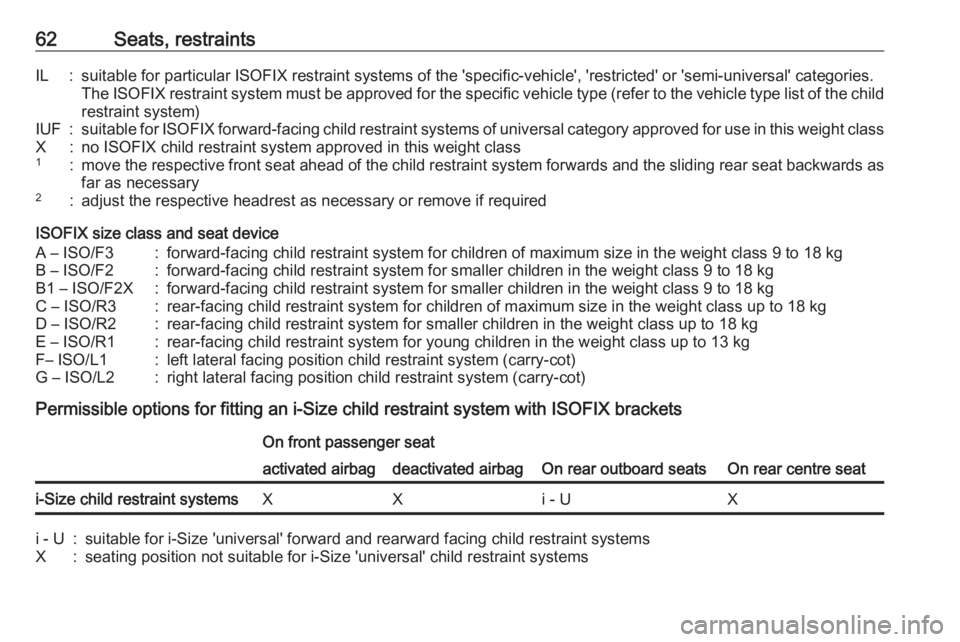
62Seats, restraintsIL:suitable for particular ISOFIX restraint systems of the 'specific-vehicle', 'restricted' or 'semi-universal' categories.
The ISOFIX restraint system must be approved for the specific vehicle type (refer to the vehicle type list of the child restraint system)IUF:suitable for ISOFIX forward-facing child restraint systems of universal category approved for use in this weight classX:no ISOFIX child restraint system approved in this weight class1:move the respective front seat ahead of the child restraint system forwards and the sliding rear seat backwards as
far as necessary2:adjust the respective headrest as necessary or remove if required
ISOFIX size class and seat device
A – ISO/F3:forward-facing child restraint system for children of maximum size in the weight class 9 to 18 kgB – ISO/F2:forward-facing child restraint system for smaller children in the weight class 9 to 18 kgB1 – ISO/F2X:forward-facing child restraint system for smaller children in the weight class 9 to 18 kgC – ISO/R3:rear-facing child restraint system for children of maximum size in the weight class up to 18 kgD – ISO/R2:rear-facing child restraint system for smaller children in the weight class up to 18 kgE – ISO/R1:rear-facing child restraint system for young children in the weight class up to 13 kgF– ISO/L1:left lateral facing position child restraint system (carry-cot)G – ISO/L2:right lateral facing position child restraint system (carry-cot)
Permissible options for fitting an i-Size child restraint system with ISOFIX brackets
On front passenger seat
On rear outboard seatsOn rear centre seat
activated airbagdeactivated airbagi-Size child restraint systemsXXi - UXi - U:suitable for i-Size 'universal' forward and rearward facing child restraint systemsX:seating position not suitable for i-Size 'universal' child restraint systems