lights OPEL GRANDLAND X 2018 Infotainment system
[x] Cancel search | Manufacturer: OPEL, Model Year: 2018, Model line: GRANDLAND X, Model: OPEL GRANDLAND X 2018Pages: 265, PDF Size: 7.5 MB
Page 13 of 265
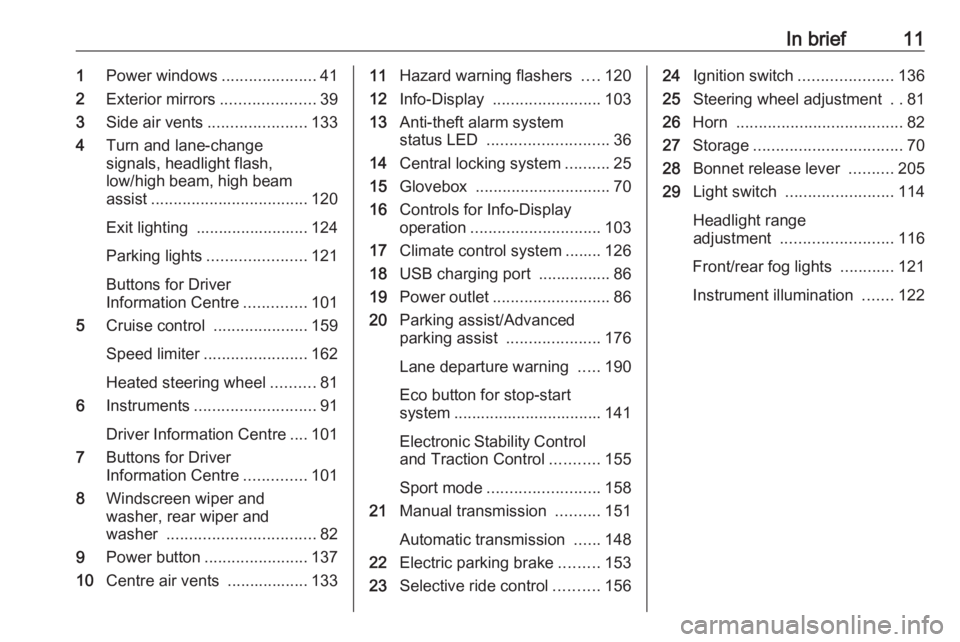
In brief111Power windows .....................41
2 Exterior mirrors .....................39
3 Side air vents ...................... 133
4 Turn and lane-change
signals, headlight flash,
low/high beam, high beam
assist ................................... 120
Exit lighting ......................... 124
Parking lights ...................... 121
Buttons for Driver
Information Centre ..............101
5 Cruise control .....................159
Speed limiter ....................... 162
Heated steering wheel ..........81
6 Instruments ........................... 91
Driver Information Centre .... 101
7 Buttons for Driver
Information Centre ..............101
8 Windscreen wiper and
washer, rear wiper and
washer ................................. 82
9 Power button ....................... 137
10 Centre air vents .................. 13311Hazard warning flashers ....120
12 Info-Display ........................ 103
13 Anti-theft alarm system
status LED ........................... 36
14 Central locking system ..........25
15 Glovebox .............................. 70
16 Controls for Info-Display
operation ............................. 103
17 Climate control system ........ 126
18 USB charging port ................ 86
19 Power outlet .......................... 86
20 Parking assist/Advanced
parking assist .....................176
Lane departure warning .....190
Eco button for stop-start
system ................................. 141
Electronic Stability Control
and Traction Control ...........155
Sport mode ......................... 158
21 Manual transmission ..........151
Automatic transmission ......148
22 Electric parking brake .........153
23 Selective ride control ..........15624Ignition switch .....................136
25 Steering wheel adjustment ..81
26 Horn ..................................... 82
27 Storage ................................. 70
28 Bonnet release lever ..........205
29 Light switch ........................ 114
Headlight range
adjustment ......................... 116
Front/rear fog lights ............121
Instrument illumination .......122
Page 15 of 265
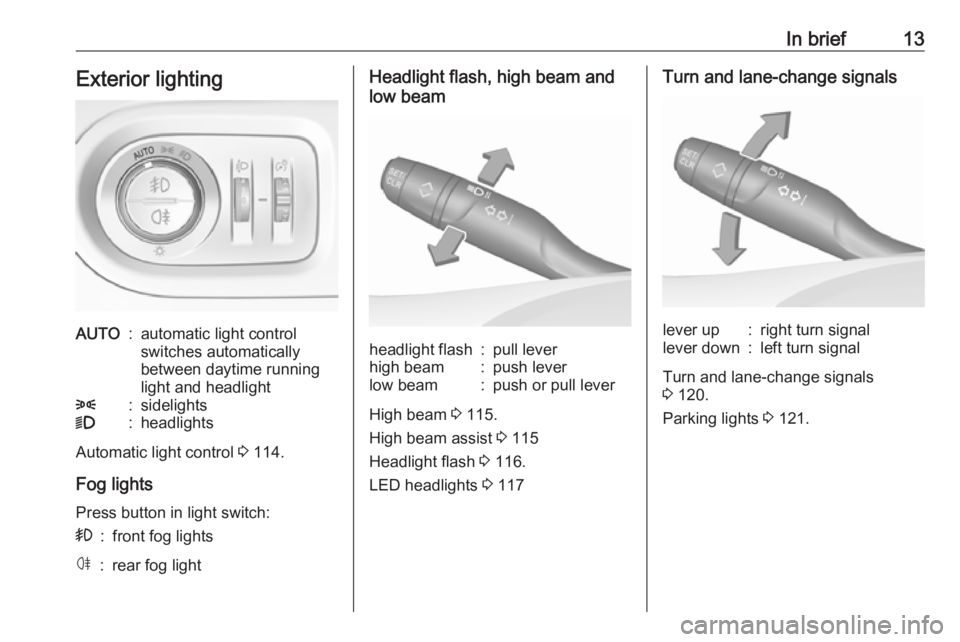
In brief13Exterior lightingAUTO:automatic light control
switches automatically
between daytime running
light and headlight8:sidelights9:headlights
Automatic light control 3 114.
Fog lights
Press button in light switch:
>:front fog lightsø:rear fog lightHeadlight flash, high beam and
low beamheadlight flash:pull leverhigh beam:push leverlow beam:push or pull lever
High beam 3 115.
High beam assist 3 115
Headlight flash 3 116.
LED headlights 3 117
Turn and lane-change signalslever up:right turn signallever down:left turn signal
Turn and lane-change signals
3 120.
Parking lights 3 121.
Page 34 of 265
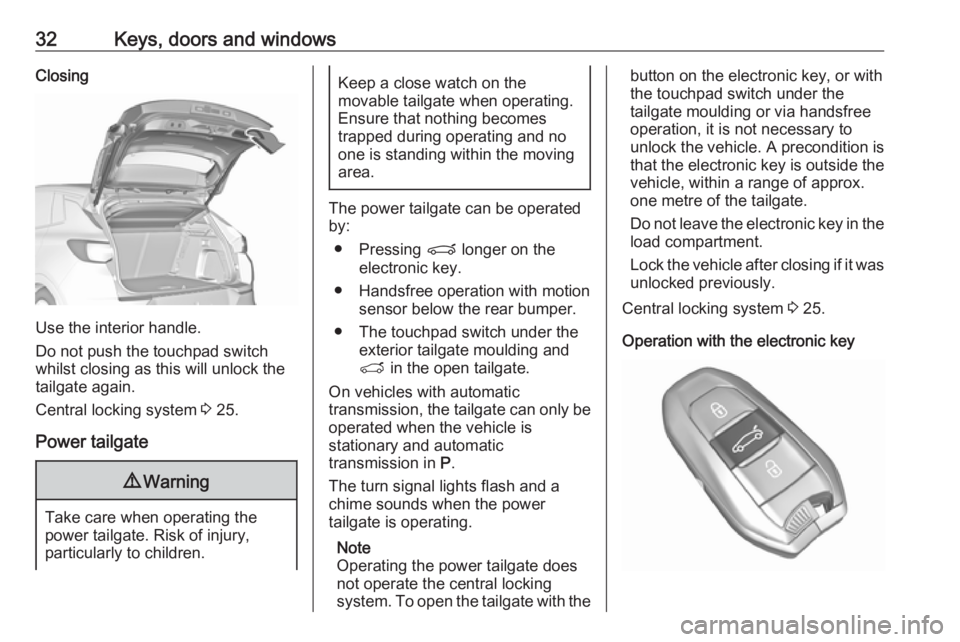
32Keys, doors and windowsClosing
Use the interior handle.
Do not push the touchpad switch
whilst closing as this will unlock the
tailgate again.
Central locking system 3 25.
Power tailgate
9 Warning
Take care when operating the
power tailgate. Risk of injury,
particularly to children.
Keep a close watch on the
movable tailgate when operating.
Ensure that nothing becomes
trapped during operating and no
one is standing within the moving
area.
The power tailgate can be operated
by:
● Pressing P longer on the
electronic key.
● Handsfree operation with motion sensor below the rear bumper.
● The touchpad switch under the exterior tailgate moulding andT in the open tailgate.
On vehicles with automatic
transmission, the tailgate can only be operated when the vehicle is
stationary and automatic
transmission in P.
The turn signal lights flash and a
chime sounds when the power
tailgate is operating.
Note
Operating the power tailgate does not operate the central locking
system. To open the tailgate with the
button on the electronic key, or with
the touchpad switch under the
tailgate moulding or via handsfree
operation, it is not necessary to
unlock the vehicle. A precondition is
that the electronic key is outside the
vehicle, within a range of approx.
one metre of the tailgate.
Do not leave the electronic key in the load compartment.
Lock the vehicle after closing if it was
unlocked previously.
Central locking system 3 25.
Operation with the electronic key
Page 36 of 265
34Keys, doors and windows
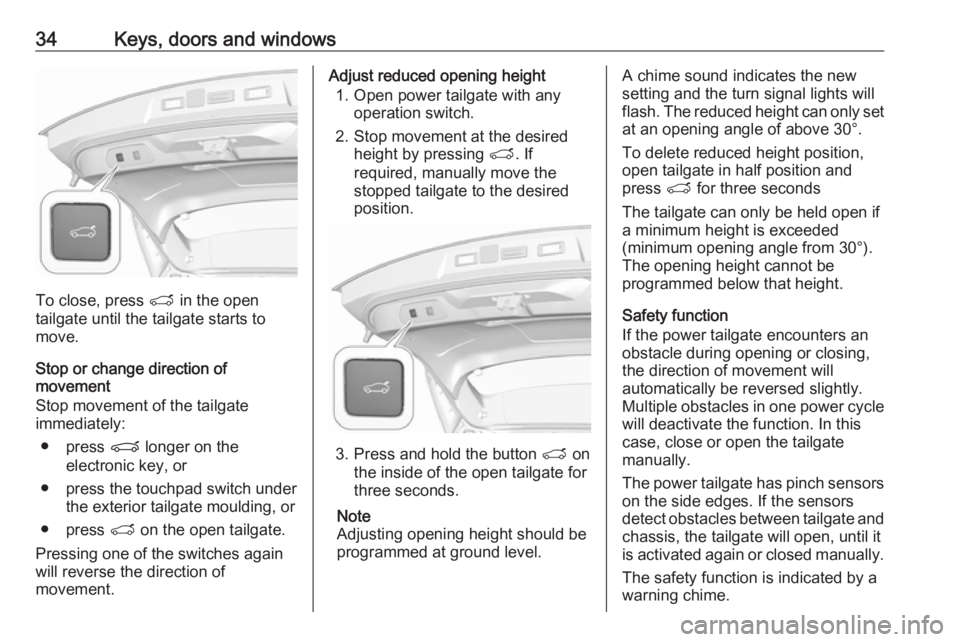
To close, press T in the open
tailgate until the tailgate starts to
move.
Stop or change direction of
movement
Stop movement of the tailgate immediately:
● press P longer on the
electronic key, or
● press the touchpad switch under the exterior tailgate moulding, or
● press T on the open tailgate.
Pressing one of the switches again
will reverse the direction of
movement.
Adjust reduced opening height
1. Open power tailgate with any operation switch.
2. Stop movement at the desired height by pressing T. If
required, manually move the
stopped tailgate to the desired
position.
3. Press and hold the button T on
the inside of the open tailgate for
three seconds.
Note
Adjusting opening height should be
programmed at ground level.
A chime sound indicates the new
setting and the turn signal lights will
flash. The reduced height can only set
at an opening angle of above 30°.
To delete reduced height position,
open tailgate in half position and
press T for three seconds
The tailgate can only be held open if
a minimum height is exceeded
(minimum opening angle from 30°).
The opening height cannot be
programmed below that height.
Safety function
If the power tailgate encounters an
obstacle during opening or closing,
the direction of movement will
automatically be reversed slightly.
Multiple obstacles in one power cycle will deactivate the function. In this
case, close or open the tailgate
manually.
The power tailgate has pinch sensors
on the side edges. If the sensors
detect obstacles between tailgate and chassis, the tailgate will open, until it
is activated again or closed manually.
The safety function is indicated by a
warning chime.
Page 40 of 265
38Keys, doors and windows
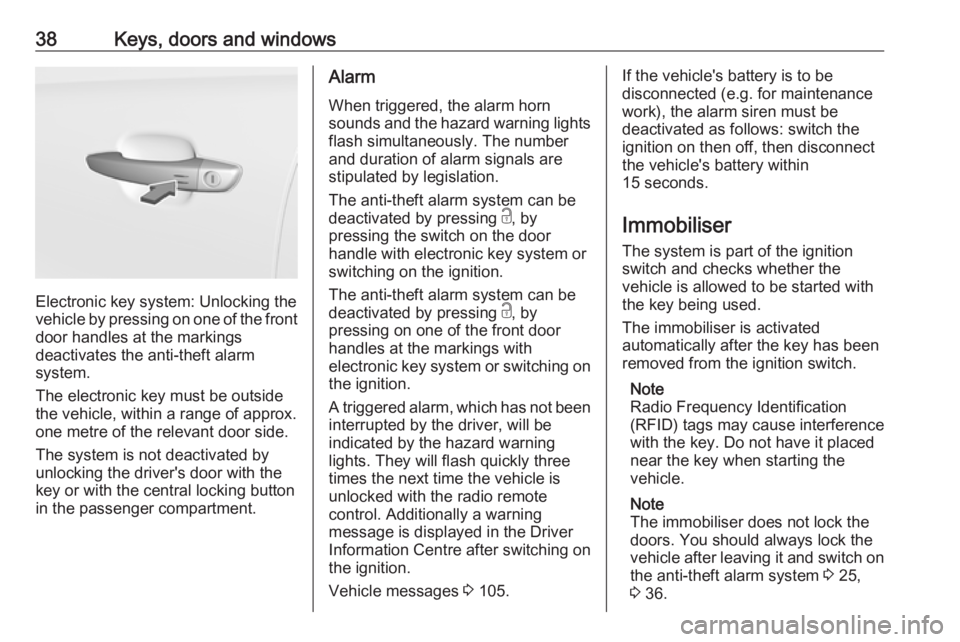
Electronic key system: Unlocking the
vehicle by pressing on one of the front
door handles at the markings
deactivates the anti-theft alarm
system.
The electronic key must be outside
the vehicle, within a range of approx. one metre of the relevant door side.
The system is not deactivated by
unlocking the driver's door with the
key or with the central locking button
in the passenger compartment.
Alarm
When triggered, the alarm horn
sounds and the hazard warning lights
flash simultaneously. The number
and duration of alarm signals are
stipulated by legislation.
The anti-theft alarm system can be
deactivated by pressing c, by
pressing the switch on the door
handle with electronic key system or
switching on the ignition.
The anti-theft alarm system can be
deactivated by pressing c, by
pressing on one of the front door
handles at the markings with
electronic key system or switching on the ignition.
A triggered alarm, which has not been
interrupted by the driver, will be
indicated by the hazard warning
lights. They will flash quickly three
times the next time the vehicle is unlocked with the radio remote
control. Additionally a warning
message is displayed in the Driver
Information Centre after switching on
the ignition.
Vehicle messages 3 105.If the vehicle's battery is to be
disconnected (e.g. for maintenance
work), the alarm siren must be
deactivated as follows: switch the
ignition on then off, then disconnect
the vehicle's battery within
15 seconds.
Immobiliser
The system is part of the ignition
switch and checks whether the
vehicle is allowed to be started with
the key being used.
The immobiliser is activated
automatically after the key has been removed from the ignition switch.
Note
Radio Frequency Identification
(RFID) tags may cause interference
with the key. Do not have it placed
near the key when starting the
vehicle.
Note
The immobiliser does not lock the
doors. You should always lock the
vehicle after leaving it and switch on the anti-theft alarm system 3 25,
3 36.
Page 44 of 265
42Keys, doors and windowsChild safety system for rear
windows
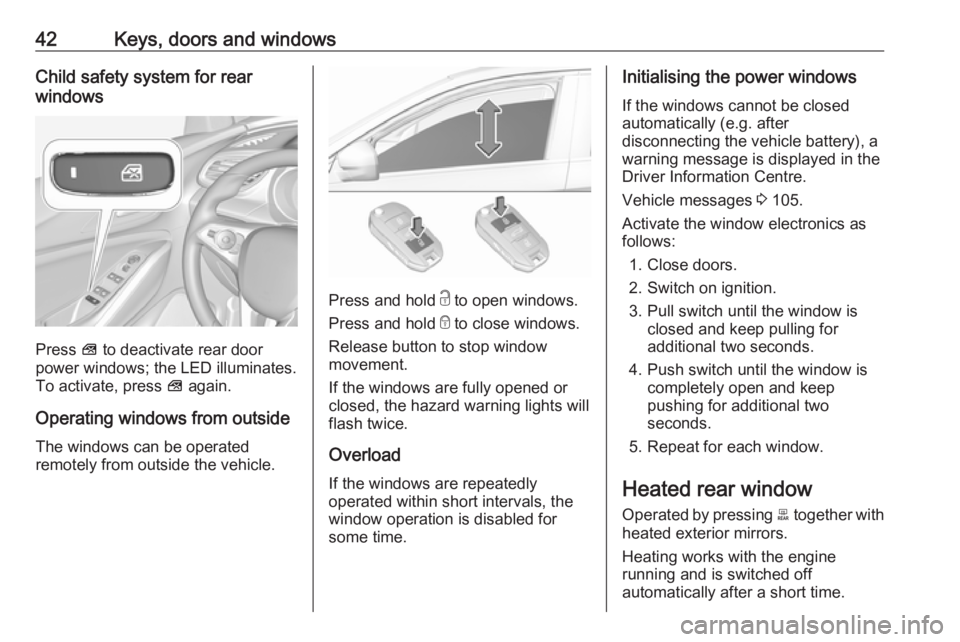
Press V to deactivate rear door
power windows; the LED illuminates.
To activate, press V again.
Operating windows from outside
The windows can be operated
remotely from outside the vehicle.
Press and hold c to open windows.
Press and hold e to close windows.
Release button to stop window
movement.
If the windows are fully opened or
closed, the hazard warning lights will
flash twice.
Overload
If the windows are repeatedly
operated within short intervals, the
window operation is disabled for
some time.
Initialising the power windows
If the windows cannot be closed
automatically (e.g. after
disconnecting the vehicle battery), a
warning message is displayed in the
Driver Information Centre.
Vehicle messages 3 105.
Activate the window electronics as
follows:
1. Close doors.
2. Switch on ignition.
3. Pull switch until the window is closed and keep pulling for
additional two seconds.
4. Push switch until the window is completely open and keep
pushing for additional two
seconds.
5. Repeat for each window.
Heated rear window Operated by pressing b together with
heated exterior mirrors.
Heating works with the engine
running and is switched off
automatically after a short time.
Page 82 of 265
80Instruments and controlsInstruments and
controlsControls ....................................... 81
Steering wheel adjustment ........81
Steering wheel controls .............81
Heated steering wheel ...............81
Horn ........................................... 82
Windscreen wiper/washer .........82
Rear window wiper/washer .......84
Outside temperature ..................84
Clock ......................................... 85
Power outlets ............................. 86
Inductive charging .....................87
Cigarette lighter ......................... 88
Ashtrays .................................... 88
Warning lights, gauges and indi‐ cators ........................................... 89
Instrument cluster ......................89
Speedometer ............................. 91
Odometer .................................. 92
Trip odometer ............................ 92
Tachometer ............................... 92
Fuel gauge ................................ 93
Engine coolant temperature gauge ....................................... 93
Service display .......................... 93Control indicators ......................94
Turn signal ................................. 95
Seat belt reminder .....................95
Airbag and belt tensioners .........95
Airbag deactivation ....................96
Charging system .......................96
Malfunction indicator light ..........96
Stop engine ............................... 96
System check ............................ 97
Brake and clutch system ...........97
Electric parking brake ................97
Electric parking brake fault ........97
Antilock brake system (ABS) .....97
Gear shifting .............................. 98
Lane departure warning ............98
Lane keep assist .......................98
Electronic Stability Control and Traction Control system ...........98
Engine coolant temperature ......98
Preheating ................................. 99
Diesel particle filter ....................99
AdBlue ....................................... 99
Deflation detection system ........99
Engine oil pressure ....................99
Low fuel ................................... 100
Autostop .................................. 100
Exterior light ............................ 100
High beam ............................... 100
High beam assist .....................100
LED headlights ........................ 100Fog light................................... 100
Rear fog light ........................... 100
Rain sensor ............................. 100
Cruise control .......................... 101
Adaptive cruise control ............101
Vehicle detected ahead ...........101
Speed limiter ........................... 101
Door open ................................ 101
Information displays ...................101
Driver Information Centre ........101
Info display .............................. 103
Vehicle messages ......................105
Warning chimes .......................105
Battery voltage ........................ 106
Vehicle personalisation ..............106
Telematics service .....................110
OnStar ..................................... 110
Page 91 of 265
Instruments and controls89
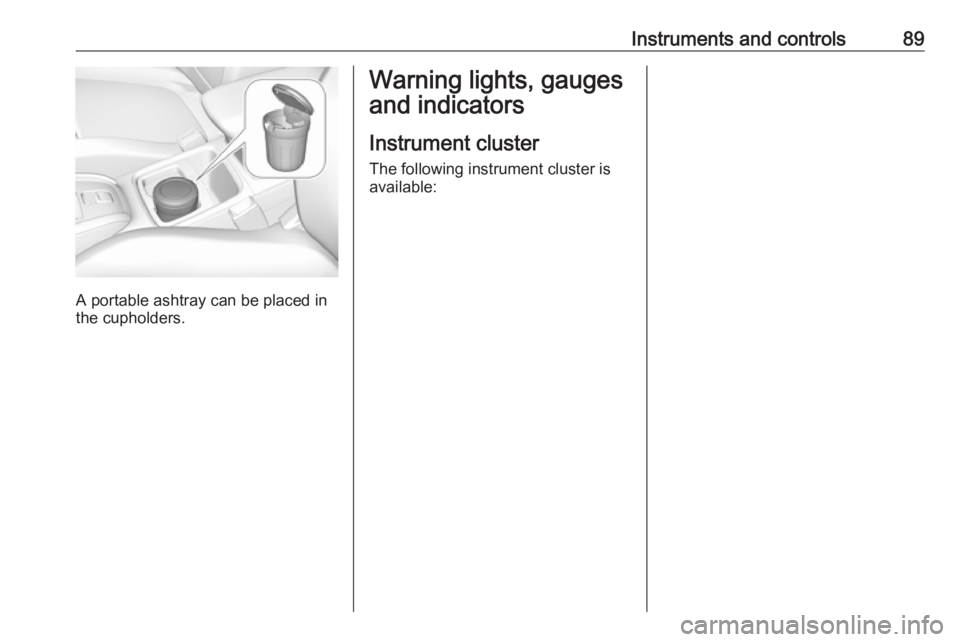
A portable ashtray can be placed in
the cupholders.
Warning lights, gauges
and indicators
Instrument cluster
The following instrument cluster is
available:
Page 96 of 265
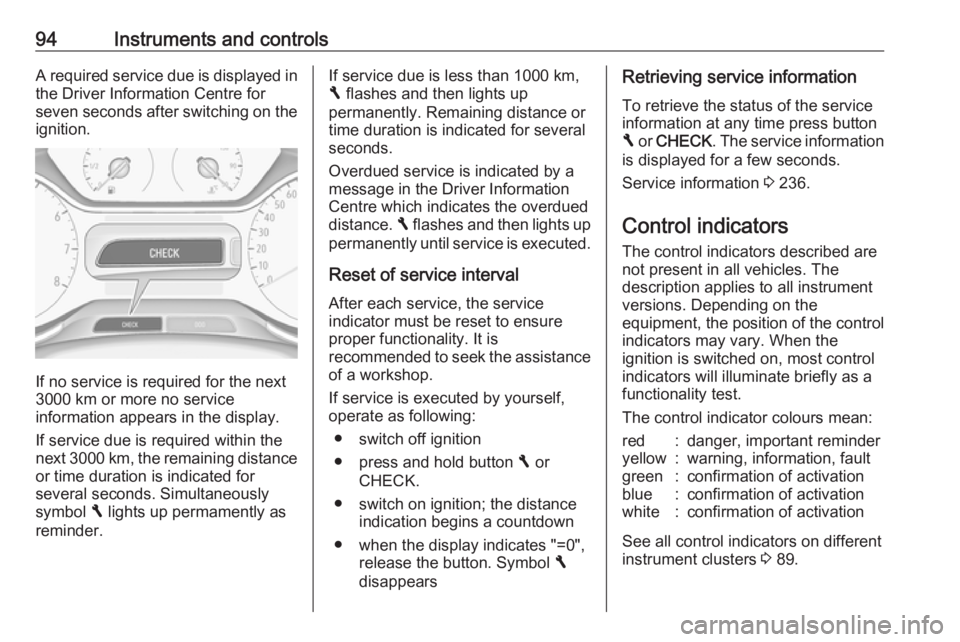
94Instruments and controlsA required service due is displayed in
the Driver Information Centre for
seven seconds after switching on the ignition.
If no service is required for the next
3000 km or more no service
information appears in the display.
If service due is required within the
next 3000 km, the remaining distance or time duration is indicated for
several seconds. Simultaneously
symbol F lights up permamently as
reminder.
If service due is less than 1000 km,
F flashes and then lights up
permanently. Remaining distance or
time duration is indicated for several
seconds.
Overdued service is indicated by a
message in the Driver Information
Centre which indicates the overdued
distance. F flashes and then lights up
permanently until service is executed.
Reset of service interval After each service, the service
indicator must be reset to ensure
proper functionality. It is
recommended to seek the assistance
of a workshop.
If service is executed by yourself,
operate as following:
● switch off ignition
● press and hold button F or
CHECK.
● switch on ignition; the distance indication begins a countdown
● when the display indicates "=0", release the button. Symbol F
disappearsRetrieving service information
To retrieve the status of the service
information at any time press button
F or CHECK . The service information
is displayed for a few seconds.
Service information 3 236.
Control indicators
The control indicators described are
not present in all vehicles. The
description applies to all instrument
versions. Depending on the
equipment, the position of the control indicators may vary. When the
ignition is switched on, most control
indicators will illuminate briefly as a
functionality test.
The control indicator colours mean:red:danger, important reminderyellow:warning, information, faultgreen:confirmation of activationblue:confirmation of activationwhite:confirmation of activation
See all control indicators on different
instrument clusters 3 89.
Page 97 of 265
Instruments and controls95Turn signal
O illuminates or flashes green.
Illuminates briefly The parking lights are switched on.
Flashes
A turn signal or the hazard warning
flashers are activated.
Rapid flashing: failure of a turn signal
light or associated fuse, failure of turn
signal light on trailer.
Bulb replacement 3 211.
Turn signals 3 120.
Seat belt reminder
Seat belt reminder on all seats X illuminates or flashes red in the
instrument cluster together with the
indication in the roof console for each
seat belt.
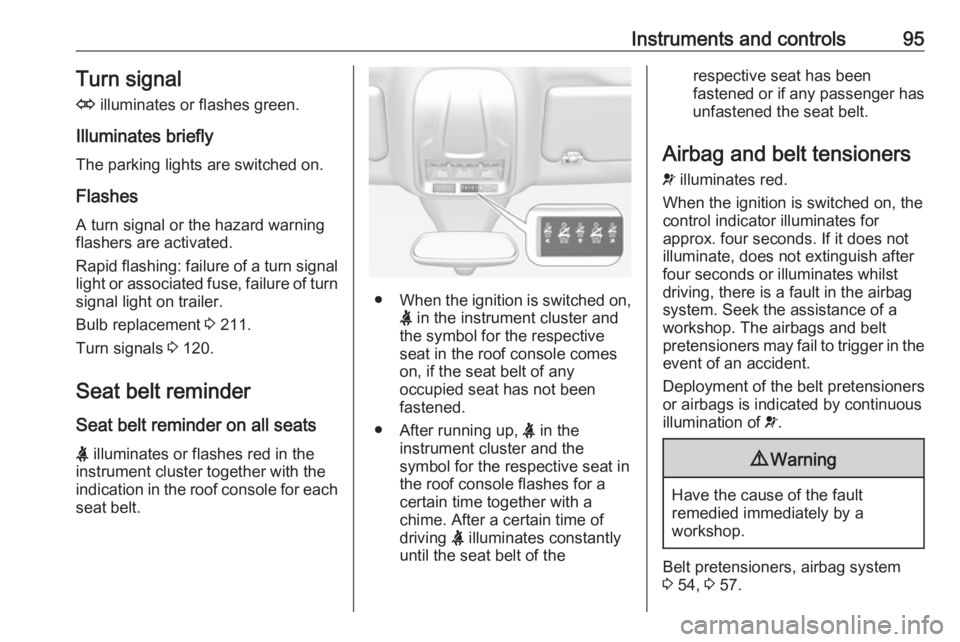
● When the ignition is switched on,
X in the instrument cluster and
the symbol for the respective
seat in the roof console comes
on, if the seat belt of any
occupied seat has not been
fastened.
● After running up, X in the
instrument cluster and the
symbol for the respective seat in
the roof console flashes for a
certain time together with a
chime. After a certain time of
driving X illuminates constantly
until the seat belt of the
respective seat has been
fastened or if any passenger has
unfastened the seat belt.
Airbag and belt tensioners
v illuminates red.
When the ignition is switched on, the
control indicator illuminates for
approx. four seconds. If it does not
illuminate, does not extinguish after
four seconds or illuminates whilst
driving, there is a fault in the airbag
system. Seek the assistance of a
workshop. The airbags and belt
pretensioners may fail to trigger in the event of an accident.
Deployment of the belt pretensioners
or airbags is indicated by continuous
illumination of v.9 Warning
Have the cause of the fault
remedied immediately by a
workshop.
Belt pretensioners, airbag system
3 54, 3 57.