OPEL GRANDLAND X 2019.75 Manual user
Manufacturer: OPEL, Model Year: 2019.75, Model line: GRANDLAND X, Model: OPEL GRANDLAND X 2019.75Pages: 273, PDF Size: 7.85 MB
Page 211 of 273
Vehicle care209
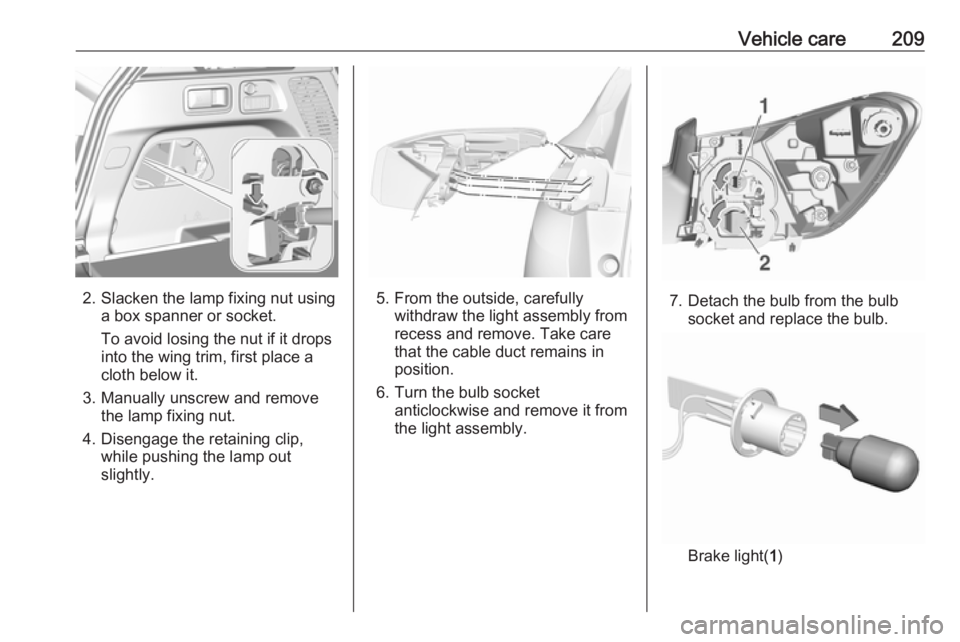
2. Slacken the lamp fixing nut usinga box spanner or socket.
To avoid losing the nut if it drops
into the wing trim, first place a
cloth below it.
3. Manually unscrew and remove the lamp fixing nut.
4. Disengage the retaining clip, while pushing the lamp out
slightly.5. From the outside, carefully withdraw the light assembly from
recess and remove. Take care
that the cable duct remains in
position.
6. Turn the bulb socket anticlockwise and remove it from
the light assembly.7. Detach the bulb from the bulb socket and replace the bulb.
Brake light( 1)
Page 212 of 273
210Vehicle care
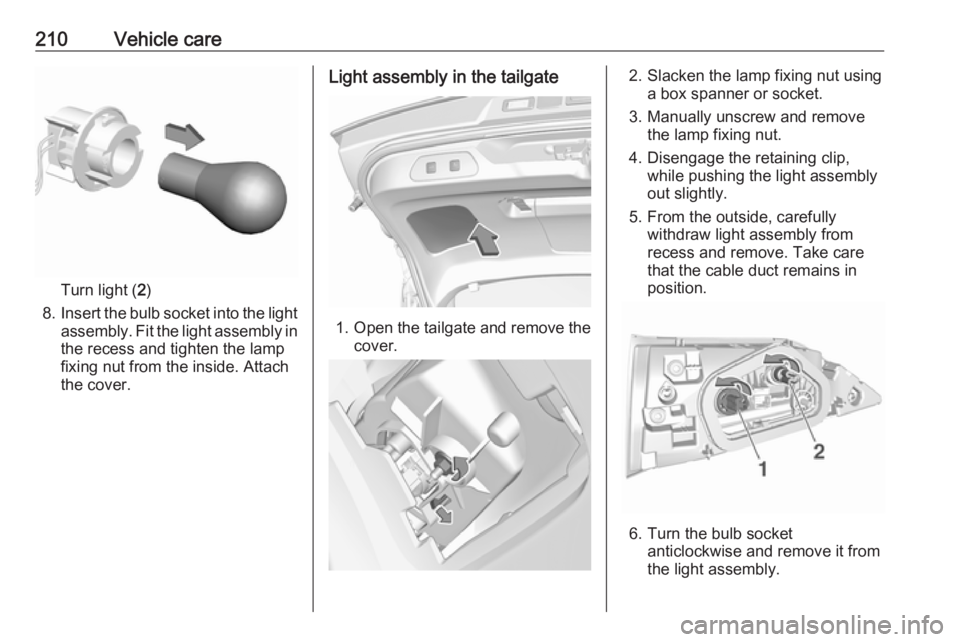
Turn light (2)
8. Insert the bulb socket into the light
assembly. Fit the light assembly in the recess and tighten the lamp
fixing nut from the inside. Attach
the cover.
Light assembly in the tailgate
1. Open the tailgate and remove the
cover.
2. Slacken the lamp fixing nut using a box spanner or socket.
3. Manually unscrew and remove the lamp fixing nut.
4. Disengage the retaining clip, while pushing the light assembly
out slightly.
5. From the outside, carefully withdraw light assembly from
recess and remove. Take care
that the cable duct remains in
position.
6. Turn the bulb socket anticlockwise and remove it from
the light assembly.
Page 213 of 273
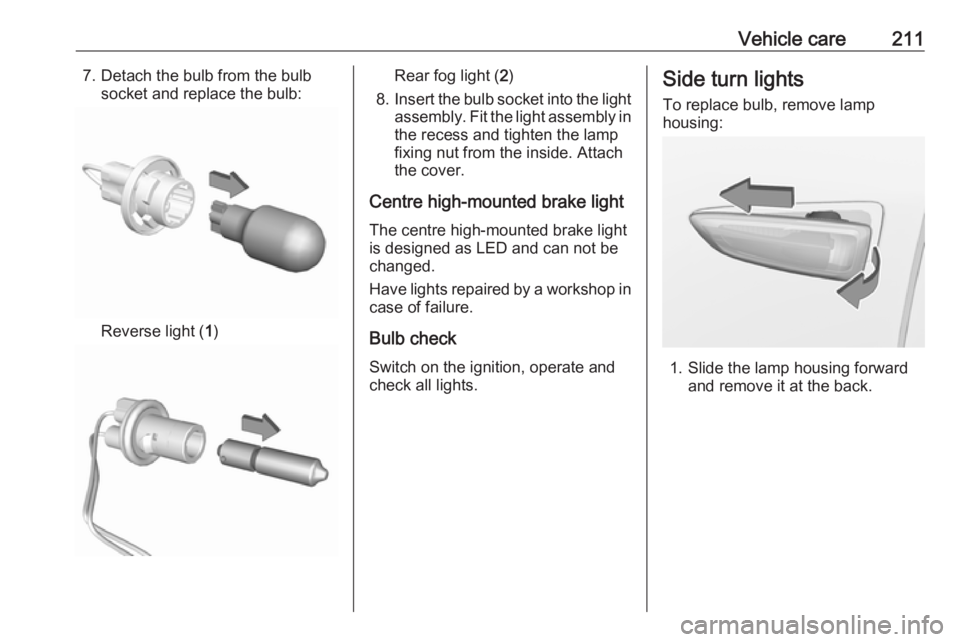
Vehicle care2117. Detach the bulb from the bulbsocket and replace the bulb:
Reverse light ( 1)
Rear fog light ( 2)
8. Insert the bulb socket into the light
assembly. Fit the light assembly in the recess and tighten the lamp
fixing nut from the inside. Attach
the cover.
Centre high-mounted brake light The centre high-mounted brake light
is designed as LED and can not be
changed.
Have lights repaired by a workshop in
case of failure.
Bulb check
Switch on the ignition, operate and
check all lights.Side turn lights
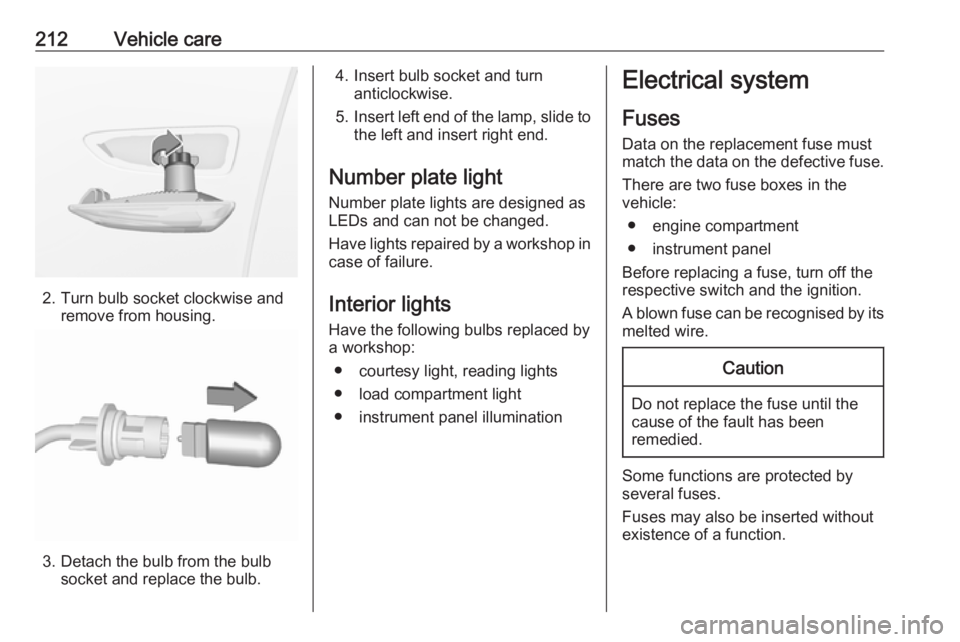
To replace bulb, remove lamp
housing:
1. Slide the lamp housing forward and remove it at the back.
Page 214 of 273
212Vehicle care
2. Turn bulb socket clockwise andremove from housing.
3. Detach the bulb from the bulbsocket and replace the bulb.
4. Insert bulb socket and turnanticlockwise.
5. Insert left end of the lamp, slide to
the left and insert right end.
Number plate light Number plate lights are designed as
LEDs and can not be changed.
Have lights repaired by a workshop in
case of failure.
Interior lightsHave the following bulbs replaced by
a workshop:
● courtesy light, reading lights
● load compartment light
● instrument panel illuminationElectrical system
Fuses Data on the replacement fuse must
match the data on the defective fuse.
There are two fuse boxes in the
vehicle:
● engine compartment
● instrument panel
Before replacing a fuse, turn off the
respective switch and the ignition.
A blown fuse can be recognised by its melted wire.Caution
Do not replace the fuse until the
cause of the fault has been
remedied.
Some functions are protected by
several fuses.
Fuses may also be inserted without
existence of a function.
Page 215 of 273
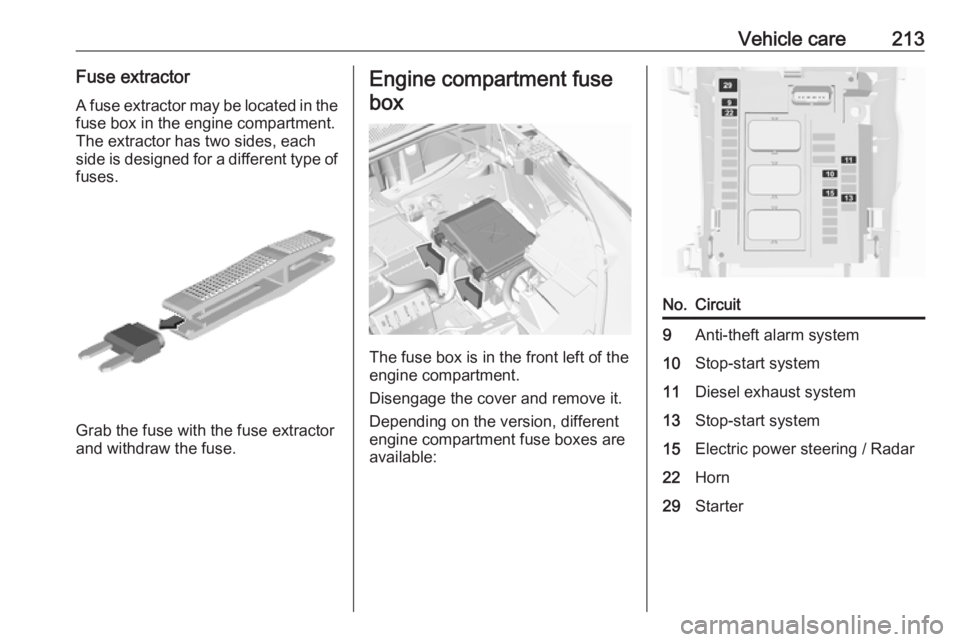
Vehicle care213Fuse extractorA fuse extractor may be located in the fuse box in the engine compartment.
The extractor has two sides, each
side is designed for a different type of
fuses.
Grab the fuse with the fuse extractor
and withdraw the fuse.
Engine compartment fuse
box
The fuse box is in the front left of the
engine compartment.
Disengage the cover and remove it. Depending on the version, different
engine compartment fuse boxes are
available:
No.Circuit9Anti-theft alarm system10Stop-start system11Diesel exhaust system13Stop-start system15Electric power steering / Radar22Horn29Starter
Page 216 of 273
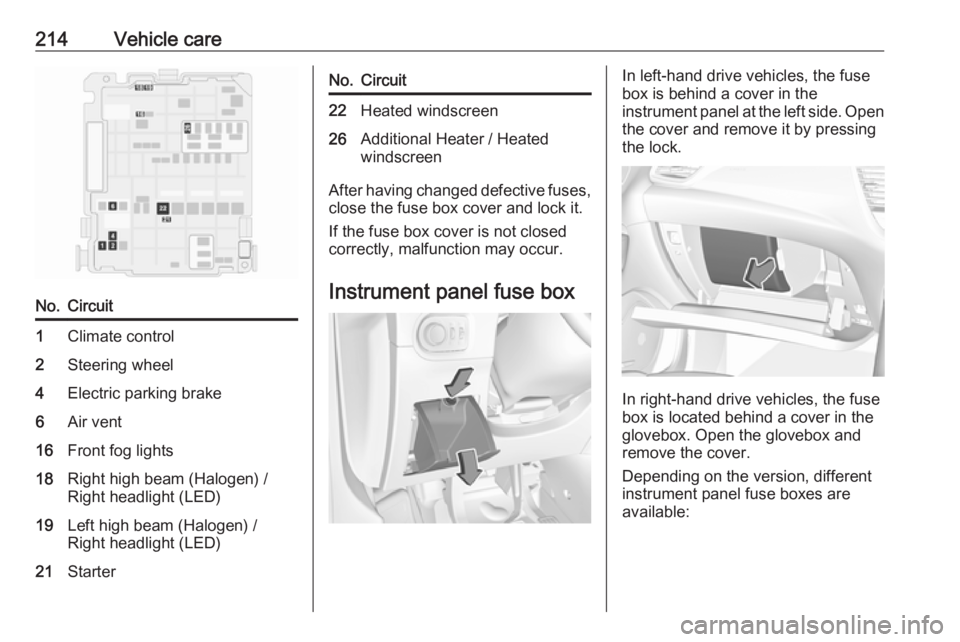
214Vehicle careNo.Circuit1Climate control2Steering wheel4Electric parking brake6Air vent16Front fog lights18Right high beam (Halogen) /
Right headlight (LED)19Left high beam (Halogen) /
Right headlight (LED)21StarterNo.Circuit22Heated windscreen26Additional Heater / Heated
windscreen
After having changed defective fuses,
close the fuse box cover and lock it.
If the fuse box cover is not closed
correctly, malfunction may occur.
Instrument panel fuse box
In left-hand drive vehicles, the fuse
box is behind a cover in the
instrument panel at the left side. Open
the cover and remove it by pressing
the lock.
In right-hand drive vehicles, the fuse
box is located behind a cover in the
glovebox. Open the glovebox and
remove the cover.
Depending on the version, different
instrument panel fuse boxes are
available:
Page 217 of 273
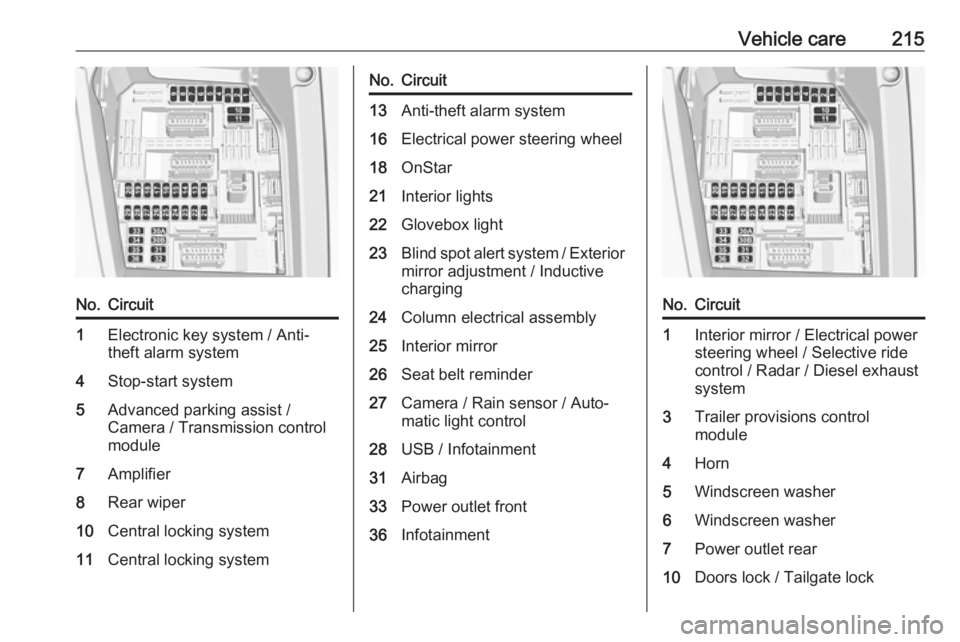
Vehicle care215No.Circuit1Electronic key system / Anti-
theft alarm system4Stop-start system5Advanced parking assist /
Camera / Transmission control
module7Amplifier8Rear wiper10Central locking system11Central locking systemNo.Circuit13Anti-theft alarm system16Electrical power steering wheel18OnStar21Interior lights22Glovebox light23Blind spot alert system / Exterior
mirror adjustment / Inductive
charging24Column electrical assembly25Interior mirror26Seat belt reminder27Camera / Rain sensor / Auto‐
matic light control28USB / Infotainment31Airbag33Power outlet front36InfotainmentNo.Circuit1Interior mirror / Electrical power
steering wheel / Selective ride
control / Radar / Diesel exhaust
system3Trailer provisions control
module4Horn5Windscreen washer6Windscreen washer7Power outlet rear10Doors lock / Tailgate lock
Page 218 of 273
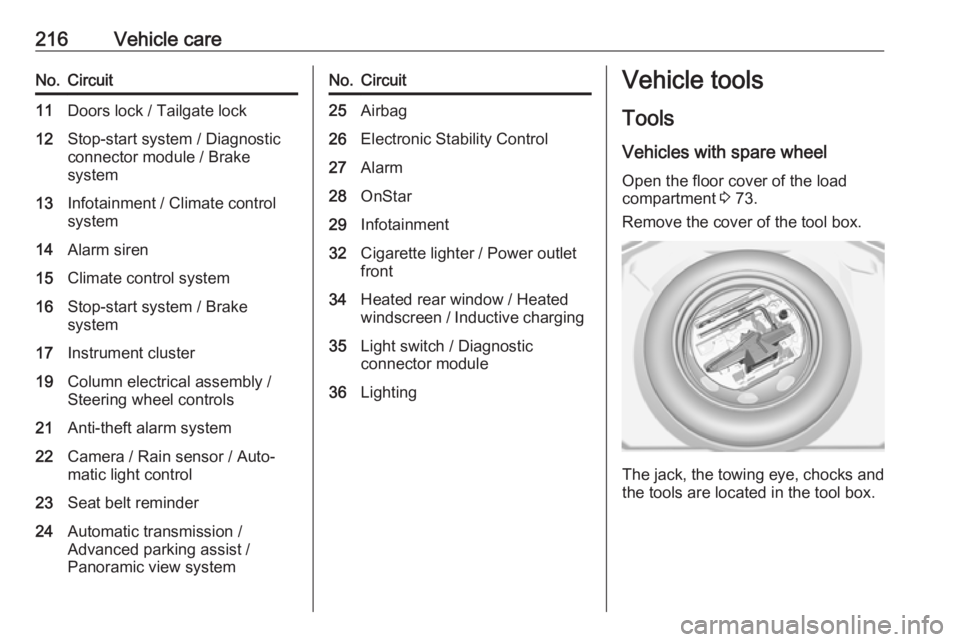
216Vehicle careNo.Circuit11Doors lock / Tailgate lock12Stop-start system / Diagnostic
connector module / Brake
system13Infotainment / Climate control
system14Alarm siren15Climate control system16Stop-start system / Brake
system17Instrument cluster19Column electrical assembly /
Steering wheel controls21Anti-theft alarm system22Camera / Rain sensor / Auto‐
matic light control23Seat belt reminder24Automatic transmission /
Advanced parking assist /
Panoramic view systemNo.Circuit25Airbag26Electronic Stability Control27Alarm28OnStar29Infotainment32Cigarette lighter / Power outlet front34Heated rear window / Heated
windscreen / Inductive charging35Light switch / Diagnostic
connector module36LightingVehicle tools
Tools
Vehicles with spare wheel Open the floor cover of the load
compartment 3 73.
Remove the cover of the tool box.
The jack, the towing eye, chocks and
the tools are located in the tool box.
Page 219 of 273
Vehicle care217Vehicles without spare wheel
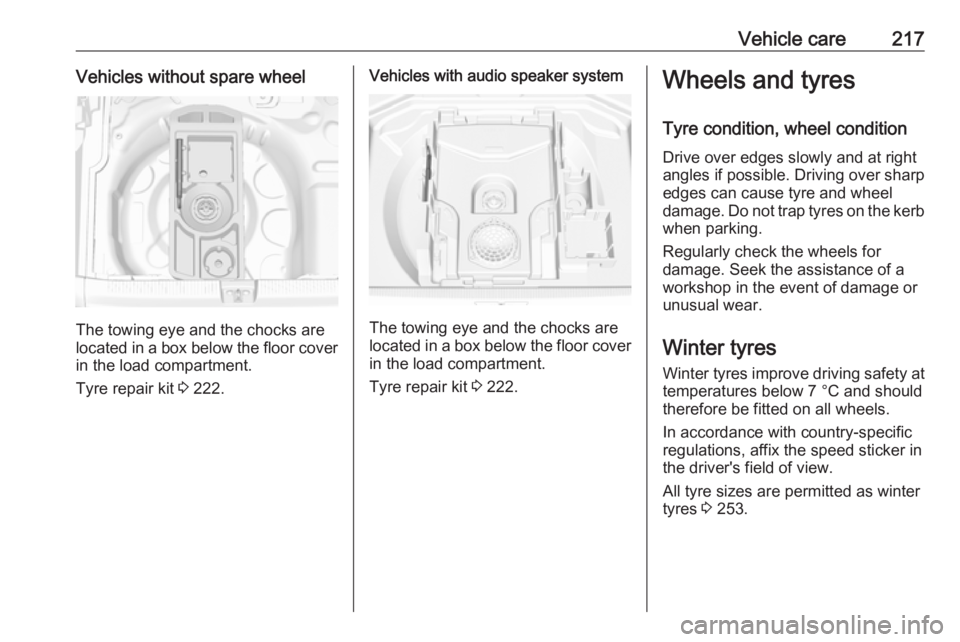
The towing eye and the chocks are
located in a box below the floor cover in the load compartment.
Tyre repair kit 3 222.
Vehicles with audio speaker system
The towing eye and the chocks are
located in a box below the floor cover in the load compartment.
Tyre repair kit 3 222.
Wheels and tyres
Tyre condition, wheel condition Drive over edges slowly and at right
angles if possible. Driving over sharp
edges can cause tyre and wheel
damage. Do not trap tyres on the kerb when parking.
Regularly check the wheels for
damage. Seek the assistance of a
workshop in the event of damage or
unusual wear.
Winter tyres
Winter tyres improve driving safety at temperatures below 7 °C and should
therefore be fitted on all wheels.
In accordance with country-specific
regulations, affix the speed sticker in
the driver's field of view.
All tyre sizes are permitted as winter
tyres 3 253.
Page 220 of 273
218Vehicle careTyre designationsE.g. 225/55 R 18 98 V225:tyre width, mm55:cross-section ratio (tyre height
to tyre width), %R:belt type: RadialRF:type: RunFlat18:wheel diameter, inches98:load index e.g. 98 is equivalent
to 750 kgV:speed code letter
Speed code letter:
Q:up to 160 km/hS:up to 180 km/hT:up to 190 km/hH:up to 210 km/hV:up to 240 km/hW:up to 270 km/h
Choose a tyre appropriate for the
maximum speed of your vehicle.
The maximum speed is achievable at kerb weight with driver (75 kg) plus
125 kg payload. Optional equipment
could reduce the maximum speed of
the vehicle.
Performance 3 250.
Directional tyres
Directional tyres should be mounted
so that they rotate in the correct
direction. The proper rotation
direction is indicated by a symbol
(e.g. an arrow) on the sidewall.
Tyre pressure
Check the pressure of cold tyres at
least every 14 days and before any
long journey. Do not forget the spare
wheel. This also applies to vehicles
with tyre pressure monitoring system.
Tyre pressure 3 253.
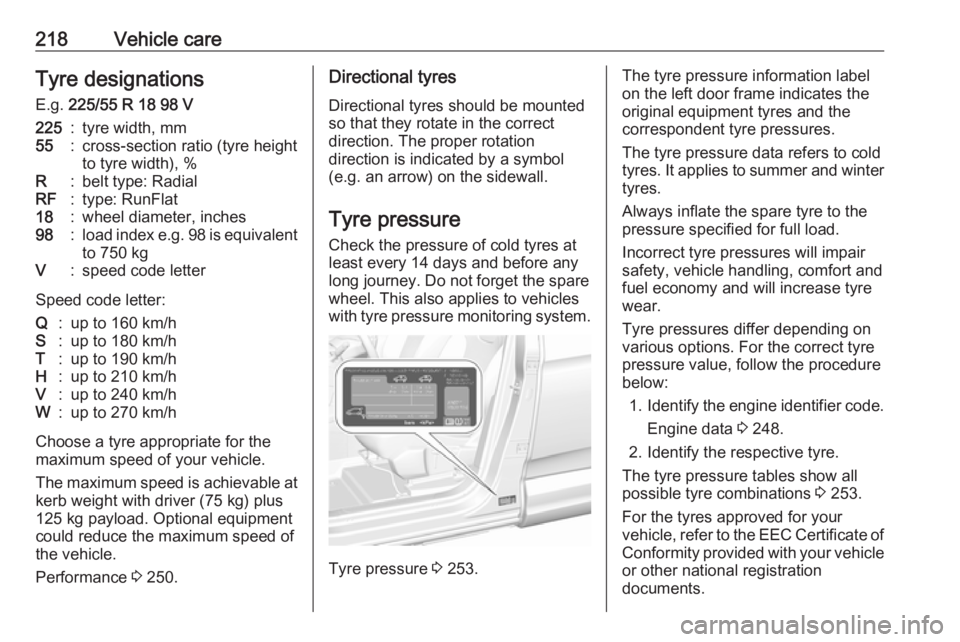
The tyre pressure information label
on the left door frame indicates the
original equipment tyres and the
correspondent tyre pressures.
The tyre pressure data refers to cold
tyres. It applies to summer and winter tyres.
Always inflate the spare tyre to the
pressure specified for full load.
Incorrect tyre pressures will impair
safety, vehicle handling, comfort and
fuel economy and will increase tyre
wear.
Tyre pressures differ depending on
various options. For the correct tyre
pressure value, follow the procedure
below:
1. Identify the engine identifier code.
Engine data 3 248.
2. Identify the respective tyre.
The tyre pressure tables show all
possible tyre combinations 3 253.
For the tyres approved for your
vehicle, refer to the EEC Certificate of Conformity provided with your vehicle
or other national registration
documents.