park assist OPEL GRANDLAND X 2019 Manual user
[x] Cancel search | Manufacturer: OPEL, Model Year: 2019, Model line: GRANDLAND X, Model: OPEL GRANDLAND X 2019Pages: 277, PDF Size: 7.75 MB
Page 181 of 277
Driving and operating179
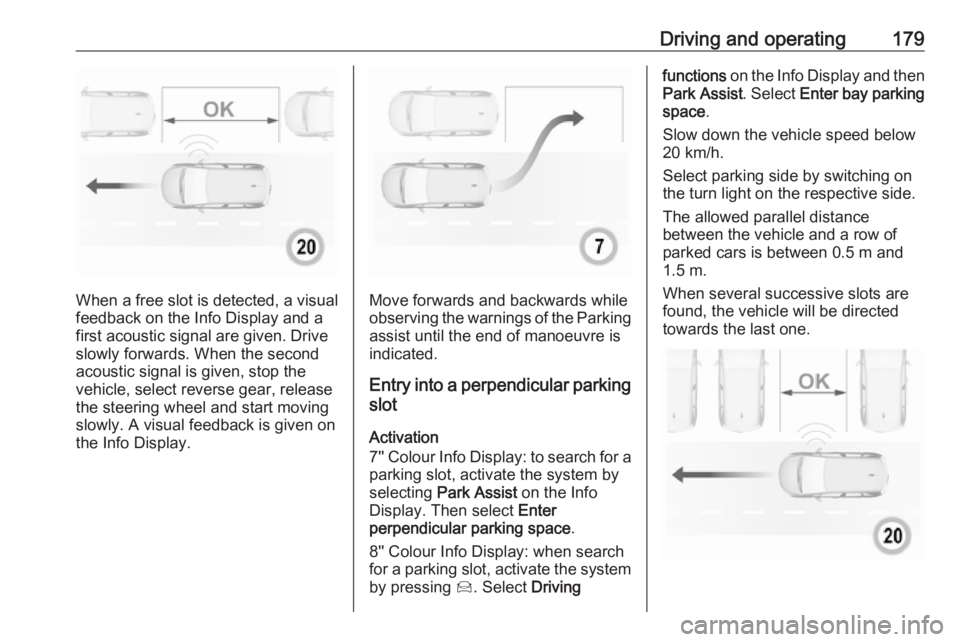
When a free slot is detected, a visual
feedback on the Info Display and a
first acoustic signal are given. Drive
slowly forwards. When the second
acoustic signal is given, stop the
vehicle, select reverse gear, release
the steering wheel and start moving
slowly. A visual feedback is given on
the Info Display.Move forwards and backwards while
observing the warnings of the Parking
assist until the end of manoeuvre is
indicated.
Entry into a perpendicular parking
slot
Activation
7'' Colour Info Display: to search for a parking slot, activate the system by
selecting Park Assist on the Info
Display. Then select Enter
perpendicular parking space .
8'' Colour Info Display: when search
for a parking slot, activate the system by pressing Í. Select Driving
functions on the Info Display and then
Park Assist . Select Enter bay parking
space .
Slow down the vehicle speed below
20 km/h.
Select parking side by switching on
the turn light on the respective side.
The allowed parallel distance
between the vehicle and a row of
parked cars is between 0.5 m and
1.5 m.
When several successive slots are found, the vehicle will be directedtowards the last one.
Page 182 of 277
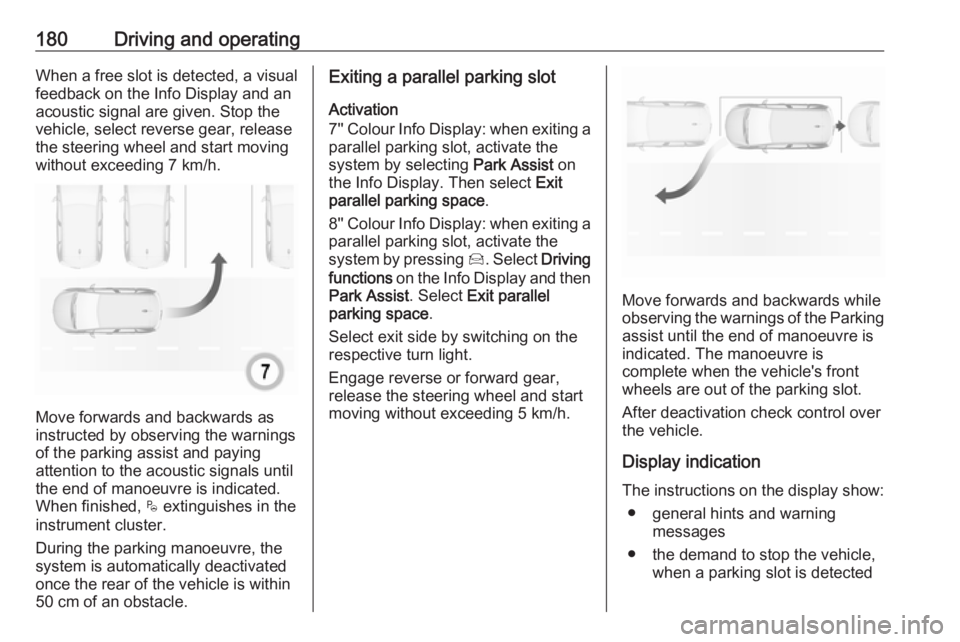
180Driving and operatingWhen a free slot is detected, a visual
feedback on the Info Display and an
acoustic signal are given. Stop the
vehicle, select reverse gear, release
the steering wheel and start moving
without exceeding 7 km/h.
Move forwards and backwards as
instructed by observing the warnings of the parking assist and paying
attention to the acoustic signals until
the end of manoeuvre is indicated.
When finished, $ extinguishes in the
instrument cluster.
During the parking manoeuvre, the
system is automatically deactivated
once the rear of the vehicle is within
50 cm of an obstacle.
Exiting a parallel parking slot
Activation
7'' Colour Info Display: when exiting a parallel parking slot, activate the
system by selecting Park Assist on
the Info Display. Then select Exit
parallel parking space .
8'' Colour Info Display: when exiting a parallel parking slot, activate the
system by pressing Í. Select Driving
functions on the Info Display and then
Park Assist . Select Exit parallel
parking space .
Select exit side by switching on the
respective turn light.
Engage reverse or forward gear,
release the steering wheel and start
moving without exceeding 5 km/h.
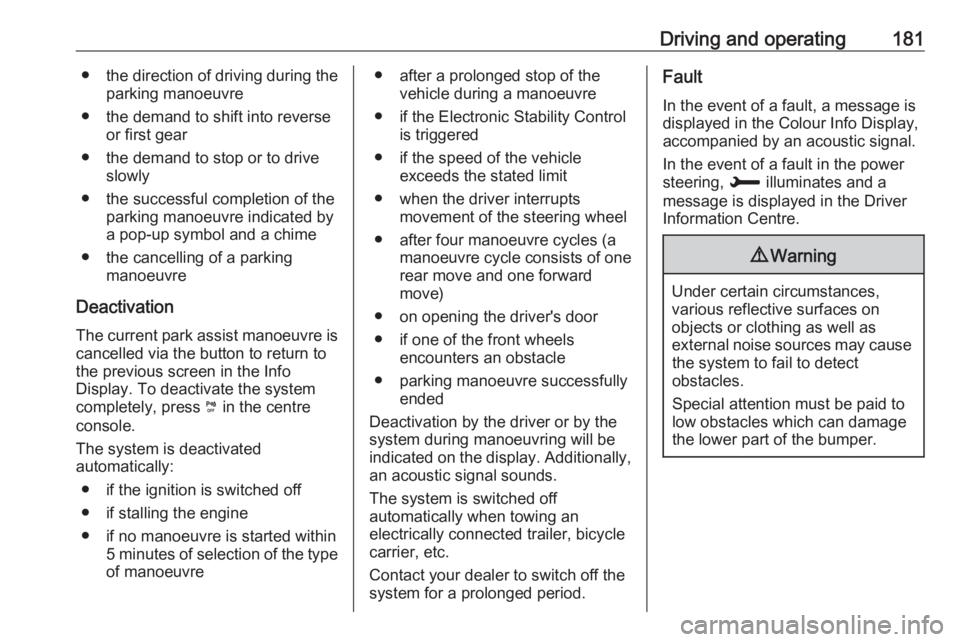
Move forwards and backwards while
observing the warnings of the Parking
assist until the end of manoeuvre is
indicated. The manoeuvre is
complete when the vehicle's front
wheels are out of the parking slot.
After deactivation check control over
the vehicle.
Display indication The instructions on the display show: ● general hints and warning messages
● the demand to stop the vehicle, when a parking slot is detected
Page 183 of 277
Driving and operating181●the direction of driving during the
parking manoeuvre
● the demand to shift into reverse or first gear
● the demand to stop or to drive slowly
● the successful completion of the parking manoeuvre indicated bya pop-up symbol and a chime
● the cancelling of a parking manoeuvre
Deactivation The current park assist manoeuvre is
cancelled via the button to return to
the previous screen in the Info
Display. To deactivate the system
completely, press ¼ in the centre
console.
The system is deactivated
automatically:
● if the ignition is switched off
● if stalling the engine
● if no manoeuvre is started within 5 minutes of selection of the typeof manoeuvre● after a prolonged stop of the vehicle during a manoeuvre
● if the Electronic Stability Control is triggered
● if the speed of the vehicle exceeds the stated limit
● when the driver interrupts movement of the steering wheel
● after four manoeuvre cycles (a manoeuvre cycle consists of one
rear move and one forward
move)
● on opening the driver's door ● if one of the front wheels encounters an obstacle
● parking manoeuvre successfully ended
Deactivation by the driver or by the
system during manoeuvring will be indicated on the display. Additionally,
an acoustic signal sounds.
The system is switched off
automatically when towing an
electrically connected trailer, bicycle
carrier, etc.
Contact your dealer to switch off the
system for a prolonged period.Fault
In the event of a fault, a message is
displayed in the Colour Info Display, accompanied by an acoustic signal.
In the event of a fault in the power
steering, H illuminates and a
message is displayed in the Driver
Information Centre.9 Warning
Under certain circumstances,
various reflective surfaces on
objects or clothing as well as
external noise sources may cause the system to fail to detect
obstacles.
Special attention must be paid to
low obstacles which can damage
the lower part of the bumper.
Page 184 of 277

182Driving and operatingCaution
Performance of the system can bereduced when sensors are
covered, e.g. by ice or snow.
Performance of the parking assist
system can be reduced due to
heavy loading.
Special conditions apply if there
are taller vehicles in the vicinity
(e.g. off-road vehicles, mini vans,
vans). Object identification and correct distance indication in the
upper part of these vehicles
cannot be guaranteed.
Objects with a very small reflection
cross-section, e.g. objects of
narrow size or soft materials, may
not be detected by the system.
Parking assist systems do not
detect objects outside the
detection range.
Note
It is possible that the sensor detects a non-existing object caused by
echo disturbance from external
acoustic noise or mechanical
misalignments (sporadic false
warnings may occur).
Make sure that the front number
plate is properly mounted (not bent
and no gaps to the bumper on the left
or right side) and the sensors are
firmly in place.
Advanced parking assist system
may not respond to changes in the
available parking space after
initiating a parking manoeuvre. The
system may recognize an entry, a
gateway, a courtyard or even a crossing as a parking slot. After
selecting reverse gear the system
will start a parking manoeuvre. Take care regarding the availability of the
suggested parking slot.
Surface irregularities, e.g. on construction zones, are not detected
by the system. The driver accepts
responsibility.
Side blind spot alert The side blind spot alert system
detects and reports objects on either
side of the vehicle, within a specified
blind spot zone. The system displaysa visual alert in each exterior mirror,
when detecting objects that may not
be visible in the interior and exterior
mirrors.
Side blind spot alert uses some of the
advanced parking assist sensors
which are located in the front and rear bumper on both sides of the vehicle.9 Warning
Side blind spot alert does not
replace driver vision.
The system does not detect:
● vehicles outside the side blind zones which may be rapidly
approaching
● pedestrians, cyclists or animals
Before changing a lane, always
check all mirrors, look over the
shoulder and use the turn light.
Activation
7'' Colour Info Display: select Blind
spot monitoring on the Info Display
and activate the function.
Page 189 of 277
Driving and operating187The panoramic view system may not
operate properly when:
● The surrounding is dark.
● The sun or the beam of headlights is shining directly into
the camera lenses.
● Weather limits visibility, such as fog, rain, or snow.
● The camera lenses are blocked by snow, ice, slush, mud, dirt.
● The vehicle is towing a trailer.
● The vehicle had an accident.
● There are extreme temperature changes.
Rear view camera The rear view camera assists the
driver when reversing by displaying a view of the area behind the vehicle.
The view of the camera is displayed
in the Info Display.9 Warning
The rear view camera does not
replace driver vision. Note that
objects that are outside the
camera's field of view and the
parking assist sensors, e.g. below
the bumper or underneath the
vehicle, are not displayed.
Do not reverse or park the vehicle
using only the rear view camera.
Always check the surrounding of
the vehicle before driving.
Switching on
Rear view camera is automatically
activated when reverse gear is
engaged.
Functionality
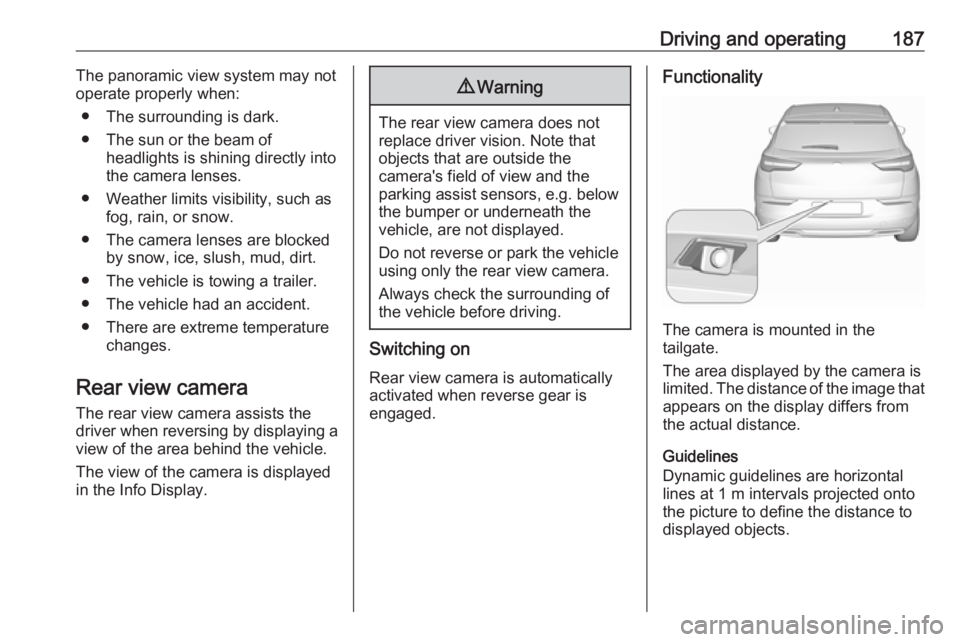
The camera is mounted in the
tailgate.
The area displayed by the camera is
limited. The distance of the image that
appears on the display differs from
the actual distance.
Guidelines
Dynamic guidelines are horizontal
lines at 1 m intervals projected onto
the picture to define the distance to displayed objects.
Page 220 of 277

218Vehicle careNo.Circuit1Electronic key system / Anti-
theft alarm system4Stop-start system5Advanced parking assist /
Camera / Transmission control
module7Amplifier8Rear wiper10Central locking system11Central locking systemNo.Circuit13Anti-theft alarm system16Electrical power steering wheel18OnStar21Interior lights22Glovebox light23Blind spot alert system / Exterior
mirror adjustment / Inductive
charging24Column electrical assembly25Interior mirror26Seat belt reminder27Camera / Rain sensor / Auto‐
matic light control28USB / Infotainment31Airbag33Power outlet front36InfotainmentNo.Circuit1Interior mirror / Electrical power
steering wheel / Selective ride
control / Radar / Diesel exhaust
system3Trailer provisions control
module4Horn5Windscreen washer6Windscreen washer7Power outlet rear10Doors lock / Tailgate lock
Page 221 of 277
Vehicle care219No.Circuit11Doors lock / Tailgate lock12Stop-start system / Diagnostic
connector module / Brake
system13Infotainment / Climate control
system14Alarm siren15Climate control system16Stop-start system / Brake
system17Instrument cluster19Column electrical assembly /
Steering wheel controls21Anti-theft alarm system22Camera / Rain sensor / Auto‐
matic light control23Seat belt reminder24Automatic transmission /
Advanced parking assist /
Panoramic view systemNo.Circuit25Airbag26Electronic Stability Control27Alarm28OnStar29Infotainment32Cigarette lighter / Power outlet front34Heated rear window / Heated
windscreen / Inductive charging35Light switch / Diagnostic
connector module36LightingVehicle tools
Tools
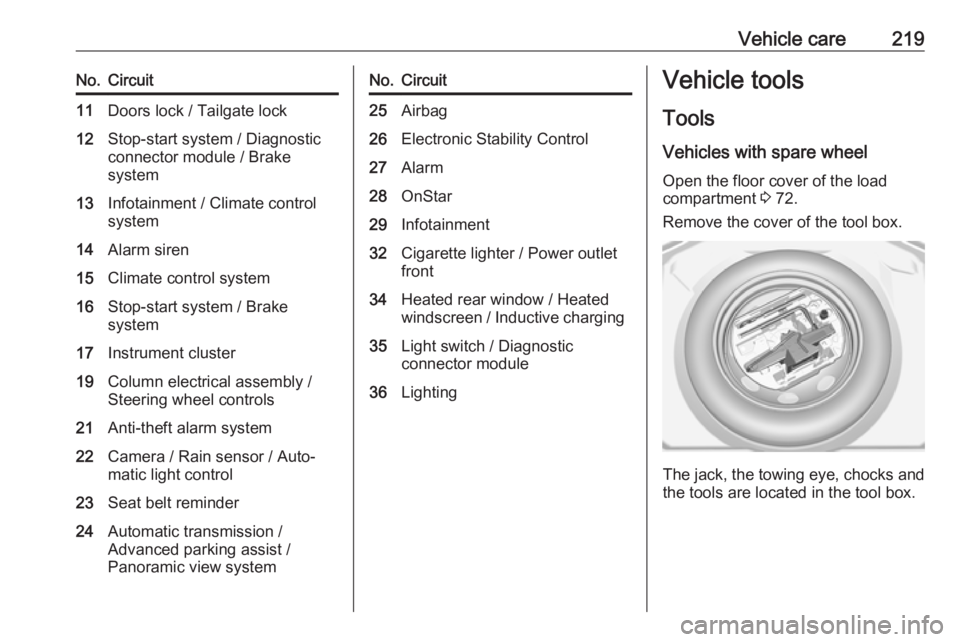
Vehicles with spare wheel Open the floor cover of the load
compartment 3 72.
Remove the cover of the tool box.
The jack, the towing eye, chocks and
the tools are located in the tool box.
Page 222 of 277

220Vehicle careVehicles without spare wheel
The towing eye and the chocks are
located in a box below the floor cover in the load compartment.
Tyre repair kit 3 225.
Vehicles with audio speaker system
The towing eye and the chocks are
located in a box below the floor cover in the load compartment.
Tyre repair kit 3 225.
Wheels and tyres
Tyre condition, wheel condition Drive over edges slowly and at right
angles if possible. Driving over sharp
edges can cause tyre and wheel
damage. Do not trap tyres on the kerb when parking.
Regularly check the wheels for
damage. Seek the assistance of a
workshop in the event of damage or
unusual wear.
Winter tyres
Winter tyres improve driving safety at temperatures below 7 °C and should
therefore be fitted on all wheels.
In accordance with country-specific
regulations, affix the speed sticker in
the driver's field of view.
All tyre sizes are permitted as winter
tyres 3 257.
Page 237 of 277
Vehicle care235Caution
Deactivate the driver assistance
systems like active emergency
braking 3 170, otherwise the
vehicle may automatically brake during towing.
Switch the selector lever to neutral.
Release the parking brake.
Caution
Drive slowly. Do not drive jerkily.
Excessive tractive force can
damage the vehicle.
When the engine is not running,
considerably more force is needed to
brake and steer.
To prevent the entry of exhaust gases from the towing vehicle, switch on the
air recirculation and close the
windows.
Vehicles with automatic transmission: The vehicle must be towed facing
forwards, not faster than 80 km/h nor further than 100 km. In all other cases
and when the transmission is
defective, the front axle must be
raised off the ground.
Seek the assistance of a workshop.
After towing, unscrew the towing eye.
Insert cap with the flange into the
recess and fix cap by pushing.
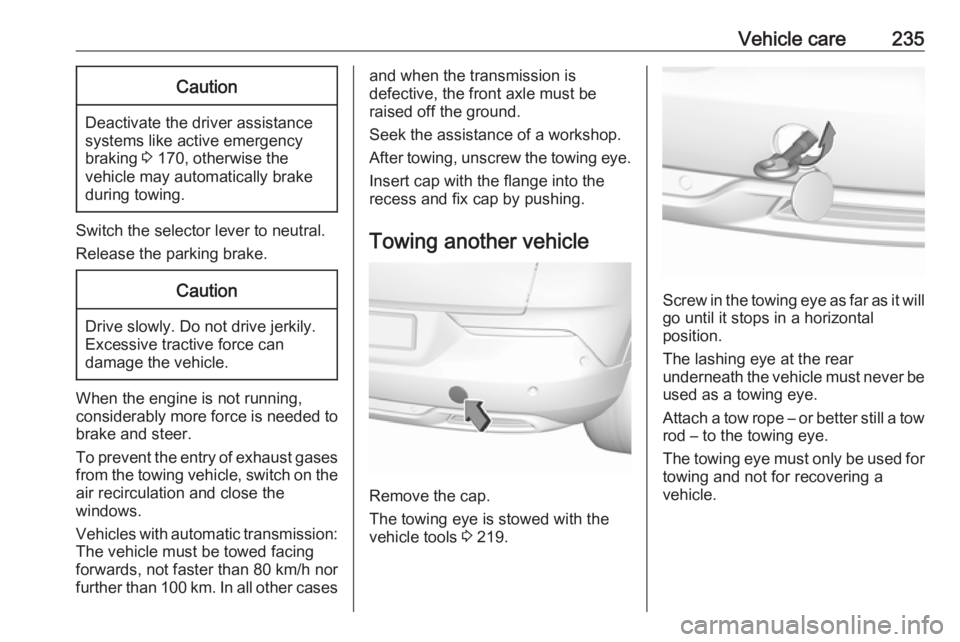
Towing another vehicle
Remove the cap.
The towing eye is stowed with the
vehicle tools 3 219.
Screw in the towing eye as far as it will
go until it stops in a horizontal
position.
The lashing eye at the rear
underneath the vehicle must never be used as a towing eye.
Attach a tow rope – or better still a tow
rod – to the towing eye.
The towing eye must only be used for towing and not for recovering a
vehicle.
Page 272 of 277

270IndexAAccessories and vehicle modifications .......................... 201
Active emergency braking ....99, 170
Adaptive cruise control .........99, 162
AdBlue .................................. 97, 144
Adjustable air vents ...................131
Advanced parking assist ............178
Airbag and belt tensioners ...........93
Airbag deactivation ................59, 94
Airbag label................................... 54 Airbag system .............................. 54
Air conditioning regular operation ................................ 133
Air conditioning system .............. 124
Air intake .................................... 132
Air vents...................................... 131
Antilock brake system ................ 151
Antilock brake system (ABS) .......96
Anti-theft alarm system ................35
Anti-theft locking system .............. 35
Appearance care ........................236
Armrest ................................... 50, 51
Ashtrays ....................................... 87
Automatic anti-dazzle ..................39
Automatic light control ...............114
Automatic locking ........................28
Automatic transmission .............147
Autostop ............................... 98, 139
Auxiliary heater ........................... 131B
Battery discharge protection ......122
Battery voltage ........................... 104
BlueInjection ............................... 144
Bonnet ....................................... 203
Brake and clutch fluid .................244
Brake and clutch system .............95
Brake assist ............................... 153
Brake fluid .................................. 206
Brakes ............................... 151, 206
Breakdown.................................. 234
Bulb replacement ....................... 209
C Capacities .................................. 256
Catalytic converter .....................143
Central locking system ................24
Centre console lighting ..............121
Centre console storage ...............69
Changing tyre and wheel size ...224
Charging system .......................... 94
Child locks ................................... 29
Child restraint installation locations ................................... 64
Child restraints.............................. 61
Child restraint systems ................61
Cigarette lighter ........................... 86
Climate control ............................. 16
Climate control systems .............123
Clock............................................. 83