wheel OPEL GRANDLAND X 2020 Manual user
[x] Cancel search | Manufacturer: OPEL, Model Year: 2020, Model line: GRANDLAND X, Model: OPEL GRANDLAND X 2020Pages: 283, PDF Size: 22.19 MB
Page 61 of 283
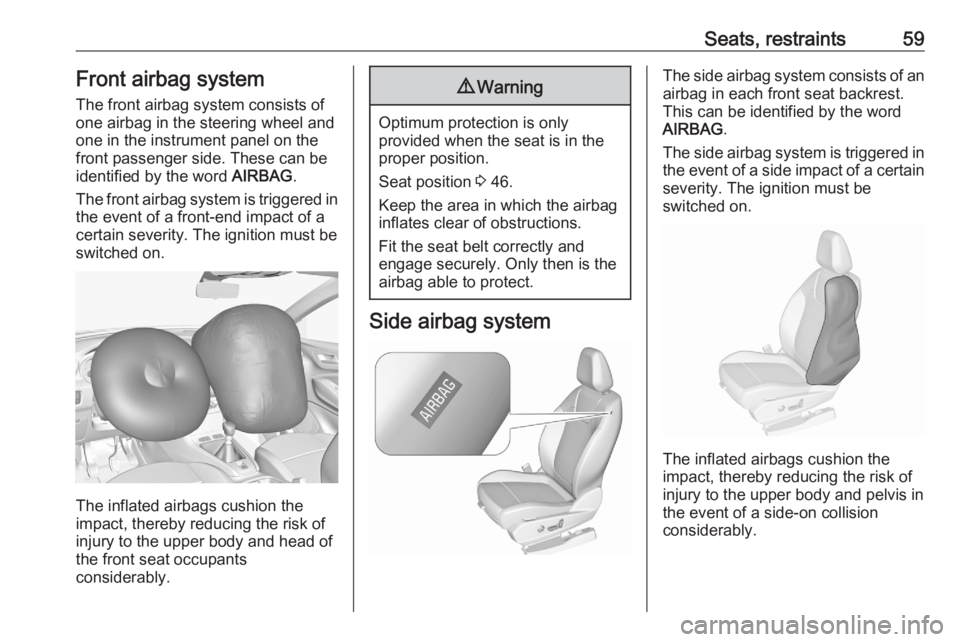
Seats, restraints59Front airbag systemThe front airbag system consists of
one airbag in the steering wheel and
one in the instrument panel on the
front passenger side. These can be
identified by the word AIRBAG.
The front airbag system is triggered in
the event of a front-end impact of a
certain severity. The ignition must be
switched on.
The inflated airbags cushion the
impact, thereby reducing the risk of
injury to the upper body and head of
the front seat occupants
considerably.
9 Warning
Optimum protection is only
provided when the seat is in the
proper position.
Seat position 3 46.
Keep the area in which the airbag
inflates clear of obstructions.
Fit the seat belt correctly and
engage securely. Only then is the
airbag able to protect.
Side airbag system
The side airbag system consists of an
airbag in each front seat backrest.
This can be identified by the word
AIRBAG .
The side airbag system is triggered in the event of a side impact of a certain
severity. The ignition must be
switched on.
The inflated airbags cushion the
impact, thereby reducing the risk of
injury to the upper body and pelvis in
the event of a side-on collision
considerably.
Page 75 of 283

Storage73Rear floor storage cover
The rear floor cover can be lifted and
removed. Raise cover at the loop and remove.
To hold the load compartment cover
in an upright positon, lift it up past the
retractable stops.
Double load floor
The double load floor can be inserted
in the load compartment in two
positions:
● lower position above the spare wheel well cover
● upper position interlocked with the grab handle into back panel
trim
To remove, press the handle to
unlock the load floor and lift it up while
using the handle.
If mounted in the upper position, the
space between the load floor and the spare wheel well cover can be used
as a storage compartment.
In this position, if the rear seat
backrests are folded forwards, an
almost completely flat load bay is
created.
In the upper position, the double load
floor is able to withstand a maximum
load of 100 kg. In the lower position,
the double load floor is able to
withstand the maximum load of
150 kg.
Page 81 of 283
Instruments and controls79Instruments and
controlsControls ....................................... 80
Steering wheel adjustment ........80
Steering wheel controls .............80
Heated steering wheel ...............81
Horn ........................................... 81
Pedestrian safety alert ...............81
Windscreen wiper and washer ..81
Rear window wiper and washer ...................................... 83
Outside temperature ..................84
Clock ......................................... 84
Power outlets ............................. 85
Inductive charging .....................87
Cigarette lighter ......................... 88
Ashtrays .................................... 88
Warning lights, gauges and indi‐ cators ........................................... 88
Instrument cluster ......................88
Speedometer ............................. 90
Odometer .................................. 90
Trip odometer ............................ 90
Tachometer ............................... 90
Fuel gauge ................................ 91
Battery gauge ............................ 91Power indicator gauge ...............91
Engine coolant temperature gauge ....................................... 92
Engine oil level monitor .............92
Service display .......................... 92
Control indicators ......................93
Turn lights .................................. 93
Seat belt reminder .....................94
Airbag and belt tensioners .........94
Airbag deactivation ....................95
Charging system .......................95
Malfunction indicator light ..........95
Service vehicle soon .................95
Stop engine ............................... 95
System check ............................ 96
Hybrid system active .................96
Hybrid system fault ....................96
Brake and clutch system ...........96
Electric parking brake ................96
Electric parking brake fault ........96
Automatic operation of electric parking brake off ....................... 97
Antilock brake system (ABS) .....97
Gear shifting .............................. 97
Lane departure warning ............97
Lane keep assist .......................97
Electronic Stability Control and Traction Control system ...........97
Electronic Stability Control and Traction Control system off ......98Engine coolant temperature ......98
Preheating ................................. 98
Exhaust filter .............................. 98
AdBlue ....................................... 98
Deflation detection system ........99
Engine oil pressure ....................99
Low fuel ..................................... 99
Charge cord connected .............99
Autostop .................................... 99
Exterior light .............................. 99
Low beam ................................ 100
High beam ............................... 100
High beam assist .....................100
LED headlights ........................ 100
Front fog lights ......................... 100
Rear fog light ........................... 100
Rain sensor ............................. 100
Cruise control .......................... 100
Adaptive cruise control ............100
Vehicle detected ahead ...........100
Side blind spot alert .................100
Active emergency braking .......101
Speed limiter ........................... 101
Door open ................................ 101
Displays ..................................... 101
Driver Information Centre ........101
Info Display .............................. 103
Vehicle messages ......................107
Warning chimes .......................107
Page 82 of 283
80Instruments and controlsVehicle personalisation..............108
Telematics services ...................111
Opel Connect .......................... 111Controls
Steering wheel adjustment
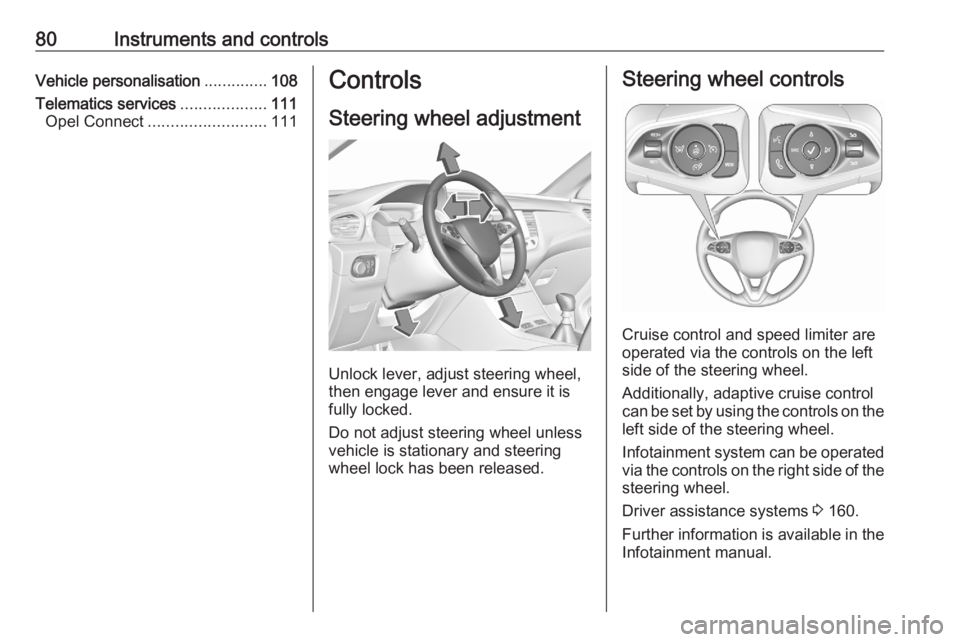
Unlock lever, adjust steering wheel,
then engage lever and ensure it is
fully locked.
Do not adjust steering wheel unless
vehicle is stationary and steering
wheel lock has been released.
Steering wheel controls
Cruise control and speed limiter are
operated via the controls on the left
side of the steering wheel.
Additionally, adaptive cruise control can be set by using the controls on the
left side of the steering wheel.
Infotainment system can be operated
via the controls on the right side of the
steering wheel.
Driver assistance systems 3 160.
Further information is available in the
Infotainment manual.
Page 83 of 283

Instruments and controls81Heated steering wheel
Activate heating by pressing *.
Activation is indicated by the LED in
the button.
Heating is operational when the
engine is running and during an
Autostop.
Stop-start system 3 139.
Horn
Press j.
Pedestrian safety alert The sound of the pedestrian safety
alert is generated to indicate the
vehicle presence to pedestrians when
combustion engine is off. It is active
up to 20 km/h.
Windscreen wiper and
washer
Windscreen wiper with adjustable wiper intervalHI:fastLO:slowINT:interval wipingOFF:off
For a single wipe when the
windscreen wiper is off, press the
lever down to position 1x.
Do not use if the windscreen is frozen.
Switch off in car washes.
Page 84 of 283

82Instruments and controlsTo activate interval wiping mode the
next time ignition is switched on,
press the lever downwards to position
OFF and back to INT.
Adjustable wiper interval
Wiper lever in position INT.
Turn the adjuster wheel to adjust the
desired wipe interval.
Windscreen wiper with rain sensorHI:fastLO:slowAUTO:automatic wiping with rain
sensorOFF:off
In AUTO position, the rain sensor
detects the amount of water on the
windscreen and automatically
regulates the frequency of the
windscreen wiper. If ignition is
switched off, automatic wiping mode
is deactivated. To activate automatic
wiping mode the next time ignition is
switched on, press the lever
downwards to position OFF and back
to AUTO .
For a single wipe when the
windscreen wiper is off, press the
lever downwards to position 1x.
Do not use if the windscreen is frozen. Switch off in car washes.
Adjustable sensitivity of the rain
sensor
Turn the adjuster wheel to adjust the
sensitivity.
Make sure the sensor is not blocked
3 39, 3 10.
Control indicator < 3 81.
Page 101 of 283
Instruments and controls99Deflation detection system
w illuminates or flashes yellow.
Illuminates
Tyre pressure loss in one or more
wheels. Stop immediately and check
tyre pressure.
Flashes
Fault in system. Consult a workshop.
Deflation detection system 3 233.
Engine oil pressure
I illuminates red.
Illuminates when the ignition is
switched on and extinguishes shortly after the engine starts.
Illuminates when the engine is
runningCaution
Engine lubrication may be
interrupted. This may result in
damage to the engine and / or
locking of the drive wheels.
1. Select neutral gear.
2. Move out of the flow of traffic as quickly as possible without
impeding other vehicles.
3. Switch off ignition.9 Warning
When the engine is off,
considerably more force is needed
to brake and steer. During an
Autostop the brake servo unit will
still be operational.
Do not remove key until vehicle is stationary, otherwise the steeringwheel lock could engage
unexpectedly.
Keep engine turned off and let the
vehicle be towed to a workshop.
Low fuel o illuminates yellow.
Level in fuel tank is too low.
Refuelling 3 204.
Bleeding the diesel fuel system
3 219.
Charge cord connected
j illuminates red.
The vehicle plug of the charge cord is
still connected to the charge port. The
vehicle cannot be started.
Disconnect the vehicle plug from the
charge port and close the charge port door.
Autostop
D illuminates or flashes green.
Illuminates green
Engine is in an Autostop.
Flashes green
Autostop is temporarily unavailable,
or Autostop mode is invoked
automatically.
Stop-start system 3 139.
Exterior light
8 illuminates green.
The exterior lights are on 3 113.
Page 104 of 283
102Instruments and controls
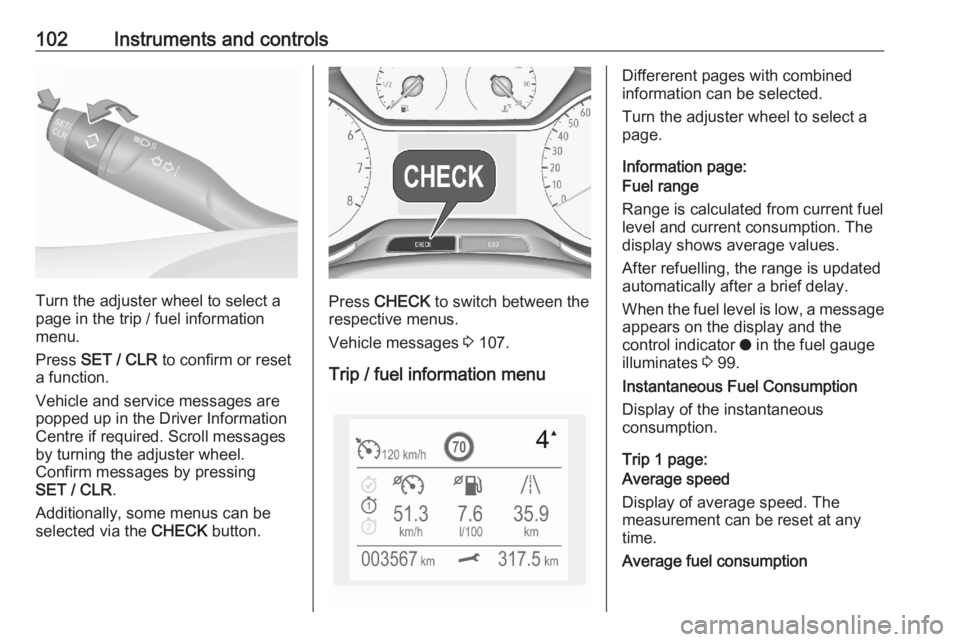
Turn the adjuster wheel to select a
page in the trip / fuel information
menu.
Press SET / CLR to confirm or reset
a function.
Vehicle and service messages are
popped up in the Driver Information
Centre if required. Scroll messages
by turning the adjuster wheel.
Confirm messages by pressing
SET / CLR .
Additionally, some menus can be selected via the CHECK button.Press CHECK to switch between the
respective menus.
Vehicle messages 3 107.
Trip / fuel information menu
Differerent pages with combined
information can be selected.
Turn the adjuster wheel to select a
page.
Information page:
Fuel range
Range is calculated from current fuel
level and current consumption. The
display shows average values.
After refuelling, the range is updated
automatically after a brief delay.
When the fuel level is low, a message appears on the display and the
control indicator o in the fuel gauge
illuminates 3 99.
Instantaneous Fuel Consumption
Display of the instantaneous
consumption.
Trip 1 page:
Average speed
Display of average speed. The
measurement can be reset at any
time.
Average fuel consumption
Page 117 of 283
Lighting115Headlight range adjustment
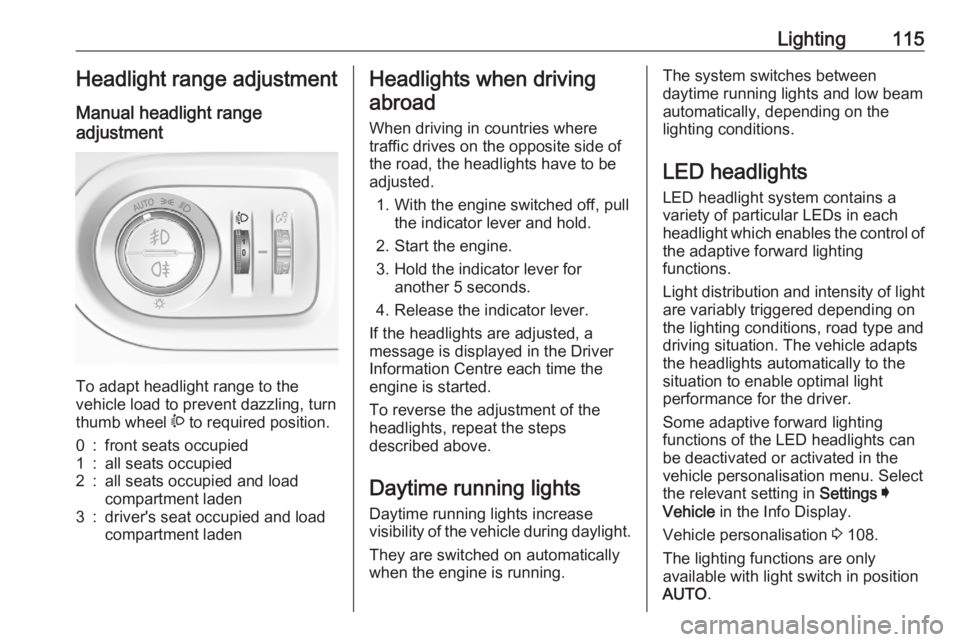
Manual headlight range
adjustment
To adapt headlight range to the
vehicle load to prevent dazzling, turn
thumb wheel ? to required position.
0:front seats occupied1:all seats occupied2:all seats occupied and load
compartment laden3:driver's seat occupied and load
compartment ladenHeadlights when driving
abroad
When driving in countries where
traffic drives on the opposite side of
the road, the headlights have to be
adjusted.
1. With the engine switched off, pull the indicator lever and hold.
2. Start the engine.
3. Hold the indicator lever for another 5 seconds.
4. Release the indicator lever.
If the headlights are adjusted, a
message is displayed in the Driver
Information Centre each time the
engine is started.
To reverse the adjustment of the
headlights, repeat the steps
described above.
Daytime running lightsDaytime running lights increase
visibility of the vehicle during daylight.
They are switched on automatically
when the engine is running.The system switches between
daytime running lights and low beam
automatically, depending on the
lighting conditions.
LED headlights
LED headlight system contains a
variety of particular LEDs in each
headlight which enables the control of the adaptive forward lighting
functions.
Light distribution and intensity of light
are variably triggered depending on
the lighting conditions, road type and
driving situation. The vehicle adapts
the headlights automatically to the
situation to enable optimal light
performance for the driver.
Some adaptive forward lighting
functions of the LED headlights can
be deactivated or activated in the
vehicle personalisation menu. Select
the relevant setting in Settings I
Vehicle in the Info Display.
Vehicle personalisation 3 108.
The lighting functions are only
available with light switch in position
AUTO .
Page 120 of 283
118LightingPushing left indicator lever once
switches on manual high beam
without high beam assist.
High beam assist switches
automatically to low beam when:
● Driving in urban areas.
● Camera detects heavy fog.
● Front or rear fog lights are switched on.
If there are no restrictions detected,
the system switches back to high
beam.
Deactivation
Deactivate the high beam assist by pressing f.
If a headlight flash is activated when
the high beam assist is activated and
low beam is on, the high beam assist will be deactivated. The system
changes to high beam.
If a headlight flash is activated when
the high beam assist is activated and
high beam is on, the high beam assist will be deactivated. The system
changes to low beam.
To reactivate the high beam assist,
flash the headlights again.Fault in LED headlight system
When the system detects a failure in
the LED headlight system, it selects a preset position to avoid dazzling of
oncoming traffic. A warning is
displayed in the Driver Information
Centre.
Hazard warning flashers
Operated by pressing ¨.
When braking in an emergency, the
hazard warning flashers are switched
on automatically depending on the
force of deceleration. They are
switched off automatically the first
time you accelerate.
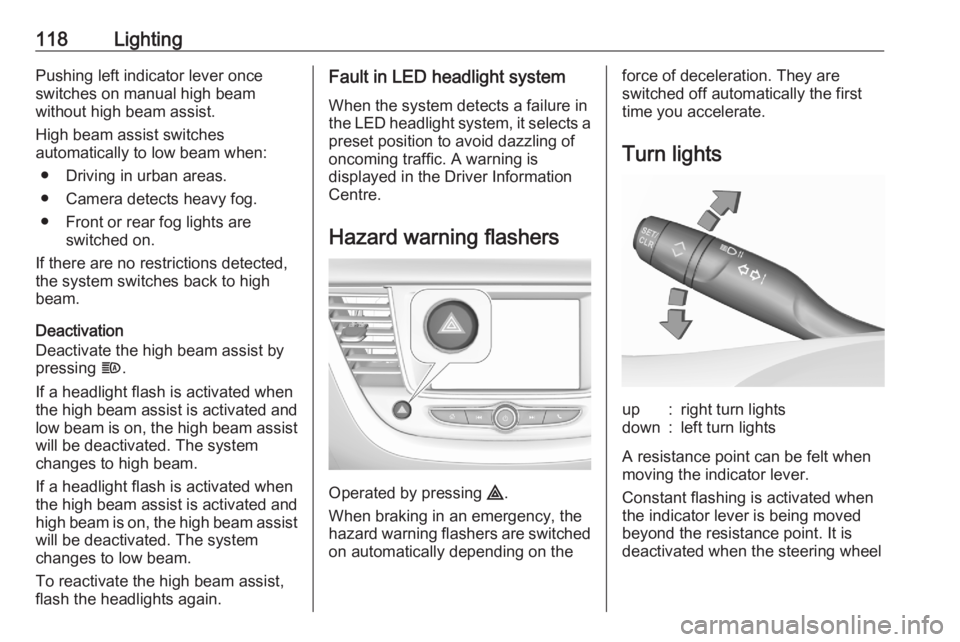
Turn lightsup:right turn lightsdown:left turn lights
A resistance point can be felt when
moving the indicator lever.
Constant flashing is activated when
the indicator lever is being moved
beyond the resistance point. It is
deactivated when the steering wheel