spare wheel OPEL GRANDLAND X 2020 Manual user
[x] Cancel search | Manufacturer: OPEL, Model Year: 2020, Model line: GRANDLAND X, Model: OPEL GRANDLAND X 2020Pages: 283, PDF Size: 22.19 MB
Page 75 of 283

Storage73Rear floor storage cover
The rear floor cover can be lifted and
removed. Raise cover at the loop and remove.
To hold the load compartment cover
in an upright positon, lift it up past the
retractable stops.
Double load floor
The double load floor can be inserted
in the load compartment in two
positions:
● lower position above the spare wheel well cover
● upper position interlocked with the grab handle into back panel
trim
To remove, press the handle to
unlock the load floor and lift it up while
using the handle.
If mounted in the upper position, the
space between the load floor and the spare wheel well cover can be used
as a storage compartment.
In this position, if the rear seat
backrests are folded forwards, an
almost completely flat load bay is
created.
In the upper position, the double load
floor is able to withstand a maximum
load of 100 kg. In the lower position,
the double load floor is able to
withstand the maximum load of
150 kg.
Page 171 of 283
Driving and operating169The adaptive cruise control is
deactivated automatically when:
● The brake pedal is depressed.
● The vehicle accelerates above 180 km/h or slows down below
30 km/h.
● The electric parking brake is applied.
● The Traction Control system or Electronic Stability Control is
deactivated or operating.
● The selector lever of automatic transmissions is neither in D nor
in M.
● A fault is detected in the Electronic Stability Control or theradar system.
Switching off the system Press C, the adaptive cruise control
mode is disabled and the adaptive
cruise control indication extinguishes
in the Driver Information Centre.
Pressing ß to activate the speed
limiter deactivates adaptive cruise
control.Switching off the ignition deletes the
stored set speed.
Driver's attention ● Use the adaptive cruise control carefully on bends or mountain
roads, as it can lose the vehicle
ahead and needs time to detect it again.
● Do not use the system on slippery roads as it can create
rapid changes in tyre traction
(wheel spinning), so that you
could lose control of the vehicle.
● Do not use the adaptive cruise control during rain, snow or
heavy dirt, as the radar sensor
can be covered by a water film,
dust, ice or snow. This reduces or suppresses completely the
visibility. In case of sensor
blockage, clean the sensor
cover.
● Do not use the system when the spare wheel is in use.System limits9Warning
The system's automatic brake
force does not permit hard braking and the braking level may not be
sufficient to avoid a collision.
● After a sudden lane change, the system needs a certain time to
detect the next preceding
vehicle. So if a new vehicle is
detected, the system may
accelerate instead of braking.
● The adaptive cruise control does ignore the oncoming traffic.
● The adaptive cruise control does not consider pedestrians and
animals for braking and driving
off.
● The adaptive cruise control considers stopped vehicles only
at low speed.
Page 178 of 283
176Driving and operating● the sensor in the windscreen orthe radar unit behind the front
bumper are blocked by snow, ice,
slush, mud, dirt etc.
● the windscreen is damaged or affected by foreign objects, e.g.
stickers
Complete attention is always required while driving, and you should beready to take action and apply the
brakes and / or steer the vehicle to
avoid crashes.
We recommend to deactivate the
system in the vehicle personalisation
in the following cases:
● when towing a trailer or caravan
● when carrying long objects on roof bars or a roof rack
● when the vehicle is being towed with the engine running
● when a spare wheel is fitted that is smaller than the other wheels
● before using an automatic car wash with the engine running
● before placing the vehicle on a rolling road in a workshop● if the windscreen has beendamaged close to the camera
● if the front bumper has been damaged
● if the brake lights are not working
Fault
In case the system requires a service,
a message is displayed in the Driver
Information Centre.
If the system does not work as it
should do, vehicle messages are
displayed in the Driver Information
Centre.
Vehicle messages 3 107.
Front pedestrian protection Front pedestrian protection may helpto avoid or reduce the harm causedby front-end crashes with pedestrians when driving forward.
The system uses the front camera in
the windscreen and a radar unit in the
front bumper to detect a pedestrian
directly ahead in your path.Front pedestrian protection can
detect and alert to pedestrians in a forward gear at speeds between
5 km/h and 60 km/h. Additionally front
pedestrian protection can provide a
boost to braking or automatically
brake the vehicle.
During nighttime driving, system
performance is limited.9 Danger
Front pedestrian braking does not
provide an alert or automatically
brake the vehicle, unless it detects
a pedestrian.
The system may not detect
pedestrians, including children,
when the pedestrian is not directly ahead, not fully visible, not
standing upright, or when part of a
group.
Front pedestrian protection includes:
● detecting front pedestrian ahead● front pedestrian alert
Front pedestrian protection is
activated together with forward
collision alert.
Page 195 of 283
Driving and operating193● the vehicle is not connected to atrailer or an electric bicycle carrier
● normal driving behaviour (system
detects dynamic driving style, i.e.
pressure on the brake or
accelerator pedal)
● roads with poor lane markings
● no spare wheel is used
● the driver needs to be active during the correction
● the vehicle is not driven in a tight
corner
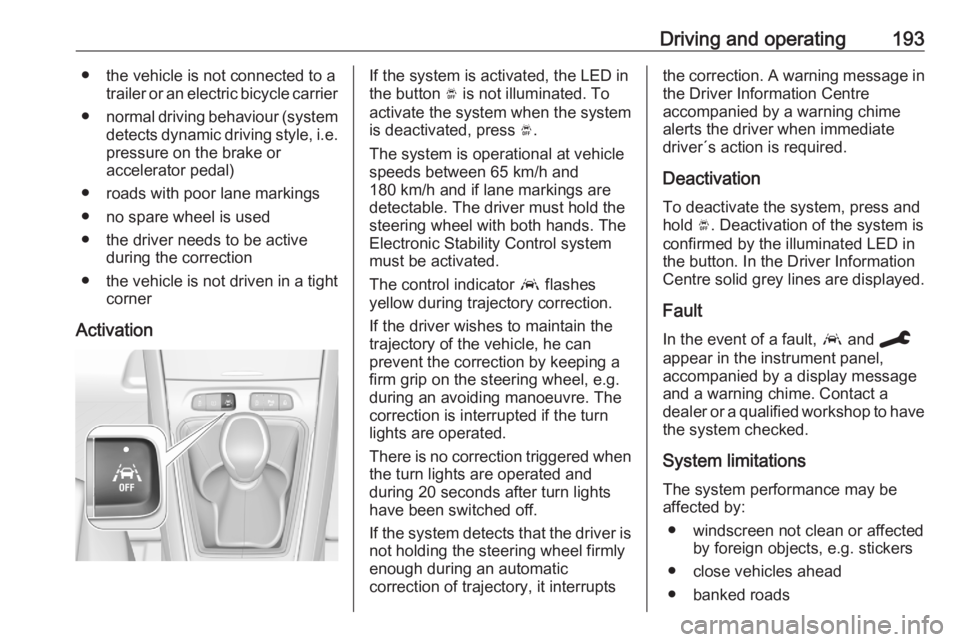
ActivationIf the system is activated, the LED in
the button Ó is not illuminated. To
activate the system when the system
is deactivated, press Ó.
The system is operational at vehicle
speeds between 65 km/h and
180 km/h and if lane markings are
detectable. The driver must hold the
steering wheel with both hands. The Electronic Stability Control system
must be activated.
The control indicator a flashes
yellow during trajectory correction.
If the driver wishes to maintain the
trajectory of the vehicle, he can
prevent the correction by keeping a
firm grip on the steering wheel, e.g.
during an avoiding manoeuvre. The correction is interrupted if the turn
lights are operated.
There is no correction triggered when
the turn lights are operated and
during 20 seconds after turn lights
have been switched off.
If the system detects that the driver is not holding the steering wheel firmly
enough during an automatic
correction of trajectory, it interruptsthe correction. A warning message in
the Driver Information Centre
accompanied by a warning chime
alerts the driver when immediate
driver´s action is required.
Deactivation
To deactivate the system, press and
hold Ó. Deactivation of the system is
confirmed by the illuminated LED in
the button. In the Driver Information
Centre solid grey lines are displayed.
Fault
In the event of a fault, a and C
appear in the instrument panel,
accompanied by a display message
and a warning chime. Contact a
dealer or a qualified workshop to have
the system checked.
System limitations
The system performance may be affected by:
● windscreen not clean or affected by foreign objects, e.g. stickers
● close vehicles ahead
● banked roads
Page 213 of 283
Vehicle care211Vehicle careGeneral Information...................211
Accessories and vehicle modifications .......................... 211
Vehicle storage ........................213
End-of-life vehicle recovery .....213
Vehicle checks ........................... 214
Performing work ......................214
Bonnet ..................................... 214
Engine oil ................................. 215
Engine coolant ......................... 216
Washer fluid ............................ 216
Brakes ..................................... 217
Brake fluid ............................... 217
Vehicle battery ......................... 217
Diesel fuel system bleeding .....219
Wiper blade replacement ........219
Bulb replacement .......................220
Halogen headlights ..................220
LED headlights ........................ 222
Front fog lights ......................... 222
Tail lights ................................. 222
Side turn lights ......................... 225
Number plate light ...................226
Interior lights ............................ 226Electrical system........................226
Fuses ....................................... 226
Engine compartment fuse box . 227
Instrument panel fuse box .......228
Vehicle tools .............................. 230
Tools ........................................ 230
Wheels and tyres .......................231
Winter tyres ............................. 231
Tyre designations ....................232
Tyre pressure .......................... 232
Tyre deflation detection system .................................... 233
Tread depth ............................. 234
Changing tyre and wheel size . 235
Wheel covers ........................... 235
Tyre chains .............................. 235
Tyre repair kit .......................... 236
Wheel changing .......................239
Spare wheel ............................ 240
Jump starting ............................. 244
Towing ....................................... 245
Towing the vehicle ...................245
Towing another vehicle ...........247
Appearance care .......................247
Exterior care ............................ 247
Interior care ............................. 249
Floor mats ............................... 250General Information
Accessories and vehicle modifications
We recommend the use of genuine parts and accessories and factory
approved parts specific for your
vehicle type. We cannot assess or
guarantee reliability of other products - even if they have a regulatory or
otherwise granted approval.
Any modification, conversion or other
changes made to standard vehicle
specifications (including, without
limitation, software modifications,
modifications of the electronic control units) may invalidate the warranty
offered by Opel. Furthermore, such
changes may affect driver assistance
systems, may impact fuel
consumption, CO 2 emissions and
other emissions of the vehicle and
cause the vehicle to no longer
conform to the operating permit,
impacting the validity of your vehicle
registration.
Page 232 of 283
230Vehicle careNo.Circuit11Doors lock / Tailgate lock12Stop-start system / Diagnostic
connector module / Brake
system13Infotainment / Climate control
system14Alarm siren15Climate control system16Stop-start system / Brake
system17Instrument cluster19Column electrical assembly /
Steering wheel controls21Anti-theft alarm system22Camera / Rain sensor / Auto‐
matic light control23Seat belt reminder24Automatic transmission /
Advanced parking assist /
Panoramic view systemNo.Circuit25Airbag26Electronic Stability Control27Alarm28BTA module29Infotainment32Cigarette lighter / Power outlet
front34Heated rear window / Heated
windscreen / Inductive charging35Light switch / Diagnostic
connector module36LightingVehicle tools
Tools
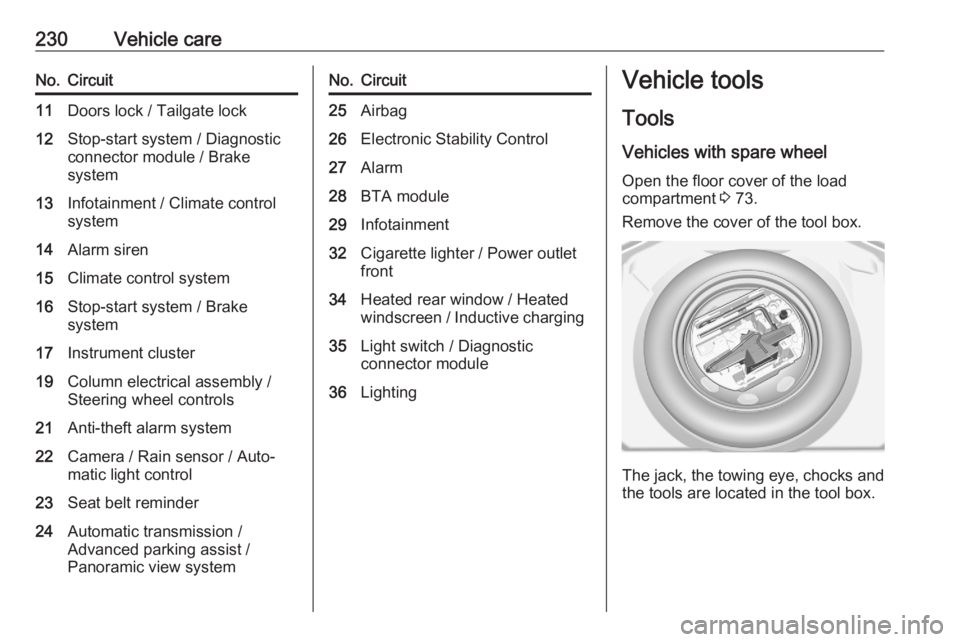
Vehicles with spare wheel Open the floor cover of the load
compartment 3 73.
Remove the cover of the tool box.
The jack, the towing eye, chocks and
the tools are located in the tool box.
Page 233 of 283
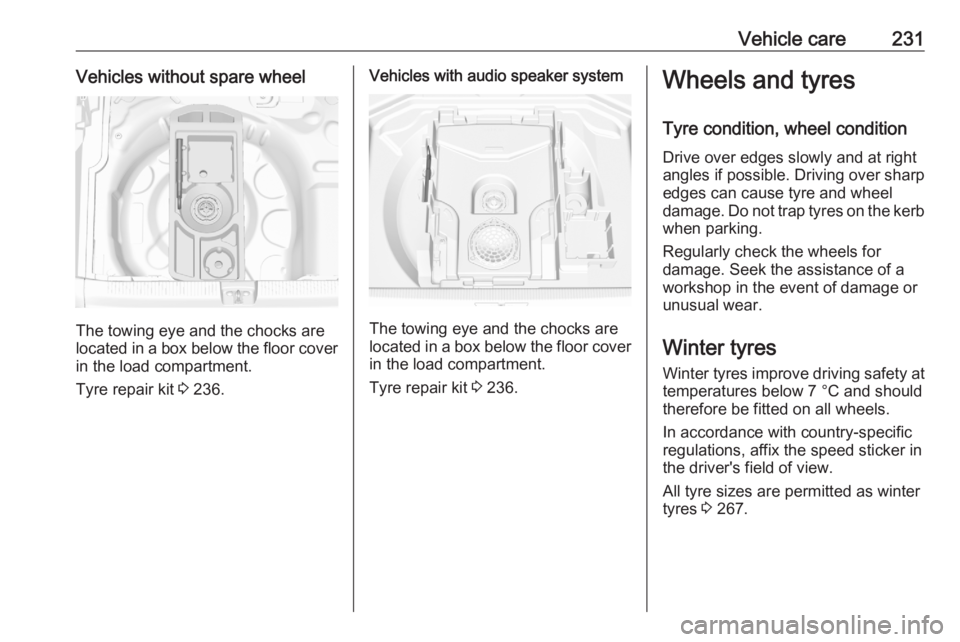
Vehicle care231Vehicles without spare wheel
The towing eye and the chocks are
located in a box below the floor cover in the load compartment.
Tyre repair kit 3 236.
Vehicles with audio speaker system
The towing eye and the chocks are
located in a box below the floor cover in the load compartment.
Tyre repair kit 3 236.
Wheels and tyres
Tyre condition, wheel condition Drive over edges slowly and at right
angles if possible. Driving over sharp
edges can cause tyre and wheel
damage. Do not trap tyres on the kerb when parking.
Regularly check the wheels for
damage. Seek the assistance of a
workshop in the event of damage or
unusual wear.
Winter tyres
Winter tyres improve driving safety at temperatures below 7 °C and should
therefore be fitted on all wheels.
In accordance with country-specific
regulations, affix the speed sticker in
the driver's field of view.
All tyre sizes are permitted as winter
tyres 3 267.
Page 234 of 283
232Vehicle careTyre designationsE.g. 225/55 R 18 98 V225:tyre width, mm55:cross-section ratio (tyre height
to tyre width), %R:belt type: RadialRF:type: RunFlat18:wheel diameter, inches98:load index e.g. 98 is equivalent
to 750 kgV:speed code letter
Speed code letter:
Q:up to 160 km/hS:up to 180 km/hT:up to 190 km/hH:up to 210 km/hV:up to 240 km/hW:up to 270 km/h
Choose a tyre appropriate for the
maximum speed of your vehicle.
The maximum speed is achievable at kerb weight with driver (75 kg) plus
125 kg payload. Optional equipment
could reduce the maximum speed of
the vehicle.
Performance 3 264.
Directional tyres
Directional tyres should be mounted
so that they rotate in the correct
direction. The proper rotation
direction is indicated by a symbol
(e.g. an arrow) on the sidewall.
Tyre pressure
Check the pressure of cold tyres at
least every 14 days and before any
long journey. Do not forget the spare
wheel. This also applies to vehicles
with tyre pressure monitoring system.
Tyre pressure 3 267.
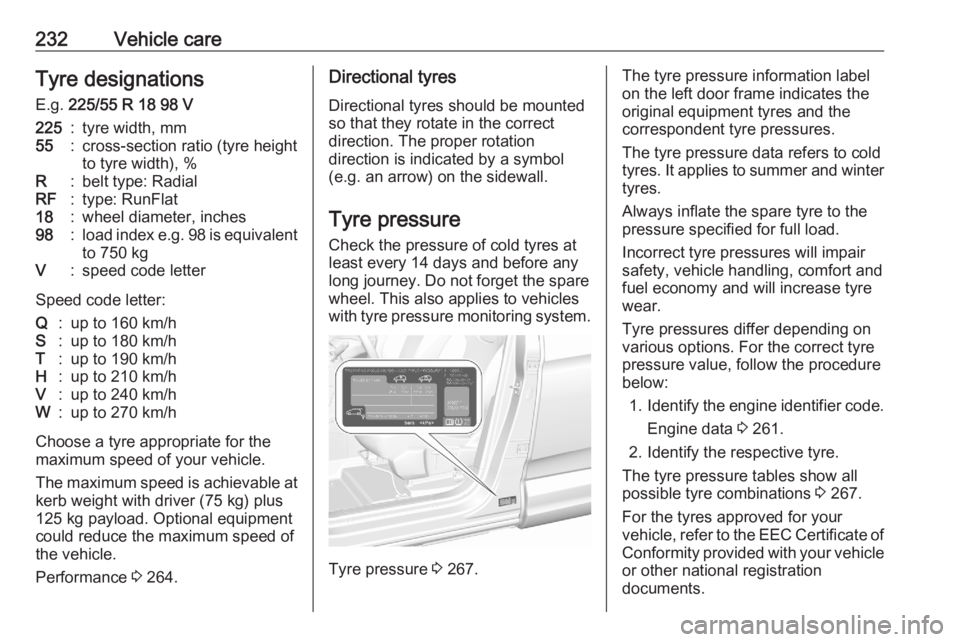
The tyre pressure information label
on the left door frame indicates the
original equipment tyres and the
correspondent tyre pressures.
The tyre pressure data refers to cold
tyres. It applies to summer and winter tyres.
Always inflate the spare tyre to the
pressure specified for full load.
Incorrect tyre pressures will impair
safety, vehicle handling, comfort and
fuel economy and will increase tyre
wear.
Tyre pressures differ depending on
various options. For the correct tyre
pressure value, follow the procedure
below:
1. Identify the engine identifier code.
Engine data 3 261.
2. Identify the respective tyre.
The tyre pressure tables show all
possible tyre combinations 3 267.
For the tyres approved for your
vehicle, refer to the EEC Certificate of Conformity provided with your vehicle
or other national registration
documents.
Page 235 of 283
Vehicle care233The driver is responsible for correct
adjustment of tyre pressure.9 Warning
If the pressure is too low, this can
result in considerable tyre warm-
up and internal damage, leading to tread separation and even to tyre
blow-out at high speeds.
9 Warning
For specific tyres the
recommended tyre pressure as
shown in the tyre pressure table may exceed the maximum tyre
pressure as indicated on the tyre.
Never exceed the maximum tyre
pressure as indicated on the tyre.
Temperature dependency
The tyre pressure depends on the
temperature of the tyre. During
driving, tyre temperature and
pressure increase. Tyre pressure
values provided on the tyre
information label and tyre pressure
chart are valid for cold tyres, which means at 20 °C.
The pressure increases by nearly
10 kPa for a 10 °C temperature
increase. This must be considered
when warm tyres are checked.
Tyre deflation detectionsystem
The tyre deflation detection system
continually checks the rotation speed
of all four wheels and warns on low
tyre pressure condition once vehicle
is driving. This is achieved by
comparing tyre rolling circumference
with reference values and further
signals.
If a tyre loses pressure the control
indicator w illuminates and a warning
message is displayed in the Driver Information Centre.
In this case reduce speed, avoid
sharp cornering and strong braking.
Stop at next safe opportunity and
check tyre pressure.
Control indicator w 3 99.After adjusting tyre pressure initialise
system to extinguish the control
indicator and restart system.Caution
Deflation detection system warns
just about low tyre pressure
condition and does not replace
regular tyre maintenance by the
driver.
In case of a system malfunction a
message is displayed in the Driver
Information Centre. Set correct tyre
pressure and reinitialise system. If the
failure continues to be displayed,
contact a workshop. The system is
inoperable when ABS or ESC has a
malfunction or a temporary spare
wheel is used. Once the road tyre has
been refitted, check the tyre pressure with cold tyres and initialise the
system.
Page 238 of 283
236Vehicle careTemporary spare wheel
The use of tyre chains is not permitted
on the temporary spare wheel.
Tyre repair kit
Minor damage to the tyre tread can be repaired with the tyre repair kit.
Do not remove foreign bodies from
the tyres.
Tyre damage exceeding 4 mm or that
is at tyre's sidewall cannot be repaired with the tyre repair kit.9 Warning
Do not drive faster than 80 km/h.
Do not use for a lengthy period.
Steering and handling may be
affected.
In the case of a flat tyre:
Apply the parking brake and engage
first gear, reverse gear or P.
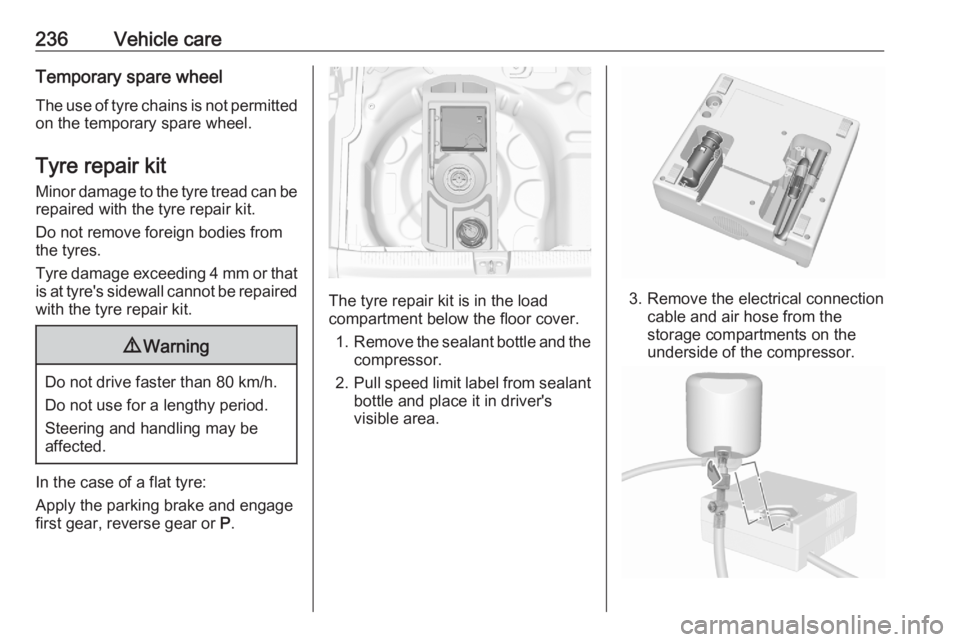
The tyre repair kit is in the load
compartment below the floor cover.
1. Remove the sealant bottle and the
compressor.
2. Pull speed limit label from sealant
bottle and place it in driver's
visible area.3. Remove the electrical connection cable and air hose from the
storage compartments on the
underside of the compressor.