head up display OPEL GRANDLAND X 2020 Owner's Manual
[x] Cancel search | Manufacturer: OPEL, Model Year: 2020, Model line: GRANDLAND X, Model: OPEL GRANDLAND X 2020Pages: 283, PDF Size: 22.19 MB
Page 13 of 283
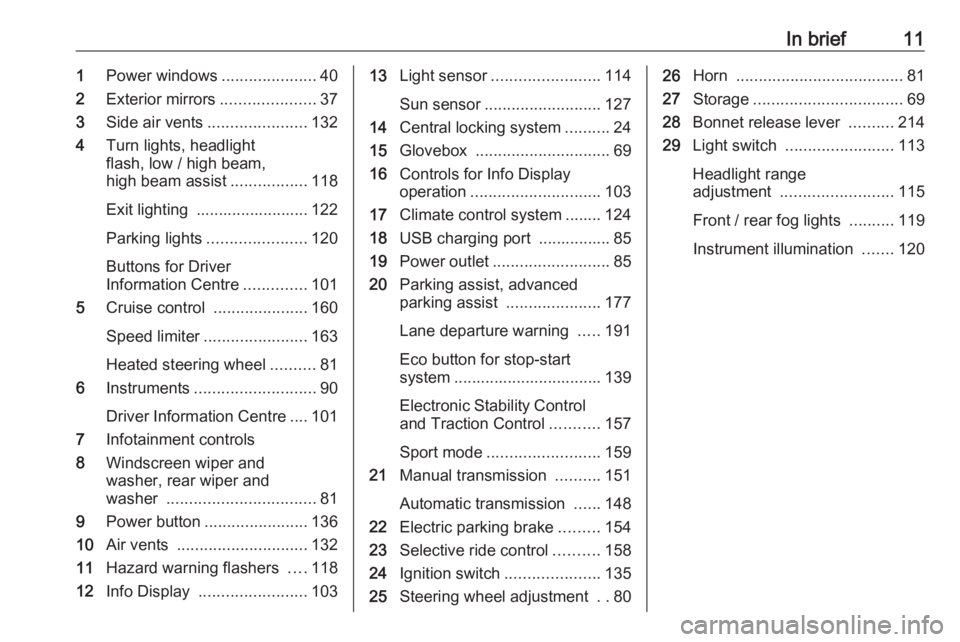
In brief111Power windows .....................40
2 Exterior mirrors .....................37
3 Side air vents ...................... 132
4 Turn lights, headlight
flash, low / high beam,
high beam assist .................118
Exit lighting ......................... 122
Parking lights ...................... 120
Buttons for Driver
Information Centre ..............101
5 Cruise control .....................160
Speed limiter ....................... 163
Heated steering wheel ..........81
6 Instruments ........................... 90
Driver Information Centre .... 101
7 Infotainment controls
8 Windscreen wiper and
washer, rear wiper and
washer ................................. 81
9 Power button ....................... 136
10 Air vents ............................. 132
11 Hazard warning flashers ....118
12 Info Display ........................ 10313Light sensor ........................ 114
Sun sensor .......................... 127
14 Central locking system ..........24
15 Glovebox .............................. 69
16 Controls for Info Display
operation ............................. 103
17 Climate control system ........ 124
18 USB charging port ................ 85
19 Power outlet .......................... 85
20 Parking assist, advanced
parking assist .....................177
Lane departure warning .....191
Eco button for stop-start
system ................................. 139
Electronic Stability Control and Traction Control ...........157
Sport mode ......................... 159
21 Manual transmission ..........151
Automatic transmission ......148
22 Electric parking brake .........154
23 Selective ride control ..........158
24 Ignition switch .....................135
25 Steering wheel adjustment ..8026 Horn ..................................... 81
27 Storage ................................. 69
28 Bonnet release lever ..........214
29 Light switch ........................ 113
Headlight range
adjustment ......................... 115
Front / rear fog lights ..........119
Instrument illumination .......120
Page 36 of 283
34Keys, doors and windowsRemove all obstacles before
resuming normal power operation.
If the vehicle is equipped with factory- fitted towing equipment and a trailer
is electrically connected, the power
tailgate can only be opened with the
tailgate button or closed with T in
the open tailgate. Ensure that there
are no obstacles in the moving area.
Overload
If the power tailgate is repeatedly
operated at short intervals, the
function is disabled for some time.
Move tailgate manually into end
position to reset the system.
Initialising power tailgate
If the power tailgate cannot be
operated automatically (e.g. after
disconnecting the vehicle battery), a
warning message is displayed in the
Driver Information Centre.
Activate electronics as follows: 1. Open tailgate manually.
2. Close tailgate manually.
3. Switch on ignition.Seek the assistance of a workshop if
the problem is not solved.
General hints for operating
tailgate9 Danger
Do not drive with the tailgate open
or ajar, e.g. when transporting
bulky objects, since toxic exhaust
gases, which cannot be seen or
smelled, could enter the vehicle.
This can cause unconsciousness
and even death.
Caution
Before opening the tailgate, check overhead obstructions, e.g. a
garage door, to avoid damage to
the tailgate. Always check the
moving area above and behind the
tailgate.
Note
The installation of certain heavy
accessories onto the tailgate may
affect its ability to remain open.
Note
The operation of the power tailgate
is disabled under low vehicle battery
conditions. In this case, the tailgate
may not even by manually operable.
Note
With the power tailgate disabled and all doors unlocked, the tailgate can
only be operated manually. In this
event, manually closing the tailgate
requires significantly greater force.
Note
At low outside temperatures the
tailgate may not open fully by itself.
In this case lift the tailgate manually
to its normal end position.
Page 48 of 283
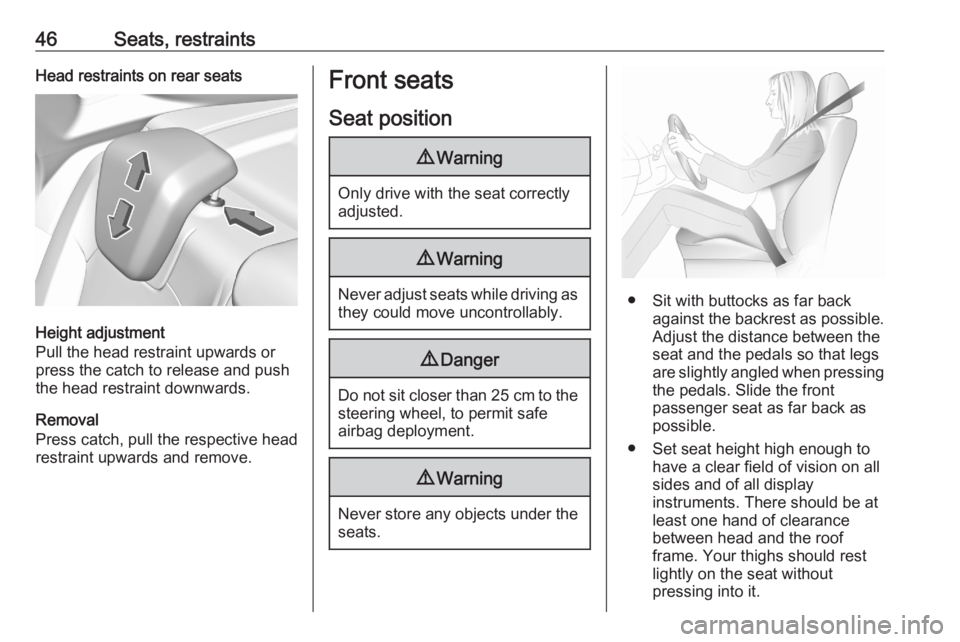
46Seats, restraintsHead restraints on rear seats
Height adjustment
Pull the head restraint upwards or
press the catch to release and push the head restraint downwards.
Removal
Press catch, pull the respective head
restraint upwards and remove.
Front seats
Seat position9 Warning
Only drive with the seat correctly
adjusted.
9 Warning
Never adjust seats while driving as
they could move uncontrollably.
9 Danger
Do not sit closer than 25 cm to the
steering wheel, to permit safe
airbag deployment.
9 Warning
Never store any objects under the
seats.
● Sit with buttocks as far back against the backrest as possible.
Adjust the distance between the
seat and the pedals so that legs
are slightly angled when pressing the pedals. Slide the front
passenger seat as far back as
possible.
● Set seat height high enough to have a clear field of vision on allsides and of all display
instruments. There should be at
least one hand of clearance
between head and the roof
frame. Your thighs should rest
lightly on the seat without
pressing into it.
Page 81 of 283
Instruments and controls79Instruments and
controlsControls ....................................... 80
Steering wheel adjustment ........80
Steering wheel controls .............80
Heated steering wheel ...............81
Horn ........................................... 81
Pedestrian safety alert ...............81
Windscreen wiper and washer ..81
Rear window wiper and washer ...................................... 83
Outside temperature ..................84
Clock ......................................... 84
Power outlets ............................. 85
Inductive charging .....................87
Cigarette lighter ......................... 88
Ashtrays .................................... 88
Warning lights, gauges and indi‐ cators ........................................... 88
Instrument cluster ......................88
Speedometer ............................. 90
Odometer .................................. 90
Trip odometer ............................ 90
Tachometer ............................... 90
Fuel gauge ................................ 91
Battery gauge ............................ 91Power indicator gauge ...............91
Engine coolant temperature gauge ....................................... 92
Engine oil level monitor .............92
Service display .......................... 92
Control indicators ......................93
Turn lights .................................. 93
Seat belt reminder .....................94
Airbag and belt tensioners .........94
Airbag deactivation ....................95
Charging system .......................95
Malfunction indicator light ..........95
Service vehicle soon .................95
Stop engine ............................... 95
System check ............................ 96
Hybrid system active .................96
Hybrid system fault ....................96
Brake and clutch system ...........96
Electric parking brake ................96
Electric parking brake fault ........96
Automatic operation of electric parking brake off ....................... 97
Antilock brake system (ABS) .....97
Gear shifting .............................. 97
Lane departure warning ............97
Lane keep assist .......................97
Electronic Stability Control and Traction Control system ...........97
Electronic Stability Control and Traction Control system off ......98Engine coolant temperature ......98
Preheating ................................. 98
Exhaust filter .............................. 98
AdBlue ....................................... 98
Deflation detection system ........99
Engine oil pressure ....................99
Low fuel ..................................... 99
Charge cord connected .............99
Autostop .................................... 99
Exterior light .............................. 99
Low beam ................................ 100
High beam ............................... 100
High beam assist .....................100
LED headlights ........................ 100
Front fog lights ......................... 100
Rear fog light ........................... 100
Rain sensor ............................. 100
Cruise control .......................... 100
Adaptive cruise control ............100
Vehicle detected ahead ...........100
Side blind spot alert .................100
Active emergency braking .......101
Speed limiter ........................... 101
Door open ................................ 101
Displays ..................................... 101
Driver Information Centre ........101
Info Display .............................. 103
Vehicle messages ......................107
Warning chimes .......................107
Page 102 of 283
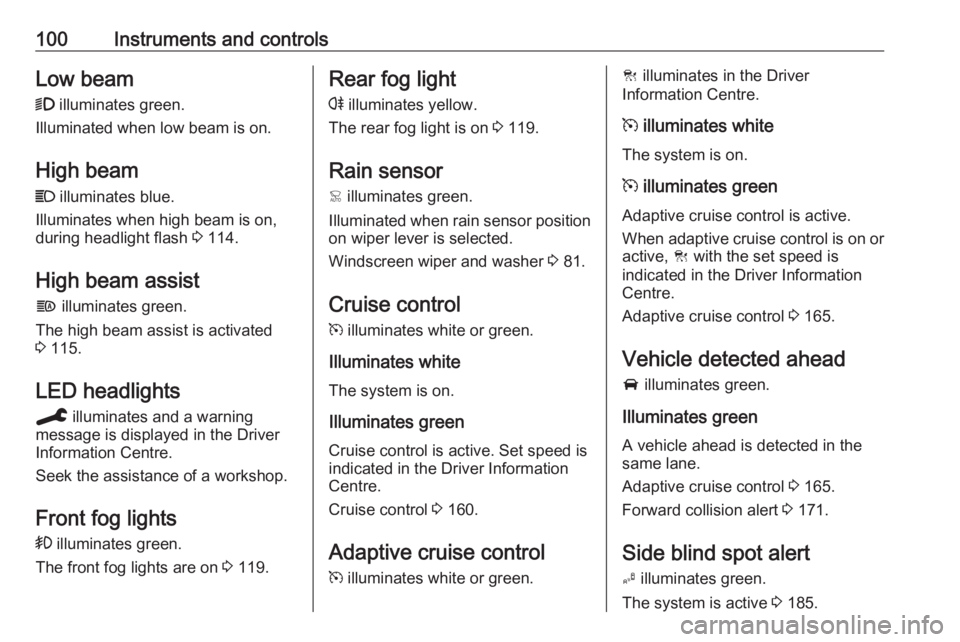
100Instruments and controlsLow beam9 illuminates green.
Illuminated when low beam is on.
High beam
C illuminates blue.
Illuminates when high beam is on,
during headlight flash 3 114.
High beam assist
f illuminates green.
The high beam assist is activated
3 115.
LED headlights
C illuminates and a warning
message is displayed in the Driver
Information Centre.
Seek the assistance of a workshop.
Front fog lights
> illuminates green.
The front fog lights are on 3 119.Rear fog light
r illuminates yellow.
The rear fog light is on 3 119.
Rain sensor < illuminates green.
Illuminated when rain sensor position on wiper lever is selected.
Windscreen wiper and washer 3 81.
Cruise control m illuminates white or green.
Illuminates white The system is on.
Illuminates green
Cruise control is active. Set speed is
indicated in the Driver Information
Centre.
Cruise control 3 160.
Adaptive cruise control
m illuminates white or green.C illuminates in the Driver
Information Centre.
m illuminates white
The system is on.
m illuminates green
Adaptive cruise control is active.
When adaptive cruise control is on or active, C with the set speed is
indicated in the Driver Information
Centre.
Adaptive cruise control 3 165.
Vehicle detected ahead
A illuminates green.
Illuminates green
A vehicle ahead is detected in the
same lane.
Adaptive cruise control 3 165.
Forward collision alert 3 171.
Side blind spot alert B illuminates green.
The system is active 3 185.
Page 110 of 283
108Instruments and controls● the electronic key is not in thepassenger compartment
● the parking assist detects an object
● an unintended lane change occurs
● the exhaust filter has reached the
maximum filling level
If several warnings appear at the
same time, only one warning chime
will sound
When the vehicle is parked and /
or the driver's door is opened
● With exterior lights on.
During an Autostop ● If the driver's door is opened.
● If any condition for a restart of the
engine is not fulfilled.Vehicle personalisation
The vehicle's behaviour can be
personalised by changing the settings
in the Info Display.
Depending on vehicle equipment and country-specific regulations some of
the functions described below may
not be available.
Some functions are only displayed or
active when the engine is running.
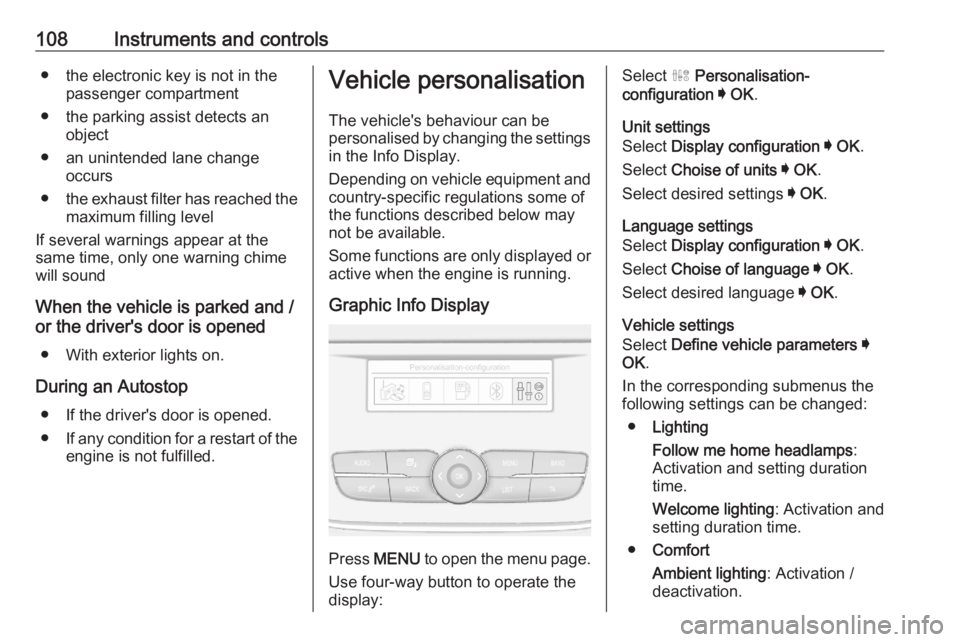
Graphic Info Display
Press MENU to open the menu page.
Use four-way button to operate the
display:
Select ˆ Personalisation-
configuration I OK .
Unit settings
Select Display configuration I OK .
Select Choise of units I OK .
Select desired settings I OK .
Language settings
Select Display configuration I OK .
Select Choise of language I OK .
Select desired language I OK .
Vehicle settings
Select Define vehicle parameters I
OK .
In the corresponding submenus the
following settings can be changed:
● Lighting
Follow me home headlamps :
Activation and setting duration
time.
Welcome lighting : Activation and
setting duration time.
● Comfort
Ambient lighting : Activation /
deactivation.
Page 117 of 283
Lighting115Headlight range adjustment
Manual headlight range
adjustment
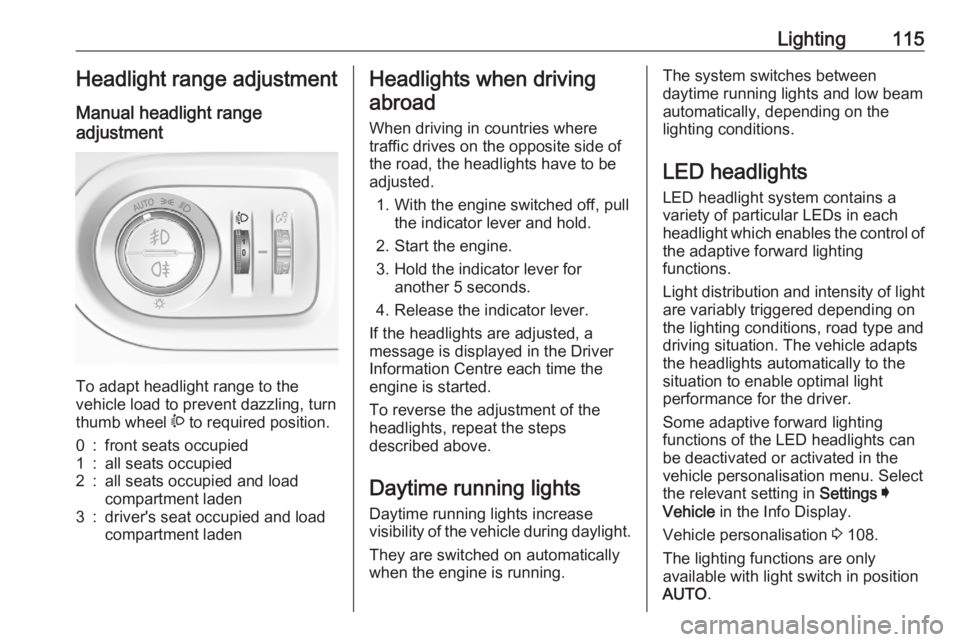
To adapt headlight range to the
vehicle load to prevent dazzling, turn
thumb wheel ? to required position.
0:front seats occupied1:all seats occupied2:all seats occupied and load
compartment laden3:driver's seat occupied and load
compartment ladenHeadlights when driving
abroad
When driving in countries where
traffic drives on the opposite side of
the road, the headlights have to be
adjusted.
1. With the engine switched off, pull the indicator lever and hold.
2. Start the engine.
3. Hold the indicator lever for another 5 seconds.
4. Release the indicator lever.
If the headlights are adjusted, a
message is displayed in the Driver
Information Centre each time the
engine is started.
To reverse the adjustment of the
headlights, repeat the steps
described above.
Daytime running lightsDaytime running lights increase
visibility of the vehicle during daylight.
They are switched on automatically
when the engine is running.The system switches between
daytime running lights and low beam
automatically, depending on the
lighting conditions.
LED headlights
LED headlight system contains a
variety of particular LEDs in each
headlight which enables the control of the adaptive forward lighting
functions.
Light distribution and intensity of light
are variably triggered depending on
the lighting conditions, road type and
driving situation. The vehicle adapts
the headlights automatically to the
situation to enable optimal light
performance for the driver.
Some adaptive forward lighting
functions of the LED headlights can
be deactivated or activated in the
vehicle personalisation menu. Select
the relevant setting in Settings I
Vehicle in the Info Display.
Vehicle personalisation 3 108.
The lighting functions are only
available with light switch in position
AUTO .
Page 120 of 283
118LightingPushing left indicator lever once
switches on manual high beam
without high beam assist.
High beam assist switches
automatically to low beam when:
● Driving in urban areas.
● Camera detects heavy fog.
● Front or rear fog lights are switched on.
If there are no restrictions detected,
the system switches back to high
beam.
Deactivation
Deactivate the high beam assist by pressing f.
If a headlight flash is activated when
the high beam assist is activated and
low beam is on, the high beam assist will be deactivated. The system
changes to high beam.
If a headlight flash is activated when
the high beam assist is activated and
high beam is on, the high beam assist will be deactivated. The system
changes to low beam.
To reactivate the high beam assist,
flash the headlights again.Fault in LED headlight system
When the system detects a failure in
the LED headlight system, it selects a preset position to avoid dazzling of
oncoming traffic. A warning is
displayed in the Driver Information
Centre.
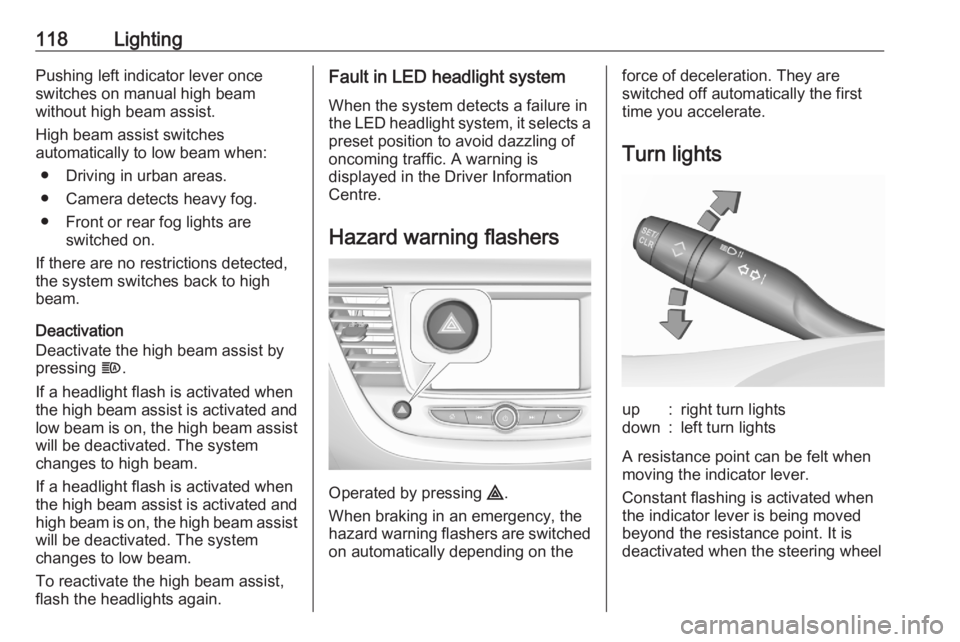
Hazard warning flashers
Operated by pressing ¨.
When braking in an emergency, the
hazard warning flashers are switched
on automatically depending on the
force of deceleration. They are
switched off automatically the first
time you accelerate.
Turn lightsup:right turn lightsdown:left turn lights
A resistance point can be felt when
moving the indicator lever.
Constant flashing is activated when
the indicator lever is being moved
beyond the resistance point. It is
deactivated when the steering wheel
Page 122 of 283
120LightingParking lights
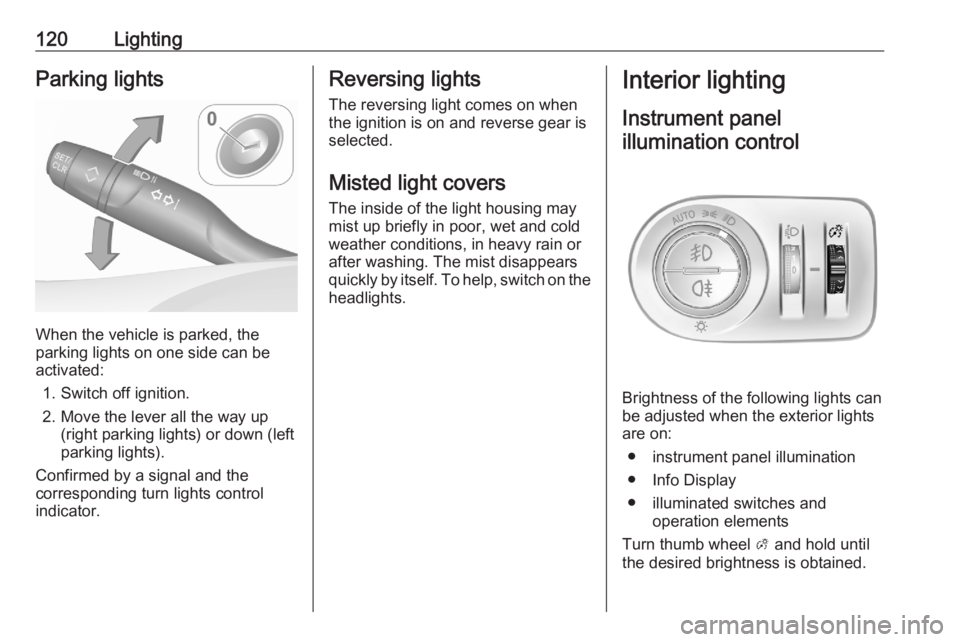
When the vehicle is parked, the
parking lights on one side can be
activated:
1. Switch off ignition.
2. Move the lever all the way up (right parking lights) or down (left
parking lights).
Confirmed by a signal and the
corresponding turn lights control
indicator.
Reversing lights
The reversing light comes on when
the ignition is on and reverse gear is
selected.
Misted light covers
The inside of the light housing may
mist up briefly in poor, wet and cold weather conditions, in heavy rain or
after washing. The mist disappears
quickly by itself. To help, switch on the headlights.Interior lighting
Instrument panel illumination control
Brightness of the following lights can
be adjusted when the exterior lights
are on:
● instrument panel illumination
● Info Display
● illuminated switches and operation elements
Turn thumb wheel A and hold until
the desired brightness is obtained.
Page 131 of 283

Climate control129Touch in the Colour Info Display:l:to windscreen and front door
windowsM:to head area and rear seats via
adjustable air ventsK:to front and rear foot well and
windscreen
To return to automatic air distribution,
press AUTO .
Temperature preselection £
Set the preselected temperatures
separately for the driver and the front
passenger to the desired value using
the left and right rotary ring. The
rotary ring on the passenger side
changes the temperature of the
passenger side. The rotary ring on the driver's side changes the temperature
of the driver's side or of both sides,
depending on activation of
synchronisation MONO in the climate
settings menu. Press MENU to enter
the menu.
Recommended temperature is 22 °C .
Temperature is indicated in displays beside the rotary rings and in the
climate settings menu.
If the minimum temperature Lo is set,
the climate control system runs at maximum cooling, if cooling A/C is
switched on.
If the maximum temperature Hi is set,
the climate control system runs at maximum heating.
Note
If A/C is switched on, reducing the
set cabin temperature can cause the
engine to restart from an Autostop or inhibit an Autostop.
Stop-start system 3 139.Dual zone temperature
synchronisation MONO or SYNC
Press MENU to enter the menu.
Touch MONO or SYNC to link
passenger side temperature setting
to the driver side.
When passenger side control dial will be adjusted, synchronisation is
deactivated.
Air conditioning A/C
Press A/C to switch on cooling. The
LED in the button illuminates to
indicate activation. Cooling is only
functional when the engine is running and climate control fan is switched on.