ABS OPEL GT 2012 Owners Manual
[x] Cancel search | Manufacturer: OPEL, Model Year: 2012, Model line: GT, Model: OPEL GT 2012Pages: 190, PDF Size: 2.46 MB
Page 12 of 190

12 In brief
Control indicators
u
Anti-lock Brake System (ABS):
see p ages 55, 124.
sLugg age comp artme nt op en:
see p ages 28, 55.
rFog t ail la mp:
see p ages 55, 75.
OTurn signals:
see p ages 14, 56, 74.
PHea dlam p high be am :
see p ages 13, 56, 74.
ZExhaust em issi ons:
see p ages 56, 116.
RBrake system, clut ch system:
s ee page s 56 , 7 0, 1 2 4, 15 6 .
IE ngine oil pre s s ur e:
s ee page 5 7.
WCool an t te mp era tu re:
s ee page 5 7.
vAirb ag systems, b el t tensi oners:
s ee page s 41 , 4 5 , 5 7 .
XDriv er’ s seat b el t:
s ee page s 39 , 4 3 , 5 7 .
pAlt ernat or:
s ee page 5 8.
vEle ctr oni c Sta bility P rogram (E SP ) ,
Ele ctr oni c Sta bility Contr ol (E SC ):
se e pages 5 8 , 1 18 .
>Fr o n t f o g la m ps :
se e pages 5 8 , 7 5.
oEle ctr oni c imm obilis e r:
se e pages 2 1 , 5 8.
WSe at occup ancy recog nition:
pas se ng er’s airbag deactiv ated -
se e page 48 .
VSe at occup ancy recog nition:
pas se ng er’s airbag activated -
se e page 49 .
kPa ssenger’s sea t belt:
se e pages 3 9 , 4 3.
Page 55 of 190
55Instru men ts, c ontrols
Instruments, controls
Co n tro l in dicato rs .... ..... .... ..... .... .... ..... 5 5
In s tru me n t dis play ... ..... .... ..... .... .... ..... 5 8
D rive r inf o rmatio n ce ntre . ..... .... .... ..... 5 9
Ch e ck co n tro l warn in g me ss age s. ..... 6 8
W arn in g bu zzers .. .... ..... .... ..... .... .... ..... 7 1
W ind scre en wipe rs ... ..... .... ..... .... .... ..... 7 1
W ind scre en was h er s ys tem ... .... .... ..... 7 2
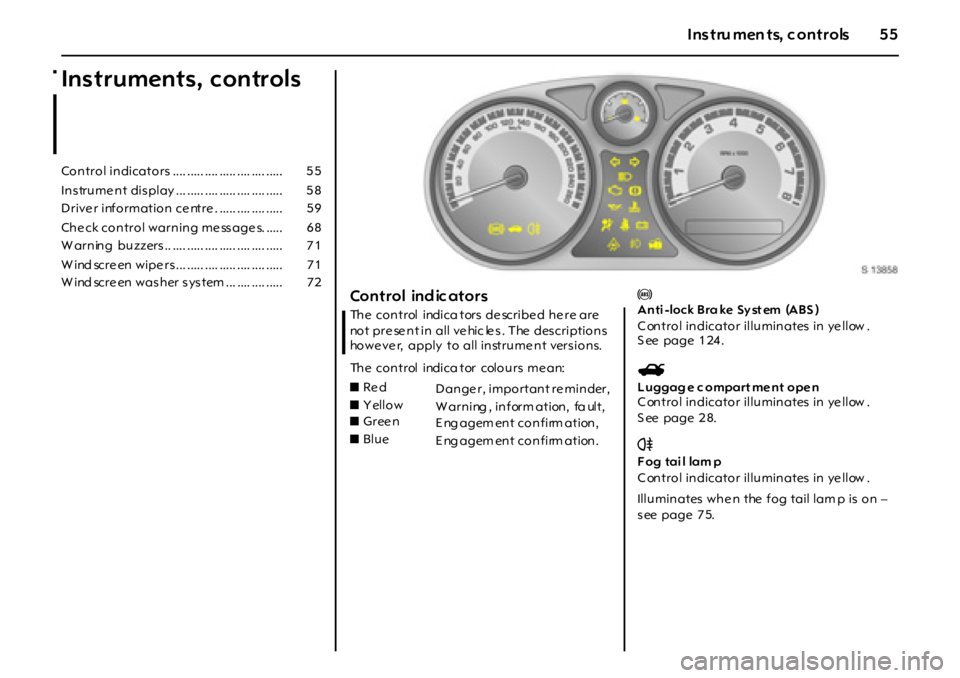
Control indic ators
The control indica tors de scribe d he re are
not present in all vehicles. The descriptions
howe ve r, apply to all instrume nt vers ions.
The control indica tor colours me an: u
Anti -lock Bra ke Sy st em (ABS )
C ontrol indicator illuminates in ye llow .
S ee page 1 24 .
s
ss sL uggag e c ompart me nt ope n
C ontrol indicator illuminates in ye llow .
S ee page 2 8.
r
Fog tail lamp
C ontrol indicator illuminates in ye llow .
Illuminates whe n the fog tail lam p is on –
s ee page 7 5. zRe d
Dange r, important re minder,
zY ellow
W arning , inform ation, fa ult,
zGree n
Eng agem ent confirm ation,
zBlue
Eng agem ent confirm ation.
Page 110 of 190

1 1 0 D r iv in g an d o p e ra t io n
Driving and operationD r iv in g h in t s
The first 1000 km (600 miles)
D ri v e y o ur v eh i cl e a t va r i o u s sp e ed s.
Do not use full throttle. Nev er allow
the e ngine to labour at low re vs .
Make good use of all ge ars . De pres s the
accele rator ped al a ma ximum of around
thre e quarters of the available p edal trave l
in all gea rs .
Do not d riv e faster than three quarte rs of
maximum spe ed .
D o no t b r a k e un n ec es sa r i l y ha rd f o r t he
first 200 km (120 miles).
Never coast w ith engine not running
Many units w ill not function in this situation
(e .g. brake se rvo unit, powe r ste ering).
Driv ing in this ma nne r is a dange r to
yo u rs e lf and o the rs.
Brake servo unit
When the engine is not running, the brake
servo unit is no longer effective once the
brake peda l has bee n depre ss e d once or
twice. Braking effe ct is not re duced , but
significantly gre ater force is re quired for
braking. Power steering
If th e po wer ste er in g f ails o r wh en be in g
towe d with the e ngine switched off, the
ve hicle c an still be s tee red, but
consid erably more force is required.
D riv ing in m ount ainous te rrain
The cooling fan is e lectrically op erate d.
Its cooling powe r is the refore inde pende nt
o f t h e en g i n e s p e ed.
S ince a c onsiderab le am ount of heat is
ge nerate d at high e ngine s pee ds and les s
at lowe r s pee ds, do not s hift down whe n
climb ing hills while the ve hic le is s till coping
with the gradient in the hig he r ge ar.
D riv ing wi th a roof loa d
N ot permitte d.
Sw itching off the engi ne
When y ou switch off the e ngine , fans in
the engine com partment m ay continue
running for a while , to c ool the engine .
If the engine te mpe rature is very high, e.g.
afte r driving in mountainous terrain, allow
the e ngine to idle for ap prox . 2 minutes , in
orde r to preve nt heat accumulation.
V eh i cl es w i t h t u r bo ch a r g ed en g i n e:
After running at high eng ine speeds or high
e ng ine loads, op erate the engine brie fly at
a low load or run in neutral for approx.
3 0 se c o n d s b ef o r e sw i t c h i n g o f f , i n o r d er
to protec t the turbocharger. D rivin g h in ts .... ..... .... ..... .... ..... .... .... ..... 11 0
Saving fuel, protecting the
en viro n men t . ..... .... ..... .... ..... .... .... ..... 11 2
F ue ls, ref u ellin g .... .... ..... .... ..... .... .... ..... 11 4
Ca ta lytic converter, exhaust g ases... 116
D rive co n tro l s ys tem s ... .... ..... .... .... ..... 11 8
Brake s ys te m ... ..... .... ..... .... ..... .... .... ..... 12 2
ABS u..... .... .... ..... .... ..... .... ..... .... .... ..... 12 4
W h ee ls , ty res ... ..... .... ..... .... ..... .... .... ..... 12 5
Page 124 of 190
1 2 4 D r iv in g an d o p e ra t io n
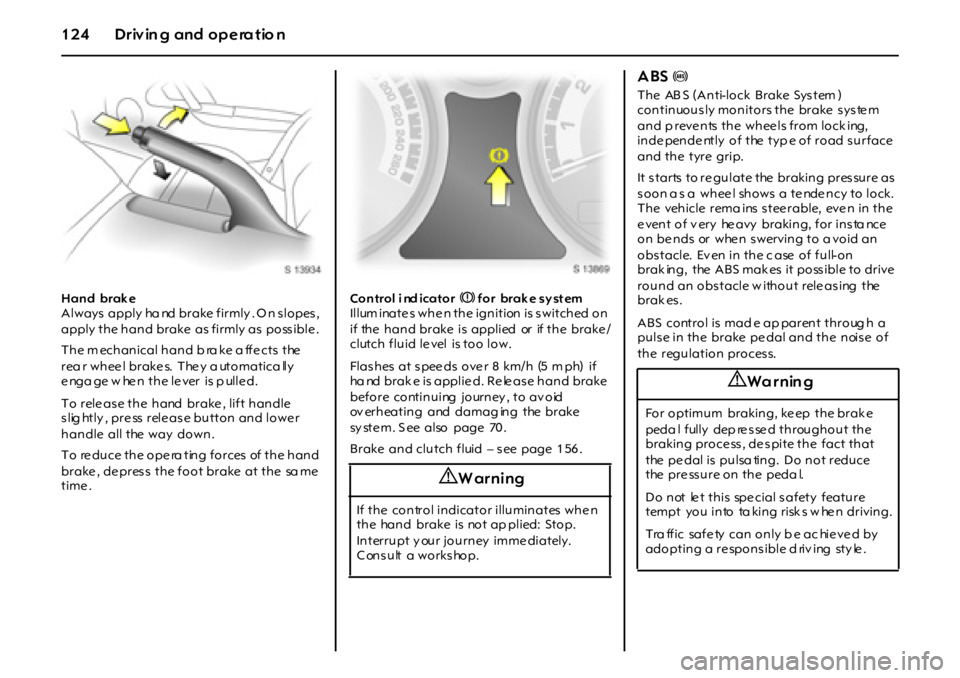
Hand brak e
Always apply ha nd brake firmly . O n s lopes ,
apply the hand brake as firmly as poss ible .
The m echanical hand b ra ke a ffe cts the
rea r wheel brakes. They a utomatica lly
enga ge w hen the lever is p ulled.
To release the hand brake, lift handle
s lig htly , pre ss rele as e button and lowe r
handle all the way down.
T o re du ce t h e o p e ra t in g f o r ces of t h e h a n d
brake , de pres s the foot brake at the sa me
time .Control i nd icator R f o r b r a k e s y st em
Illum inate s whe n the ignition is s witched on
if the hand brake is applied or if the brake/
clutch fluid le vel is too low.
Flas hes at s pee ds ove r 8 km/ h (5 m ph) if
ha nd brak e is applie d. Re le as e hand brake
b ef o r e c o nt i n u i ng j o ur n ey , t o a v o id
ov erheating and damag ing the brake
sy ste m. S ee also page 70 .
Brake and clutch fluid – s ee page 1 56 .
ABS u
T h e AB S ( A n ti-lo ck Brake Sys tem )
continuously monitors the brake system
a n d p r eve n ts t h e w h ee l s f r o m l o ck i ng ,
inde pende ntly of the typ e of road surface
and the tyre grip.
It s tarts to re gulate the braking pres sure as
soon a s a wheel shows a tendency to lock.
T h e veh i cl e r em a i ns s t ee r a bl e, eve n i n t h e
e vent of v ery he avy braking, for ins ta nce
on bends or when swerving to a void an
o bs t acl e. Ev en i n t h e c ase o f f u l l- o n
brak ing, the ABS mak es it poss ible to drive
round an obs tacle w ithout rele as ing the
brak es .
ABS control is mad e ap parent throug h a
puls e in the brake pe dal and the nois e of
the regulation process.
9 Warning
If the control indicator illuminates whe n
the hand brake is not ap plied: Stop.
Interrupt y our journey immediately.
C onsult a workshop.
9 Wa r nin g
For optimum braking, ke ep the brak e
peda l fully dep re s se d throughout the
braking proce ss , de s pite the fact that
the pe dal is pulsa ting. Do not reduce
the pre ssure on the peda l.
Do not le t this spe cial safety feature
tempt you into ta king risk s w he n driving.
Tra ffic safe ty can only b e ac hie ve d by
adopting a re spons ible d riv ing sty le .
Page 125 of 190
12 5Dr i vi ng and o pe r ati on
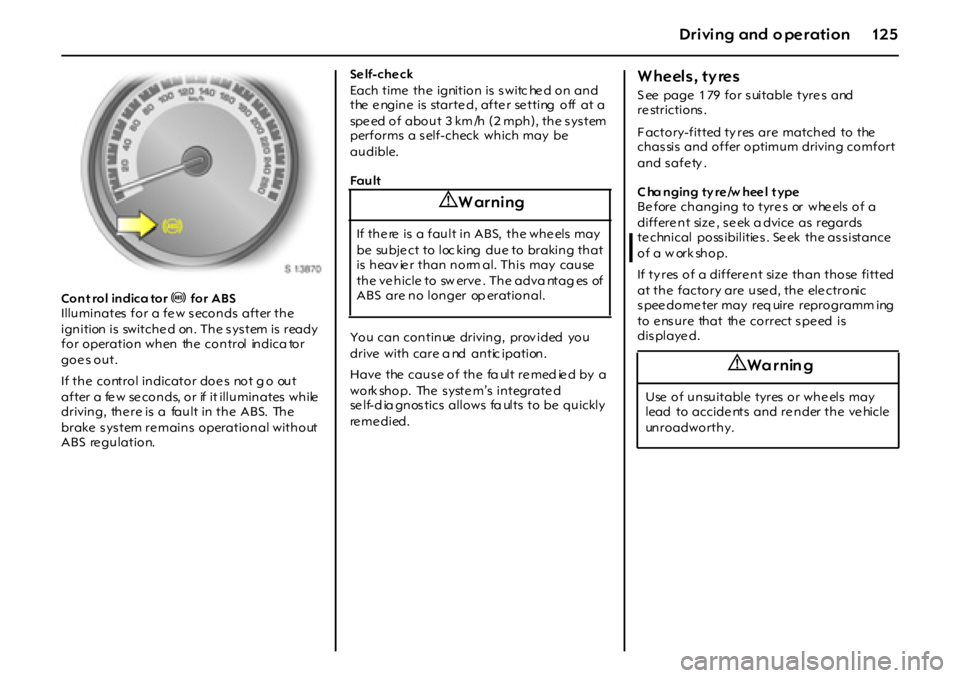
Con t rol in dica tor u for ABS
Illuminates for a few seconds after the
ignition is switche d on. The s ys tem is ready
for operation when the control indica tor
goe s out.
If the control indicator doe s not g o out
after a fe w se conds, or if it illuminates while
driving, there is a fault in the ABS. The
brake system remains operational without
ABS regulation.Se lf-che ck
Each time the ignition is switc he d on and
the e ngine is starte d, afte r se tting off at a
speed of about 3 km /h (2 mph), the system
performs a s elf-check which may be
audible.
Fa u lt
You can continue driving, prov ided you
drive with care a nd antic ipation.
Have the cause of the fa ult re med ie d by a
workshop. The system’s integrated
se lf-d ia gnos tics allows fa ults to be quickly
re m e d i e d .
Wheels, tyres
S ee page 1 79 for s uitable tyre s and
re strictions.
F actory-fitted ty res are matched to the
chas sis and offer optimum driving comfort
and s afe ty .
C ha nging ty re/w heel t ype
Be fore changing to tyre s or whe els of a
differe nt size , s e ek a dvice as regards
te chnical poss ibilitie s . Se ek the as s istance
of a w ork shop.
If ty res of a differe nt size than those fitted
at the factory are used, the electronic
spee dome ter may req uire reprogramm ing
to ensure that the correct speed is
dis playe d.
9 Warning
If the re is a fault in ABS, the whe els may
be subje ct to loc king due to braking that
is heav ie r than norm al. This may cause
t h e ve h i cl e t o sw er ve . T h e a dva nt a g es of
A B S a r e n o l o n g er op er a t i o n a l .
9 Wa r nin g
Use of unsuitable tyres or wheels may
lead to accide nts and re nder the ve hicle
unroadworthy.
Page 136 of 190
136 Self-help, vehicle care
Tyre rep air k it
Minor damag e to the tyre tread, e.g . from
foreign bodie s, can be tem porarily
rep aire d using the ty re re pair kit.
Do not rem ov e foreign bodies from the
tyre s. Damage d are as bigger than 4 m m
and da mage at the ty re rim cannot be
rep aire d using the ty re re pair kit.
The tyre re pair k it can be use d to seal small
puncture s with a liquid seala nt. Use of the
sealant doe s not c onstitute a pe rmane nt
rep air but is des igned as an eme rgency
measure, to allow the vehicle to be driven
while awaiting tyre replace me nt.
The ty re re pair kit ca n also be used to
infla te the tyres to the c orre ct ty re pressure
(se e page 18 0 ) without us ing the s ea lant.For important information – s ee page 1 40 .
If you have a flat ty re:
zPark on a leve l, firm a nd non-s lippery
surface.
zSw itch on haz ard warning lamps , a pply
hand brak e, engage rev ers e ge ar and
switch off engine.
zC orre ctly s et up the warning triangle3.
W arning tria ngle – se e page 13 5 .
Nev er use the liquid sealant on more than
one tyre at a tim e.
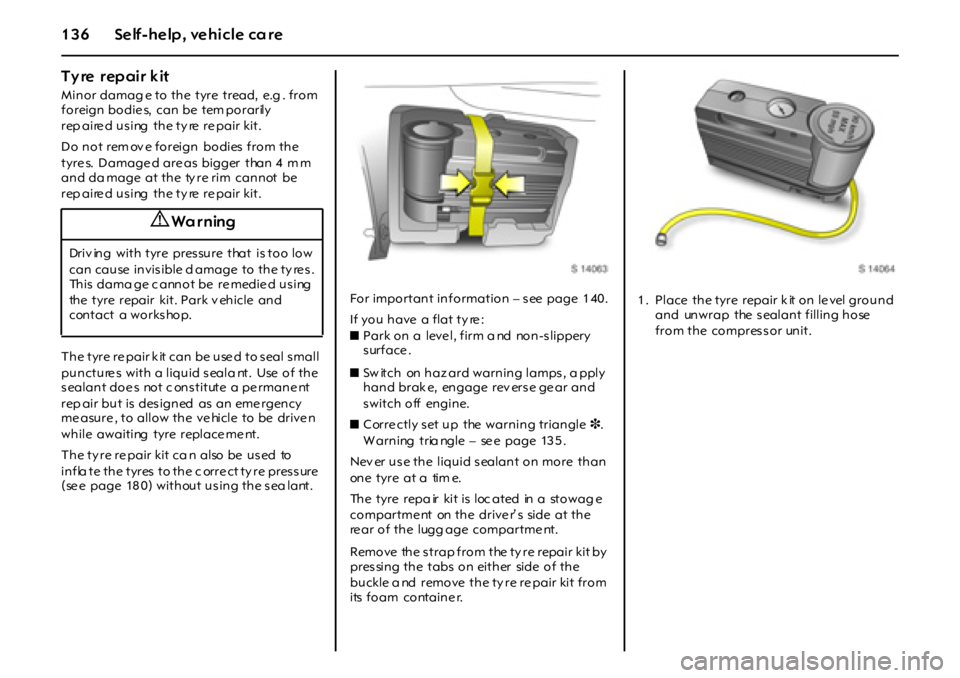
The tyre repa ir kit is loc ated in a stowag e
compartme nt on the drive r’ s side at the
re ar of the lugg age compartme nt.
Remove the strap from the ty re repair kit by
pressing the tabs on either side of the
buckle a nd remove the ty re re pair kit from
its foam containe r.
9 Wa r ning
Driv ing with tyre pressure that is too low
can cause invisible d amage to the ty re s.
This dama ge c annot be re medie d us ing
the tyre repair kit. Park v ehicle and
contact a works hop.
1 . Place the tyre repair k it on le vel ground
and unwrap the s ealant filling hose
from the compressor unit.
Page 144 of 190
144 Self-help, vehicle care
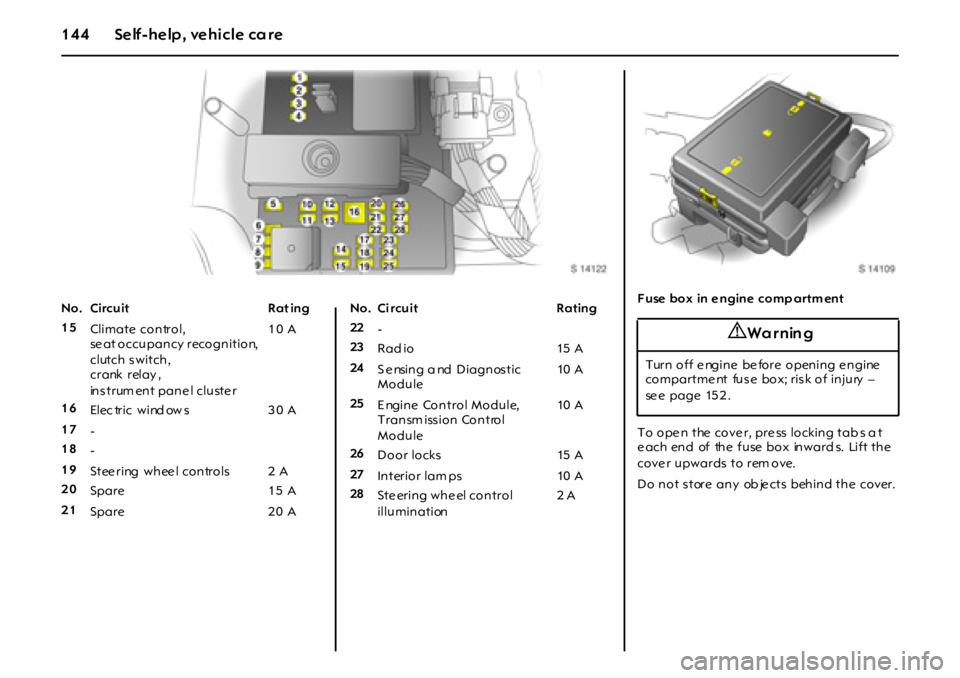
No. Circuit Rat ing
15
Climate co n tro l,
se at occupancy recognition,
clutch s witch,
crank relay ,
instrum ent panel cluster10 A
16
El ec tr i c w i nd ow s 3 0 A
17
-
18
-
19
St ee r i ng w h ee l co n tr o l s 2 A
20
Spare 1 5 A
21
Spare 2 0 ANo. Ci rcuit Rating
22
-
23
Rad io 15 A
24
S e nsing a nd Diagnos tic
Module10 A
25
Engine Control Module,
Transm iss ion Control
Module10 A
26
Door locks 15 A
27
In terio r lam ps 10 A
28
Steering wheel control
illumination2 AF use box in e ngine comp artm ent
To open the cover, press locking tabs a t
each end of the fuse box inwards. Lift the
cove r upwards to rem ove.
Do not store any ob jects behind the cover.
9 Wa r nin g
Turn off e ngine be fore opening e ngine
compartme nt fuse box; risk of injury –
se e page 15 2 .
Page 145 of 190
14 5Self-help, vehicle care
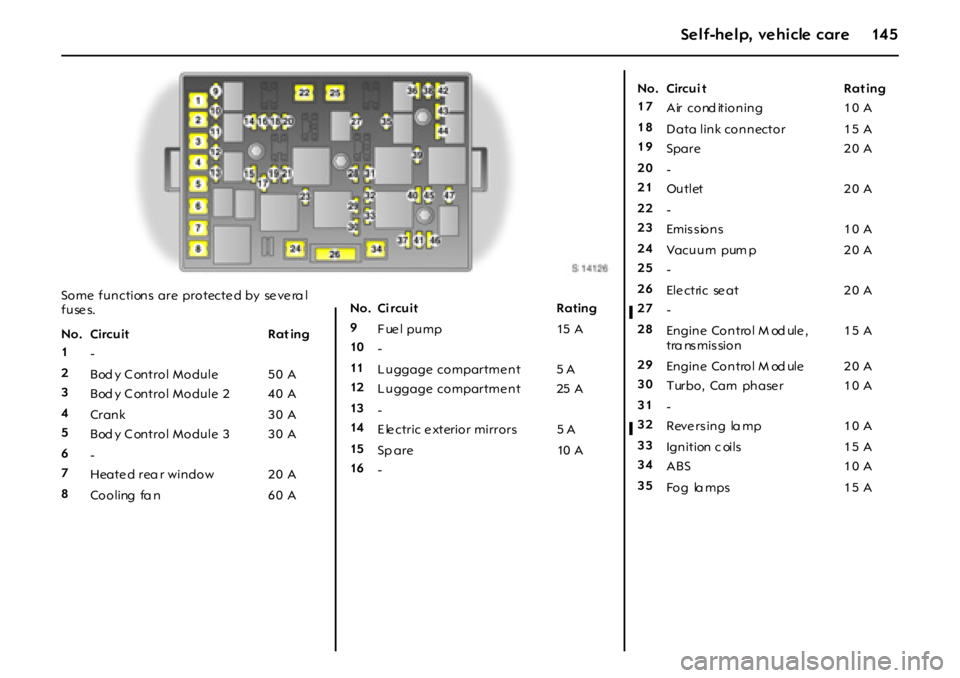
Some functions are protecte d by se ve ra l
f u se s.
No. Circuit Rat ing
1
-
2
Bod y C ontrol Module 50 A
3
Bod y C ontrol Module 2 40 A
4
Cran k 3 0 A
5
Bod y C ontrol Module 3 30 A
6
-
7
Heate d rea r window 2 0 A
8
Cooling fa n 6 0 ANo. Ci rcuit Rating
9
Fuel pump 15 A
10
-
11
L uggage compartme nt 5 A
12
L uggage compartme nt 25 A
13
-
14
E le ctric e xterior mirrors 5 A
15
Sp are 10 A
16
-No. Circui t Rat ing
17
Air cond itioning 10 A
18
Data link connector 1 5 A
19
Spare 2 0 A
20
-
21
Ou t let 2 0 A
22
-
23
Emissions 10 A
24
Vacuum pum p 20 A
25
-
26
Ele ct ric se at 2 0 A
27
-
28
Engine Control M od ule,
tra nsmission15 A
29
Engine Control M od ule 20 A
30
Turbo, Cam phase r 1 0 A
31
-
32
Reve rsing la mp 1 0 A
33
Ign ition c oils 1 5 A
34
ABS 10 A
35
Fo g la m p s 1 5 A
Page 149 of 190
14 9Self-help, vehicle care
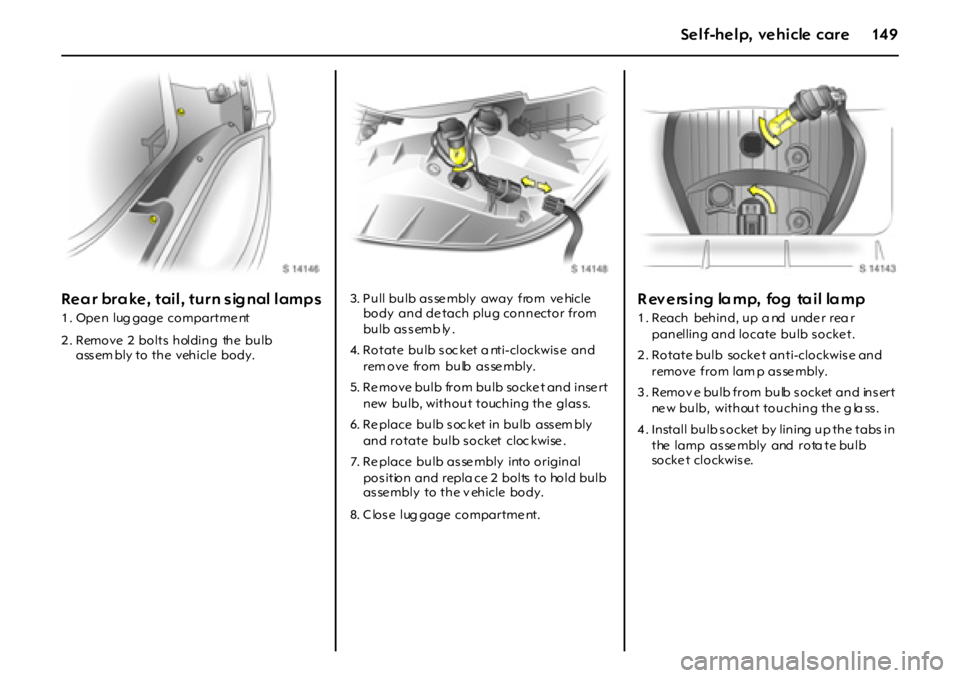
Rear brake, tail, turn signal lamps
1 . Ope n lug gage compartme nt
2 . Remove 2 bolts holding the bulb
assem bly to the vehicle body.3. Pull bulb as se mbly away from ve hicle
body and de tach plug connector from
bulb assemb ly.
4. Rotate bulb soc ket a nti-clockwise and
rem ove from bulb asse mbly.
5. Re move bulb from bulb socke t and inse rt
new bulb, without touching the glass.
6. Re place bulb s oc ket in bulb ass em bly
and rotate bulb socket cloc kwise .
7. Re place bulb as se mbly into original
pos ition and repla ce 2 bolts to hold bulb
asse mbly to the v ehicle body.
8. C los e lug gage compartme nt.
R eversing lamp, fog tail lamp
1. Reach behind, up a nd under rea r
panelling and locate bulb s ocke t.
2. Rotate bulb socke t anti-clockwise and
remove from lam p as se mbly.
3 . Remov e bulb from bulb s ocket and ins ert
ne w bulb, without touching the g la ss.
4 . Install bulb s ocket by lining up the tabs in
the lamp as se mbly and rota te bulb
socke t clockwis e.
Page 157 of 190
15 7Self-help, vehicle care
Brak e/clut ch fluid c ha nge
Brake /clutch fluid is hygroscopic, i.e . it
absorbs water. If the brak es be come hot,
s uc h as whe n driving on long downhill
stretches, va pour bubbles can occur in the
water, which can have an extrem ely
adv ers e e ffe ct on braking power
( dep en di n g o n t h e p ro p o r t i o n o f w a t e r) .
The fluid change intervals s pecifie d in the
chapter "Service, Maintenance" on
page 1 65 m us t there fore be obs erve d.
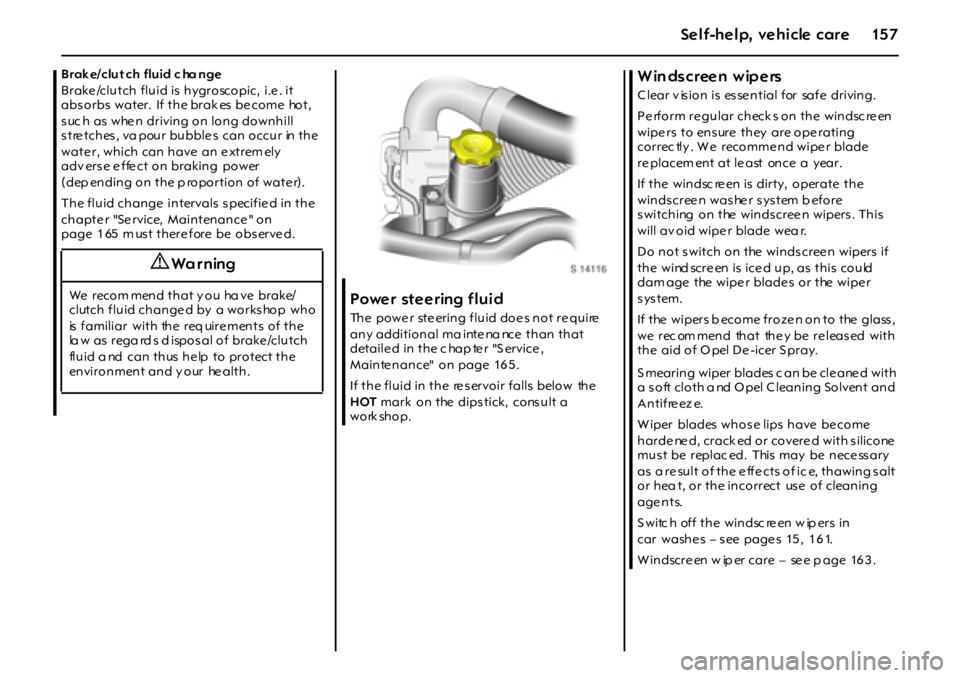
Power steering fluid
The power steering fluid does not require
any additional ma inte na nce than that
detaile d in the c hap te r "S ervice ,
Mainte nance" on page 16 5 .
If the fluid in the re s ervoir falls below the
HOT mark on the dipstick, consult a
work shop.
Windscreen wipers
C lear v is ion is es se ntial for safe driving.
Pe rform re gular check s on the windsc re en
wipe rs to ens ure they are ope rating
correc tly . W e recomme nd wipe r blade
re placem ent at le ast once a year.
If t h e w i n dsc re en i s di r t y, o p er a t e t h e
windscreen washer system b efore
s witching on the winds cree n wipers . This
will av oid wipe r blade wea r.
Do not switch on the windscree n wipers if
the wind scre en is ice d up, as this could
dam age the wipe r blade s or the wipe r
system.
If the wipers b ecome froze n on to the glass,
w e r e c om m e n d th a t th e y b e r e l e a s e d w i t h
t h e a i d o f O p el D e - i cer S p r a y.
S mearing wiper blades c an be cle ane d with
a soft cloth a nd Opel C leaning Solvent and
Antifreez e.
W iper blades whos e lips have be come
harde ne d, crack ed or covere d with s ilicone
mus t be replac ed. This may be nece ss ary
as a re sult of the e ffe cts of ic e, thawing s alt
or hea t, or the incorrect use of cleaning
age nts.
S witc h off the windsc re en w ip ers in
car washe s – s ee page s 15 , 1 6 1.
W indscre en w ip er care – se e p age 163.
9 Wa r ning
We r ec o m m en d t h a t y o u ha v e b r a k e/
clutch fluid change d by a works hop who
is familiar with the req uire ments of the
la w as rega rd s d ispos al of brake /clutch
fluid a nd can thus he lp to protect the
en vi r o n m en t a n d y o ur he a l t h .