ABS OPEL GT-R 1973 Repair Manual
[x] Cancel search | Manufacturer: OPEL, Model Year: 1973, Model line: GT-R, Model: OPEL GT-R 1973Pages: 625, PDF Size: 17.22 MB
Page 574 of 625

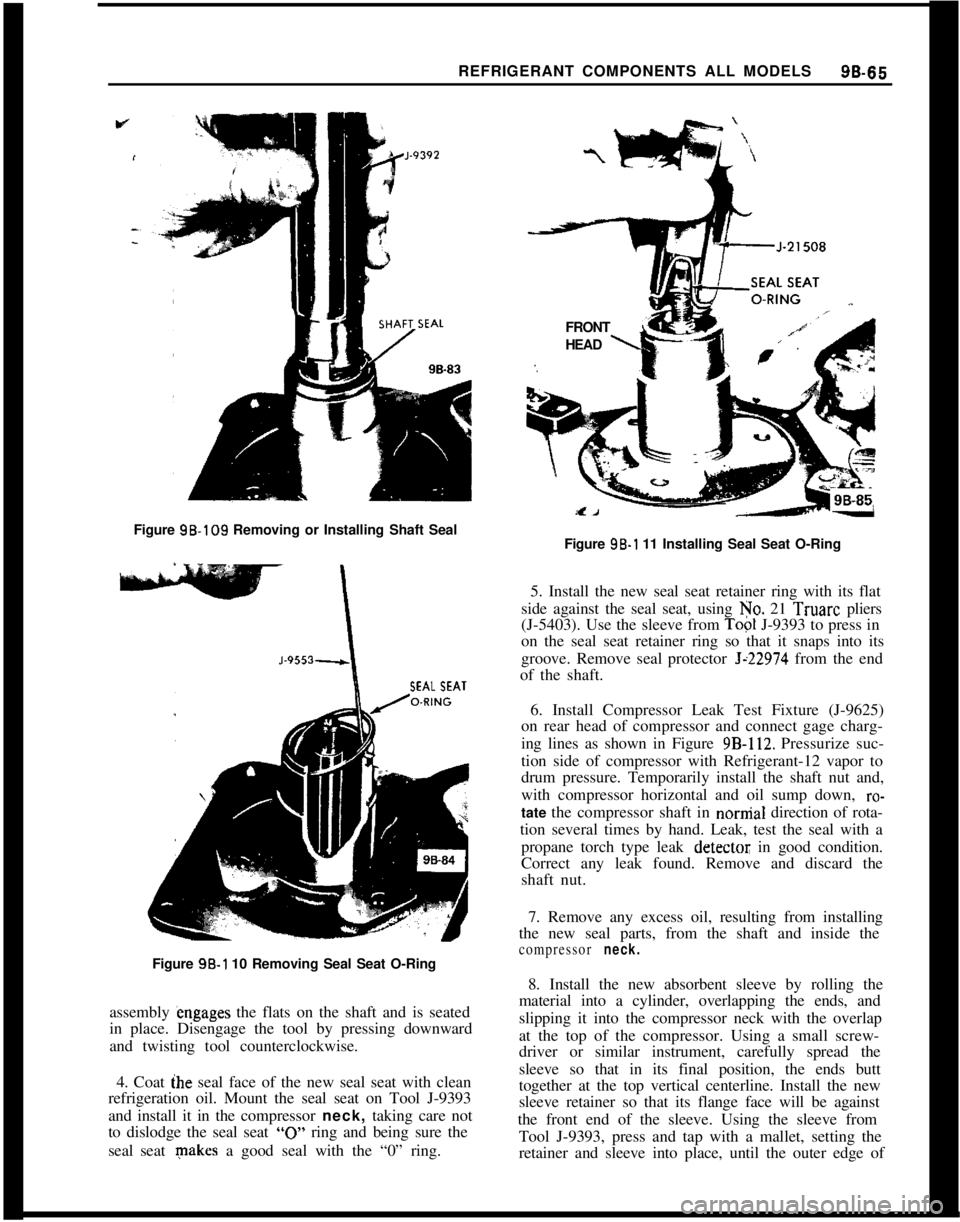
REFRIGERANT COMPONENTS ALL MODELS96-66Figure 98.109 Removing or Installing Shaft Seal
SEAL SEAT
-Figure 98-l 10 Removing Seal Seat O-Ring
assembly engages the flats on the shaft and is seated
in place. Disengage the tool by pressing downward
and twisting tool counterclockwise.
4. Coat ihe seal face of the new seal seat with clean
refrigeration oil. Mount the seal seat on Tool J-9393
and install it in the compressor neck, taking care not
to dislodge the seal seat
“0” ring and being sure the
seal seat makes a good seal with the “0” ring.FRONT
L’HEAD
\Figure 96-l 11 Installing Seal Seat O-Ring
5. Install the new seal seat retainer ring with its flat
side against the seal seat, using No. 21 Truarc pliers
(J-5403). Use the sleeve from
Top1 J-9393 to press in
on the seal seat retainer ring so that it snaps into its
groove. Remove seal protector
Jz22974 from the end
of the shaft.
6. Install Compressor Leak Test Fixture (J-9625)
on rear head of compressor and connect gage charg-
ing lines as shown in Figure
9B-112. Pressurize suc-
tion side of compressor with Refrigerant-12 vapor to
drum pressure. Temporarily install the shaft nut and,
with compressor horizontal and oil sump down,
ro-tate the compressor shaft in nornial direction of rota-
tion several times by hand. Leak, test the seal with a
propane torch type leak
detectot; in good condition.
Correct any leak found. Remove and discard the
shaft nut.
7. Remove any excess oil, resulting from installing
the new seal parts, from the shaft and inside the
compressor neck.8. Install the new absorbent sleeve by rolling the
material into a cylinder, overlapping the ends, and
slipping it into the compressor neck with the overlap
at the top of the compressor. Using a small screw-
driver or similar instrument, carefully spread the
sleeve so that in its final position, the ends butt
together at the top vertical centerline. Install the new
sleeve retainer so that its flange face will be against
the front end of the sleeve. Using the sleeve from
Tool J-9393, press and tap with a mallet, setting the
retainer and sleeve into place, until the outer edge of
Page 623 of 625

SubjectPage Number
Subject Page Number
o,,e, 1900 & Manta .....................1H-59
GT..................................lH-63
intake Manifold, 1.9L Engine
..........:.....6A-12
R
Radiator
JRadiator All Models .,.
Radio
66-32
Joint,
Ball
adder.; ...............................3A-7
dower...............................3A-7
K
Antenna Trimmer Adjustment GT
Antenna Trimmer Adjustment
Opel 1900
& Manta
Removal and Installation Opel 1900
& Manta
Removal and Installation GT
Trouble Diagnosis GT
.,.
Trouble Diagnosis -Opel 1900 &Manta
Reverse Clutch
Rings, Piston,
1.9L Engine
Rocker Arm Assembly.
1.9L Engine..
9C-1 06
9C-1 10
Keys and Locks ..........................OA-1
L
Low Servo Cover .........................7c-100
Lubrication
Engine Oil Change Interval ................OC-7
Oil Viscosity Chart. .....................
OC-7
Fluid Capacities........................OC-5
Lubrication System, Engine .................6A-4
9C-1 11
9c-107
9c-105
9c-109
7c-103
6A-19
6A-12
s
M
Mainshaft Assembly 4.Speed
Manual Transmission ....................
78-26
Manifold
Intake ...............................
6A-12
Exhaust ..............................
6A-12
Master
Cdlinder, Brake.....................5A-2
Model
D&ignation (Body Style)
.............. OA-2
Mountings. Engine, GT ....................
28-6
Opel 1900 & Manta
.......................28-6
0
Oil Chan& Interval ........................OC-7
Oil Filter: Engine
.........................OC-7
Oil Flow Circuits, Automatic Transmission .....7C-64
Oil
Pan. Engine ..........................6A-10
Oil Pump Engine.........................
6A-26
Oil Pump Transmission ....................
7C-103
Oil Recommendations Engine. ..............
OC-7
Oil Strainer-Transmission..................7C-99
Oil Viscosity Chart ........................
OC-7
Opel Emission Control System
(OECS)
Specifications..........................6F-64
Service Procedures......................6F-63
Trouble Diagnosis ......................
6F-62
P
Parking Brake............................5C-33
Piston, Pin Rings ..........................
6A~lS
Planetary Gear Set ........................
7C-118
Power Unit Brake ........................
5A-5
Propeller Shaft ...........................
4A-2
Pump, Oil Engine........................
6A-26 Sequence for Transmission Diagnosis
..........
7C-81
Service ProceduresClutch..................7A~5
Shift Linkage Adjustments
4.Speed Manual ........................78-19
3.Speed Automatic .....................7C~93
Shock Absorber, Rear
All Series .............................
3F-51
Spark Plug Specifications ...........................
66-68
Clean &Adjust. ........................
lC-22
Installation............................lC-22
Wires................................lC~21
Specifications
Engine ................................
6A-27
Front Wheel Alignment ....................
3C~22
Speedometer Installation
Opel1900&Manta.....................1 l-68
GT..................................11-70
Spring
Rear SuspensionAll Series ..............
:............3F-52
Front Suspension
Opel 1900
& Manta ...................3A~l6
GTO Opel ..........................
3A15
Starting Motor
Description ............................
1 E-1 0
Specifications .............:............1 B-1 7
Repairs
..................:............18-13
Removal..............................1 B-l 3
Steering Columns
Service Procedures -Opel 1900 &Manta ....
3E-36
Service Procedures
- GT ...._............3E-44
Steering Gear Adjustment. .....
:............3D-27
Steering Gear Disassembly and
Redssembly.....3D-30
Steering Gear Removal and Install&ion ........
30-28
Steering Linkage ..........................
38-19
Suspension
Front................................3A-2
Rear .................................
3F-51
,