ECO mode OPEL INSIGNIA 2014 Manual user
[x] Cancel search | Manufacturer: OPEL, Model Year: 2014, Model line: INSIGNIA, Model: OPEL INSIGNIA 2014Pages: 321, PDF Size: 8.95 MB
Page 115 of 321
Instruments and controls113
Turn the adjuster wheel or press Q
or P to select a page and follow the
instructions given in the submenus:
■ Units
■ Display themes
■ Info pages
■ Speed warning
■ Tyre loading
■ Software information
Units
Press > while units is displayed.
Select imperial or metric units by
pressing 9.
Display themes
Press > while display themes is
displayed. Select Sport or Touring
mode by pressing 9. Sport mode
includes more vehicle information,
Tour mode includes more media information.
This setting is only available with
Uplevel display.Info pages
Press > while Info pages is displayed.
A list of all items in the Info Menu is
displayed. Select the functions to be
displayed in the Info page by pressing
9 . Selected pages have a 9 in a
checkbox. Non viewable functions
have a blank checkbox. See Info
Menu above.
Speed warning
The speed warning display allows
you to set a speed that you do not
want to exceed.
To set the speed warning, press >
while the page is displayed. Press
Q or P to adjust the value. Press
9 to set the speed. Once the speed
is set, this feature can be turned off by pressing 9 while viewing this page. If
the selected speed limit is exceeded,
a pop-up warning is displayed with a
chime.
Tyre loading
The tyre loading display selects tyre
pressure category according to the
actually inflated tyre pressure. Press
> while the page is displayed 3 241.Select:
■ Light for comfort pressure up to
3 people
■ Eco for Eco pressure up to
3 people
■ Max for full loading
by pressing 9.
Software information
Displays the open source software
information.
Valet mode
Some functions of the Driver
Information Centre and the Colour-
Info-Display can be limited for some
drivers.
Activation or deactivation of valet
mode can be set in the menu
Settings in the vehicle personalisation
menu.
Colour-Info-Display 3 114.
Vehicle personalisation 3 118.
For more information see
Infotainment system manual.
Page 121 of 321
Instruments and controls119
■Voice
■ Display
■ Rear Camera
■ Return to Factory Settings
■ Software Information
■ TouchPad
In the corresponding submenus the
following settings can be changed:
Time and Date
See Clock 3 87.
Sport Mode
The driver can select the functions
which will be activated in Sport mode
3 168.
■ Sport Mode Backlighting : Change
of instrument illumination colour.
■ Engine Sport Performance :
Accelerator pedal and gear change
characteristics become more
responsive.
■ Sport Steering : Steering support is
reduced.■ Sport Suspension : Damping
becomes harder.
■ All Wheel Drive : Engine torque is
distributed to a greater extent to the rear axle.
Language (Language)
Selection of the desired language.
See Infotainment system manual.
Valet Mode
See Infotainment system manual.
Radio
See Infotainment system manual.
Vehicle ■ Climate and Air Quality
Auto Fan Max Speed : Modifies the
level of the cabin airflow of the
climate control in automatic mode.
Air Conditioning Mode : Controls the
state of the cooling compressor
when the vehicle is started. Last
setting (recommended) or at
vehicle start is either always ON or
always OFF.
Auto Demist : Supports windscreen
dehumidification by automaticallyselecting the necessary settings and automatic air conditioning
mode.
Auto Rear Demist : Activates
automatically the heated rear
window.
■ Collision / Detection Systems
Park Assist : Activates or
deactivates the ultrasonic parking
assist.
Auto Collision Preparation :
Activates or deactivates the automatic brake functionality of the
vehicle in the event of imminent
collision danger. The following is
selectable: the system will take
over brake control, warn by chimes
only or is deactivated completely.
Go Notifier : Activates or
deactivates the reminder function
of the adaptive cruise control.
Side Blind Zone Alert : Activates or
deactivates side blind zone alert.
Rear Cross Traffic Alert : Activates
or deactivates rear cross traffic
alert.
Page 127 of 321
Lighting125
Dynamic automatic headlight
levelling 3 125.
Headlights when driving
abroad
The asymmetrical headlight beam
extends visibility at the edge of the
road at the passenger side.
However, when driving in countries
where traffic drives on the opposite
side of the road, adjust the headlights
to prevent dazzling of oncoming
traffic.
Vehicles with halogen headlight
system Have the headlights adjusted by a
workshop.
Vehicles with Xenon headlight system and Adaptive forward
lighting system
Headlights can be set to right hand or left hand drive traffic mode in the
vehicle personalisation menu in the
Colour-Info-Display.Select the relevant setting in Settings,
I Vehicle in the Colour-Info-Display.
Colour-Info-Display 3 114.
Vehicle personalisation 3 118.
Every time the ignition is switched on,
control indicator f flashes for approx.
4 seconds as a reminder that right
hand drive traffic mode is selected.
Change back to left hand drive traffic
mode in the vehicle personalisation
menu as described above. f will not
flash when left hand drive traffic mode
is selected.
Control indicator f 3 106.
Daytime running lights
Daytime running light increases
visibility of the vehicle during daylight.
They are switched on automatically
when ignition is on.
If the vehicle is equipped with
automatic light control function, the
system switches between daytime running light and low/high beam
automatically depending on thelighting conditions and information
given by the rain sensor system.
Automatic light control 3 123.
Adaptive forward lighting
The Adaptive forward lighting
functions are only available with Bi-
Xenon headlights. Light range, light
distribution and intensity of light are
variably triggered depending on the
light conditions, weather and road
type.
With the light switch in position
AUTO all lighting functions are
available.
The following functions are available
also with light switch in position 9:
■ Dynamic curve lighting
■ Corner lighting
■ Reversing function
■ Dynamic automatic headlight levelling
Page 139 of 321
Climate control137
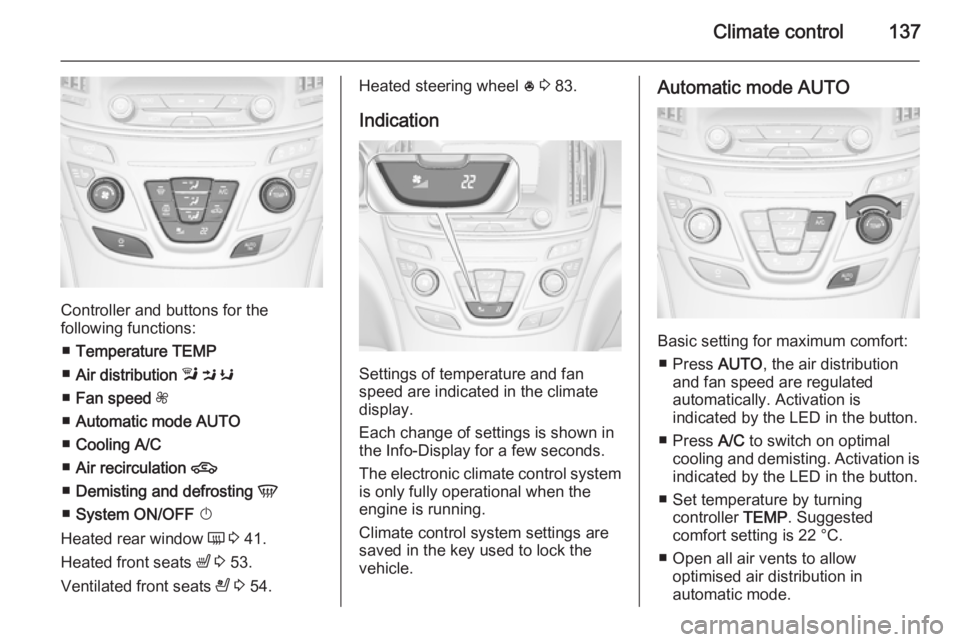
Controller and buttons for the
following functions:
■ Temperature TEMP
■ Air distribution l M K
■ Fan speed Z
■ Automatic mode AUTO
■ Cooling A/C
■ Air recirculation 4
■ Demisting and defrosting V
■ System ON/OFF X
Heated rear window Ü 3 41.
Heated front seats ß 3 53.
Ventilated front seats A 3 54.
Heated steering wheel * 3 83.
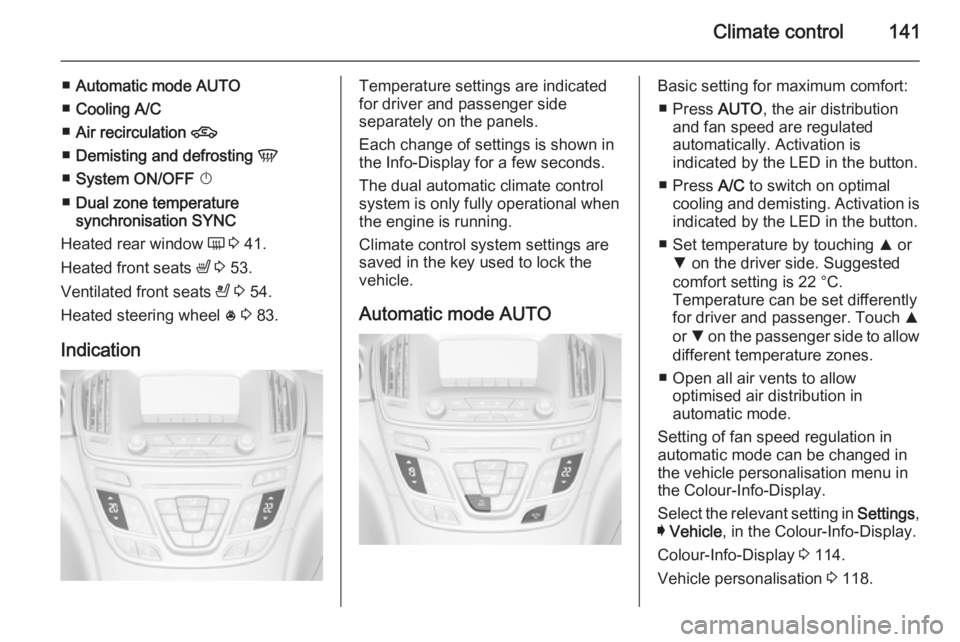
Indication
Settings of temperature and fan
speed are indicated in the climate
display.
Each change of settings is shown in
the Info-Display for a few seconds.
The electronic climate control system
is only fully operational when the
engine is running.
Climate control system settings are
saved in the key used to lock the vehicle.
Automatic mode AUTO
Basic setting for maximum comfort:
■ Press AUTO, the air distribution
and fan speed are regulated
automatically. Activation is
indicated by the LED in the button.
■ Press A/C to switch on optimal
cooling and demisting. Activation is indicated by the LED in the button.
■ Set temperature by turning controller TEMP. Suggested
comfort setting is 22 °C.
■ Open all air vents to allow optimised air distribution in
automatic mode.
Page 143 of 321
Climate control141
■Automatic mode AUTO
■ Cooling A/C
■ Air recirculation 4
■ Demisting and defrosting V
■ System ON/OFF X
■ Dual zone temperature
synchronisation SYNC
Heated rear window Ü 3 41.
Heated front seats ß 3 53.
Ventilated front seats A 3 54.
Heated steering wheel * 3 83.
IndicationTemperature settings are indicated
for driver and passenger side
separately on the panels.
Each change of settings is shown in
the Info-Display for a few seconds.
The dual automatic climate control
system is only fully operational when
the engine is running.
Climate control system settings are
saved in the key used to lock the vehicle.
Automatic mode AUTOBasic setting for maximum comfort: ■ Press AUTO, the air distribution
and fan speed are regulated
automatically. Activation is
indicated by the LED in the button.
■ Press A/C to switch on optimal
cooling and demisting. Activation is indicated by the LED in the button.
■ Set temperature by touching R or
S on the driver side. Suggested
comfort setting is 22 °C.
Temperature can be set differently
for driver and passenger. Touch R
or S on the passenger side to allow
different temperature zones.
■ Open all air vents to allow optimised air distribution in
automatic mode.
Setting of fan speed regulation in
automatic mode can be changed in the vehicle personalisation menu in
the Colour-Info-Display.
Select the relevant setting in Settings,
I Vehicle , in the Colour-Info-Display.
Colour-Info-Display 3 114.
Vehicle personalisation 3 118.
Page 152 of 321
150Driving and operating
Ignition on power mode: press and
hold Engine Start/Stop button for
6 seconds without operating clutch or brake pedal. The green LED in the
button illuminates, diesel engine is
preheating. Control indicators light up
and the most electrical functions are
operable.
Engine start: operate clutch pedal
(manual transmission) or brake pedal (automatic transmission) and press
Engine Start/Stop button once more.
Release button after starting
procedure begins.
Ignition off: press Engine Start/Stop
button briefly in each mode or when
engine is running. Some functions
remain active until driver's door is
opened, if ignition was on before.
Steering wheel lock
The steering wheel lock activates
automatically when:
■ the vehicle is stationary and
■ the ignition has been switched off and
■ the driver's door is opened.To release steering wheel lock, open
and close driver's door and switch on accessory mode or start the engine
directly.9 Warning
If the vehicle battery is discharged,
the vehicle must not be towed,
tow-started or jump-started as the
steering wheel lock cannot be
disengaged.
Emergency operation on
vehicles with electronic key
system
If either the electronic key fails or the
battery of the electronic key is weak,
the Driver Information Centre may
display No Remote Detected or
Replace Battery in Remote Key when
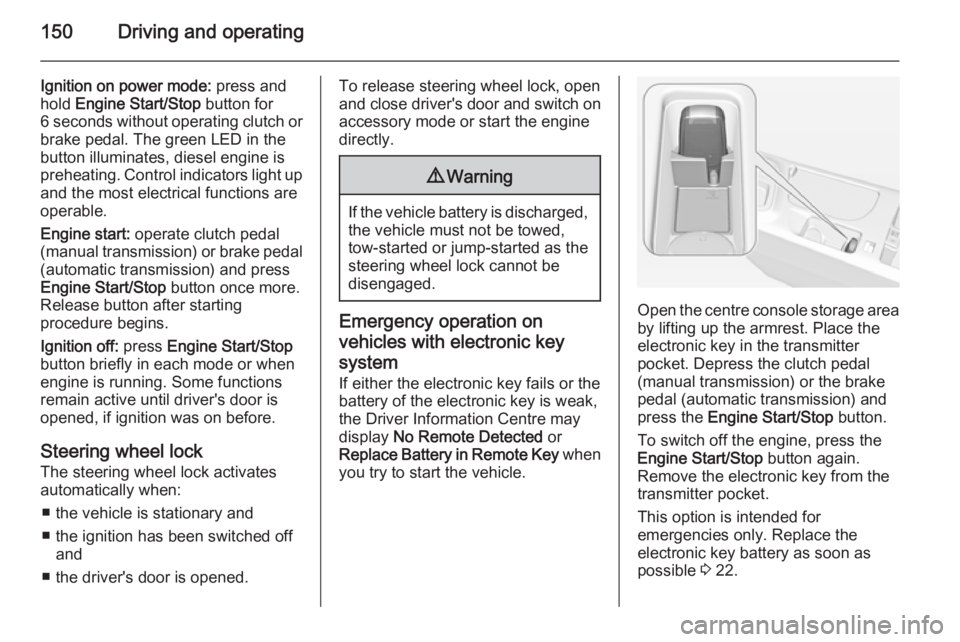
you try to start the vehicle.Open the centre console storage area by lifting up the armrest. Place the
electronic key in the transmitter
pocket. Depress the clutch pedal
(manual transmission) or the brake
pedal (automatic transmission) and
press the Engine Start/Stop button.
To switch off the engine, press the Engine Start/Stop button again.
Remove the electronic key from the
transmitter pocket.
This option is intended for
emergencies only. Replace the
electronic key battery as soon as
possible 3 22.
Page 161 of 321
Driving and operating159
Parking
Apply the parking brake and engage P .
The ignition key can only be removed
when the selector lever is in position
P .
Manual mode
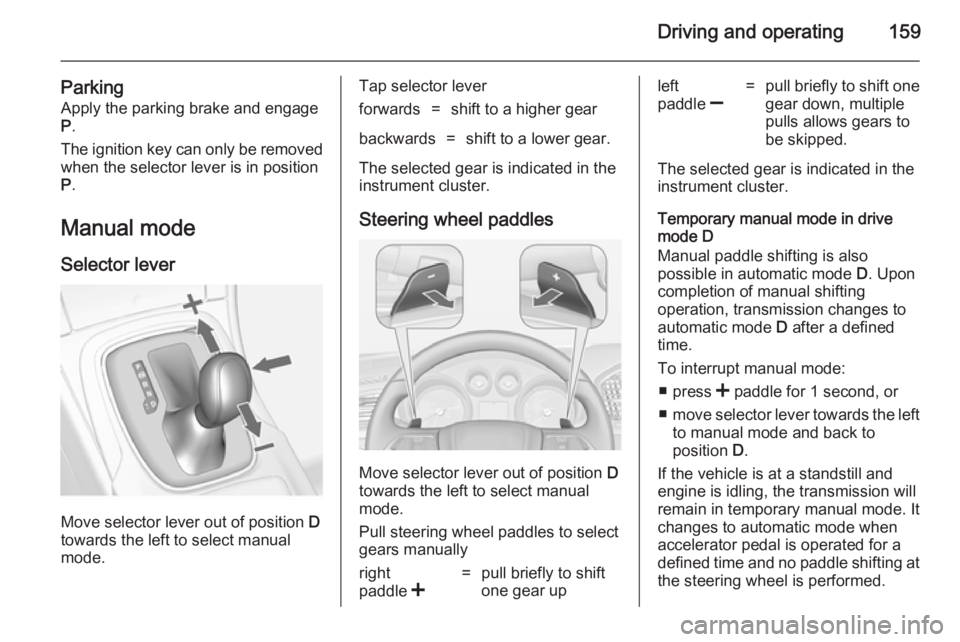
Selector lever
Move selector lever out of position D
towards the left to select manual
mode.
Tap selector leverforwards=shift to a higher gearbackwards=shift to a lower gear.
The selected gear is indicated in the
instrument cluster.
Steering wheel paddles
Move selector lever out of position D
towards the left to select manual
mode.
Pull steering wheel paddles to select
gears manually
right
paddle <=pull briefly to shift
one gear upleft
paddle ]=pull briefly to shift one
gear down, multiple
pulls allows gears to
be skipped.
The selected gear is indicated in the instrument cluster.
Temporary manual mode in drive
mode D
Manual paddle shifting is also
possible in automatic mode D. Upon
completion of manual shifting
operation, transmission changes to
automatic mode D after a defined
time.
To interrupt manual mode: ■ press < paddle for 1 second, or
■ move selector lever towards the left
to manual mode and back to
position D.
If the vehicle is at a standstill and
engine is idling, the transmission will remain in temporary manual mode. It
changes to automatic mode when
accelerator pedal is operated for a
defined time and no paddle shifting at
the steering wheel is performed.
Page 167 of 321

Driving and operating165
Do not operate electric parking brake
system too often without engine
running as this will discharge the vehicle battery.
Before leaving the vehicle, check the electric parking brake status. Control
indicator m 3 102.
Releasing
Switch on ignition. Keep foot brake
pedal depressed and then push
switch m.
Drive away function
Depressing clutch pedal (manual
transmission) or engaging drive gear
(automatic transmission) and then
depressing the accelerator pedal
releases the electric parking brake
automatically. This is not possible
when the switch is pulled at the same time.
This function also helps driving away
on inclines.
Aggressive drive away may reduce
life time of wear parts.Dynamic braking when vehicle is
moving
When the vehicle is moving and the
switch m is kept pulled, the electric
parking brake system will decelerate the vehicle, but will not apply
statically.
As soon as the switch m is released,
dynamic braking will be stopped.
Automatic applying
If the vehicle is equipped with
Automatic transmission and Adaptive cruise control is active, electric
parking brake is applied automatically
when vehicle is stopped by the
system for more than 2 minutes.
Parking brake releases automatically
after moving off.
Functionality check
When the vehicle is not moving, the
electric parking brake might be
applied automatically. This is done to
check the system.Fault
Failure mode of electric parking brake
is indicated by a control indicator j
and by a vehicle message which is
displayed in the Driver Information Centre. Vehicle messages 3 116.
Apply electric parking brake: pull and hold the switch m for more than
5 seconds. If control indicator m
illuminates, electric parking brake is
applied.
Release electric parking brake: push and hold the switch m for more than
2 seconds. If control indicator m
extinguishes, electric parking brake is released.
Control indicator m flashes: electric
parking brake is not fully applied or released. When continuously
flashing, release electric parking
brake and retry applying.
Brake assist
If brake pedal is depressed quickly
and forcefully, maximum brake force
is automatically applied.
Page 171 of 321
Driving and operating169
■ Shift points of automatictransmission occur later.
■ With SPORT mode activated, the illumination of main instruments
changes from white to red.
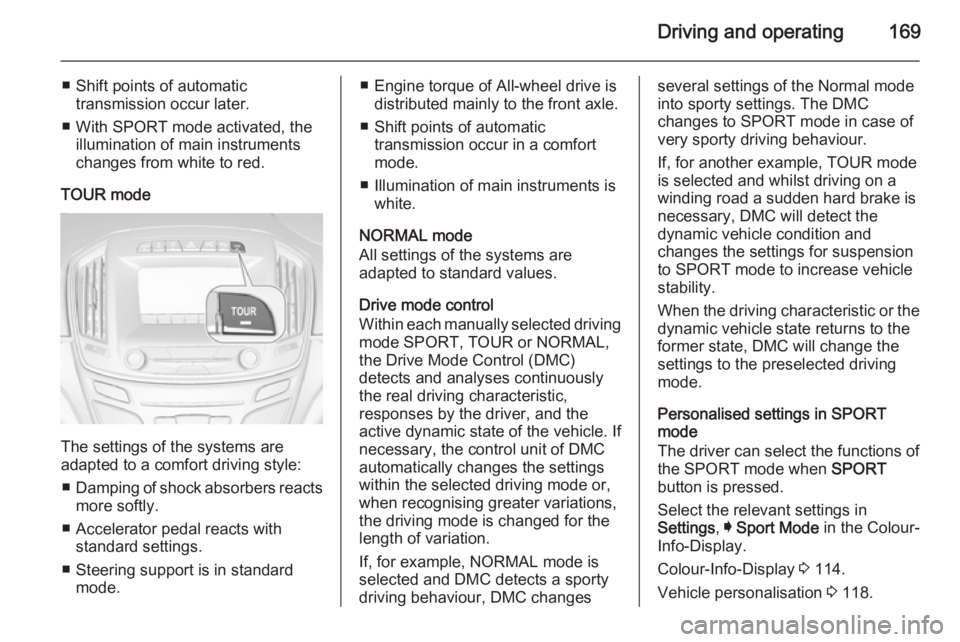
TOUR mode
The settings of the systems are
adapted to a comfort driving style:
■ Damping of shock absorbers reacts
more softly.
■ Accelerator pedal reacts with standard settings.
■ Steering support is in standard mode.
■ Engine torque of All-wheel drive isdistributed mainly to the front axle.
■ Shift points of automatic transmission occur in a comfort
mode.
■ Illumination of main instruments is white.
NORMAL mode
All settings of the systems are
adapted to standard values.
Drive mode control
Within each manually selected driving mode SPORT, TOUR or NORMAL,
the Drive Mode Control (DMC)
detects and analyses continuously
the real driving characteristic,
responses by the driver, and the
active dynamic state of the vehicle. If
necessary, the control unit of DMC
automatically changes the settings
within the selected driving mode or,
when recognising greater variations,
the driving mode is changed for the
length of variation.
If, for example, NORMAL mode is
selected and DMC detects a sporty
driving behaviour, DMC changesseveral settings of the Normal mode
into sporty settings. The DMC
changes to SPORT mode in case of
very sporty driving behaviour.
If, for another example, TOUR mode
is selected and whilst driving on a
winding road a sudden hard brake is
necessary, DMC will detect the
dynamic vehicle condition and
changes the settings for suspension
to SPORT mode to increase vehicle
stability.
When the driving characteristic or the
dynamic vehicle state returns to the
former state, DMC will change the
settings to the preselected driving
mode.
Personalised settings in SPORT
mode
The driver can select the functions of
the SPORT mode when SPORT
button is pressed.
Select the relevant settings in
Settings , I Sport Mode in the Colour-
Info-Display.
Colour-Info-Display 3 114.
Vehicle personalisation 3 118.
Page 206 of 321
204Driving and operating
Press the LPG button to switch
between petrol and liquid gas
operation as soon as the required
parameters (coolant temperature,
gas temperature and minimum
engine speed) have been reached.
The requirements are usually fulfilled
after around 60 seconds (depending
on exterior temperature) and the first
firm press on the accelerator. The
LED status shows the current
operating mode.1 off=petrol operation1 illumi‐
nates=liquid gas operation1 flashes=no switching is
possible, one type
of fuel is empty
As soon as the liquid gas tank is
empty, petrol operation is
automatically engaged until the
ignition is switched off.
Every six months, run the petrol tank
down until control indicator i or Y
illuminates, then refuel. This helps
maintain fuel quality and system
function for petrol operation.
Fill the tank completely at regular
intervals to prevent corrosion in the
tank.
Faults and remedies
If gas mode is not possible, check the following:
■ Is there enough liquid gas present?
■ Is there enough petrol present for starting?
Due to extreme temperatures in
combination with the gas
composition, it may take slightly
longer before the system switches
from petrol to gas mode.
In extreme situations, the system may
also switch back to petrol mode if the
minimum requirements are not
fulfilled.
Seek the assistance of a workshop in the event of all other faults.Caution
Repairs and adjustments may onlybe made by trained specialists in
order to maintain the safety and
warranty on the LPG system.
Liquid gas is given a particular odour
(odorised) so that any leaks can be
detected easily.
9 Warning
If you smell gas in the vehicle or in
the immediate vicinity, switch to petrol mode immediately. No
smoking. No naked flames or
ignition sources.
If the gas odour persists, do not start
the engine. If possible, close the
manual shut-off valve on the
multivalve. The multivalve is located
on the liquid gas tank in the load
compartment, underneath the rear
floor cover.