lights OPEL INSIGNIA 2017 Manual user
[x] Cancel search | Manufacturer: OPEL, Model Year: 2017, Model line: INSIGNIA, Model: OPEL INSIGNIA 2017Pages: 327, PDF Size: 9.3 MB
Page 210 of 327
208Driving and operatingThe function can be deactivated in the
vehicle personalisation menu in the
Colour-Info-Display.
Select the relevant setting in Settings,
I Vehicle in the Colour-Info-Display.
Colour-Info-Display 3 118.
Vehicle personalisation 3 121.
Warning symbols
Warning symbols are indicated as
triangles 9 on the picture which show
obstacles detected by the rear
sensors of the advanced parking
assist.
Additionally 9 appears on the top line
of the Info-Display with the warning to
check the vehicle surrounding.
Deactivation
The camera is deactivated when a certain forward speed is exceeded or
if reverse gear is not engaged for
approx. 10 seconds.
Activation or deactivation of the rear
view camera can be set in the vehicle personalisation menu in the Colour-
Info-Display.Select the relevant setting in Settings,
I Vehicle in the Colour-Info-Display.
Colour-Info-Display 3 118.
Vehicle personalisation 3 121.
Fault
Fault messages are displayed with a 9 on the top line of the Info-Display.
The rear view camera may not
operate properly when:
● The surrounding is dark.
● The sun or the beam of headlights is shining directly into
the camera lens.
● Ice, snow, mud, or anything else covers the camera lens. Clean
the lens, rinse it with water, and
wipe it with a soft cloth.
● The tailgate is not closed correctly.
● The vehicle is towing a trailer. ● The vehicle had a rear end accident.
● There are extreme temperature changes.Rear cross traffic alert
Additional to the rear view camera
3 206 , rear cross traffic alert warns of
cross traffic from left or right side
when driving rearwards. When cross
traffic is recognized and the rear view
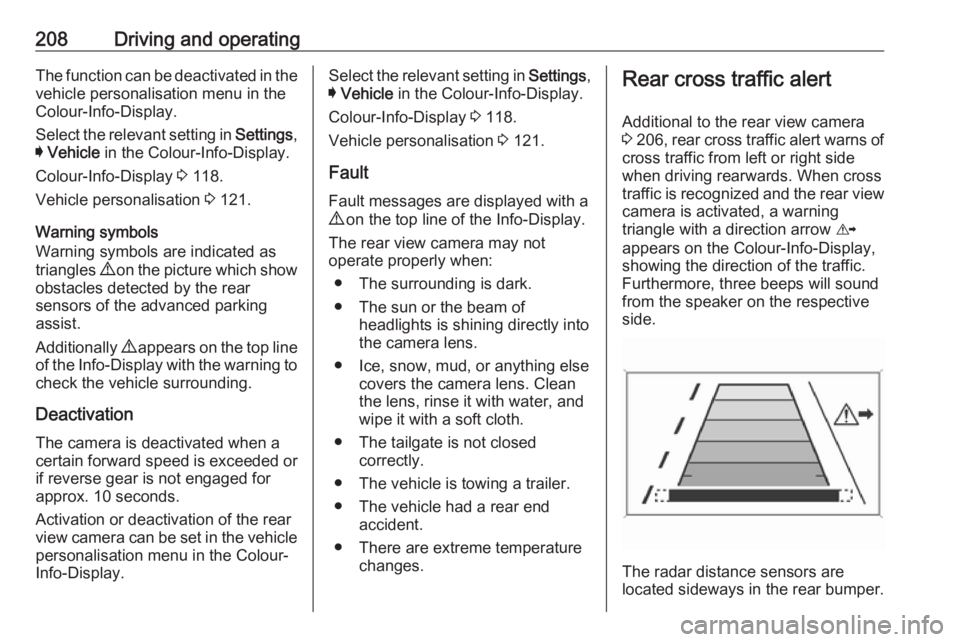
camera is activated, a warning
triangle with a direction arrow K
appears on the Colour-Info-Display,
showing the direction of the traffic.
Furthermore, three beeps will sound
from the speaker on the respective
side.
The radar distance sensors are
located sideways in the rear bumper.
Page 219 of 327
Driving and operating2179Warning
If you smell gas in the vehicle or in
the immediate vicinity, switch to petrol mode immediately. No
smoking. No naked flames or
ignition sources.
If the gas odour persists, do not start
the engine. If possible, close the
manual shut-off valve on the
multivalve. The multivalve is located
on the liquid gas tank in the load
compartment, underneath the rear
floor storage cover 3 75.
Turn the thumb wheel clockwise.
If no further gas odour is perceptible
when the manual shut-off valve is
closed, the vehicle can be used in
petrol mode. If the gas odour persists, do not start the engine. Have the
cause of the fault remedied by a workshop.
When using underground car parks,
follow the instructions of the operator
and local laws.
Note
In the event of an accident, switch off
the ignition and lights. Close the
manual shut-off valve on multivalve.
Refuelling9 Danger
Before refuelling, switch off
ignition and any external heaters
with combustion chambers.
Follow the operating and safety
instructions of the filling station
when refuelling.
9 Danger
Fuel is flammable and explosive.
No smoking. No naked flames or
sparks.
If you can smell fuel in your
vehicle, have the cause of this
remedied immediately by a
workshop.
Caution
In case of misfuelling, do not
switch on ignition.
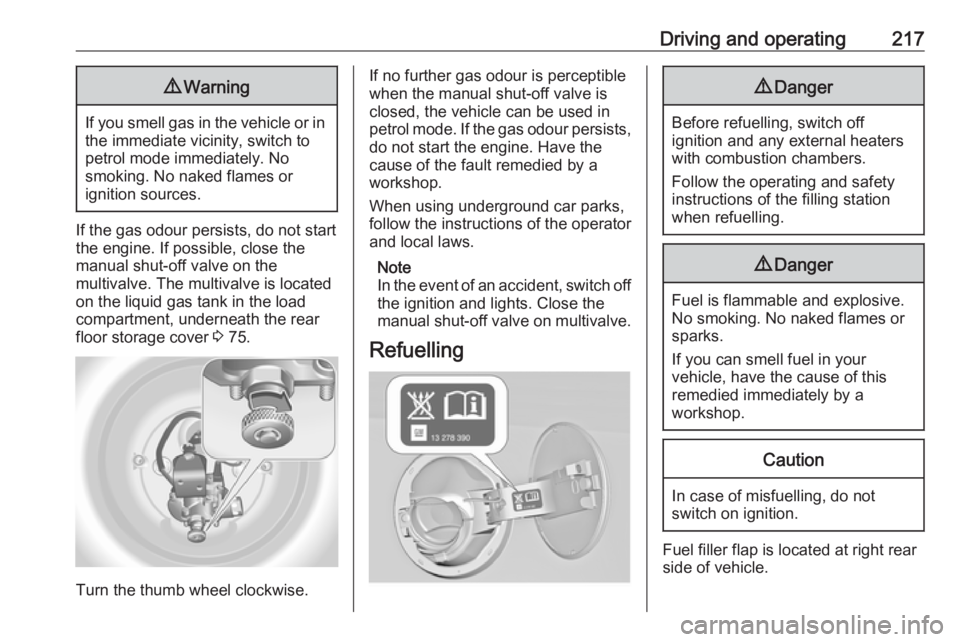
Fuel filler flap is located at right rear
side of vehicle.
Page 228 of 327
226Vehicle careVehicle careGeneral Information...................227
Accessories and vehicle modifications .......................... 227
Vehicle storage ........................227
End-of-life vehicle recovery .....228
Vehicle checks ........................... 228
Performing work ......................228
Bonnet ..................................... 228
Engine oil ................................. 229
Automatic transmission fluid ....230
Engine coolant ......................... 231
Power steering fluid .................232
Washer fluid ............................ 232
Brakes ..................................... 233
Brake fluid ............................... 233
Vehicle battery ......................... 233
Diesel fuel system bleeding .....235
Wiper blade replacement ........235
Bulb replacement .......................236
Halogen headlights ..................237
Xenon headlights .....................239
Fog lights ................................. 241
Tail lights ................................. 242
Side turn signal lights ..............244
Number plate light ...................245Interior lights ............................ 246
Instrument panel illumination ...246
Electrical system ........................246
Fuses ....................................... 246
Engine compartment fuse box . 248
Instrument panel fuse box .......250
Load compartment fuse box ....251
Vehicle tools .............................. 253
Tools ........................................ 253
Wheels and tyres .......................254
Winter tyres ............................. 254
Tyre designations ....................254
Tyre pressure .......................... 254
Tyre pressure monitoring system .................................... 256
Tread depth ............................. 257
Changing tyre and wheel size . 258
Wheel covers ........................... 258
Tyre chains .............................. 259
Tyre repair kit .......................... 259
Wheel changing .......................262
Spare wheel ............................ 264
Jump starting ............................. 267
Towing ....................................... 268
Towing the vehicle ...................268
Towing another vehicle ...........270Appearance care .......................272
Exterior care ............................ 272
Interior care ............................. 274
Page 230 of 327
228Vehicle care● Since the durability of AdBlue islimited to two years, fluid should
be exchanged if it is too old. Seek the assistance of a workshop.
● Fit the number plate if necessary.
End-of-life vehicle recovery
Information on end-of-life vehicle
recovery centres and the recycling of
end-of-life vehicles is available on our website, where legally required. Only
entrust this work to an authorised
recycling centre.
Gas vehicles must be recycled by a
service centre authorised for gas
vehicles.Vehicle checks
Performing work9 Warning
Only perform engine compartment
checks when the ignition is off.
The cooling fan may start
operating even if the ignition is off.
9 Danger
The ignition system and Xenon
headlights use extremely high
voltage. Do not touch.
Bonnet
Opening
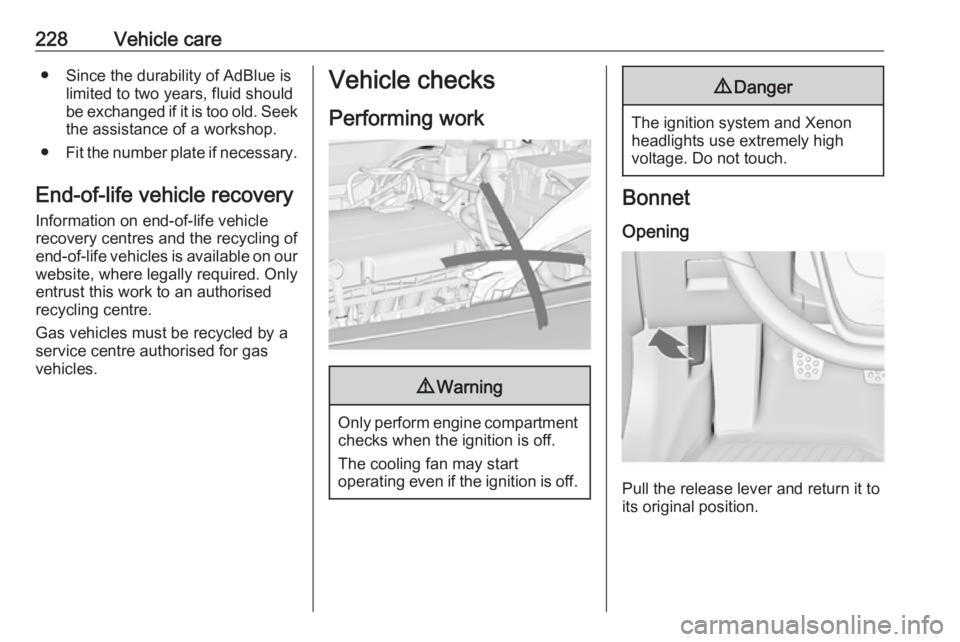
Pull the release lever and return it to
its original position.
Page 238 of 327
236Vehicle care
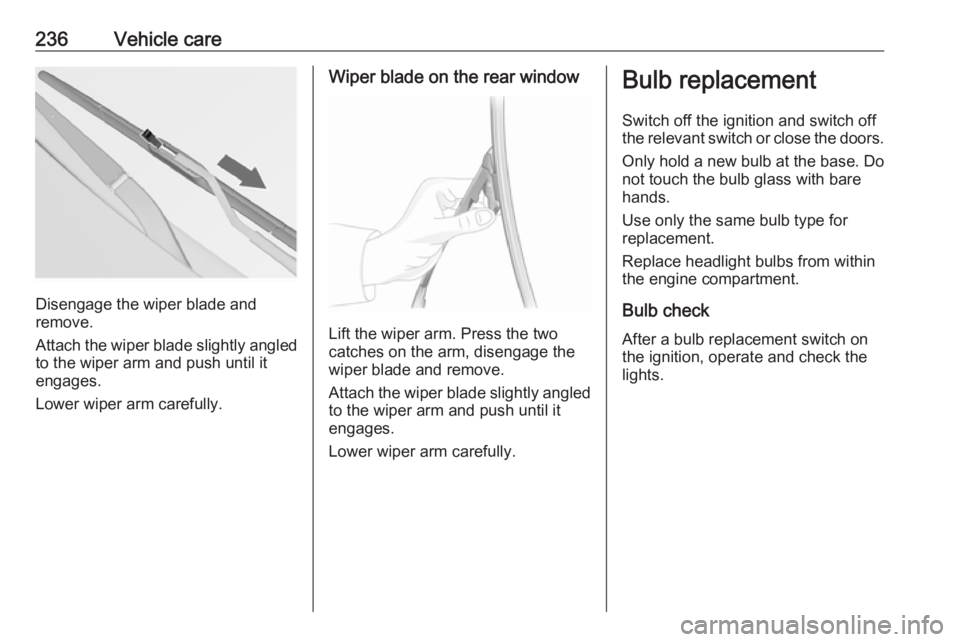
Disengage the wiper blade and
remove.
Attach the wiper blade slightly angled
to the wiper arm and push until it
engages.
Lower wiper arm carefully.
Wiper blade on the rear window
Lift the wiper arm. Press the two
catches on the arm, disengage the
wiper blade and remove.
Attach the wiper blade slightly angled
to the wiper arm and push until it
engages.
Lower wiper arm carefully.
Bulb replacement
Switch off the ignition and switch off
the relevant switch or close the doors.
Only hold a new bulb at the base. Do
not touch the bulb glass with bare
hands.
Use only the same bulb type for
replacement.
Replace headlight bulbs from within
the engine compartment.
Bulb check
After a bulb replacement switch on
the ignition, operate and check the
lights.
Page 239 of 327
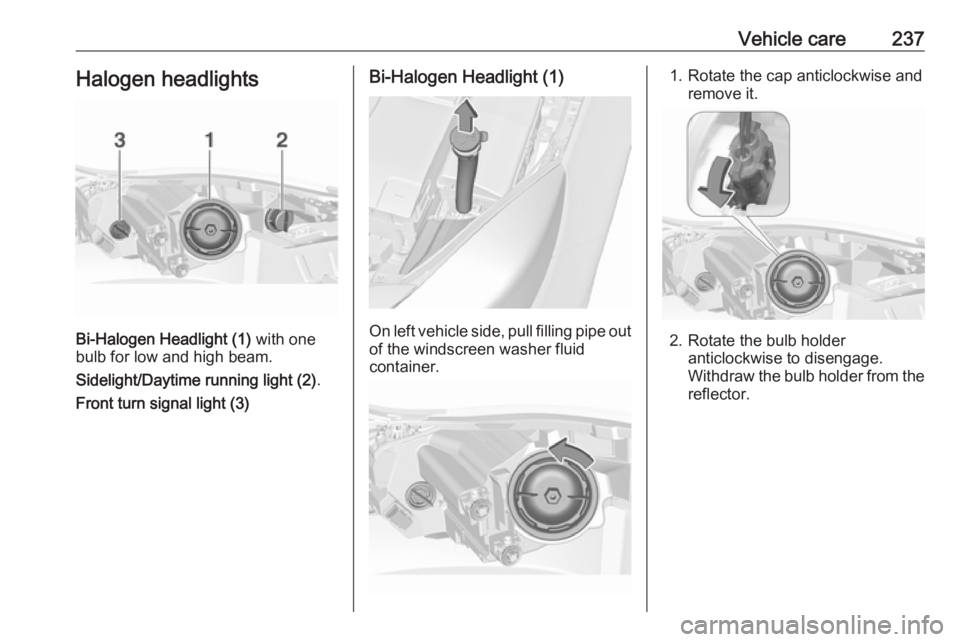
Vehicle care237Halogen headlights
Bi-Halogen Headlight (1) with one
bulb for low and high beam.
Sidelight/Daytime running light (2) .
Front turn signal light (3)
Bi-Halogen Headlight (1)
On left vehicle side, pull filling pipe out
of the windscreen washer fluid
container.
1. Rotate the cap anticlockwise and remove it.
2. Rotate the bulb holderanticlockwise to disengage.
Withdraw the bulb holder from the
reflector.
Page 241 of 327
Vehicle care239Sidelight/Daytime running light
with LEDs
On another version, sidelight and
daytime running lights are designed
as LEDs. In case of failure, have
LEDs replaced by a workshop.
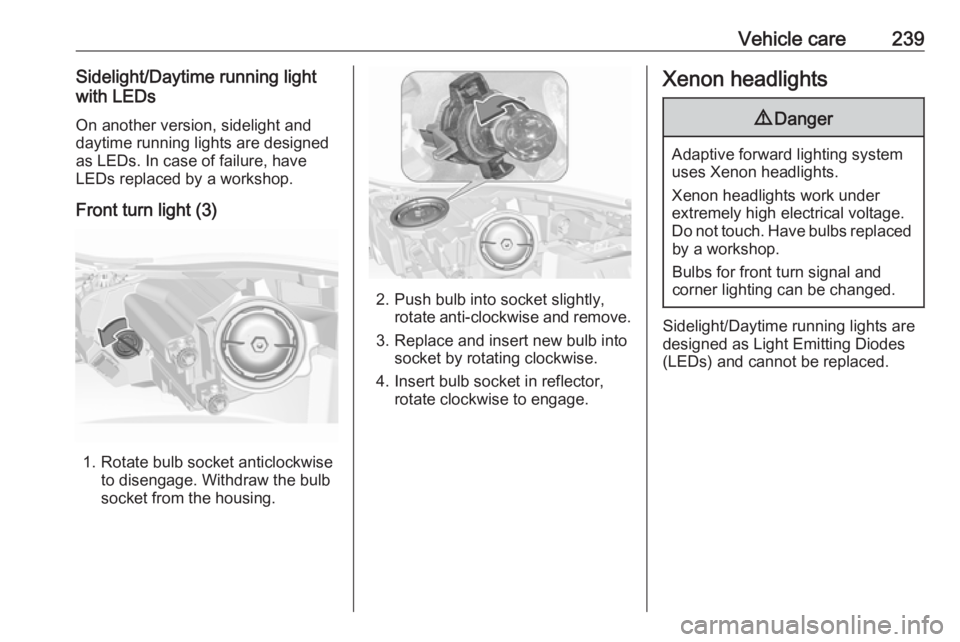
Front turn light (3)
1. Rotate bulb socket anticlockwise to disengage. Withdraw the bulb
socket from the housing.
2. Push bulb into socket slightly, rotate anti-clockwise and remove.
3. Replace and insert new bulb into socket by rotating clockwise.
4. Insert bulb socket in reflector, rotate clockwise to engage.
Xenon headlights9 Danger
Adaptive forward lighting system
uses Xenon headlights.
Xenon headlights work under
extremely high electrical voltage.
Do not touch. Have bulbs replaced by a workshop.
Bulbs for front turn signal and
corner lighting can be changed.
Sidelight/Daytime running lights are
designed as Light Emitting Diodes
(LEDs) and cannot be replaced.
Page 243 of 327
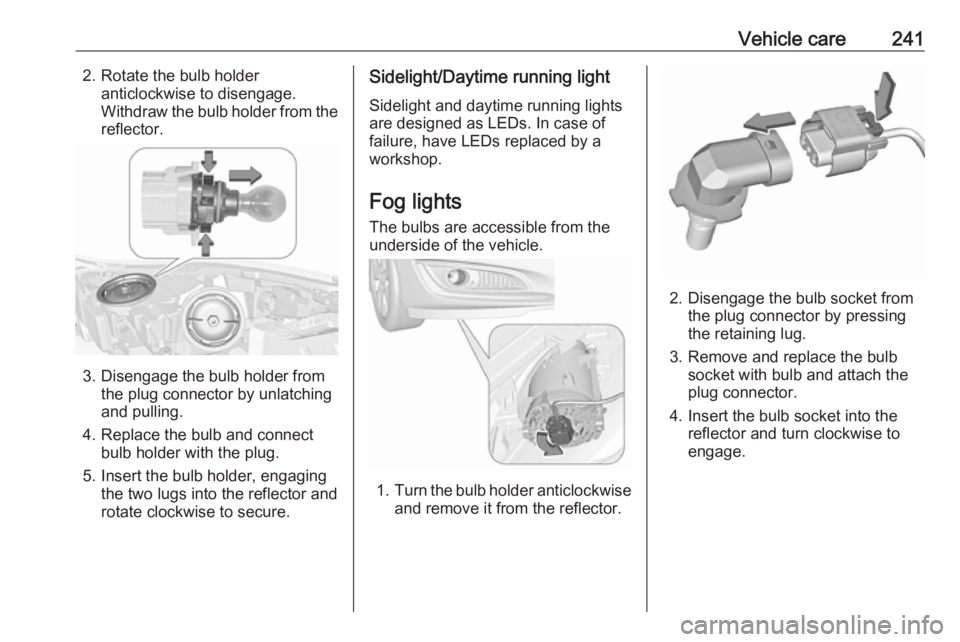
Vehicle care2412. Rotate the bulb holderanticlockwise to disengage.
Withdraw the bulb holder from the reflector.
3. Disengage the bulb holder from the plug connector by unlatching
and pulling.
4. Replace the bulb and connect bulb holder with the plug.
5. Insert the bulb holder, engaging the two lugs into the reflector androtate clockwise to secure.
Sidelight/Daytime running light
Sidelight and daytime running lights
are designed as LEDs. In case of
failure, have LEDs replaced by a
workshop.
Fog lights
The bulbs are accessible from the
underside of the vehicle.
1. Turn the bulb holder anticlockwise
and remove it from the reflector.
2. Disengage the bulb socket from the plug connector by pressing
the retaining lug.
3. Remove and replace the bulb socket with bulb and attach the
plug connector.
4. Insert the bulb socket into the reflector and turn clockwise to
engage.
Page 244 of 327
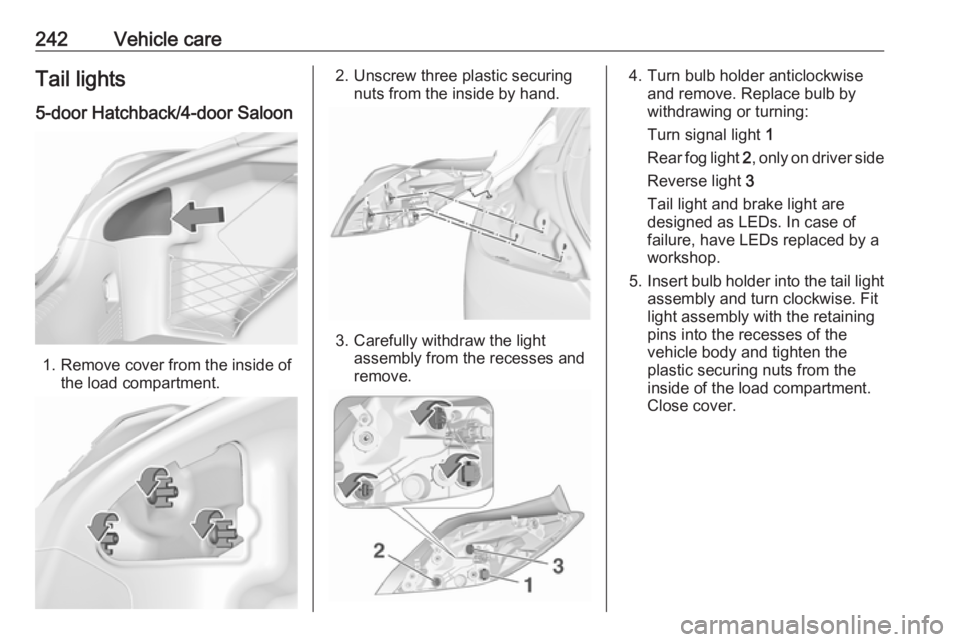
242Vehicle careTail lights5-door Hatchback/4-door Saloon
1. Remove cover from the inside of the load compartment.
2. Unscrew three plastic securingnuts from the inside by hand.
3. Carefully withdraw the lightassembly from the recesses and
remove.
4. Turn bulb holder anticlockwise and remove. Replace bulb by
withdrawing or turning:
Turn signal light 1
Rear fog light 2, only on driver side
Reverse light 3
Tail light and brake light are
designed as LEDs. In case of
failure, have LEDs replaced by a
workshop.
5. Insert bulb holder into the tail light
assembly and turn clockwise. Fit
light assembly with the retaining
pins into the recesses of the
vehicle body and tighten the
plastic securing nuts from the
inside of the load compartment.
Close cover.
Page 245 of 327
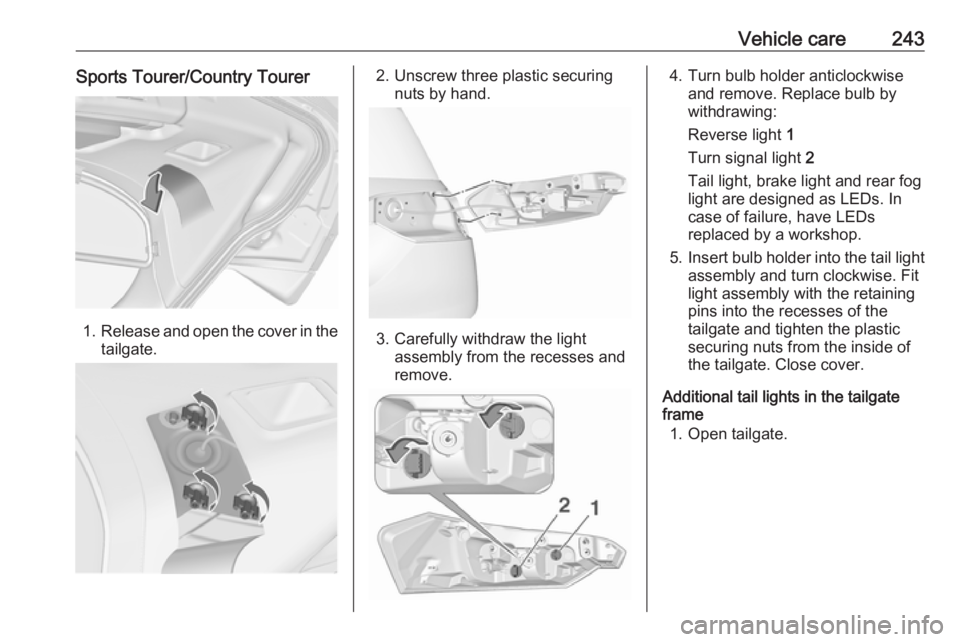
Vehicle care243Sports Tourer/Country Tourer
1.Release and open the cover in the
tailgate.
2. Unscrew three plastic securing nuts by hand.
3. Carefully withdraw the lightassembly from the recesses and
remove.
4. Turn bulb holder anticlockwise and remove. Replace bulb by
withdrawing:
Reverse light 1
Turn signal light 2
Tail light, brake light and rear fog
light are designed as LEDs. In
case of failure, have LEDs
replaced by a workshop.
5. Insert bulb holder into the tail light
assembly and turn clockwise. Fit
light assembly with the retaining
pins into the recesses of the
tailgate and tighten the plastic
securing nuts from the inside of
the tailgate. Close cover.
Additional tail lights in the tailgate
frame
1. Open tailgate.