lock OPEL INSIGNIA 2017 Manual user
[x] Cancel search | Manufacturer: OPEL, Model Year: 2017, Model line: INSIGNIA, Model: OPEL INSIGNIA 2017Pages: 327, PDF Size: 9.3 MB
Page 159 of 327
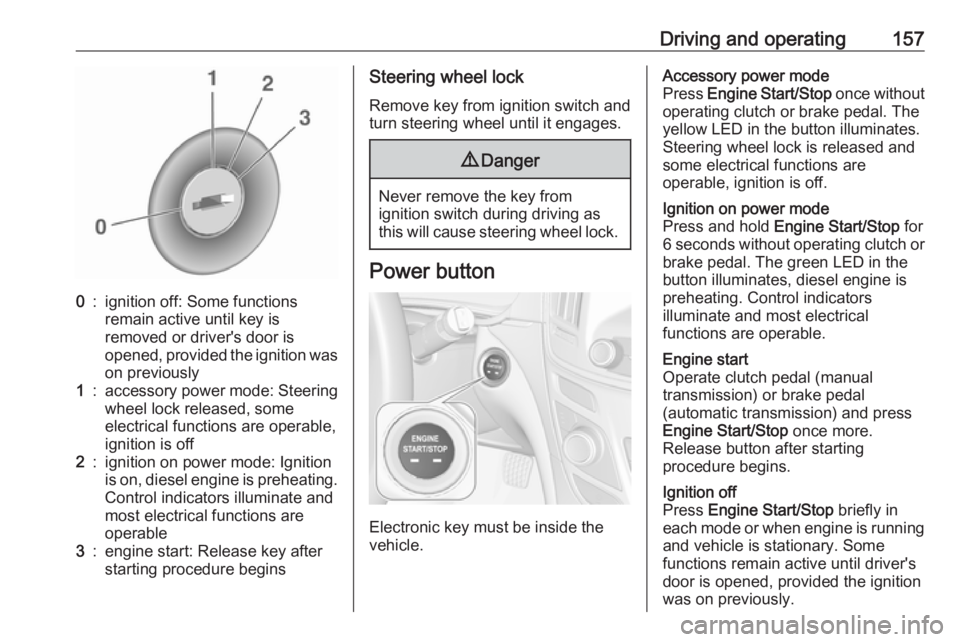
Driving and operating1570:ignition off: Some functions
remain active until key is
removed or driver's door is
opened, provided the ignition was
on previously1:accessory power mode: Steering wheel lock released, some
electrical functions are operable,
ignition is off2:ignition on power mode: Ignition
is on, diesel engine is preheating.
Control indicators illuminate and
most electrical functions are
operable3:engine start: Release key after
starting procedure beginsSteering wheel lock
Remove key from ignition switch and
turn steering wheel until it engages.9 Danger
Never remove the key from
ignition switch during driving as
this will cause steering wheel lock.
Power button
Electronic key must be inside the
vehicle.
Accessory power mode
Press Engine Start/Stop once without
operating clutch or brake pedal. The yellow LED in the button illuminates.
Steering wheel lock is released and
some electrical functions are
operable, ignition is off.Ignition on power mode
Press and hold Engine Start/Stop for
6 seconds without operating clutch or brake pedal. The green LED in the
button illuminates, diesel engine is
preheating. Control indicators
illuminate and most electrical
functions are operable.Engine start
Operate clutch pedal (manual
transmission) or brake pedal
(automatic transmission) and press
Engine Start/Stop once more.
Release button after starting
procedure begins.Ignition off
Press Engine Start/Stop briefly in
each mode or when engine is running and vehicle is stationary. Some
functions remain active until driver's
door is opened, provided the ignition
was on previously.
Page 160 of 327
158Driving and operatingEmergency shut off during driving
Press Engine Start/Stop for longer
than 2 seconds or press twice briefly
within 5 seconds 3 159.
Steering wheel lock The steering wheel lock activates
automatically when:
● The vehicle is stationary.
● The ignition has been switched off.
● The driver's door is opened.
To release steering wheel lock, open
and close driver's door and switch on accessory mode or start the engine
directly.9 Warning
If the vehicle battery is discharged,
the vehicle must not be towed,
tow-started or jump-started as the
steering wheel lock cannot be
disengaged.
Operation on vehicles with
electronic key system in case of
failure
If either the electronic key fails or the
battery of the electronic key is weak,
the Driver Information Centre may
display No Remote Detected or
Replace Battery in Remote Key when
you try to start the vehicle.
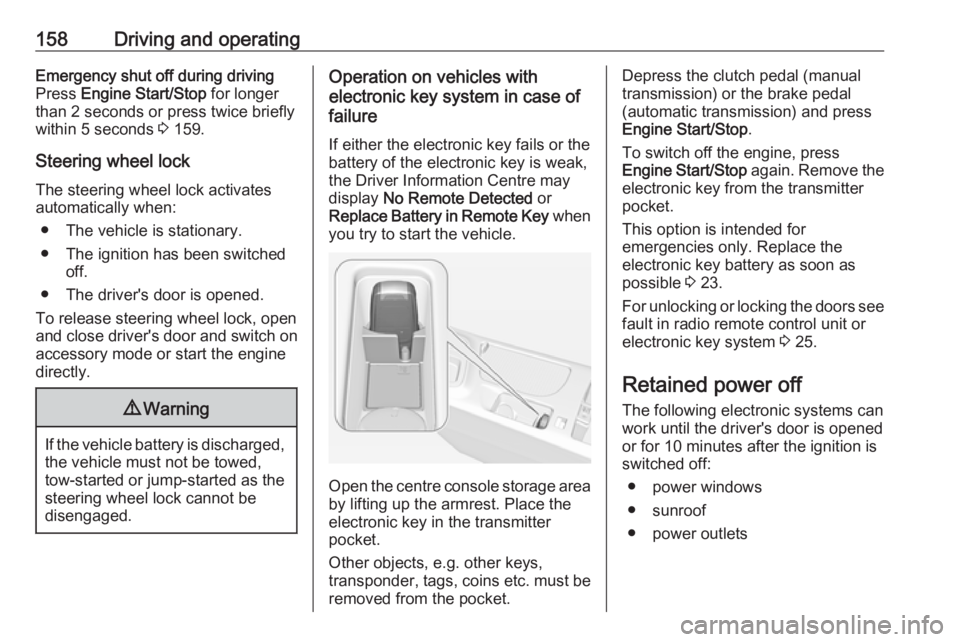
Open the centre console storage area by lifting up the armrest. Place the
electronic key in the transmitter
pocket.
Other objects, e.g. other keys,
transponder, tags, coins etc. must be
removed from the pocket.
Depress the clutch pedal (manual
transmission) or the brake pedal
(automatic transmission) and press
Engine Start/Stop .
To switch off the engine, press
Engine Start/Stop again. Remove the
electronic key from the transmitter
pocket.
This option is intended for
emergencies only. Replace the
electronic key battery as soon as
possible 3 23.
For unlocking or locking the doors see
fault in radio remote control unit or
electronic key system 3 25.
Retained power off
The following electronic systems can
work until the driver's door is opened
or for 10 minutes after the ignition is
switched off:
● power windows
● sunroof
● power outlets
Page 165 of 327
Driving and operating163Parking9Warning
● Do not park the vehicle on an
easily ignitable surface. The
high temperature of the
exhaust system could ignite the
surface.
● Always apply the parking brake. Activate the manual
parking brake without pressing the release button. Apply as
firmly as possible on a downhill slope or uphill slope. Depress
brake pedal at the same time to
reduce operating force.
For vehicles with electric
parking brake, pull switch m for
approx. one second.
The electric parking brake is
applied when control indicator
m illuminates 3 106.
● Switch off the engine.
● If the vehicle is on a level surface or uphill slope, engage
first gear or set the selector
lever to position P before
removing the ignition key or
switching off ignition on
vehicles with power button. On
an uphill slope, turn the front
wheels away from the kerb.
If the vehicle is on a downhill
slope, engage reverse gear or
set the selector lever to position
P before removing the ignition
key or switching off ignition on
vehicles with power button.
Turn the front wheels towards
the kerb.
● Close the windows and the sunroof.
● Remove the ignition key from the ignition switch or switch off
ignition on vehicles with power
button. Turn the steering wheel until the steering wheel lock is
felt to engage.
For vehicles with automatic
transmission, the key can only
be removed when the selector
lever is in position P.●
Lock the vehicle with button e on
the radio remote control.
Activate the anti-theft alarm
system 3 35.
● The engine cooling fans may run
after the engine has been
switched off 3 228.Caution
After running at high engine
speeds or with high engine loads,
operate the engine briefly at a low load or run in neutral for
approx. 30 seconds before
switching off, in order to protect
the turbocharger.
Note
In the event of an accident with
airbag deployment, the engine is
turned off automatically if the vehicle
comes to a standstill within a certain time.
Page 170 of 327
168Driving and operatingThe vehicle must be parked on a levelsurface.
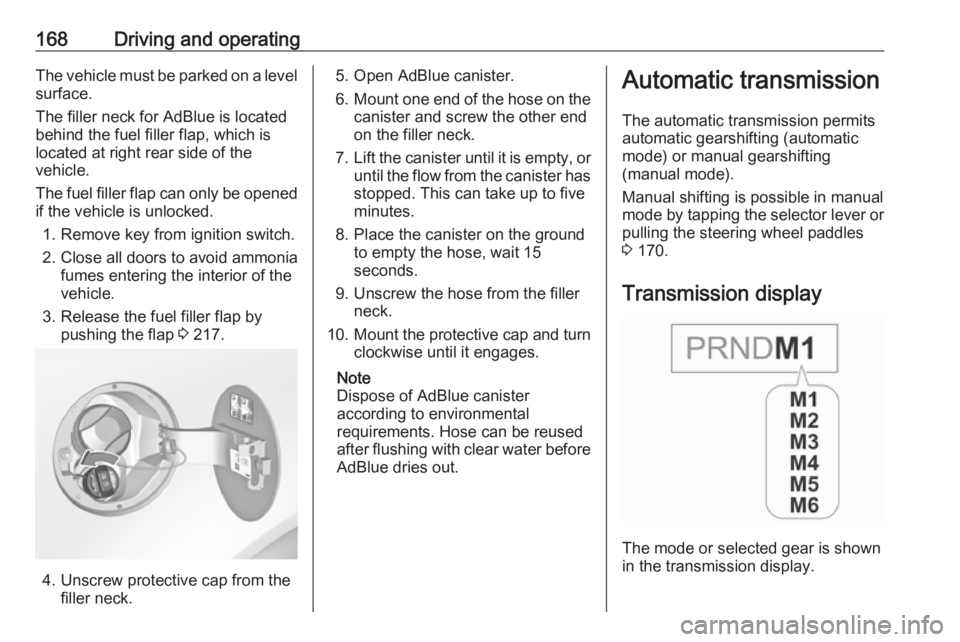
The filler neck for AdBlue is located behind the fuel filler flap, which islocated at right rear side of the
vehicle.
The fuel filler flap can only be opened
if the vehicle is unlocked.
1. Remove key from ignition switch.2. Close all doors to avoid ammonia fumes entering the interior of the
vehicle.
3. Release the fuel filler flap by pushing the flap 3 217.
4. Unscrew protective cap from the
filler neck.
5. Open AdBlue canister.
6. Mount one end of the hose on the
canister and screw the other end
on the filler neck.
7. Lift the canister until it is empty, or
until the flow from the canister has stopped. This can take up to five
minutes.
8. Place the canister on the ground to empty the hose, wait 15
seconds.
9. Unscrew the hose from the filler neck.
10. Mount the protective cap and turn
clockwise until it engages.
Note
Dispose of AdBlue canister
according to environmental
requirements. Hose can be reused
after flushing with clear water before
AdBlue dries out.Automatic transmission
The automatic transmission permits
automatic gearshifting (automatic
mode) or manual gearshifting
(manual mode).
Manual shifting is possible in manual
mode by tapping the selector lever or pulling the steering wheel paddles
3 170.
Transmission display
The mode or selected gear is shown
in the transmission display.
Page 171 of 327
Driving and operating169In automatic mode, the driving
programme is indicated by D in the
Driver Information Centre.
In manual mode, M and the number
of the selected gear is indicated.
R indicates reverse gear.
N indicates neutral position.
P indicates park position.
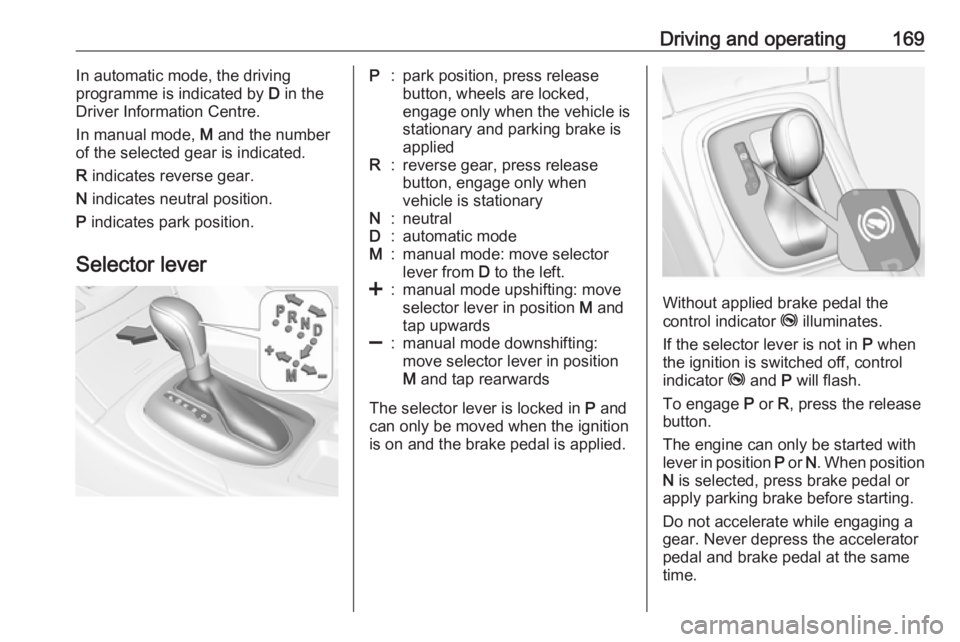
Selector leverP:park position, press release
button, wheels are locked,
engage only when the vehicle is
stationary and parking brake is
appliedR:reverse gear, press release
button, engage only when
vehicle is stationaryN:neutralD:automatic modeM:manual mode: move selector
lever from D to the left.<:manual mode upshifting: move
selector lever in position M and
tap upwards]:manual mode downshifting:
move selector lever in position
M and tap rearwards
The selector lever is locked in P and
can only be moved when the ignition
is on and the brake pedal is applied.
Without applied brake pedal the
control indicator j illuminates.
If the selector lever is not in P when
the ignition is switched off, control
indicator j and P will flash.
To engage P or R, press the release
button.
The engine can only be started with
lever in position P or N. When position
N is selected, press brake pedal or
apply parking brake before starting.
Do not accelerate while engaging a
gear. Never depress the accelerator
pedal and brake pedal at the same
time.
Page 174 of 327
172Driving and operatingFault
In the event of a fault a vehicle
message is displayed in the Driver
Information Centre. Vehicle
messages 3 120.
The transmission no longer shifts
automatically. Continued travel is
possible with manual shifting.
Only the highest gear is available.
Depending on the fault, 2nd gear may also be available in manual mode.
Shift only when vehicle is stationary.
Have the cause of the fault remedied
by a workshop.
Interruption of power supply In the event of an interruption of
power supply, the selector lever
cannot be moved out of the P
position. The ignition key cannot be
removed from the ignition switch.
If the vehicle battery is discharged,
start the vehicle using jump leads
3 267.
If the vehicle battery is not the cause
of the fault, release the selector lever.
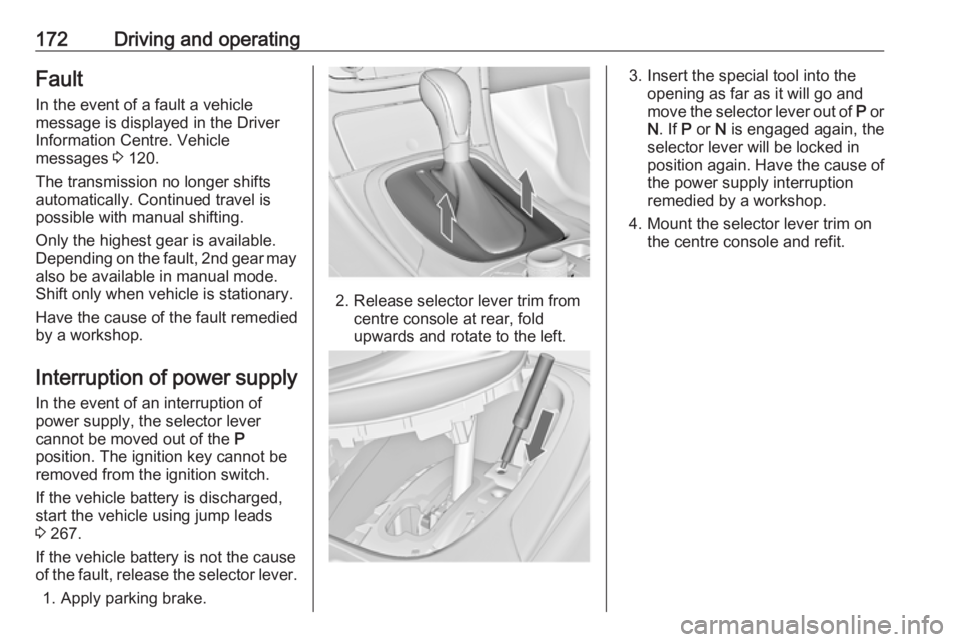
1. Apply parking brake.
2. Release selector lever trim from centre console at rear, fold
upwards and rotate to the left.
3. Insert the special tool into the opening as far as it will go and
move the selector lever out of P or
N . If P or N is engaged again, the
selector lever will be locked in
position again. Have the cause of
the power supply interruption
remedied by a workshop.
4. Mount the selector lever trim on the centre console and refit.
Page 176 of 327
174Driving and operatingBrakes
The brake system comprises two
independent brake circuits.
If a brake circuit fails, the vehicle can
still be braked using the other brake
circuit. However, braking effect is
achieved only when the brake pedal
is depressed firmly. Considerably
more force is needed for this. The
braking distance is extended. Seek the assistance of a workshop before
continuing the journey.
When the engine is not running, the
support of the brake servo unit
disappears once the brake pedal has been depressed once or twice.
Braking effect is not reduced, but
braking requires significantly greater
force. It is especially important to bear this in mind when being towed.
Control indicator R 3 106.
Antilock brake system
Antilock brake system (ABS)
prevents the wheels from locking.ABS starts to regulate brake pressure as soon as a wheel shows a tendency to lock. The vehicle remains
steerable, even during hard braking.
ABS control is made apparent
through a pulse in the brake pedal
and the noise of the regulation
process.
For optimum braking, keep the brake
pedal fully depressed throughout the
braking process, despite the fact that the pedal is pulsating. Do not reduce
the pressure on the pedal.
After starting off, the system performs
a self-test which may be audible.
Control indicator u 3 107.
Adaptive brake light During full braking, all three brake
lights flash for the duration of ABS
control.
Fault9 Warning
If there is a fault in the ABS, the
wheels may be liable to lock due
to braking that is heavier than
normal. The advantages of ABS are no longer available. During
hard braking, the vehicle can no longer be steered and may
swerve.
Have the cause of the fault remedied
by a workshop.
Page 181 of 327
Driving and operating179Interactive driving systemFlex Ride
Flex Ride driving system allows the
driver to select between three driving
modes:
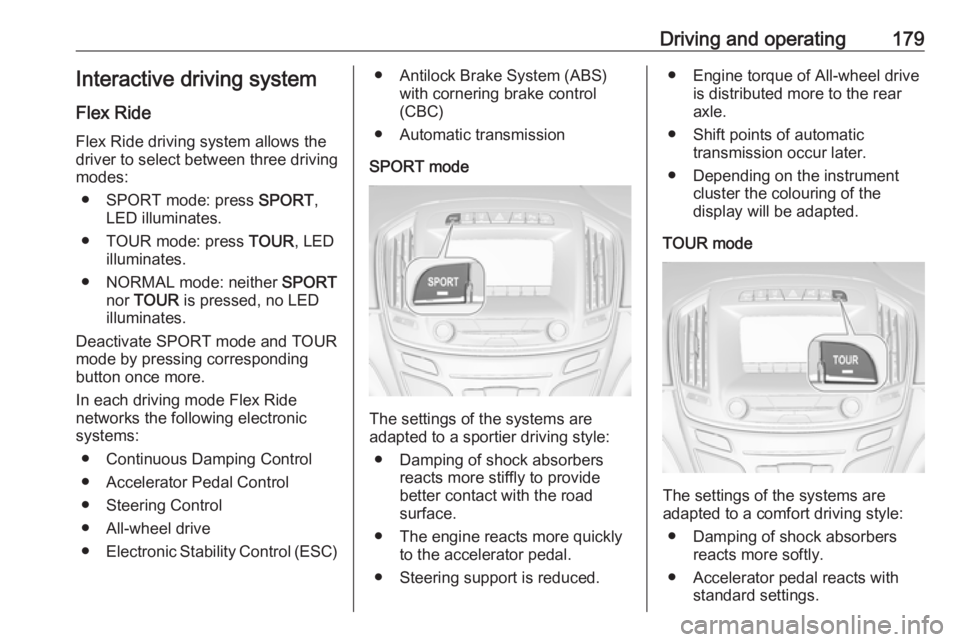
● SPORT mode: press SPORT,
LED illuminates.
● TOUR mode: press TOUR, LED
illuminates.
● NORMAL mode: neither SPORT
nor TOUR is pressed, no LED
illuminates.
Deactivate SPORT mode and TOUR
mode by pressing corresponding
button once more.
In each driving mode Flex Ride
networks the following electronic
systems:
● Continuous Damping Control
● Accelerator Pedal Control
● Steering Control
● All-wheel drive
● Electronic Stability Control (ESC)● Antilock Brake System (ABS)
with cornering brake control
(CBC)
● Automatic transmission
SPORT mode
The settings of the systems are
adapted to a sportier driving style:
● Damping of shock absorbers reacts more stiffly to providebetter contact with the road
surface.
● The engine reacts more quickly to the accelerator pedal.
● Steering support is reduced.
● Engine torque of All-wheel drive is distributed more to the rear
axle.
● Shift points of automatic transmission occur later.
● Depending on the instrument cluster the colouring of the
display will be adapted.
TOUR mode
The settings of the systems are
adapted to a comfort driving style:
● Damping of shock absorbers reacts more softly.
● Accelerator pedal reacts with standard settings.
Page 183 of 327
Driving and operating181OPC Flex Ride driving system allows
the driver to select between three
driving modes:
● OPC mode: press OPC, LED
illuminates.
● SPORT mode: press SPORT,
LED illuminates.
● NORMAL mode: neither SPORT
nor OPC is pressed, no LED
illuminates.
Deactivate SPORT mode and OPC
mode by pressing corresponding
button once more.
In each driving mode OPC Flex Ride
networks the following electronic
systems:
● Continuous Damping Control
● Accelerator Pedal Control
● Steering Control
● All-wheel drive
● Electronic Stability Control (ESC)
● Antilock Brake System (ABS) with cornering brake control
(CBC)
● Automatic transmissionOPC mode
The drive dynamic characteristics are
adapted to high performance
settings.
Depending on the instrument cluster the colouring of the display will beadapted.
SPORT mode
The settings of the systems are
adapted to a sportier driving style.
NORMAL mode
In NORMAL mode, when neither SPORT nor OPC is pressed, all
settings of the systems are adapted
to standard values.
Personalised settings in the OPC mode
The driver can select the functions of
the OPC mode when OPC is pressed.
Select the relevant settings in
Settings , I Sport Mode in the Colour-
Info-Display.
Colour-Info-Display 3 118.
Vehicle personalisation 3 121.Driver assistance
systems9 Warning
Driver assistance systems are
developed to support the driver
and not to replace the driver's
attention.
The driver accepts full
responsibility when driving the
vehicle.
When using driver assistance
systems, always take care
regarding the current traffic
situation.
Cruise control
The cruise control can store and
maintain speeds of approx. 30 to
200 km/h. Deviations from the stored
speeds may occur when driving uphill or downhill.
For safety reasons, the cruise control cannot be activated until the brake
pedal has been operated once.
Activating in first gear is not possible.
Page 190 of 327
188Driving and operating
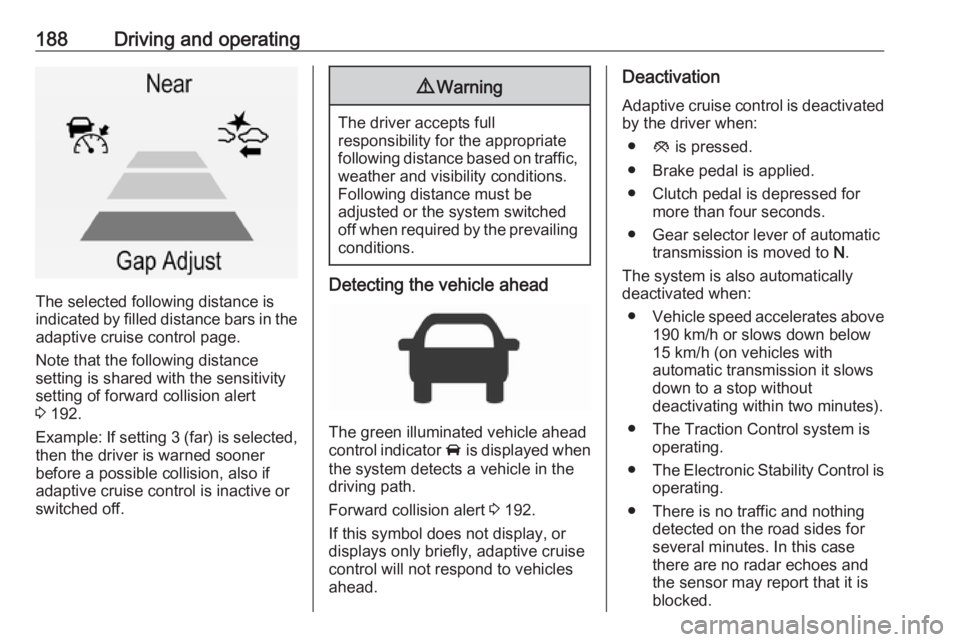
The selected following distance is
indicated by filled distance bars in the
adaptive cruise control page.
Note that the following distance
setting is shared with the sensitivity
setting of forward collision alert
3 192.
Example: If setting 3 (far) is selected,
then the driver is warned sooner
before a possible collision, also if
adaptive cruise control is inactive or
switched off.
9 Warning
The driver accepts full
responsibility for the appropriate
following distance based on traffic, weather and visibility conditions.
Following distance must be
adjusted or the system switched
off when required by the prevailing
conditions.
Detecting the vehicle ahead
The green illuminated vehicle ahead
control indicator A is displayed when
the system detects a vehicle in the driving path.
Forward collision alert 3 192.
If this symbol does not display, or displays only briefly, adaptive cruise
control will not respond to vehicles
ahead.
Deactivation
Adaptive cruise control is deactivated by the driver when:
● y is pressed.
● Brake pedal is applied.
● Clutch pedal is depressed for more than four seconds.
● Gear selector lever of automatic transmission is moved to N.
The system is also automatically deactivated when:
● Vehicle speed accelerates above
190 km/h or slows down below
15 km/h (on vehicles with
automatic transmission it slows
down to a stop without
deactivating within two minutes).
● The Traction Control system is operating.
● The Electronic Stability Control is
operating.
● There is no traffic and nothing detected on the road sides for
several minutes. In this case
there are no radar echoes and
the sensor may report that it is blocked.