height OPEL INSIGNIA BREAK 2017.75 Owner's Manual
[x] Cancel search | Manufacturer: OPEL, Model Year: 2017.75, Model line: INSIGNIA BREAK, Model: OPEL INSIGNIA BREAK 2017.75Pages: 323, PDF Size: 9.18 MB
Page 9 of 323
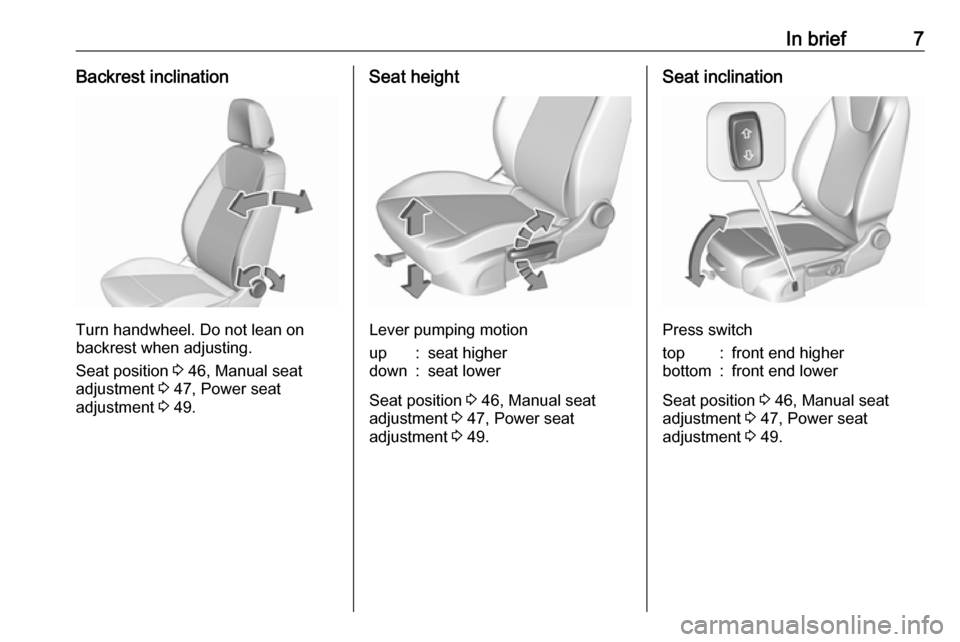
In brief7Backrest inclination
Turn handwheel. Do not lean on
backrest when adjusting.
Seat position 3 46, Manual seat
adjustment 3 47, Power seat
adjustment 3 49.
Seat height
Lever pumping motion
up:seat higherdown:seat lower
Seat position 3 46, Manual seat
adjustment 3 47, Power seat
adjustment 3 49.
Seat inclination
Press switch
top:front end higherbottom:front end lower
Seat position 3 46, Manual seat
adjustment 3 47, Power seat
adjustment 3 49.
Page 10 of 323
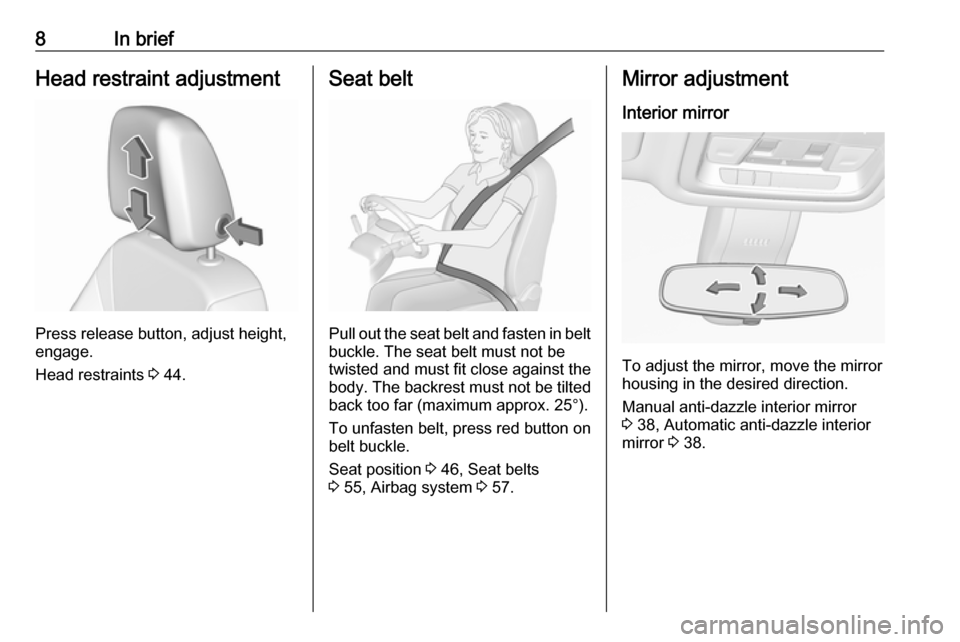
8In briefHead restraint adjustment
Press release button, adjust height,
engage.
Head restraints 3 44.
Seat belt
Pull out the seat belt and fasten in belt
buckle. The seat belt must not be
twisted and must fit close against the
body. The backrest must not be tilted back too far (maximum approx. 25°).
To unfasten belt, press red button on belt buckle.
Seat position 3 46, Seat belts
3 55, Airbag system 3 57.
Mirror adjustment
Interior mirror
To adjust the mirror, move the mirror
housing in the desired direction.
Manual anti-dazzle interior mirror
3 38, Automatic anti-dazzle interior
mirror 3 38.
Page 33 of 323

Keys, doors and windows31● press C on the open tailgate,
or
● press C on the inside of the
driver's door.
Pressing one of the switches again
will reverse the direction of
movement.
Operation modes
The power tailgate has three modes
of operation, which are controlled by
the switch C in the driver's door. To
change the mode, turn the switch:● Normal mode MAX: Power
tailgate opens to full height.
● Intermediate mode 3/4: Power
tailgate opens to a reduced
height that can be adjusted.
● Mode Off: Tailgate can only be
operated manually.
Adjust reduced opening height in
intermediate mode
1. Turn operation mode switch to 3/4 .
2. Open power tailgate with any operation switch.
3. Stop movement at the desired height by pressing any operation
switch. If required, manually move
the stopped tailgate to the desired
position.
4. Press and hold the button C on
the inside of the open tailgate for
three seconds.
Note
Adjusting opening height should be programmed at ground level.
A chime sound indicates the new
setting and the turn signal lights will
flash. The reduced height can only set
at an opening angle of above 30°.
When turning the adjuster wheel in
the driver's door to intermediate mode 3/4 , the power tailgate will stop
opening at the newly set position.
Page 34 of 323

32Keys, doors and windowsThe tailgate can only be held open if
a minimum height is exceeded
(minimum opening angle from 30°).
The opening height cannot be
programmed below that height.
Safety function
If the power tailgate encounters an
obstacle during opening or closing,
the direction of movement will
automatically be reversed slightly.
Multiple obstacles in one power cycle will deactivate the function. In this
case, close or open the tailgate
manually.
The power tailgate has pinch sensors
on the side edges. If the sensors
detect obstacles between tailgate and chassis, the tailgate will open, until it
is activated again or closed manually.
The safety function is indicated by a
warning chime.
Remove all obstacles before
resuming normal power operation.
If the vehicle is equipped with factory-
fitted towing equipment and a trailer
is electrically connected, the power
tailgate can only be opened with thetouchpad switch or closed with G in
the open tailgate. Ensure that there
are no obstacles in the moving area.
Overload
If the power tailgate is repeatedly
operated at short intervals, the
function is disabled for some time.
Move tailgate manually into end
position to reset the system.
General hints for operating
tailgate9 Danger
Do not drive with the tailgate open
or ajar, e.g. when transporting
bulky objects, since toxic exhaust
gases, which cannot be seen or
smelled, could enter the vehicle.
This can cause unconsciousness
and even death.
Caution
Before opening the tailgate, check overhead obstructions, e.g. a
garage door, to avoid damage to
the tailgate. Always check the
moving area above and behind the
tailgate.
Note
The installation of certain heavy
accessories onto the tailgate may
affect its ability to remain open.
Note
The operation of the power tailgate
is disabled under low vehicle battery
conditions. In this case, the tailgate
may not even be manually operable.
Note
With the power tailgate disabled and
all doors unlocked, the tailgate can
only be operated manually. In this
event, manually closing the tailgate
requires significantly greater force.
Note
At low outside temperatures the
tailgate may not open fully by itself.
In this event, lift the tailgate manually
to its normal end position.
Page 47 of 323
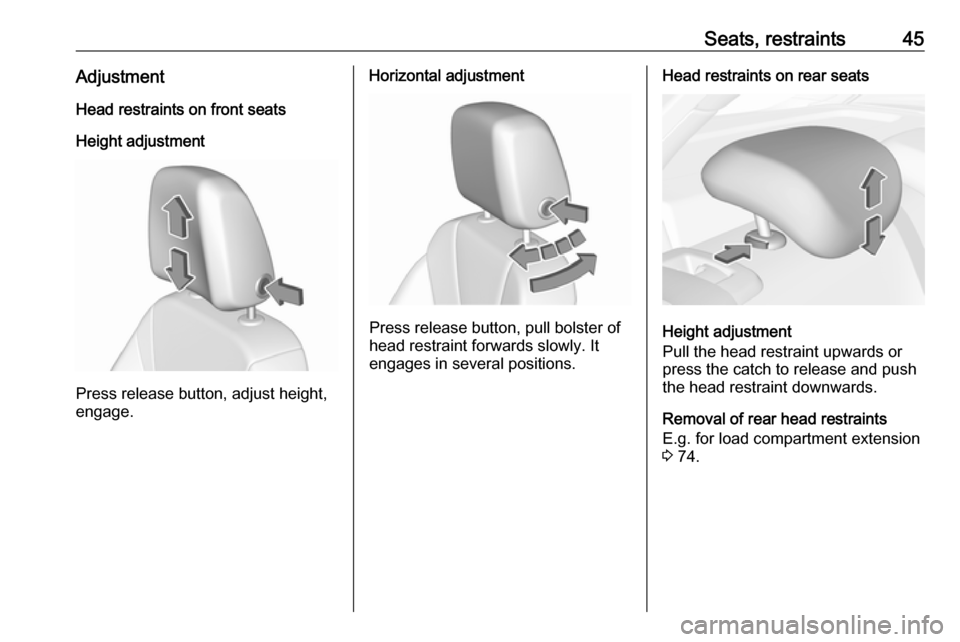
Seats, restraints45AdjustmentHead restraints on front seats
Height adjustment
Press release button, adjust height,
engage.
Horizontal adjustment
Press release button, pull bolster of
head restraint forwards slowly. It
engages in several positions.
Head restraints on rear seats
Height adjustment
Pull the head restraint upwards or
press the catch to release and push the head restraint downwards.
Removal of rear head restraints
E.g. for load compartment extension
3 74.
Page 48 of 323
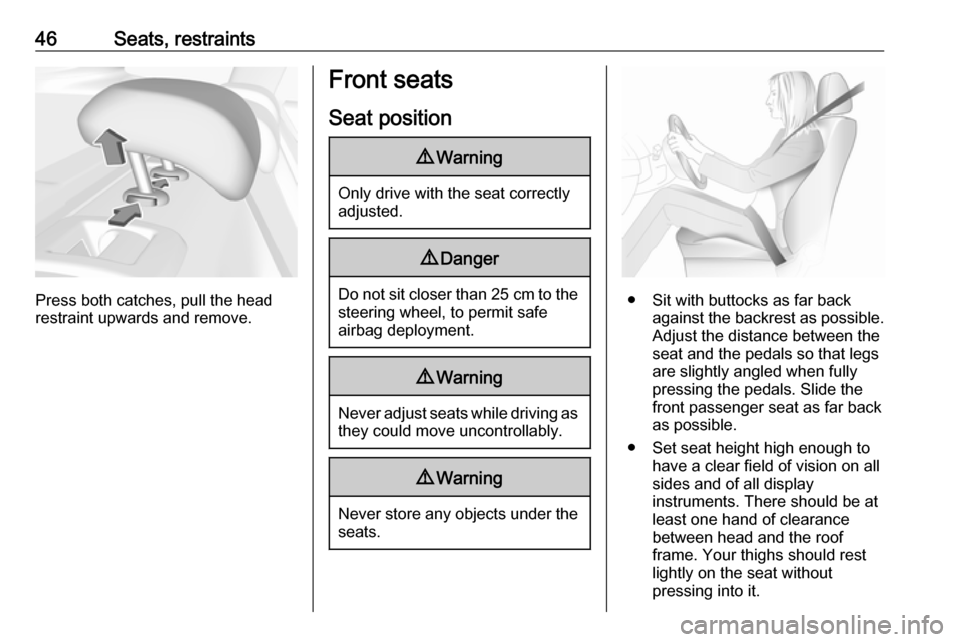
46Seats, restraints
Press both catches, pull the head
restraint upwards and remove.
Front seats
Seat position9 Warning
Only drive with the seat correctly
adjusted.
9 Danger
Do not sit closer than 25 cm to the
steering wheel, to permit safe
airbag deployment.
9 Warning
Never adjust seats while driving as
they could move uncontrollably.
9 Warning
Never store any objects under the
seats.
● Sit with buttocks as far back against the backrest as possible.
Adjust the distance between the
seat and the pedals so that legs
are slightly angled when fully
pressing the pedals. Slide the
front passenger seat as far back
as possible.
● Set seat height high enough to have a clear field of vision on all
sides and of all display
instruments. There should be at
least one hand of clearance
between head and the roof
frame. Your thighs should rest
lightly on the seat without
pressing into it.
Page 50 of 323
48Seats, restraintsSeat height
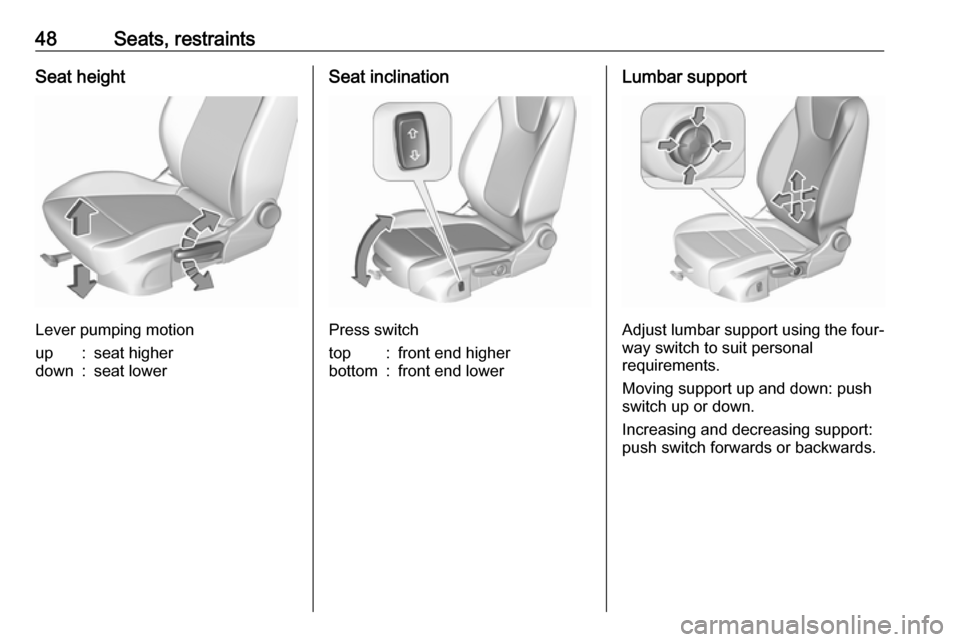
Lever pumping motion
up:seat higherdown:seat lowerSeat inclination
Press switch
top:front end higherbottom:front end lowerLumbar support
Adjust lumbar support using the four-way switch to suit personal
requirements.
Moving support up and down: push switch up or down.
Increasing and decreasing support:
push switch forwards or backwards.
Page 51 of 323
Seats, restraints49Adjustable thigh support
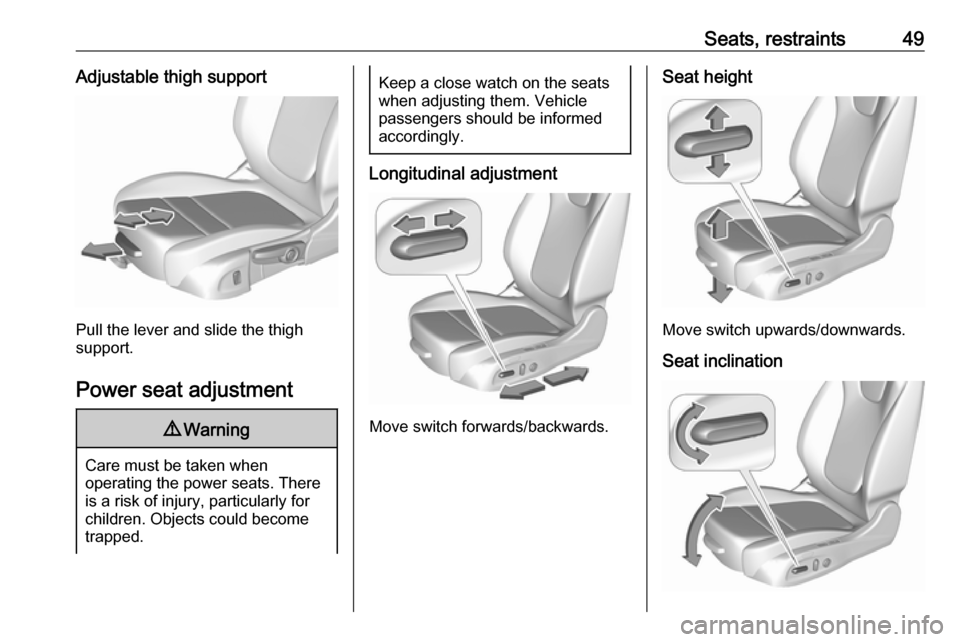
Pull the lever and slide the thigh
support.
Power seat adjustment
9 Warning
Care must be taken when
operating the power seats. There
is a risk of injury, particularly for
children. Objects could become
trapped.
Keep a close watch on the seats
when adjusting them. Vehicle
passengers should be informed
accordingly.
Longitudinal adjustment
Move switch forwards/backwards.
Seat height
Move switch upwards/downwards.
Seat inclination
Page 70 of 323

68Seats, restraintsIL:suitable for particular ISOFIX restraint systems of the 'specific-vehicle', 'restricted' or 'semi-universal' categories.
The ISOFIX restraint system must be approved for the specific vehicle type (refer to the vehicle type list of the child restraint system)IUF:suitable for ISOFIX forward-facing child restraint systems of universal category approved for use in this weight classX:no ISOFIX child restraint system approved in this weight class1:move seat forwards as far as necessary and adjust seat backrest inclination as far as necessary to a vertical positionto ensure that the belt runs forwards from the upper anchorage point2:move seat height adjustment upwards as far as necessary and adjust seat backrest inclination as far as necessary
to a vertical position to ensure that the belt is tight on the buckle side3:move the respective front seat ahead of the child restraint system forwards as far as necessary4:adjust the respective headrest as necessary or remove if required
ISOFIX size class and seat device
A – ISO/F3:forward-facing child restraint system for children of maximum size in the weight class 9 to 18 kgB – ISO/F2:forward-facing child restraint system for smaller children in the weight class 9 to 18 kgB1 – ISO/F2X:forward-facing child restraint system for smaller children in the weight class 9 to 18 kgC – ISO/R3:rear-facing child restraint system for children of maximum size in the weight class up to 18 kgD – ISO/R2:rear-facing child restraint system for smaller children in the weight class up to 18 kgE – ISO/R1:rear-facing child restraint system for young children in the weight class up to 13 kgF– ISO/L1:left lateral facing position child restraint system (carry-cot)G – ISO/L2:right lateral facing position child restraint system (carry-cot)
Permissible options for fitting an i-Size child restraint system with ISOFIX brackets
On front passenger seat
On rear outboard seatsOn rear centre seat
activated airbagdeactivated airbagi-Size child restraint systemsXXi - UX
Page 126 of 323
124Instruments and controlsThe image can temporarily light up
depending on angel and position of
sunlight.
Switching off
Hold down & to turn the head-up
display off.
Language Preferred language can be set invehicle personalisation menu 3 126.
Units Units can be changed in the settings
menu of the Driver Information Centre
3 113.
Care of head-up display Clean the inside of the windscreen as
needed to remove any dirt or film that
could reduce the sharpness or clarity
of the head-up image.
Clean the head-up display lens in the instrument panel with a soft cloth
sprayed with glass cleaner. Wipe the
lens gently, then dry it.System limitations
Head-up display may not operate
properly when:
● The lens in the instrument panel is covered by objects or
windscreen and lens are not
clean.
● Display brightness is too dim or bright.
● Image is not adjusted to the proper height.
● The driver wears polarised sunglasses.
If the head-up image is not correct for other reasons, contact a workshop.
The windscreen is part of the head-up
display system. Windscreen
replacement 3 38.Vehicle messages
Messages are indicated in the Driver
Information Centre, in some cases
together with a warning and signal
buzzer.
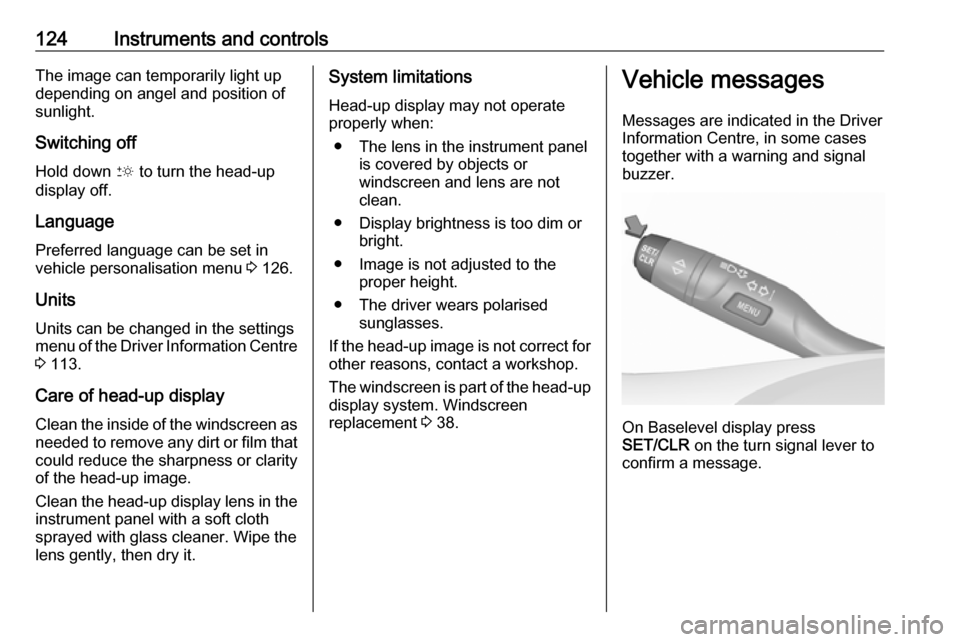
On Baselevel display press
SET/CLR on the turn signal lever to
confirm a message.