clock OPEL INSIGNIA BREAK 2018.5 Manual user
[x] Cancel search | Manufacturer: OPEL, Model Year: 2018.5, Model line: INSIGNIA BREAK, Model: OPEL INSIGNIA BREAK 2018.5Pages: 329, PDF Size: 9.32 MB
Page 256 of 329

254Vehicle careReverse light
6. Insert the bulb socket into the tail light assembly. Fit light assembly
on the tailgate and tighten the
screw from the inside. Attach
cover.
Sports Tourer, Country Tourer
Light assembly in the body
1. Open the covers with screwdriver.
Unscrew and remove both
screws.
2. Carefully withdraw tail light assembly from recess and
remove. Take care that the cable
duct remains in position.
3. Turn the turn signal light bulb socket anticlockwise and removeit from the light assembly.
4. Detach the bulb from the bulb socket and replace the turn signal
light bulb.
5. Attach the bulb socket to the light assembly.
6. Attach the light assembly to the vehicle body and tighten the
screws. Close covers.
Page 257 of 329

Vehicle care255Light assembly in the tailgate
1. Release the cover in the tailgateand remove it.
2. Unscrew the plastic securing nutby hand.
3. Carefully withdraw the lightassembly from the recesses and
remove. Take care that the cable
duct remains in position.
4. Turn the bulb socket anticlockwise and remove it from
the light assembly.
Rear fog light ( 1)
Reverse light ( 2)
5. Detach the bulb from the bulb socket and replace the bulb.
Rear fog light
Page 258 of 329

256Vehicle care
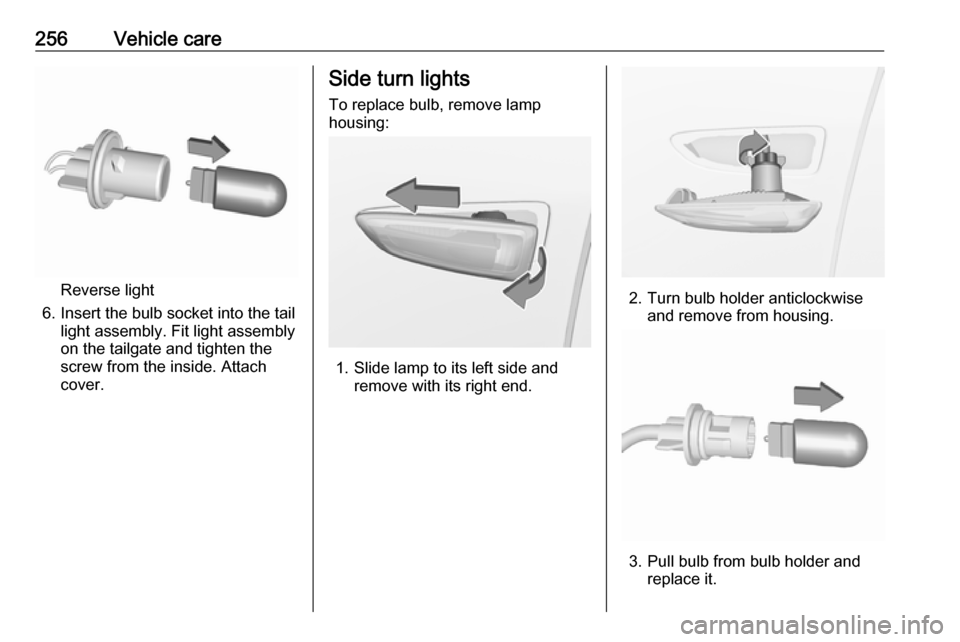
Reverse light
6. Insert the bulb socket into the tail light assembly. Fit light assembly
on the tailgate and tighten the
screw from the inside. Attach
cover.
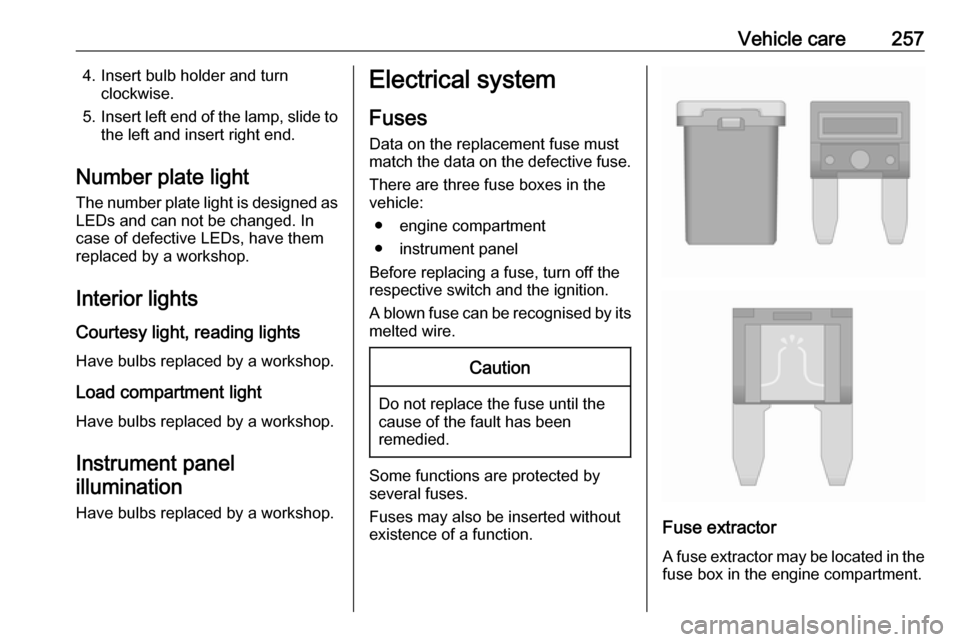
Side turn lights
To replace bulb, remove lamp
housing:
1. Slide lamp to its left side and remove with its right end.
2. Turn bulb holder anticlockwiseand remove from housing.
3. Pull bulb from bulb holder and replace it.
Page 259 of 329

Vehicle care2574. Insert bulb holder and turnclockwise.
5. Insert left end of the lamp, slide to
the left and insert right end.
Number plate light
The number plate light is designed as LEDs and can not be changed. Incase of defective LEDs, have them
replaced by a workshop.
Interior lights
Courtesy light, reading lights Have bulbs replaced by a workshop.
Load compartment light
Have bulbs replaced by a workshop.
Instrument panelillumination
Have bulbs replaced by a workshop.Electrical system
Fuses Data on the replacement fuse mustmatch the data on the defective fuse.
There are three fuse boxes in the
vehicle:
● engine compartment
● instrument panel
Before replacing a fuse, turn off the
respective switch and the ignition.
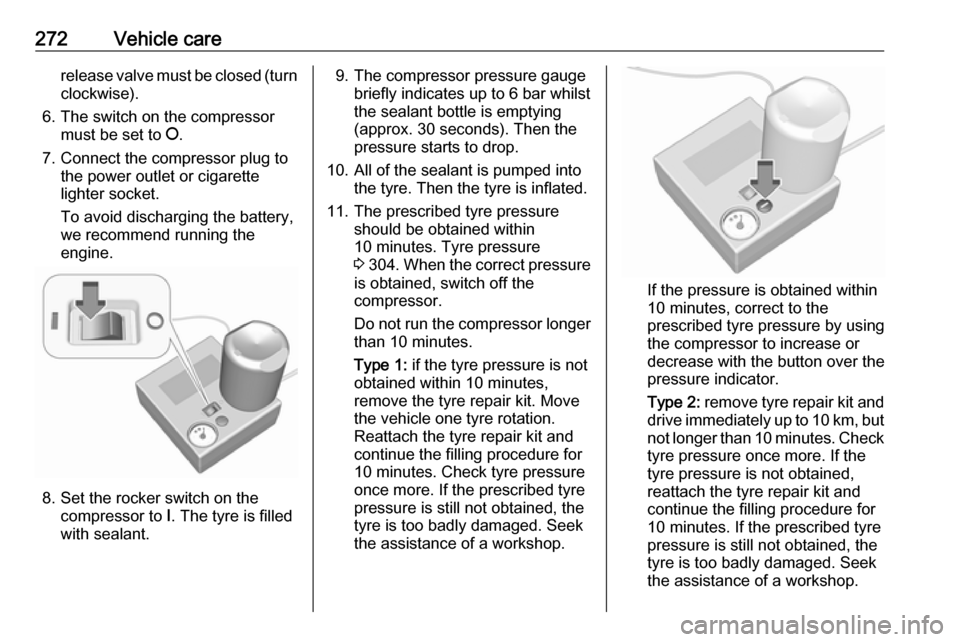
A blown fuse can be recognised by its melted wire.Caution
Do not replace the fuse until the
cause of the fault has been
remedied.
Some functions are protected by
several fuses.
Fuses may also be inserted without
existence of a function.
Fuse extractor
A fuse extractor may be located in the
fuse box in the engine compartment.
Page 274 of 329

272Vehicle carerelease valve must be closed (turnclockwise).
6. The switch on the compressor must be set to J.
7. Connect the compressor plug to the power outlet or cigarette
lighter socket.
To avoid discharging the battery, we recommend running the
engine.
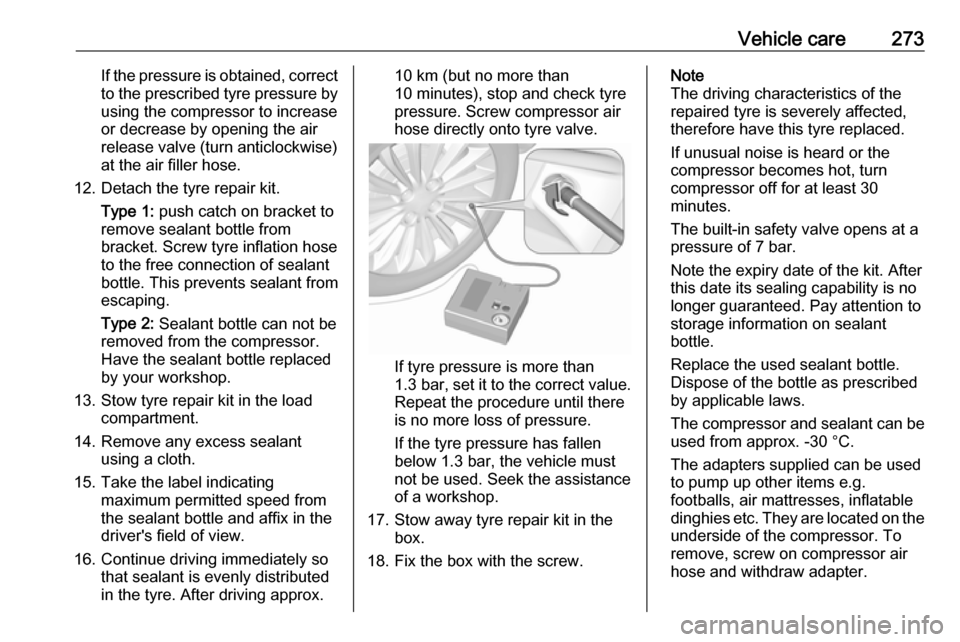
8. Set the rocker switch on the compressor to I. The tyre is filled
with sealant.
9. The compressor pressure gauge briefly indicates up to 6 bar whilstthe sealant bottle is emptying
(approx. 30 seconds). Then the
pressure starts to drop.
10. All of the sealant is pumped into the tyre. Then the tyre is inflated.
11. The prescribed tyre pressure should be obtained within
10 minutes. Tyre pressure
3 304 . When the correct pressure
is obtained, switch off the
compressor.
Do not run the compressor longer than 10 minutes.
Type 1: if the tyre pressure is not
obtained within 10 minutes,
remove the tyre repair kit. Move
the vehicle one tyre rotation.
Reattach the tyre repair kit and
continue the filling procedure for
10 minutes. Check tyre pressure
once more. If the prescribed tyre
pressure is still not obtained, the
tyre is too badly damaged. Seek
the assistance of a workshop.
If the pressure is obtained within
10 minutes, correct to the
prescribed tyre pressure by using
the compressor to increase or
decrease with the button over the
pressure indicator.
Type 2: remove tyre repair kit and
drive immediately up to 10 km, but
not longer than 10 minutes. Check tyre pressure once more. If the
tyre pressure is not obtained,
reattach the tyre repair kit and
continue the filling procedure for
10 minutes. If the prescribed tyre
pressure is still not obtained, the
tyre is too badly damaged. Seek
the assistance of a workshop.
Page 275 of 329

Vehicle care273If the pressure is obtained, correctto the prescribed tyre pressure byusing the compressor to increase
or decrease by opening the air
release valve (turn anticlockwise)
at the air filler hose.
12. Detach the tyre repair kit. Type 1: push catch on bracket to
remove sealant bottle from
bracket. Screw tyre inflation hose
to the free connection of sealant
bottle. This prevents sealant from
escaping.
Type 2: Sealant bottle can not be
removed from the compressor.
Have the sealant bottle replaced
by your workshop.
13. Stow tyre repair kit in the load compartment.
14. Remove any excess sealant using a cloth.
15. Take the label indicating maximum permitted speed from
the sealant bottle and affix in the
driver's field of view.
16. Continue driving immediately so that sealant is evenly distributedin the tyre. After driving approx.10 km (but no more than
10 minutes), stop and check tyre
pressure. Screw compressor air
hose directly onto tyre valve.
If tyre pressure is more than
1.3 bar , set it to the correct value.
Repeat the procedure until there
is no more loss of pressure.
If the tyre pressure has fallen
below 1.3 bar, the vehicle must
not be used. Seek the assistance
of a workshop.
17. Stow away tyre repair kit in the box.
18. Fix the box with the screw.
Note
The driving characteristics of the
repaired tyre is severely affected,
therefore have this tyre replaced.
If unusual noise is heard or the
compressor becomes hot, turn
compressor off for at least 30
minutes.
The built-in safety valve opens at a
pressure of 7 bar.
Note the expiry date of the kit. After
this date its sealing capability is no
longer guaranteed. Pay attention to
storage information on sealant
bottle.
Replace the used sealant bottle. Dispose of the bottle as prescribed
by applicable laws.
The compressor and sealant can be used from approx. -30 °C.
The adapters supplied can be used
to pump up other items e.g.
footballs, air mattresses, inflatable
dinghies etc. They are located on the
underside of the compressor. To
remove, screw on compressor air hose and withdraw adapter.
Page 279 of 329

Vehicle care277To remove:1. Open the floor cover.
2. The spare wheel is secured with a
wing nut. Turn wing nut
anticlockwise and remove the
spare wheel.
Under the spare wheel there is the
box with vehicle tools.
3. When, after a wheel change, no wheel is placed in the spare wheelwell, secure the tool box by
turning right back the wing nut and
close the floor cover.
4. After wheel change back to full size wheel, place the spare wheel
outside up in the well and secure
with the wing nut.
Stowing the replaced full size
wheel in the spare wheel well
Secure a damaged full size wheel
facing upwards with the wing nut in
the spare wheel well after mounting
an extension bolt on the thread bolt.
The extension bolt is stowed with the
vehicle tools 3 262. To secure the
wheel:
1. Stick the extension bolt onto the thread bolt.
2. Store the damaged wheel outside
up in the spare wheel well and
secure it by turning the wing nut
clockwise on the extension bolt.
9 Warning
Storing a jack, a wheel or other
equipment in the load
compartment could cause injury if they are not fixed properly. During
a sudden stop or a collision, looseequipment could strike someone.
Store wheel, jack and tools always
in the original storage location and secure them by fixing.
Temporary spare wheel
Caution
The use of a spare wheel that issmaller than the other wheels or in combination with winter tyres
could affect driveability. Have the defective tyre replaced as soon as
possible.
Only mount one temporary spare
wheel. Do not drive faster than
80 km/h. Take curves slowly. Do not use for a long period of time.
If your vehicle gets a flat tyre on the
rear while towing another vehicle,
mount the temporary spare wheel in the front and the full tyre in the rear.
Tyre chains 3 269.
Page 325 of 329

323Child restraints.............................. 64
Child restraint systems ................64
Climate control ............................. 16
Clock............................................. 93
Collision damage repair ..............314
Control indicators........................ 107
Control of the vehicle .................163
Controls ........................................ 89
Convex shape .............................. 37
Coolant and antifreeze ...............286
Cruise control ....................113, 189
Cupholders .................................. 73
Curtain airbag system .................. 62
Curve lighting.............................. 140
D Danger, Warnings and Cautions ...4
Daytime running lights ...............140
Declaration of conformity ............310
DEF ............................................ 172
Diesel exhaust fluid ....................172
Diesel fuel system bleeding .......246
Diesel particle filter ....................170
Door open .................................. 113
Doors ............................................ 28
Driver assistance systems ..........189
Driver Information Centre ...........114
Driving characteristics and towing tips .............................. 235
Driving hints ................................ 163E
Electric adjustment ......................37
Electrical system......................... 257
Electric parking brake .........109, 181
Electric parking brake fault .........109
Electronic climate control system 153
Electronic key system ...................22
Electronic Stability Control.......... 185
Electronic Stability Control and Traction Control system ..........110
Electronic Stability Control off..... 110
End-of-life vehicle recovery .......240
Engine compartment fuse box ...258
Engine coolant ........................... 243
Engine coolant temperature ......111
Engine coolant temperature gauge ..................................... 106
Engine data ............................... 294
Engine exhaust .......................... 170
Engine identification ...................290
Engine oil ................... 242, 286, 291
Engine oil pressure ....................111
Entry lighting .............................. 147
Event data recorders ..................317
Exit lighting ................................ 147
Exterior care .............................. 281
Exterior light ............................... 112
Exterior lighting ....................13, 136
Exterior mirrors ............................. 37F
First aid kit ................................... 84
Fixed air vents ........................... 160
Fog light ..................................... 112
Fog lights ................................... 249
Folding mirrors ............................. 37
Following distance ......................110
Following distance indication ......202
Forward collision alert................. 200
Front airbag system .....................61
Front fog lights ........................... 144
Front pedestrian protection ........206
Front seats.................................... 47
Front storage ................................ 74
Fuel............................................. 231
Fuel for diesel engines ..............232
Fuel for petrol engines ...............231
Fuel gauge ................................. 105
Funnel......................................... 233
Fuses ......................................... 257
G Gauges ....................................... 103
Gear shifting ............................... 110
General information ...................235
Glovebox ..................................... 73
H Halogen headlights ....................247
Hand brake ................................. 180
Hazard warning flashers ............143