check engine OPEL INSIGNIA BREAK 2018.5 Owner's Guide
[x] Cancel search | Manufacturer: OPEL, Model Year: 2018.5, Model line: INSIGNIA BREAK, Model: OPEL INSIGNIA BREAK 2018.5Pages: 329, PDF Size: 9.32 MB
Page 274 of 329

272Vehicle carerelease valve must be closed (turnclockwise).
6. The switch on the compressor must be set to J.
7. Connect the compressor plug to the power outlet or cigarette
lighter socket.
To avoid discharging the battery, we recommend running the
engine.
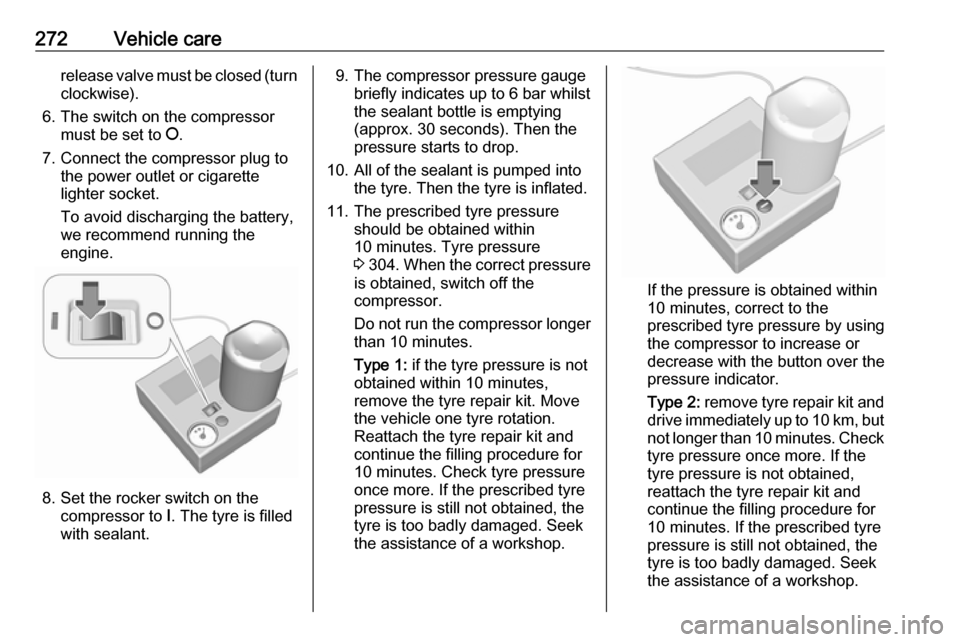
8. Set the rocker switch on the compressor to I. The tyre is filled
with sealant.
9. The compressor pressure gauge briefly indicates up to 6 bar whilstthe sealant bottle is emptying
(approx. 30 seconds). Then the
pressure starts to drop.
10. All of the sealant is pumped into the tyre. Then the tyre is inflated.
11. The prescribed tyre pressure should be obtained within
10 minutes. Tyre pressure
3 304 . When the correct pressure
is obtained, switch off the
compressor.
Do not run the compressor longer than 10 minutes.
Type 1: if the tyre pressure is not
obtained within 10 minutes,
remove the tyre repair kit. Move
the vehicle one tyre rotation.
Reattach the tyre repair kit and
continue the filling procedure for
10 minutes. Check tyre pressure
once more. If the prescribed tyre
pressure is still not obtained, the
tyre is too badly damaged. Seek
the assistance of a workshop.
If the pressure is obtained within
10 minutes, correct to the
prescribed tyre pressure by using
the compressor to increase or
decrease with the button over the
pressure indicator.
Type 2: remove tyre repair kit and
drive immediately up to 10 km, but
not longer than 10 minutes. Check tyre pressure once more. If the
tyre pressure is not obtained,
reattach the tyre repair kit and
continue the filling procedure for
10 minutes. If the prescribed tyre
pressure is still not obtained, the
tyre is too badly damaged. Seek
the assistance of a workshop.
Page 292 of 329

290Technical dataInformation on identification plate:1:manufacturer2:type approval number3:vehicle identification number4:permissible gross vehicle weight
rating in kg5:permissible gross train weight in
kg6:maximum permissible front axle
load in kg7:maximum permissible rear axle
load in kg8:vehicle-specific or country-
specific data, e.g. MY = model
year
The combined total of front and rear
axle loads must not exceed the
permissible gross vehicle weight. For
example, if the front axle is bearing its
maximum permissible load, the rear
axle can only bear a load that is equal
to the gross vehicle weight minus the front axle load.
The technical data is determined in
accordance with European
Community standards. We reserve
the right to make modifications.
Specifications in the vehicle
documents always have priority over
those given in this manual.
Engine identification
The technical data tables use the
engine identifier code. The engine
data table additionally shows the
engineering code. Engine data
3 294.
To identify the respective engine,
refer to the EEC Certificate of
Conformity provided with your vehicle
or other national registration
documents.
The Certificate of Conformity shows the engine identifier code, other
national publications may show the
engineering code. Check piston
displacement and engine power to
identify the respective engine.