tow OPEL INSIGNIA BREAK 2018 Manual user
[x] Cancel search | Manufacturer: OPEL, Model Year: 2018, Model line: INSIGNIA BREAK, Model: OPEL INSIGNIA BREAK 2018Pages: 323, PDF Size: 9.37 MB
Page 18 of 323

16In briefClimate control
Heated rear window
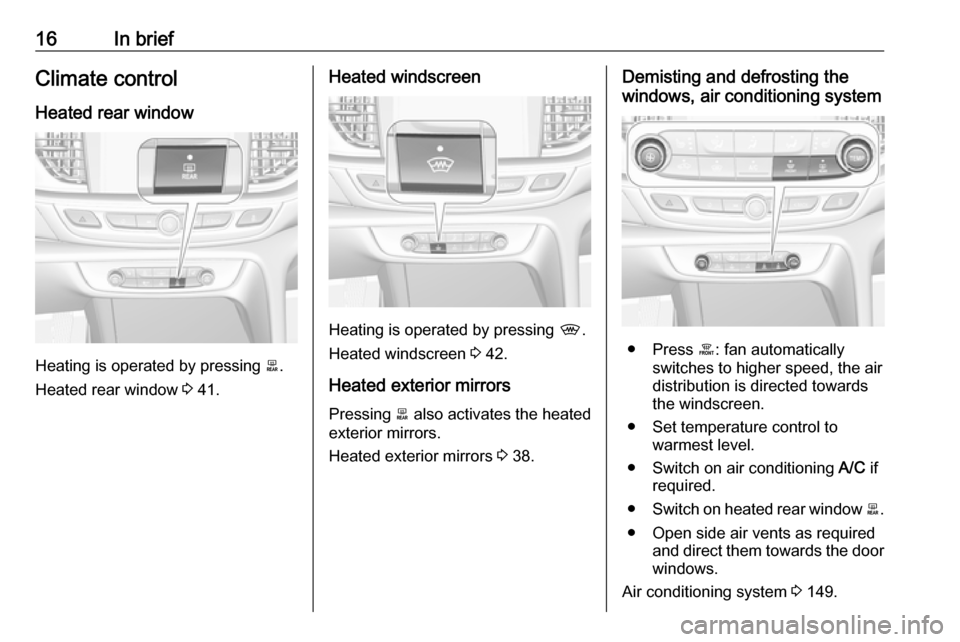
Heating is operated by pressing b.
Heated rear window 3 41.
Heated windscreen
Heating is operated by pressing ,.
Heated windscreen 3 42.
Heated exterior mirrors
Pressing b also activates the heated
exterior mirrors.
Heated exterior mirrors 3 38.
Demisting and defrosting the
windows, air conditioning system
● Press á: fan automatically
switches to higher speed, the air
distribution is directed towards
the windscreen.
● Set temperature control to warmest level.
● Switch on air conditioning A/C if
required.
● Switch on heated rear window b.
● Open side air vents as required and direct them towards the doorwindows.
Air conditioning system 3 149.
Page 21 of 323

In brief19Parking9Warning
● Do not park the vehicle on an
easily ignitable surface. The
high temperature of the
exhaust system could ignite the
surface.
● Always apply the parking brake. Pull switch m for
approx. one second and check
if the control indicator m
illuminates.
The electric parking brake is applied when control indicator
m illuminates 3 108.
● Switch off the engine. ● If the vehicle is on a level surface or uphill slope, engage
first gear or set the selector
lever to position P before
switching off ignition. On an
uphill slope, turn the front
wheels away from the kerb.
If the vehicle is on a downhill
slope, engage reverse gear or
set the selector lever to position P before switching off ignition.
Turn the front wheels towards
the kerb.
● Close the windows and the sunroof.
● Switch off ignition with power button. Turn the steering wheel
until the steering wheel lock is
felt to engage.
● Lock the vehicle by pressing the button on the door handle.
Activate the anti-theft alarm
system 3 33.
● The engine cooling fans may run
after the engine has been
switched off 3 240.
Caution
After running at high engine
speeds or with high engine loads,
operate the engine briefly at a low
load or run in neutral for
approx. 30 seconds before
switching off, in order to protect
the turbocharger.
Electronic key system 3 20, Laying
the vehicle up for a long period of time
3 239.
Page 34 of 323

32Keys, doors and windows
4.Press and hold the button C on
the inside of the open tailgate for
three seconds.
Note
Adjusting opening height should be
programmed at ground level.
A chime sound indicates the new
setting and the turn signal lights will
flash. The reduced height can only set at an opening angle of above 30°.
When turning the adjuster wheel in
the driver's door to intermediate mode 3/4 , the power tailgate will stop
opening at the newly set position.
The tailgate can only be held open if a minimum height is exceeded
(minimum opening angle from 30°).
The opening height cannot be
programmed below that height.
Safety function
If the power tailgate encounters an obstacle during opening or closing,
the direction of movement will
automatically be reversed slightly.
Multiple obstacles in one power cycle
will deactivate the function. In this
case, close or open the tailgate
manually.
The power tailgate has pinch sensors
on the side edges. If the sensors
detect obstacles between tailgate and chassis, the tailgate will open, until it
is activated again or closed manually.
The safety function is indicated by a
warning chime.
Remove all obstacles before
resuming normal power operation.
If the vehicle is equipped with factory-
fitted towing equipment and a trailer
is electrically connected, the power
tailgate can only be opened with thetouchpad switch or closed with G in
the open tailgate. Ensure that there
are no obstacles in the moving area.
Overload
If the power tailgate is repeatedly
operated at short intervals, the
function is disabled for some time.
Move tailgate manually into end
position to reset the system.
General hints for operating
tailgate9 Danger
Do not drive with the tailgate open
or ajar, e.g. when transporting
bulky objects, since toxic exhaust
gases, which cannot be seen or
smelled, could enter the vehicle.
This can cause unconsciousness
and even death.
Caution
Before opening the tailgate, check overhead obstructions, e.g. a
garage door, to avoid damage to
Page 61 of 323

Seats, restraints59føre til at BARNET utsettes for
LIVSFARE og fare for ALVORLIGE
SKADER.
PT: NUNCA use um sistema de
retenção para crianças voltado para
trás num banco protegido com um AIRBAG ACTIVO na frente do
mesmo, poderá ocorrer a PERDA DE
VIDA ou FERIMENTOS GRAVES na
CRIANÇA.
IT: Non usare mai un sistema di
sicurezza per bambini rivolto
all'indietro su un sedile protetto da
AIRBAG ATTIVO di fronte ad esso:
pericolo di MORTE o LESIONI
GRAVI per il BAMBINO!
EL: ΠΟΤΕ μη χρησιμοποιείτε παιδικό
κάθισμα ασφαλείας με φορά προς τα
πίσω σε κάθισμα που προστατεύεται
από μετωπικό ΕΝΕΡΓΟ ΑΕΡΟΣΑΚΟ, διότι το παιδί μπορεί να υποστεί
ΘΑΝΑΣΙΜΟ ή ΣΟΒΑΡΟ
ΤΡΑΥΜΑΤΙΣΜΟ.
PL: NIE WOLNO montować fotelika
dziecięcego zwróconego tyłem do
kierunku jazdy na fotelu, przed
którym znajduje się WŁĄCZONA
PODUSZKA POWIETRZNA.
Niezastosowanie się do tegozalecenia może być przyczyną
ŚMIERCI lub POWAŻNYCH
OBRAŻEŃ u DZIECKA.
TR: Arkaya bakan bir çocuk emniyet
sistemini KESİNLİKLE önünde bir
AKTİF HAVA YASTIĞI ile
korunmakta olan bir koltukta
kullanmayınız. ÇOCUK ÖLEBİLİR
veya AĞIR ŞEKİLDE
YARALANABİLİR.
UK: НІКОЛИ не використовуйте
систему безпеки для дітей, що встановлюється обличчям назад,
на сидінні з УВІМКНЕНОЮ
ПОДУШКОЮ БЕЗПЕКИ, інакше це
може призвести до СМЕРТІ чи
СЕРЙОЗНОГО ТРАВМУВАННЯ
ДИТИНИ.
HU: SOHA ne használjon hátrafelé
néző biztonsági gyerekülést előlről
AKTÍV LÉGZSÁKKAL védett ülésen,
mert a GYERMEK HALÁLÁT vagy
KOMOLY SÉRÜLÉSÉT okozhatja.
HR: NIKADA nemojte koristiti sustav
zadržavanja za djecu okrenut prema
natrag na sjedalu s AKTIVNIM
ZRAČNIM JASTUKOM ispred njega,
to bi moglo dovesti do SMRTI ili
OZBILJNJIH OZLJEDA za DIJETE.SL: NIKOLI ne nameščajte otroškega
varnostnega sedeža, obrnjenega v
nasprotni smeri vožnje, na sedež z
AKTIVNO ČELNO ZRAČNO
BLAZINO, saj pri tem obstaja
nevarnost RESNIH ali SMRTNIH
POŠKODB za OTROKA.
SR: NIKADA ne koristiti bezbednosni
sistem za decu u kome su deca
okrenuta unazad na sedištu sa
AKTIVNIM VAZDUŠNIM
JASTUKOM ispred sedišta zato što
DETE može da NASTRADA ili da se
TEŠKO POVREDI.
MK: НИКОГАШ не користете детско
седиште свртено наназад на
седиште заштитено со АКТИВНО
ВОЗДУШНО ПЕРНИЧЕ пред него,
затоа што детето може ДА ЗАГИНЕ или да биде ТЕШКО ПОВРЕДЕНО.
BG: НИКОГА не използвайте
детска седалка, гледаща назад,
върху седалка, която е защитена
чрез АКТИВНА ВЪЗДУШНА
ВЪЗГЛАВНИЦА пред нея - може да
се стигне до СМЪРТ или
СЕРИОЗНО НАРАНЯВАНЕ на
ДЕТЕТО.
Page 79 of 323

Storage779Warning
When folding up, ensure that
backrests are securely locked in
position before driving. Failure to
do so may result in personal injury or damage to the load or vehicle in the event of hard braking or a
collision.
The seat belt of the centre seat could
be blocked when the backrest is
folded up too quickly. To unlock the
retractor, push in the seat belt or pull
it out by approx. 20 mm then release.
Load compartment cover
Do not place any objects on the cover.
Grand Sport
Removing cover
Unhook retaining straps from tailgate.
Lift cover at the rear and at the front.
Remove the cover.
Fitting cover
Engage cover in side guides and fold
downwards. Attach the retaining
straps to the tailgate.
Sports Tourer, Country Tourer
Closing roller blind
Pull the roller blind using the handle
towards the rear and upwards until it
engages in the sideward retainers.
Page 85 of 323

Storage83Warning triangle
Grand Sport
Stow the warning triangle in the space
at the rear of the load compartment.
Sports Tourer, Country Tourer
Stow the warning triangle with the
retaining straps of the tailgate inner
panelling.
First aid kit
Grand Sport
Stow the first aid kit on the right side
of the load compartment and secure it with the strap.
Page 86 of 323

84StorageSports Tourer, Country Tourer
Stow the first aid kit with the retainingstraps of the tailgate inner panelling.
Roof rack system
Roof rack
For safety reasons and to avoid
damage to the roof, the vehicle
approved roof rack system is
recommended. For further
information, contact your workshop.
Mounting roof rack
Grand Sport
Open all doors.
Mounting points are located in each
door frame of the vehicle body.
Fasten the roof rack according to the installation instructions delivered with the roof rack.
Remove the roof rack when not in use.
Sports Tourer, Country Tourer
Mounting points are located in each
roof railing.
Fasten the roof rack on the first two
mounting points according to the
installation instructions delivered with the roof rack.
Remove the roof rack when not in
use.
Page 87 of 323

Storage85Loading information
● Heavy objects in the loadcompartment should be placed
against the seat backrests. Make
sure that the backrests are
securely engaged, i.e. no longer
showing the red markings on the side near the release lever. If
objects can be stacked, heavier
objects should be placed at the
bottom.
● Secure objects with lashing straps attached to lashing eyes
3 80.
● Secure loose objects in the load
compartment to prevent from
sliding.
● When transporting objects in the load compartment, the backrestsof the rear seats must not be
angled forward.
● Do not allow the load to protrude above the upper edge of the
backrests.
● Do not place any objects on the load compartment cover or theinstrument panel, and do not
cover the sensor on top of the instrument panel.
● The load must not obstruct the operation of the pedals, parking
brake and gear selector, or
hinder the freedom of movement of the driver. Do not place any
unsecured objects in the interior.
● Do not drive with an open load compartment.9Warning
Always ensure that the load in the
vehicle is securely stowed.
Otherwise objects can be thrown
around inside the vehicle and
cause personal injury or damage
to the load or vehicle.
● The payload is the difference between the permitted grossvehicle weight (see identification
plate 3 288) and the EC kerb
weight.
To calculate the payload, enter the data for your vehicle in the
weights table at the front of this
manual.
The EC kerb weight includes
weights for the driver (68 kg),
luggage (7 kg) and all fluids (fuel
tank 90% full).
Optional equipment and
accessories increase the kerb
weight.
● Driving with a roof load increases
the sensitivity of the vehicle to
cross-winds and has a
Page 124 of 323

122Instruments and controlsValet mode
Some functions of the Driver
Information Centre and the Info-
Display can be limited for some
drivers. The load compartment is
being locked and cannot be unlocked.
For more information, see
Infotainment manual.
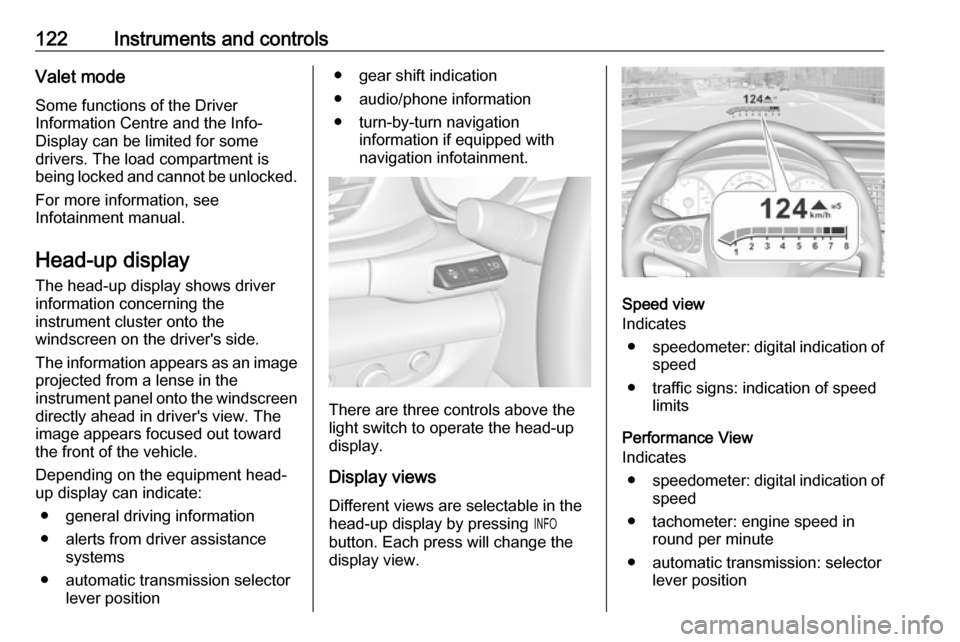
Head-up display The head-up display shows driver
information concerning the
instrument cluster onto the
windscreen on the driver's side.
The information appears as an image
projected from a lense in the
instrument panel onto the windscreen
directly ahead in driver's view. The
image appears focused out toward
the front of the vehicle.
Depending on the equipment head-
up display can indicate:
● general driving information
● alerts from driver assistance systems
● automatic transmission selector lever position● gear shift indication
● audio/phone information
● turn-by-turn navigation information if equipped with
navigation infotainment.
There are three controls above the
light switch to operate the head-up display.
Display views
Different views are selectable in the
head-up display by pressing /
button. Each press will change the
display view.
Speed view
Indicates
● speedometer: digital indication of
speed
● traffic signs: indication of speed limits
Performance View
Indicates
● speedometer: digital indication of
speed
● tachometer: engine speed in round per minute
● automatic transmission: selector lever position
Page 141 of 323

Lighting139Every time the ignition is switched on,
f flashes for approx. four seconds as
a reminder.
To deactivate, use the same
procedure as described above. f will
not flash when function is
deactivated.
Control indicator f 3 111.
Daytime running lights Daytime running lights increase
visibility of the vehicle during daylight.
They are switched on automatically
during daytime when engine is
running.
The system switches between
daytime running lights and headlights automatically, depending on the
lighting conditions. Automatic light
control 3 136.
LED headlights LED headlight system contains a
variety of particular LEDs in each
headlight which enables the control of different lighting programs.Light distribution and intensity of light
are variably triggered depending on
the lighting conditions, road type and
driving situation. The vehicle adapts
the headlights automatically to the
situation to enable optimal light
performance for the driver.
Some functions of the LED headlights
can be deactivated or activated in the vehicle personalisation menu. Select
the relevant setting in Settings, I
Vehicle in the Info-Display. Vehicle
personalisation 3 126.
High beam assist can not be
deactivated.
The following lighting functions are
available with light switch in position
AUTO or 9.
Town lightActivated automatically at a speed up to approx. 55 km/h and in situations
with exterior ambient light. The light is
wide and symmetrical. A special
beam pattern is designed to avoid
glare for other road users.
Country light
Activated automatically at a speed
above approx. 55 km/h when driving
in rural areas. The illumination of the current lane and the side of the roadis improved. Oncoming and
preceding vehicles are not dazzled.
Curve light