turn signal OPEL INSIGNIA BREAK 2019 Manual user
[x] Cancel search | Manufacturer: OPEL, Model Year: 2019, Model line: INSIGNIA BREAK, Model: OPEL INSIGNIA BREAK 2019Pages: 345, PDF Size: 9.73 MB
Page 13 of 345

In brief111Power windows .....................40
2 Exterior mirrors .....................37
3 Central locking system ..........25
4 Side air vents ...................... 172
5 Cruise control .....................201
Speed limiter ....................... 202
Adaptive cruise control .......204
Forward collision alert .........214
6 Turn and lane-change
signals, headlight flash,
low/high beam, high beam
assist ................................... 138
Exit lighting ......................... 141
Parking lights ...................... 139
Buttons for Driver
Information Centre ..............112
7 Instruments ........................ 101
Driver Information Centre .... 112
8 Buttons for Driver
Information Centre ..............112
9 Head-up display ..................11910Windscreen wiper and
washer, headlight washer,
rear wiper and washer .........89
11 Centre air vents .................. 172
12 Hazard warning flashers ....137
13 Info-Display ........................ 118
14 Anti-theft alarm system
status LED ........................... 34
15 Electronic Stability Control . 197
Traction Control system .....196
16 Glovebox .............................. 73
17 Controls for Info-Display
operation ............................. 118
18 Climate control system ........ 163
19 Power outlet .......................... 93
20 Sport/Tour mode ................199
Parking assist/Advanced
parking assist .....................223
Lane keep assist ................242
Eco button for stop-start
system ................................. 180
21 Manual transmission ..........192
Automatic transmission ......18722Electric parking brake .........194
23 Power switch ....................... 177
24 Steering wheel adjustment ..88
25 Horn ..................................... 89
26 Bonnet release lever ..........254
27 Fuse box ............................ 274
28 Light switch ........................ 131
Headlight range
adjustment ......................... 133
Front/rear fog lights ............138
Instrument illumination .......139
29 Head-up display ..................119
Page 15 of 345

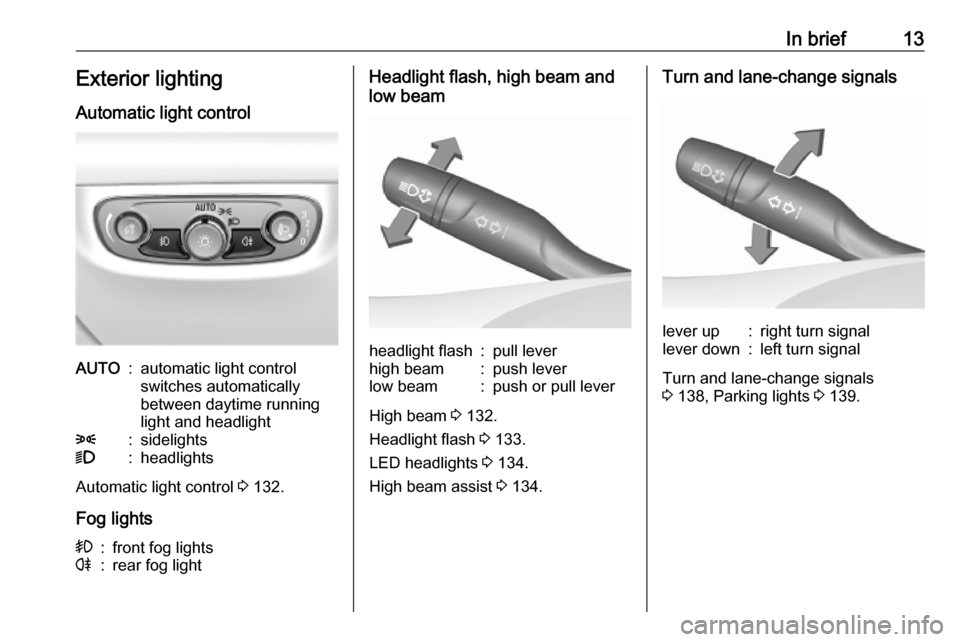
In brief13Exterior lightingAutomatic light controlAUTO:automatic light control
switches automatically
between daytime running
light and headlight8:sidelights9:headlights
Automatic light control 3 132.
Fog lights
>:front fog lightsr:rear fog lightHeadlight flash, high beam and
low beamheadlight flash:pull leverhigh beam:push leverlow beam:push or pull lever
High beam 3 132.
Headlight flash 3 133.
LED headlights 3 134.
High beam assist 3 134.
Turn and lane-change signalslever up:right turn signallever down:left turn signal
Turn and lane-change signals
3 138, Parking lights 3 139.
Page 32 of 345

30Keys, doors and windowstrapped during operating and no
one is standing within the moving
area.
The power tailgate can be operated
by:
● The electronic key.
● Handsfree operation with motion sensor below the rear bumper.
● The touchpad switch under the exterior tailgate moulding andC in the open tailgate.
● The switch C on the inside of
the driver's door.
On vehicles with automatic
transmission, the tailgate can only be operated when the vehicle is
stationary and with selector lever in P.
The turn signal lights flash and a
chime sounds when the power
tailgate is operating.
Note
Operating the power tailgate does
not operate the central locking
system. To open the tailgate with the
button on the electronic key, or with
the touchpad switch under the
tailgate moulding or via handsfree
operation, it is not necessary to
unlock the vehicle. A precondition is
that the electronic key is outside the
vehicle, within a range of approx.
one metre of the tailgate.
Do not leave the electronic key in the load compartment.
Lock the vehicle after closing if it was
unlocked previously.
Central locking system 3 25.
Operation with the electronic keyPress X twice to open or close the
tailgate. To prevent unintended
opening of the tailgate, X must be
pressed longer than during locking or unlocking.
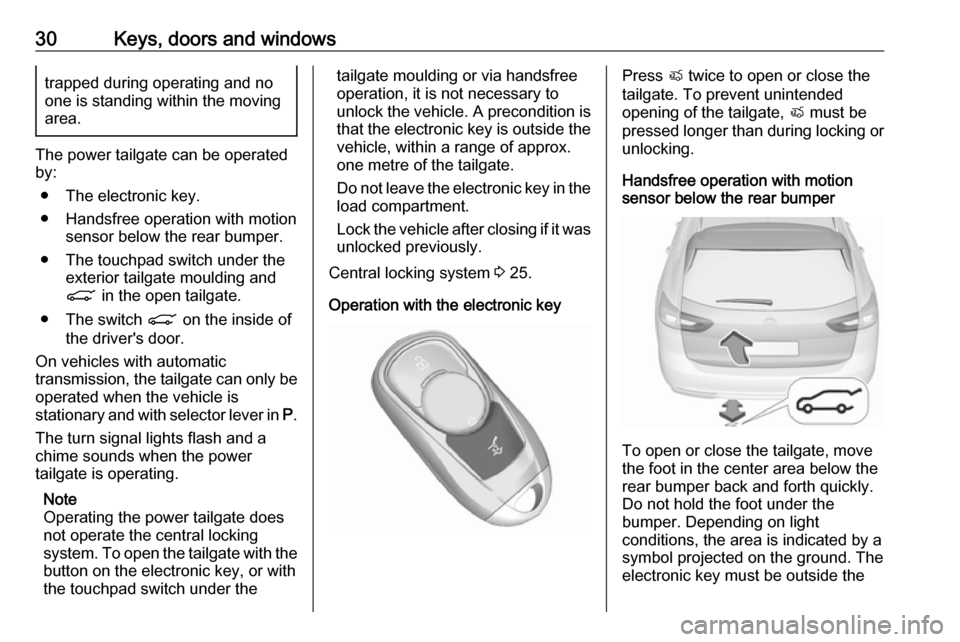
Handsfree operation with motion
sensor below the rear bumper
To open or close the tailgate, move
the foot in the center area below the
rear bumper back and forth quickly.
Do not hold the foot under the
bumper. Depending on light
conditions, the area is indicated by a
symbol projected on the ground. The
electronic key must be outside the
Page 34 of 345

32Keys, doors and windows● press C on the open tailgate,
or
● press C on the inside of the
driver's door.
Pressing one of the switches again
will reverse the direction of
movement.
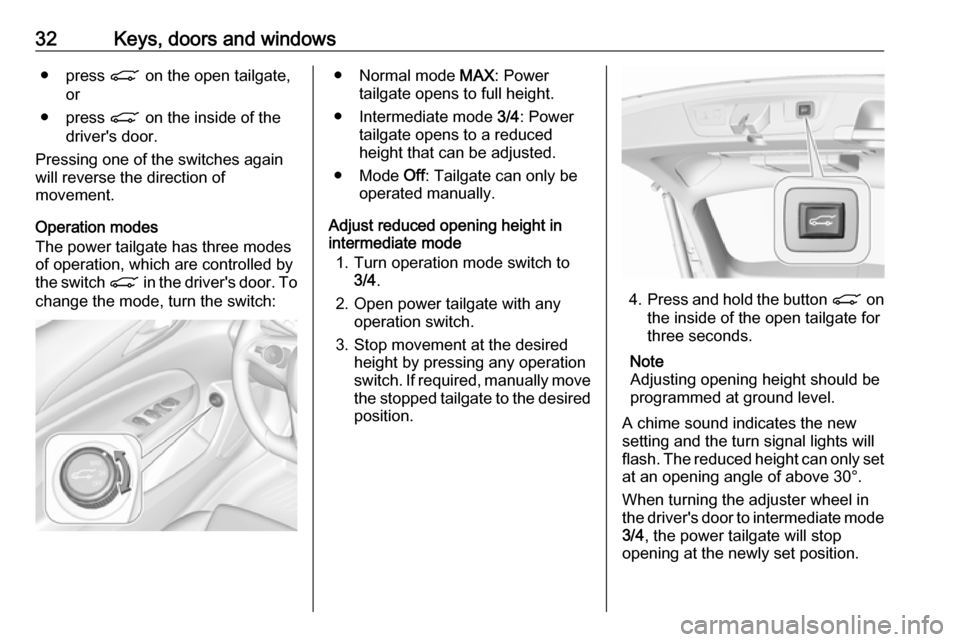
Operation modes
The power tailgate has three modes
of operation, which are controlled by
the switch C in the driver's door. To
change the mode, turn the switch:● Normal mode MAX: Power
tailgate opens to full height.
● Intermediate mode 3/4: Power
tailgate opens to a reduced
height that can be adjusted.
● Mode Off: Tailgate can only be
operated manually.
Adjust reduced opening height in
intermediate mode
1. Turn operation mode switch to 3/4 .
2. Open power tailgate with any operation switch.
3. Stop movement at the desired height by pressing any operation
switch. If required, manually move
the stopped tailgate to the desired
position.
4. Press and hold the button C on
the inside of the open tailgate for
three seconds.
Note
Adjusting opening height should be programmed at ground level.
A chime sound indicates the new
setting and the turn signal lights will
flash. The reduced height can only set
at an opening angle of above 30°.
When turning the adjuster wheel in
the driver's door to intermediate mode 3/4 , the power tailgate will stop
opening at the newly set position.
Page 103 of 345

Instruments and controls101OverviewOTurn signal 3 105XSeat belt reminder 3 105vAirbag and belt tensioners
3 106VAirbag deactivation 3 106pCharging system 3 107ZMalfunction indicator light
3 107RBrake and clutch system 3 107mElectric parking brake 3 107jElectric parking brake fault
3 107uAntilock brake system (ABS)
3 108RGear shifting 3 108EFollowing distance 3 108aLane keep assist 3 108nElectronic Stability Control off
3 108bElectronic Stability Control and
Traction Control system 3 108kTraction Control system off
3 109WEngine coolant temperature
3 109!Preheating 3 109uAdBlue 3 109wTyre pressure monitoring
system 3 109IEngine oil pressure 3 109YLow fuel 3 110dImmobiliser 3 1108Exterior light 3 110CHigh beam 3 110fHigh beam assist 3 110fLED headlights 3 110>Fog light 3 110rRear fog light 3 111mCruise control 3 111CAdaptive cruise control 3 111AVehicle detected ahead 3 1117Pedestrian detected ahead
3 221LSpeed limiter 3 111LTraffic sign assistant 3 111hDoor open 3 111
Speedometer
Indicates vehicle speed.
Page 104 of 345

102Instruments and controlsOdometer
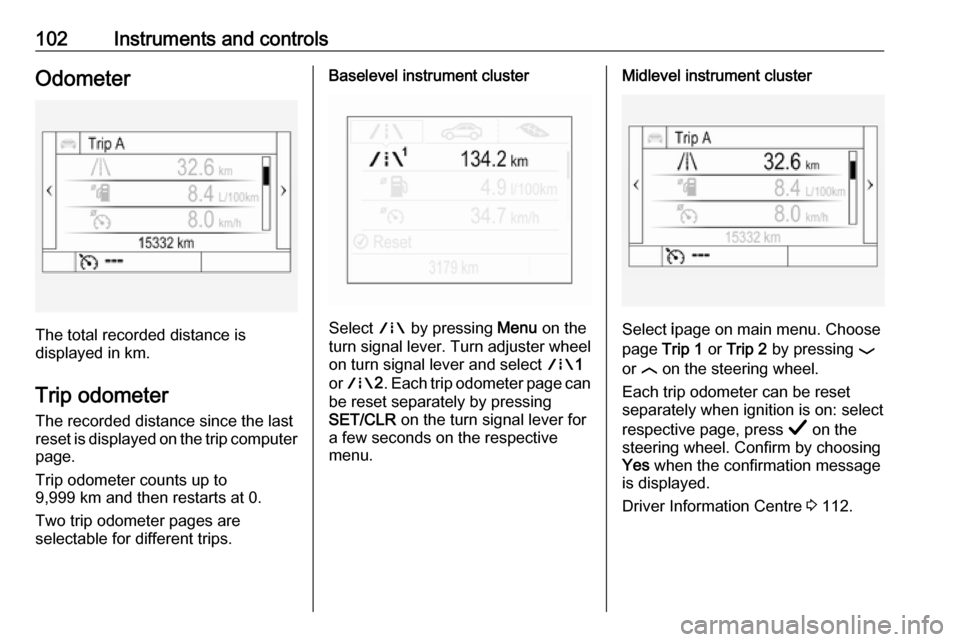
The total recorded distance is
displayed in km.
Trip odometer The recorded distance since the last
reset is displayed on the trip computer
page.
Trip odometer counts up to
9,999 km and then restarts at 0.
Two trip odometer pages are
selectable for different trips.
Baselevel instrument cluster
Select ; by pressing Menu on the
turn signal lever. Turn adjuster wheel
on turn signal lever and select ;1
or ; 2. Each trip odometer page can
be reset separately by pressing
SET/CLR on the turn signal lever for
a few seconds on the respective
menu.
Midlevel instrument cluster
Select ipage on main menu. Choose
page Trip 1 or Trip 2 by pressing P
or N on the steering wheel.
Each trip odometer can be reset separately when ignition is on: select
respective page, press Å on the
steering wheel. Confirm by choosing
Yes when the confirmation message
is displayed.
Driver Information Centre 3 112.
Page 107 of 345

Instruments and controls105Select Info, " or ? Menu by
pressing è on steering wheel. Press
å to select Oil Life page.
Remaining oil life duration is indicated
in percentage.
Reset On Baselevel display press
SET/CLR on turn signal lever for
several seconds to reset. The ignition must be switched on but engine not
running.
On Midlevel display press Å on
steering wheel. Confirm reset by
choosing Yes and pressing Å again.
The ignition must be switched on but
engine not running.
On Uplevel display press é on
steering wheel to open the subfolder. Select Reset and confirm by pressing
Å . The ignition must be switched on
but engine not running.
The system must be reset every time
the engine oil is changed to allow
proper functionality. Seek the
assistance of a workshop.Next service
A message appears in the Driver
Information Centre, when
maintenance of the vehicle is
required. Have maintenance work
carried out by a workshop within one week or 500 km, whichever occursfirst.
Service information 3 299.
Control indicators The control indicators described are
not present in all vehicles. The
description applies to all instrument
versions. Depending on the
equipment, the position of the control indicators may vary. When the
ignition is switched on, most control
indicators will illuminate briefly as a
functionality test.
The control indicator colours mean:red:danger, important reminderyellow:warning, information, faultgreen:confirmation of activationblue:confirmation of activationwhite:confirmation of activationSee all control indicators on different
instrument clusters 3 96.
Turn lights
O illuminates or flashes green.
Illuminates briefly The parking lights are switched on.
Flashes
A turn signal or the hazard warning
flashers are activated.
Rapid flashing: failure of a turn signal
light or associated fuse, failure of turn signal light on trailer.
Bulb replacement 3 260, Fuses
3 270.
Turn signals 3 138.
Seat belt reminder
Seat belt reminder on front seats
X for driver seat illuminates or flashes
red in the instrument cluster.
Page 110 of 345

108Instruments and controlsFlashes
Electric parking brake is in service mode. Stop vehicle, apply and
release the electric parking brake to
reset.9 Warning
Have the cause of the fault
remedied immediately by a
workshop. Avoid parking on
inclines until the cause of the fault has been remedied.
Antilock brake system
(ABS)
u illuminates yellow.
Illuminates for a few seconds after the
ignition is switched on. The system is ready for operation when the control
indicator extinguishes.
If the control indicator does not go out after a few seconds, or if it illuminates while driving, there is a fault in the
ABS. The brake system remains
operational but without ABS
regulation.
Antilock brake system 3 193.
Gear shifting
R or S with the number of a higher or
lower gear is indicated, when up- or
downshifting is recommended for fuel
saving reasons.
Following distance
E indicates the following distance
setting of the alert timing sensitivity
for the forward collision alert using
filled distance bars.
Forward collision alert 3 214.
Lane keep assist a illuminates green or yellow, or
flashes yellow.
Illuminates green
The system is switched on and ready
to operate.Illuminates yellow
The system approaches a detected
lane marking without using the turn
signal in that direction.
Flashes yellow
The system recognizes that the lane
is departed significantly.
Lane keep assist 3 242
Electronic Stability Control
off
t illuminates yellow.
The system is deactivated.
Electronic Stability Control
and Traction Control system
b illuminates or flashes yellow.
Illuminates A fault in the system is present.
Continued driving is possible. Driving
stability, however, may deteriorate
depending on road surface
conditions.
Page 131 of 345

Instruments and controls129To operate these functions, download
the app from App Store ®
or
Google Play™ Store.
Remote control
If desired, use any phone to call an
advisor, who can remotely operate
specific vehicle functions. Find the
respective OnStar phone number on
our country-specific website.
The following functions are available: ● Lock or unlock vehicle.
● Provide information on the vehicle location.
● Honk horn or flash lights.
Stolen vehicle assistance
If the vehicle is stolen, report the theft to the authorities and request OnStar
stolen vehicle assistance. Use any
phone to call an advisor. Find the
respective OnStar phone number on
our country-specific website.
OnStar can provide support in
locating and recovering the vehicle.Theft alert
When the anti-theft alarm system is
triggered, a notification is sent to
OnStar. You are then informed about
this event by text message or email.Restart prevention
By sending remote signals, OnStar can prevent the vehicle from
restarting once it has been turned off.
On-demand diagnostics
At any time e.g. if the vehicle displays a vehicle message, press Z to
contact an advisor and ask to complete a real-time diagnostic check
to directly determine the issue.
Depending on the results, the advisor
will provide further support.
Diagnostic report
The vehicle automatically transmits
diagnostic data to OnStar which
sends a monthly email report to you
and your preferred workshop.
Note
The workshop notification function
can be disabled in your account.
The report contains the status of key
operating systems of the vehicle like
engine, transmission, airbags, ABS,
and other major systems. It also
provides information on possible
maintenance items and tyre pressure
(only with tyre pressure monitoring
system).
To look at the information in greater
detail, select the link within the email
and log in to your account.
Destination download
A desired destination can be directly
downloaded to the navigation system.
Press Z to call an advisor and
describe the destination or point of
interest.
The advisor can look up any address
or point of interest and directly send
the destination to the built-in
navigation system.
OnStar settings
OnStar PIN
To have full access to all OnStar
services, a four-digit PIN is required. The PIN has to be personalised when
first talking to an advisor.
Page 135 of 345

Lighting133Activation
The green control indicator f
illuminates continuously when the
assist is activated, the blue one 7
illuminates when high beam is on.
Control indicator f 3 110.
Deactivation
With high beam on, pull the turn signal lever once to deactivate high beamassist. If a headlight flash is activated when the high beam is off, the high
beam assist will remain activated.
Pushing the indicator lever to activate manual high beam will deactivate
high beam assist. It is also
deactivated when fog lights are
switched on.
Press f once to deactivate high
beam assist.
The latest setting of the high beam
assist is being stored and remains set
when the ignition is switched on
again.
Headlight flash
To activate the headlight flash, pull
lever.
Pulling lever deactivates high beam.
LED headlights 3 134.
Headlight range adjustment Manual headlight range
adjustment
To adapt headlight range to the
vehicle load to prevent dazzling: push
and then turn ? to required position.
0:front seats occupied1:all seats occupied2:all seats occupied and load
compartment laden3:driver's seat occupied and load
compartment laden