change time OPEL INSIGNIA BREAK 2020 Manual user
[x] Cancel search | Manufacturer: OPEL, Model Year: 2020, Model line: INSIGNIA BREAK, Model: OPEL INSIGNIA BREAK 2020Pages: 315, PDF Size: 9.45 MB
Page 201 of 315

Driving and operating1999Warning
Front pedestrian braking may alert
or automatically brake the vehicle
suddenly in situations where it is
unexpected and undesired. It
could falsely alert or brake for
objects similar in shape or size to
pedestrians, including shadows.
This is normal operation and the
vehicle does not need a service.
To override Automatic braking,
firmly depress the accelerator
pedal, if it is safe to do so.
9 Warning
Using the Front pedestrian braking
system while towing a trailer couldcause loss of vehicle control and
crash. Turn the system to Alert or
Off in the vehicle personalisation
when towing a trailer.
Vehicle personalisation 3 123.
System limitations
In the following cases, front
pedestrian protection may not detect
a pedestrian ahead or sensor
performance is limited:
● Vehicle speed is out of range from 8 km/h to 80 km/h in forwardgear.
● The distance to an pedestrian ahead is more than 40 m.
● Driving on winding or hilly roads.
● During nighttime driving.
● Weather limits visibility, such as fog, rain, or snow.
● The sensor in the windscreen is blocked by snow, ice, slush, mud,dirt, windscreen damage or
affected by foreign items, e.g.
stickers.
Parking assist
General information When the trailer hitch is attached,
change the configuration settings in
the vehicle personalisation menu in
the Info Display.Vehicle personalisation 3 123.
When attaching a trailer or bike
carrier to the trailer hitch, the parking
assist is deactivated.
Front-rear parking assist9 Warning
The driver bears full responsibility
for the parking manoeuvre.
Always check the surrounding
area when driving backwards or
forwards while using parking
assist system.
The front-rear parking assist
measures the distance between the vehicle and obstacles in front and
behind the vehicle. It informs and
warns the driver by giving acoustic
signals and display indication.
It uses two different acoustic warning
signals for the front and rear
monitoring areas, each with a
different tone frequency.
Page 213 of 315
Driving and operating211System limitationsCaution
For optimal operation of the
system, it is important to keep the
lenses of the cameras in the front
grille, the housings of outside
mirrors and in the tailgate between the number plate lights always
clean. Rinse the lenses with water and wipe with a soft cloth.
Do not clean the lenses with a
steam-jet or high-pressure jet
cleaner.
The panoramic view system may not
operate properly when:
● The surrounding is dark.
● The sun or the beam of headlights is shining directly into
the camera lenses.
● During nighttime driving.
● Weather limits visibility, such as fog, rain, or snow.
● The camera lenses are blocked by snow, ice, slush, mud, dirt.
● The vehicle is towing a trailer.
● The vehicle had an accident.
● There are extreme temperature changes.
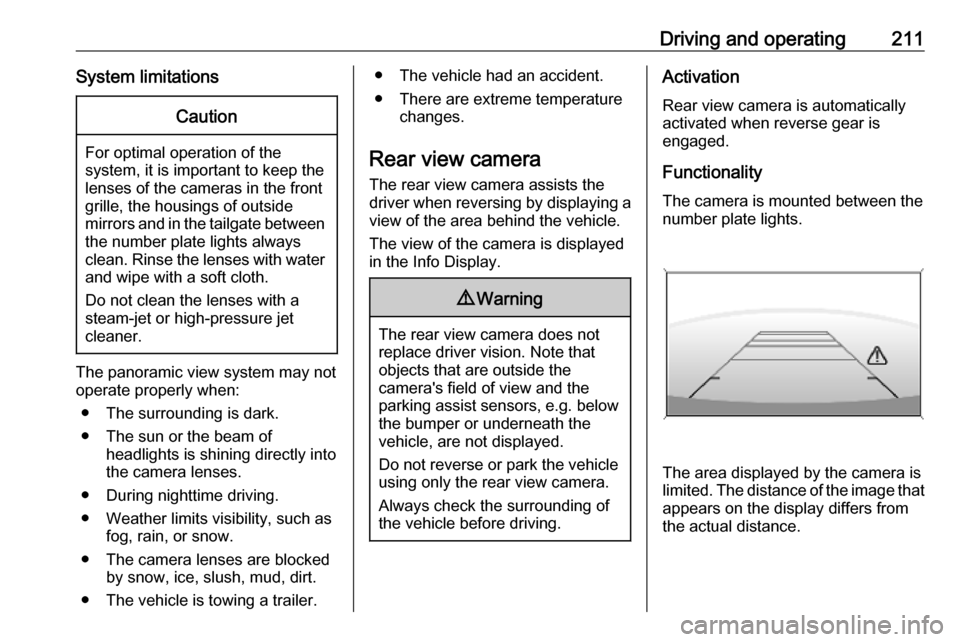
Rear view camera The rear view camera assists the
driver when reversing by displaying a
view of the area behind the vehicle.
The view of the camera is displayed
in the Info Display.9 Warning
The rear view camera does not
replace driver vision. Note that
objects that are outside the
camera's field of view and the
parking assist sensors, e.g. below
the bumper or underneath the
vehicle, are not displayed.
Do not reverse or park the vehicle
using only the rear view camera.
Always check the surrounding of
the vehicle before driving.
Activation
Rear view camera is automatically
activated when reverse gear is
engaged.
Functionality
The camera is mounted between the number plate lights.
The area displayed by the camera is
limited. The distance of the image that
appears on the display differs from
the actual distance.
Page 214 of 315
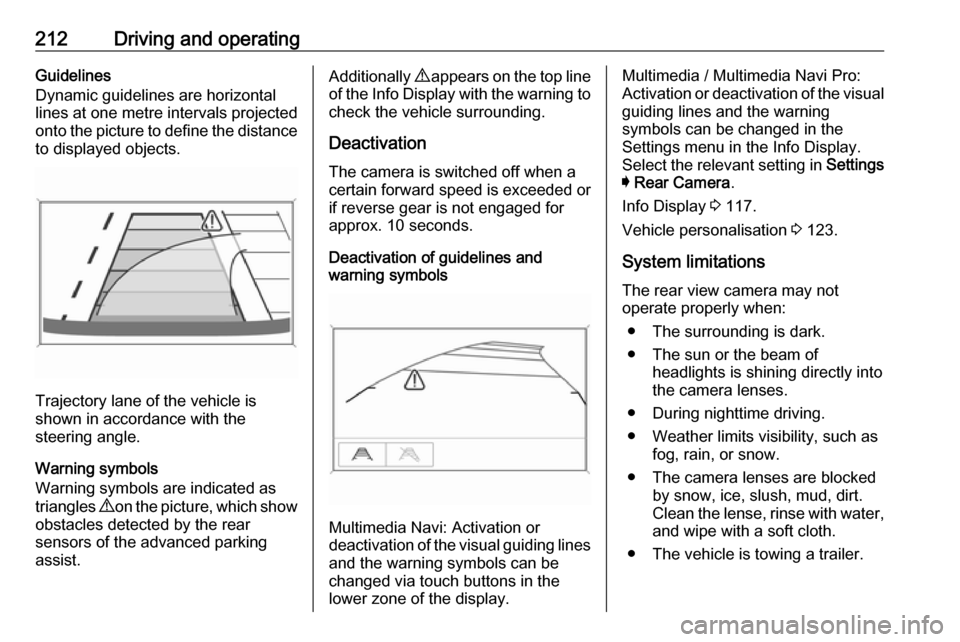
212Driving and operatingGuidelines
Dynamic guidelines are horizontal
lines at one metre intervals projected
onto the picture to define the distance
to displayed objects.
Trajectory lane of the vehicle is
shown in accordance with the
steering angle.
Warning symbols
Warning symbols are indicated as
triangles 9 on the picture, which show
obstacles detected by the rear
sensors of the advanced parking
assist.
Additionally 9 appears on the top line
of the Info Display with the warning to
check the vehicle surrounding.
Deactivation
The camera is switched off when a
certain forward speed is exceeded or
if reverse gear is not engaged for
approx. 10 seconds.
Deactivation of guidelines and
warning symbols
Multimedia Navi: Activation or
deactivation of the visual guiding lines and the warning symbols can be
changed via touch buttons in the
lower zone of the display.
Multimedia / Multimedia Navi Pro:
Activation or deactivation of the visual
guiding lines and the warning
symbols can be changed in the
Settings menu in the Info Display.
Select the relevant setting in Settings
I Rear Camera .
Info Display 3 117.
Vehicle personalisation 3 123.
System limitations The rear view camera may not
operate properly when:
● The surrounding is dark.
● The sun or the beam of headlights is shining directly into
the camera lenses.
● During nighttime driving.
● Weather limits visibility, such as fog, rain, or snow.
● The camera lenses are blocked by snow, ice, slush, mud, dirt.
Clean the lense, rinse with water, and wipe with a soft cloth.
● The vehicle is towing a trailer.
Page 219 of 315
Driving and operating217Select Alerts ON or Alerts OFF .
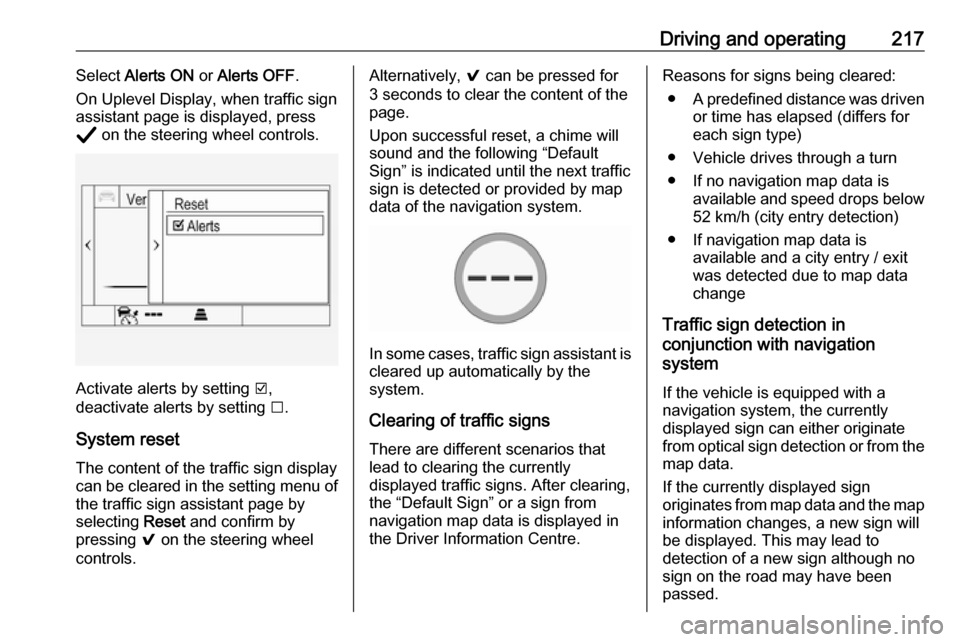
On Uplevel Display, when traffic sign
assistant page is displayed, press
Å on the steering wheel controls.
Activate alerts by setting J,
deactivate alerts by setting I.
System reset The content of the traffic sign displaycan be cleared in the setting menu of the traffic sign assistant page by
selecting Reset and confirm by
pressing 9 on the steering wheel
controls.
Alternatively, 9 can be pressed for
3 seconds to clear the content of the
page.
Upon successful reset, a chime will
sound and the following “Default
Sign” is indicated until the next traffic
sign is detected or provided by map
data of the navigation system.
In some cases, traffic sign assistant is
cleared up automatically by the
system.
Clearing of traffic signs
There are different scenarios that
lead to clearing the currently
displayed traffic signs. After clearing,
the “Default Sign” or a sign from
navigation map data is displayed in
the Driver Information Centre.
Reasons for signs being cleared:
● A predefined distance was driven
or time has elapsed (differs for
each sign type)
● Vehicle drives through a turn
● If no navigation map data is available and speed drops below52 km/h (city entry detection)
● If navigation map data is available and a city entry / exit
was detected due to map data
change
Traffic sign detection in
conjunction with navigation
system
If the vehicle is equipped with a
navigation system, the currently
displayed sign can either originate
from optical sign detection or from the
map data.
If the currently displayed sign
originates from map data and the map
information changes, a new sign will
be displayed. This may lead to
detection of a new sign although no
sign on the road may have been
passed.
Page 220 of 315
218Driving and operatingSystem limitations
Traffic sign assistant may not operate properly when:
● Vehicle speed is faster than 200 km/h.
● Driving on winding or hilly roads. ● During nighttime driving.
● The area of the windscreen, where the front camera is
located, is not clean or affected
by foreign items, e.g. stickers.
● Weather limits visibility, such as fog, rain, or snow.
● The sun is shining directly into the camera lens.
● Traffic signs are completely or partially covered or difficult to
discern.
● Traffic signs are incorrectly mounted or damaged.
● Traffic signs do not comply with the Vienna Convention on Road
Signs and Signals.
● The navigation map data is outdated.Caution
The system is intended to help thedriver within a defined speed
range to discern certain traffic
signs. Do not ignore traffic signs
which are not displayed by the
system.
The system does not discern any other than the conventional traffic
signs that might give or end a
speed limit.
Do not let this special feature
tempt you into taking risks when
driving.
Always adapt speed to the road
conditions.
The driver assistance systems do not relieve the driver from full
responsibility for vehicle
operation.
Lane keep assist
Lane keep assist helps to avoid
crashes due to unintentional lane
departures. The front camera
observes the lane markings between
which the vehicle is driving. If the
vehicle approaches a lane marking, the steering wheel is gently turned to
position the vehicle back into the lane. Turn steering wheel in same
direction, if system steering is not
sufficient. Turn steering wheel gently
into opposite direction, if lane change is intended.
When crossing a lane marking
significantly, lane keep assist starts a
visual and acoustic warning.
Additionally, the status of the lane
keep assist is indicated on the Driver
Assistance page in the Driver
Information Center 3 111.
Unintended lane departure is
assumed
● without using turn lights● using the turn lights in the opposite direction of the lane
departure
● without braking
● without acceleration
● without active steering.
Page 222 of 315

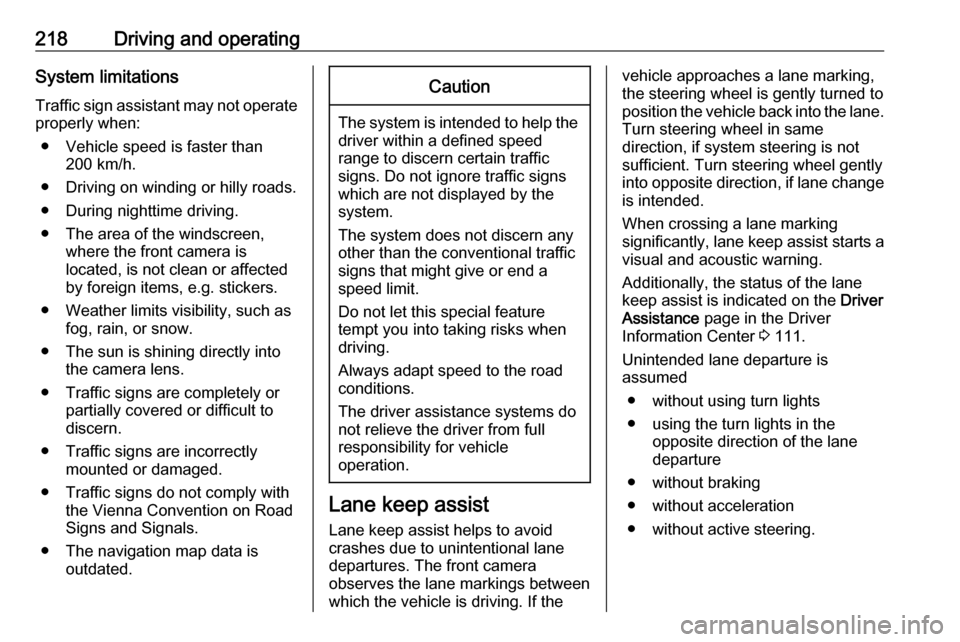
220Driving and operatingIf the system detects a lane, it
appears as a green dashed line, as
shown on the right side of the vehicle in the graphic above. This dashed line
becomes amber if the vehicle
approaches a detected lane marking
without the turn lights in that direction
has been used.
If the system intervenes by steering, a short amber line appears, as shown on the left side of the vehicle in the
graphic above.
Deactivation The system is deactivated by
pressing a; the LED in the button
extinguishes.
The system is deactivated
automatically when a trailer is
detected.
System limitations The system performance may not
operate properly when:
● vehicle speed is out of range from
60 to 180 km/h
● driving on winding or hilly roads
● during nighttime driving● weather limits visibility, such as fog, rain, or snow
● the sensor in the windscreen is blocked by snow, ice, slush, mud,dirt, windscreen damage or
affected by foreign items, e.g.
stickers
● the sun is shining directly into the
camera lens
● close vehicles ahead
● banked roads
● road edges
● roads with poor lane markings
● sudden lighting changes
● vehicle modifications, e.g. tyres
Switch off the system if the system is
disturbed by tar marks, shadows,
road cracks, temporary or
construction lane markings, or other
road imperfections.9 Warning
Always keep your attention on the
road and maintain proper vehicle
position within the lane, otherwise
vehicle damage, injury or death
could occur.
Lane keep assist does not
continuously steer the vehicle.
The system may not keep the
vehicle in the lane or give an alert,
even if a lane marking is detected.
The steering of the lane keep
assist may not be sufficient to
avoid a lane departure.
The system may not detect hands-
off driving due to external
influences (road condition and
surface, weather etc). The driver
has full responsibility to control the vehicle and is always required tokeep the hands on the steeringwheel while driving.
Using the system while towing a
trailer or on slippery roads could
cause loss of control of the vehicle
and a crash. Switch the system off.
Page 232 of 315

230Vehicle careCaution
When transporting the vehicle on
a train or on a recovery vehicle, the
mud flaps might be damaged.
Vehicle storage
Storage for a long period of time
If the vehicle is to be stored for several months:
● Wash and wax the vehicle.
● Have the wax in the engine compartment and underbody
checked.
● Clean and preserve the rubber seals.
● Fill up fuel tank completely.
● Change the engine oil.
● Drain the washer fluid reservoir.
● Check the coolant antifreeze and
corrosion protection.
● Adjust tyre pressure to the value specified for full load.
● Park the vehicle in a dry, wellventilated place. Engage first or
reverse gear or set selector lever
to P. Prevent the vehicle from
rolling.
● Do not apply the parking brake.
● Open the bonnet, close all doors and lock the vehicle.
● Disconnect the clamp from the negative terminal of the vehicle
battery. Note that all systems are
not functional, e.g. anti-theft
alarm system.
Putting back into operation
When the vehicle is to be put back into operation:
● Connect the clamp to the negative terminal of the vehicle
battery. Initialize the power
windows 3 41.
● Check tyre pressure.
● Fill up the washer fluid reservoir.
● Check the engine oil level.
● Check the coolant level.
● Fit the number plate if necessary.End-of-life vehicle recovery
Information on end-of-life vehicle
recovery centres and the recycling of
end-of-life vehicles is available on our website, where legally required. Only
entrust this work to an authorised
recycling centre.
Page 242 of 315
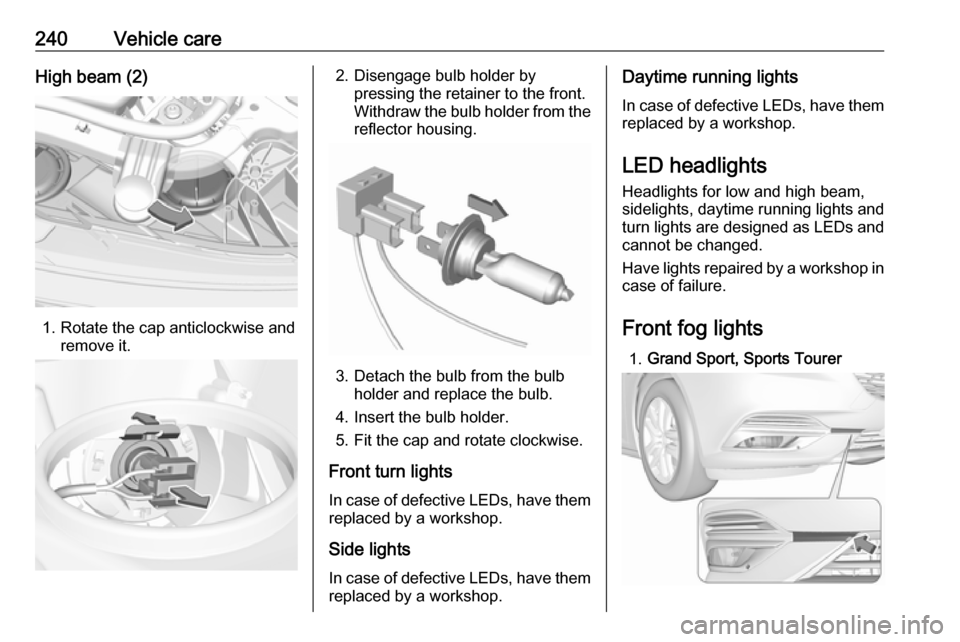
240Vehicle careHigh beam (2)
1. Rotate the cap anticlockwise andremove it.
2. Disengage bulb holder bypressing the retainer to the front.
Withdraw the bulb holder from the
reflector housing.
3. Detach the bulb from the bulb holder and replace the bulb.
4. Insert the bulb holder.
5. Fit the cap and rotate clockwise.
Front turn lights
In case of defective LEDs, have them replaced by a workshop.
Side lights In case of defective LEDs, have them
replaced by a workshop.
Daytime running lights
In case of defective LEDs, have them replaced by a workshop.
LED headlights Headlights for low and high beam,
sidelights, daytime running lights and
turn lights are designed as LEDs and
cannot be changed.
Have lights repaired by a workshop in case of failure.
Front fog lights 1. Grand Sport, Sports Tourer
Page 268 of 315

266Vehicle careOnly mount one temporary spare
wheel. Do not drive faster than
80 km/h. Take curves slowly. Do not
use for a long period of time.Caution
The use of a spare wheel that is smaller than the other wheels or in
combination with winter tyres
could affect driveability. Have the defective tyre replaced as soon as
possible.
Caution
If driving with a temporary spare
wheel, active emergency braking
has to deactivated.
The spare wheel is located in the load
compartment beneath the floor
covering.
To remove: 1. Open the floor cover.
2. The spare wheel is secured with a
wing nut. Unscrew the wing nut
and take out the spare wheel.
Under the spare wheel there is the
box with vehicle tools.
3. When, after a wheel change, no wheel is placed in the spare wheel
well, secure the tool box by
tightening the wing nut as far as it will go and close floor cover.
4. After wheel change back to full size wheel, place the spare wheel
outside up in the well and secure
with the wing nut.
Only mount one temporary spare
wheel. The permissible maximum
speed on the label on the temporary
spare wheel is only valid for the
factory-fitted tyre size.
Fitting the spare wheel Make the following preparations and
observe the following information:
● Park the vehicle on a level, firm and non-skid surface. The front
wheels must be in the straight-
ahead position.
● Apply the parking brake and engage first gear, reverse gear or
P .
● Remove the spare wheel.
● Never change more than one wheel at once.
Page 307 of 315

Customer information305breakdown services) can read the
data from the vehicle. The same
applies to warranty work and quality
assurance measures.
Data is generally read via the OBD
(On-Board Diagnostics) port
prescribed by law in the vehicle. The
operating data which is read out,
documents the technical condition of
the vehicle or individual components
and assists with fault diagnosis,
compliance with warranty obligations
and quality improvement. This data,
in particular information on
component stress, technical events,
operator errors and other faults, is
transmitted to the manufacturer
where appropriate, together with the
vehicle identification number. The
manufacturer is also subject to
product liability. The manufacturer
potentially also uses operating data
from vehicles for product recalls. This
data can also be used to check
customer warranty and guarantee
claims.
Fault memories in the vehicle can be
reset by a service company when
carrying out servicing or repairs or at
your request.Comfort and infotainment
functions
Comfort settings and custom settings
can be stored in the vehicle and
changed or reset at any time.
Depending on the equipment level in
question, these include
● seat and steering wheel position settings
● chassis and air conditioning settings
● custom settings such as interior lighting
You can input your own data in the
infotainment functions for your
vehicle as part of the selected
features.
Depending on the equipment level in
question, these include
● multimedia data such as music, videos or photos for playback in
an integrated multimedia system
● address book data for use with an
integrated hands-free system or an integrated navigation system● input destinations
● data on the use of online services
This data for comfort and
infotainment functions can be stored
locally in the vehicle or be kept on a
device that you have connected to the
vehicle ( e.g. a smartphone, USB stick
or MP3 player). Data that you have input yourself can be deleted at any
time.
This data can only be transmitted out
of the vehicle at your request,
particularly when using online
services in accordance with the
settings selected by you.
Smartphone integration, e.g.
Android Auto or Apple CarPlay
If your vehicle is equipped
accordingly, you can connect your
smartphone or another mobile device
to the vehicle so that you can control
it via the controls integrated in the
vehicle. The smartphone image and
sound can be output via the
multimedia system in this case. At the same time, specific information is
transmitted to your smartphone.
Depending on the type of integration,